To avoid these ads, REGISTER NOW!

Above 1200 Sq/FT Blue Bomber's Garages

Wokspaces above 1200 squarefeet.
OP
B

BlueBomber

Well-known member
Joined
Sep 14, 2013
Messages
3,201
Location
Outside Boston, MA
Here's John in the backhoe toting the boulder...barely. John says the loader weighs 13,000 pounds and this rock has it rocking forward onto the toes of the treads. The boulder is easily over 8000 pounds, maybe as much as the loader!

c1f5893863f1b8793e36b545300822a5.jpg

Sent from my SM-G950U using Tapatalk
 

Attachments

  • c1f5893863f1b8793e36b545300822a5.jpg
    c1f5893863f1b8793e36b545300822a5.jpg
    137.7 KB · Views: 2
Last edited:
To avoid these ads, REGISTER NOW!
OP
B

BlueBomber

Well-known member
Joined
Sep 14, 2013
Messages
3,201
Location
Outside Boston, MA
I reserved a backhoe for this coming weekend, so I'm hopeful my electrician buddy can come through as claimed with the electrical permit, conduit and inspections by Saturday.


Sent from my SM-G950U using Tapatalk
 
OP
B

BlueBomber

Well-known member
Joined
Sep 14, 2013
Messages
3,201
Location
Outside Boston, MA
I came home to find this:

0b45045926810f234a49264b52c327da.jpg

Anyone see the problem? Yeah, no vapor barrier! I sent a text to the concrete company owner reminding him that one was needed, and he confirmed it would be installed. I hope so, because I can't be home to watch them pour the cement.

I also picked up a yard of sand today for the bottom of the utility trench and shoveled most of it in.

cbb6dffb2f1a14f71b3f243c0a7d9989.jpg

Then, I dry-fit my 4" conduit in the trench and confirmed that I have enough on hand to make the run. That's nice because I got all of it for pennies on the dollar at estate sales. Well, the straight tubing, that is. The fitting all came fromHome Depot, and cost me more than the conduit by a factor of two or three. I'll use this tube for a compressed air line from the main building to the new one, plus any future runs.

25d217de5ccdfd5c523193e5be6312b6.jpg
bd788ab501f74e9beff8ad274bedf36e.jpg

The two dark rectangles are depressions in the gravel that will allow for slightly thicker concrete under the future two-post lift. I spray painted them black so they'd stand out.

242d00e9e0ddd7dfc5dc1f6c756ee268.jpg
Sent from my SM-G950U using Tapatalk
 

Attachments

  • 242d00e9e0ddd7dfc5dc1f6c756ee268.jpg
    242d00e9e0ddd7dfc5dc1f6c756ee268.jpg
    224 KB · Views: 1
  • bd788ab501f74e9beff8ad274bedf36e.jpg
    bd788ab501f74e9beff8ad274bedf36e.jpg
    138 KB · Views: 1
  • 25d217de5ccdfd5c523193e5be6312b6.jpg
    25d217de5ccdfd5c523193e5be6312b6.jpg
    169 KB · Views: 1
  • cbb6dffb2f1a14f71b3f243c0a7d9989.jpg
    cbb6dffb2f1a14f71b3f243c0a7d9989.jpg
    160.3 KB · Views: 1
  • 0b45045926810f234a49264b52c327da.jpg
    0b45045926810f234a49264b52c327da.jpg
    165.3 KB · Views: 1
Last edited:
OP
B

BlueBomber

Well-known member
Joined
Sep 14, 2013
Messages
3,201
Location
Outside Boston, MA
The concrete guys were out to finish putting the wire down and set the forms across the door openings. Still no sign of a vapor barrier. I may have to go into work late tomorrow to make sure the crew actually puts one in.

In other news, a front came through today, complete with flash flood warnings and torrential downpours. Nowhere near what Houston saw, but my newly sanded utility trench had 6 inches of water sitting in it and sides collapsing....sigh.609010784dae5178d0272cbbe728a77f.jpg603f984019ba2886d38667a2039bec9e.jpg

Sent from my SM-G950U using Tapatalk
 

Attachments

  • 603f984019ba2886d38667a2039bec9e.jpg
    603f984019ba2886d38667a2039bec9e.jpg
    181.1 KB · Views: 1
  • 609010784dae5178d0272cbbe728a77f.jpg
    609010784dae5178d0272cbbe728a77f.jpg
    136.3 KB · Views: 1
OP
B

BlueBomber

Well-known member
Joined
Sep 14, 2013
Messages
3,201
Location
Outside Boston, MA
The utility trench has even more water on it this morning. I'm using a second hand water pump to try and drain it. We'll see how long it holds out. a2b0a6d33d4c92dfcfe1dd75334bd534.jpgeb060f6bc1c914262b2adeb122ba86bd.jpg

Sent from my SM-G950U using Tapatalk
 

Attachments

  • eb060f6bc1c914262b2adeb122ba86bd.jpg
    eb060f6bc1c914262b2adeb122ba86bd.jpg
    185 KB · Views: 1
  • a2b0a6d33d4c92dfcfe1dd75334bd534.jpg
    a2b0a6d33d4c92dfcfe1dd75334bd534.jpg
    192 KB · Views: 1
OP
B

BlueBomber

Well-known member
Joined
Sep 14, 2013
Messages
3,201
Location
Outside Boston, MA
The pump died, so I had to resort to bucket bailing. After 45 minutes, I got most of it out. Unfortunately, the collapsing sides had hidden almost all traces of my sand layer. I'm hopeful the inspector will pass it anyway. 1b777c8cc279197e4e61b27393770492.jpg

Sent from my SM-G950U using Tapatalk
 

Attachments

  • 1b777c8cc279197e4e61b27393770492.jpg
    1b777c8cc279197e4e61b27393770492.jpg
    228.1 KB · Views: 1
OP
B

BlueBomber

Well-known member
Joined
Sep 14, 2013
Messages
3,201
Location
Outside Boston, MA
Never a dull moment around here. Heavy rain, not wind, brought down this oak limb, right across the driveway. Since the cement truck is coming to pour the slab on the new garage today, I had to delay departure for work again to saw it up. Fortunately, the heavy base of the limb missed SWMBO's plants! I counted the rings on this one -- just the limb is 90 years old!!

e4ff1cabbe3eb9c87e423be230f0989f.jpg

On the garage front, the crew was out this morning putting down the poly vapor barrier and rebar threshold -to- slab tie ins. The workers tell me the slab should get poured mid - day.

87b4dde4b0257eb35e7458c779a798af.jpg
c22a9107c53116a68b25f27898b35f4d.jpg

Also, the electricians made it out yesterday to put the main electrical conduit into the utility trench today. Once the inspection is done, I will add my 4" "everything else " conduit and close up the trench this weekend.

25051f5ae506b754afa64d28527bf42c.jpg
335744cc46356103ab869e7d9ee2b0fb.jpg
 

Attachments

  • 87b4dde4b0257eb35e7458c779a798af.jpg
    87b4dde4b0257eb35e7458c779a798af.jpg
    166.1 KB · Views: 1
  • e4ff1cabbe3eb9c87e423be230f0989f.jpg
    e4ff1cabbe3eb9c87e423be230f0989f.jpg
    259.3 KB · Views: 1
  • c22a9107c53116a68b25f27898b35f4d.jpg
    c22a9107c53116a68b25f27898b35f4d.jpg
    179 KB · Views: 1
  • 25051f5ae506b754afa64d28527bf42c.jpg
    25051f5ae506b754afa64d28527bf42c.jpg
    222.8 KB · Views: 1
  • 335744cc46356103ab869e7d9ee2b0fb.jpg
    335744cc46356103ab869e7d9ee2b0fb.jpg
    146.5 KB · Views: 1
Last edited:

C_F

ALLIANCE MEMBER
Joined
Jan 21, 2005
Messages
9,675
Location
Utah...SNOW BLOWS!
Looks like your build is cruising right along so far. Nice work with the progress photos, too! :)

With all the trees you have around there, I would imagine your chain saw gets used quite a bit.
 
OP
B

BlueBomber

Well-known member
Joined
Sep 14, 2013
Messages
3,201
Location
Outside Boston, MA
Looks like your build is cruising right along so far. Nice work with the progress photos, too! :)

With all the trees you have around there, I would imagine your chain saw gets used quite a bit.

Thanks, C_F. I don't use the chainsaw a bunch, but enough to justify owning one. We have three gigantic oaks on the front of our property, so when they do drop limbs, like this one they are usually enormous.
 
Last edited:
OP
B

BlueBomber

Well-known member
Joined
Sep 14, 2013
Messages
3,201
Location
Outside Boston, MA
Slab is in! Looks like they did a pretty good job. This weekend will be all about backhoe work cleaning up the mess and prepping for a new driveway in October.5001fbf100c04a452851ed616b04433f.jpgbb3bd0bcb88a1e2ccdb22362d679b705.jpg

Sent from my SM-G950U using Tapatalk
 

Attachments

  • bb3bd0bcb88a1e2ccdb22362d679b705.jpg
    bb3bd0bcb88a1e2ccdb22362d679b705.jpg
    37.2 KB · Views: 1
  • 5001fbf100c04a452851ed616b04433f.jpg
    5001fbf100c04a452851ed616b04433f.jpg
    150 KB · Views: 1
OP
B

BlueBomber

Well-known member
Joined
Sep 14, 2013
Messages
3,201
Location
Outside Boston, MA
Busy day today.

Picked up the backhoe.

4fda6b0c9fa5aa0baea83cd6a86ee411.jpg

Glued together my 4-inch utility conduit.

316c080ce3cc79bd5e2ab5b0bb807eff.jpg

Accidentally glued the 22-1/2-degree elbow where I should have glued a 45-degree elbow...d'oh! Fortunately, I was able to cut it off and use it elsewhere in the line.

9bcdc98c1f53c44d80978cc35330f7df.jpg

You can see the correct place for the 22-1/2- degree elbow in the picture below. I was able to use it anyway by turning the grey conduit around.

b6bc7647f35e229d3dde2287e01b79cd.jpgc23bd68ded34d72d5046f4517549b6c3.jpg

I also opened up a new trench across the driveway in another area to extend a future sewer line from the original barn. I had one stubbed in when they repoured the slab three years ago, but since the driveway will be paved in October, I added 20 more feet to the stub.

d89571165530b45529ebd8e51722082c.jpg

The backhoe bucket moves a lot of earth quickly, but I am far from the maestro that John my foundation excavator is. To be expected I guess, since he gets much more practice then I do.

67d9eed040561684d84ba8b91010ad46.jpg

Oh, and I found another New England potatoe in the trench!

d6a7c98259593cf42a8db8e7f94b6987.jpg

Sent from my SM-G950U using Tapatalk
 

Attachments

  • d89571165530b45529ebd8e51722082c.jpg
    d89571165530b45529ebd8e51722082c.jpg
    204.8 KB · Views: 1
  • b6bc7647f35e229d3dde2287e01b79cd.jpg
    b6bc7647f35e229d3dde2287e01b79cd.jpg
    197.5 KB · Views: 1
  • 9bcdc98c1f53c44d80978cc35330f7df.jpg
    9bcdc98c1f53c44d80978cc35330f7df.jpg
    152.9 KB · Views: 1
  • 316c080ce3cc79bd5e2ab5b0bb807eff.jpg
    316c080ce3cc79bd5e2ab5b0bb807eff.jpg
    154.2 KB · Views: 1
  • 4fda6b0c9fa5aa0baea83cd6a86ee411.jpg
    4fda6b0c9fa5aa0baea83cd6a86ee411.jpg
    172.2 KB · Views: 1
  • 67d9eed040561684d84ba8b91010ad46.jpg
    67d9eed040561684d84ba8b91010ad46.jpg
    193.7 KB · Views: 1
  • d6a7c98259593cf42a8db8e7f94b6987.jpg
    d6a7c98259593cf42a8db8e7f94b6987.jpg
    223.9 KB · Views: 1
  • c23bd68ded34d72d5046f4517549b6c3.jpg
    c23bd68ded34d72d5046f4517549b6c3.jpg
    201.1 KB · Views: 1
Last edited:
OP
B

BlueBomber

Well-known member
Joined
Sep 14, 2013
Messages
3,201
Location
Outside Boston, MA
Today, I finished all the projects I wanted to use the backhoe for. I leveled the piles of leftover dirt from the foundation work. Then, for my last project, I dug another trench through the front driveway to install an outlet down closer to the road. Usually, I have to run an extension cord down for Christmas decorations but that's a pain in the *** when it snows. So the big machine went to work.

The asphalt came up in big sheets. That surprised me--I expected it to break and crumble around the bucket. No big boulders in the line of the trench, thank goodness.

b935fe23920000c43a3f6a9d72021e04.jpg
a6fdd250479e24af2e2590ee2c3f45a0.jpg

I tucked the outlet into one of SWMBO's flowerbed. The backhoe easily cut into this end.

d0feae9b1f9f21b0122f9f7dc4489cdf.jpg

This end required a bit more surgical precision.

2bdc1f39cabcf7a4801e5206b8b46b4a.jpg

Here's why: SWMBO's favorite irises. I called her out to make sure I dug them up according to her wishes. I used a spade...

1b91e5a6a38cc30d648a97b09dd12cd0.jpg

...at least, until I broke the spade! I deserved it, though, as I was prying on the remnants of a lamp post foundation, a little too hard i guess.

28ac116fda696bfc4b8e6875cc0a6cd6.jpg

Sent from my SM-G950U using Tapatalk
 

Attachments

  • b935fe23920000c43a3f6a9d72021e04.jpg
    b935fe23920000c43a3f6a9d72021e04.jpg
    210.5 KB · Views: 1
  • a6fdd250479e24af2e2590ee2c3f45a0.jpg
    a6fdd250479e24af2e2590ee2c3f45a0.jpg
    270.6 KB · Views: 1
  • d0feae9b1f9f21b0122f9f7dc4489cdf.jpg
    d0feae9b1f9f21b0122f9f7dc4489cdf.jpg
    237.9 KB · Views: 1
  • 2bdc1f39cabcf7a4801e5206b8b46b4a.jpg
    2bdc1f39cabcf7a4801e5206b8b46b4a.jpg
    200.5 KB · Views: 1
  • 1b91e5a6a38cc30d648a97b09dd12cd0.jpg
    1b91e5a6a38cc30d648a97b09dd12cd0.jpg
    248 KB · Views: 1
  • 28ac116fda696bfc4b8e6875cc0a6cd6.jpg
    28ac116fda696bfc4b8e6875cc0a6cd6.jpg
    127.1 KB · Views: 1
Last edited:

C_F

ALLIANCE MEMBER
Joined
Jan 21, 2005
Messages
9,675
Location
Utah...SNOW BLOWS!
Looks like you were having all sorts of fun with the backhoe! :) I don't blame you though, I'm sure I would have done the same.
 
OP
B

BlueBomber

Well-known member
Joined
Sep 14, 2013
Messages
3,201
Location
Outside Boston, MA
Yep, it's a big fun toy..er..tool. Wish I owned one. Plus, I wanted to get my money's worth it of out, since the nanny-state of Massachusetts required me to get a hoisting license just so I could rent it.

Sent from my SM-G950U using Tapatalk
 
Last edited:
OP
B

BlueBomber

Well-known member
Joined
Sep 14, 2013
Messages
3,201
Location
Outside Boston, MA
I didn't get anything done on the garage this past week, however I did get my trusses ordered. They should be delivered before the end of the month. The DigSafe crew was out to mark utilities for the driveway pavers--they're scheduled for the first week of October. Next weekend, I'll probably go buy some lumber and maybe get a wall or three framed up.
 
OP
B

BlueBomber

Well-known member
Joined
Sep 14, 2013
Messages
3,201
Location
Outside Boston, MA
Today I picked up the lumber to start the carpentry!

9d4ab646d903dba8d6b9bae354d45801.jpg

After unloading the lumber onto my new slab...

b5697530818d4595b2d213188fadc32a.jpg

...I got started on the back wall. First step was prepping the pressure treated sill plates for the stem wall bolts. I used the tried and true BFH method to mark the bottom side and drilled them out.

60459a90a87a5d360c35776c141061d5.jpg
444996cbfe6334c409aab3a049ce35df.jpg

Next, I dug into my stash and came up with two boxes of framing nails for my HF nail gun, one galvanized for attaching the studs to the PT and another regular for all the rest of the framing.

aa8a3d126a6f0140053c8b4e7c210ea0.jpg
d6e962fb225079c07a5c233f242d0090.jpg

The back wall is 32' wide, so I built it in two sections so I could lift them up myself. I also used saw horses to build them at the same level as the stem walls. The plans call for one window on each wall, but this side will be in shadow all day long. So I omitted the window opening.

9f5bb7d14a54d26795b821c3b2d314f7.jpg

Eventually, I got both wall sections hoisted into place.

61cede6c509832962f3d9e7c4aa31ce7.jpg

Here's the sky hook I made to keep pushing up on the wall once it exceeded my reach.

905fc7b045f73fbb01cb7ab102349187.jpg

With top plate on, tomorrow will turn to framing the side walls.
 

Attachments

  • 9d4ab646d903dba8d6b9bae354d45801.jpg
    9d4ab646d903dba8d6b9bae354d45801.jpg
    141.8 KB · Views: 1
  • b5697530818d4595b2d213188fadc32a.jpg
    b5697530818d4595b2d213188fadc32a.jpg
    110.6 KB · Views: 1
  • 60459a90a87a5d360c35776c141061d5.jpg
    60459a90a87a5d360c35776c141061d5.jpg
    96.4 KB · Views: 1
  • 444996cbfe6334c409aab3a049ce35df.jpg
    444996cbfe6334c409aab3a049ce35df.jpg
    87.4 KB · Views: 1
  • aa8a3d126a6f0140053c8b4e7c210ea0.jpg
    aa8a3d126a6f0140053c8b4e7c210ea0.jpg
    121.8 KB · Views: 1
  • d6e962fb225079c07a5c233f242d0090.jpg
    d6e962fb225079c07a5c233f242d0090.jpg
    105.6 KB · Views: 1
  • 9f5bb7d14a54d26795b821c3b2d314f7.jpg
    9f5bb7d14a54d26795b821c3b2d314f7.jpg
    108.4 KB · Views: 2
  • 61cede6c509832962f3d9e7c4aa31ce7.jpg
    61cede6c509832962f3d9e7c4aa31ce7.jpg
    146.5 KB · Views: 2
  • 905fc7b045f73fbb01cb7ab102349187.jpg
    905fc7b045f73fbb01cb7ab102349187.jpg
    118.9 KB · Views: 2
Last edited:
OP
B

BlueBomber

Well-known member
Joined
Sep 14, 2013
Messages
3,201
Location
Outside Boston, MA
Turned the corner this morning, framing up the first wall with a window. It took a bit longer than planned (as usual), but now that I have all the cuts right, I'm hopeful the other sections can go up faster.

4c238cf06160d7497e93478bb66e6da3.jpg

I dug into my salvaged lumber pile to find these already spiked 2x6 beams for the window header. They've been in there a while and have a touch of rot on one end, but I was able to get a 51" header out of the other end.

8459436e42aa023e49aadee7e7c3cbc2.jpg
cee5205593be37678c94efca70b15d0f.jpg
 

Attachments

  • 4c238cf06160d7497e93478bb66e6da3.jpg
    4c238cf06160d7497e93478bb66e6da3.jpg
    187.6 KB · Views: 1
  • 8459436e42aa023e49aadee7e7c3cbc2.jpg
    8459436e42aa023e49aadee7e7c3cbc2.jpg
    116.7 KB · Views: 1
  • cee5205593be37678c94efca70b15d0f.jpg
    cee5205593be37678c94efca70b15d0f.jpg
    95.6 KB · Views: 1
Last edited:

Jim_No_Garage

Well-known member
Joined
Jan 15, 2011
Messages
3,309
Location
Millington NJ
Yep, it's a big fun toy..er..tool. Wish I owned one. Plus, I wanted to get my money's worth it of out, since the nanny-state of Massachusetts required me to get a hoisting license just so I could rent it.,,

Sent from my SM-G950U using Tapatalk

BB:

Your project is coming along nicely.

Please tell us more about the hoisting license - was there a test or just a $$$ fee?

Cheers

Jim
 
OP
B

BlueBomber

Well-known member
Joined
Sep 14, 2013
Messages
3,201
Location
Outside Boston, MA
BB:

Your project is coming along nicely.

Please tell us more about the hoisting license - was there a test or just a $$$ fee?

Cheers

Jim

Thanks, Jim. The Mass Hoisting License Exam is on-line. You have to take the on-line course, and it requires you to pause ten seconds on each page before it let's you continue. The content is mostly about how to dig and lift loads safely. A lot is common sense, but I found a few nuggets of interest. It costs $25 and is good for 14 days.

One rental place I checked for availability told me they were selling their backhoe because no one was renting it due to the licensing issue.
 
Last edited:
OP
B

BlueBomber

Well-known member
Joined
Sep 14, 2013
Messages
3,201
Location
Outside Boston, MA
I worked past dark, by the headlights of two vehicles, but I got all three walls framed, up and braced all by myself in one weekend!

d44a5accea57f5b8aa293ec112845832.jpg

Here are some pictures of how I assembled and raised a wall section. I built them in saw horses, with the PT end sitting next to the bolt ends on the top of the stem wall.

3d37bcee14b94dd86aeb2947c31ad791.jpg

When I was ready to lift, I elevated the PT sill board with two blocks of woods so that the it would rotate up onto the bolt end. Usually I hit the bolt exactly and the sill board would drop right down. Once or twice, I had to leave my sky hook jammed onto the slab and go tap the base gently to align bolt and hole.

5f40bb85b818a166a810ac20fa185b5f.jpg

Once everything lined up vertically, I usually added a diagonal brace or two and then eased out the blocks with a pry bar.

329745566e8152f8b613a3c8178ac551.jpg

Sorry I didn't get more pics. When you are working by yourself and there's a wall section in the air, you don't pause to take happy snaps.

Next step will be squaring everything up and putting on sheathing. I'll tackle that next weekend.

Sent from my SM-G950U using Tapatalk
 

Attachments

  • d44a5accea57f5b8aa293ec112845832.jpg
    d44a5accea57f5b8aa293ec112845832.jpg
    79.5 KB · Views: 1
  • 3d37bcee14b94dd86aeb2947c31ad791.jpg
    3d37bcee14b94dd86aeb2947c31ad791.jpg
    151.8 KB · Views: 1
  • 5f40bb85b818a166a810ac20fa185b5f.jpg
    5f40bb85b818a166a810ac20fa185b5f.jpg
    168.3 KB · Views: 1
  • 329745566e8152f8b613a3c8178ac551.jpg
    329745566e8152f8b613a3c8178ac551.jpg
    108.5 KB · Views: 1
Last edited:
To avoid these ads, REGISTER NOW!

C_F

ALLIANCE MEMBER
Joined
Jan 21, 2005
Messages
9,675
Location
Utah...SNOW BLOWS!
Sorry I didn't get more pics. When you are working by yourself and there's a wall section in the air, you don't pause to take happy snaps.
That's totally understandable, I'm just glad you are able to get as many photos as you are.:thumbup:

It's looking really good so far, and you are making good time too! Are you going to hire some help when it comes time to do the rafters?
 
OP
B

BlueBomber

Well-known member
Joined
Sep 14, 2013
Messages
3,201
Location
Outside Boston, MA
That's totally understandable, I'm just glad you are able to get as many photos as you are.[emoji106]

It's looking really good so far, and you are making good time too! Are you going to hire some help when it comes time to do the rafters?
Thanks, C_F! Right now I'm leaning toward renting a scissor lift and inviting some buddies over to help with the trusses.

Sent from my SM-G950U using Tapatalk
 

bcoke

Well-known member
Joined
Mar 8, 2013
Messages
341
Location
Pawlet Vermont
Blue Bomber I understand the doing it yourself but a few buddies would make it a lot safer....just leave the Adult beverages for--- the rehashing the days work and razzing each others skill level after the work is done...... Looks great so far ........Boy the town's all **** with regulations......do not get me started........Bobbycoke
 
OP
B

BlueBomber

Well-known member
Joined
Sep 14, 2013
Messages
3,201
Location
Outside Boston, MA
Blue Bomber I understand the doing it yourself but a few buddies would make it a lot safer....just leave the Adult beverages for--- the rehashing the days work and razzing each others skill level after the work is done...... Looks great so far ........Boy the town's all **** with regulations......do not get me started........Bobbycoke
Yeah, not to mention it goes faster that way, too!

Sent from my SM-G950U using Tapatalk
 
OP
B

BlueBomber

Well-known member
Joined
Sep 14, 2013
Messages
3,201
Location
Outside Boston, MA
The next ten days will be big--trusses will be delivered, picking up a scissor lift to help during placement, driveway being replaced and planning a truss-raising party on Columbus Day. Today is kinda drizzly, so just doing clean up and prep around the property. Tomorrow's supposed to be better, so I return to carpentry then.

Sent from my SM-G950U using Tapatalk
 

BUGTHUG

Well-known member
Joined
Nov 12, 2010
Messages
2,960
Location
Kansas
lot of work. I love those rocks, to bad we aren't closer. Amazing how much work you did by yourself, gotta be careful.
 
OP
B

BlueBomber

Well-known member
Joined
Sep 14, 2013
Messages
3,201
Location
Outside Boston, MA
lot of work. I love those rocks, to bad we aren't closer. Amazing how much work you did by yourself, gotta be careful.
Thanks, Bugthug. I'm definitely rounding up help for the trusses.

I have my '60 Bel Air tucked away in a temp shelter off the end of the existing garage. The shelter stuck a foot or so into the area that will be paved, so I needed to shift the whole structure back. That was easy-- loosed the anchor cables and shoved it where it needed to go. The shelter is pretty light weight.

The Bel Air is most definitely not. Sitting on semi low tires on gravel, the car just laughed at me as I tried to rock it out of its divots.

So what do you do when you need to move a 57-year old car? Bring in a 52-year old car and a tow cable! I ran the line from the Bel Air's back bumper, under the shelter flap, to my daughter's '65 Malibu. It worked great.

cf9d0c6f6587800fa967c5e1e03640f2.jpgefb60c14b3f1029b079ad7525b20088a.jpgd0e3278d89677e4e18f5417274cac7ee.jpg

Sent from my SM-G950U using Tapatalk
 

Attachments

  • cf9d0c6f6587800fa967c5e1e03640f2.jpg
    cf9d0c6f6587800fa967c5e1e03640f2.jpg
    149.9 KB · Views: 2
  • efb60c14b3f1029b079ad7525b20088a.jpg
    efb60c14b3f1029b079ad7525b20088a.jpg
    148.4 KB · Views: 2
  • d0e3278d89677e4e18f5417274cac7ee.jpg
    d0e3278d89677e4e18f5417274cac7ee.jpg
    211.5 KB · Views: 2
OP
B

BlueBomber

Well-known member
Joined
Sep 14, 2013
Messages
3,201
Location
Outside Boston, MA
Today, I started on sheathing the three walls. I decided to use the zip paneling system and picked up 45 sheets from Home Depot. I love how they'll pick it out and load it for you, if you ask.7a5b97c73509a8efb6e56fc8387fe049.jpg

Here a first -- first vehicle parked on the slab in the new garage! I decided to just leave the panels on the truck and unload them through the back wall.

75b40ba9cbfe492d4fb82705d23293e1.jpg24dc6da2316bf5db0fd92ac3ad396502.jpg

I came up with a few tricks to help handle the panels by myself. The first was to mount a header board eight feet up that I could shove the panel up against. However, I still needed three hands to brace the panel AND pick up the nail gun. Then I figure out that if I put a small board right at the two - foot balance point (at the right height), I could readily hold it with one hand while i fine tuned the alignment and shot the first few nails. It worked great!

2aae7aca6c5e91a680d92fc096972c84.jpg

I paneled right over the window openings rather than measuring and cutting the panels. I'll open them up with a Sawzall later.

9b4192c50339aca1156ec08c2e45b0e4.jpg

Here's the obligatory progress shot. I hope to do a little evening work this week to finish paneling the side walls, and get the joints taped up.

0a91a267cc0e0b892b3dd0c8bd21730d.jpg

Oh, and with SWMBO's expert help (steering and come-a-long suggestions), we pulled the Impala up and shoved it into the last bay of the old garage. Now the entire paving area is clear and ready for the asphalt work.

4d1acf4c47dd3ecce49fd64b9ae998e4.jpg

Sent from my SM-G950U using Tapatalk
 

Attachments

  • 7a5b97c73509a8efb6e56fc8387fe049.jpg
    7a5b97c73509a8efb6e56fc8387fe049.jpg
    157.9 KB · Views: 3
  • 75b40ba9cbfe492d4fb82705d23293e1.jpg
    75b40ba9cbfe492d4fb82705d23293e1.jpg
    164.7 KB · Views: 3
  • 24dc6da2316bf5db0fd92ac3ad396502.jpg
    24dc6da2316bf5db0fd92ac3ad396502.jpg
    134.3 KB · Views: 3
  • 2aae7aca6c5e91a680d92fc096972c84.jpg
    2aae7aca6c5e91a680d92fc096972c84.jpg
    134 KB · Views: 2
  • 9b4192c50339aca1156ec08c2e45b0e4.jpg
    9b4192c50339aca1156ec08c2e45b0e4.jpg
    134.5 KB · Views: 2
  • 0a91a267cc0e0b892b3dd0c8bd21730d.jpg
    0a91a267cc0e0b892b3dd0c8bd21730d.jpg
    117.2 KB · Views: 2
  • 4d1acf4c47dd3ecce49fd64b9ae998e4.jpg
    4d1acf4c47dd3ecce49fd64b9ae998e4.jpg
    98.4 KB · Views: 9
Last edited:

old__man

Well-known member
Joined
Apr 29, 2017
Messages
294
Location
Gander, Canada

I'm not an expert and this is not meant as a criticism but it doesn't look right the way you cut the bottom of those studs on the right side of the window. There is no continuous load path. I just hope the inspector doesn't ding you for it.
 

Attachments

  • 9b4192c50339aca1156ec08c2e45b0e4.jpg
    9b4192c50339aca1156ec08c2e45b0e4.jpg
    131.2 KB · Views: 16
OP
B

BlueBomber

Well-known member
Joined
Sep 14, 2013
Messages
3,201
Location
Outside Boston, MA
I'm not an expert and this is not meant as a criticism but it doesn't look right the way you cut the bottom of those studs on the right side of the window. There is no continuous load path. I just hope the inspector doesn't ding you for it.
Thanks for the feedback, oldman.

The king stud in this case fell almost directly on top of the foundation bolt. Although the picture doesn't clearly show it, I carved out a pocket for the bolt, vise cutting it off completely. About 1/3 of the king stud goes all the way to the sill plate. I tried to compensate by attaching the short board to the right of the king stud, but based on your observation about needing a continuous load path, I will go back and replace the short board with a full length stud. Hopefully that will satisfy the inspector.

I do appreciate the feedback--keep it coming, GJ!

Sent from my SM-G950U using Tapatalk
 
Last edited:

old__man

Well-known member
Joined
Apr 29, 2017
Messages
294
Location
Gander, Canada
...but based on your observation about needing a continuous load path, I will go back and replace the short board with a full length stud. Hopefully that will satisfy the inspector.

Just to be clear, I am no expert. I only learned what a king stud was a few weeks ago. Hopefully someone else will chime in.

Personally, I would have just extended the header all the way to the first place you can get a full jack stud in followed by your king. In your case it would have meant extending your header about 3". But again, I am still learning.
 
OP
B

BlueBomber

Well-known member
Joined
Sep 14, 2013
Messages
3,201
Location
Outside Boston, MA
Just to be clear, I am no expert. I only learned what a king stud was a few weeks ago. Hopefully someone else will chime in.

Personally, I would have just extended the header all the way to the first place you can get a full jack stud in followed by your king. In your case it would have meant extending your header about 3". But again, I am still learning.
You've definitely got me thinking. I admit to being a bit rushed on that wall and didn't notice where the bolt was going to fall until I was half way through nailing the studs to the sill plate. There's still time for me to make a correction without too much posterior pain...

Sent from my SM-G950U using Tapatalk
 
OP
B

BlueBomber

Well-known member
Joined
Sep 14, 2013
Messages
3,201
Location
Outside Boston, MA
Woot! Back to work after a few deliveries:

Trusses arrived Wednesday...

494a013aede9194f08fa963f5385a2aa.jpg

...as did the scissor lift.

ae659c532222c803824c2099d1fe8217.jpg

Yesterday, the paving company ripped out the old driveway and prepped it for asphalt.

ab71515d56979de985c05a46dc4cadf1.jpg
b6db2edd88ad7810260c9c1b9aacef18.jpg

I took a half day off to get a jumpstart on the rainy weekend. The self-propelled scissor lift is my new favorite tool. A mobile work platform lifts all my tools and blocking to a convenient height plus eliminates all that up-and-down-the-ladder time.

704dcf10421068f0ad37465dc9cef47e.jpg
ad4331e11bc3148a49614c02ef03b162.jpg
Sent from my SM-G950U using Tapatalk
 

Attachments

  • 494a013aede9194f08fa963f5385a2aa.jpg
    494a013aede9194f08fa963f5385a2aa.jpg
    170.9 KB · Views: 8
  • ae659c532222c803824c2099d1fe8217.jpg
    ae659c532222c803824c2099d1fe8217.jpg
    143.4 KB · Views: 6
  • ab71515d56979de985c05a46dc4cadf1.jpg
    ab71515d56979de985c05a46dc4cadf1.jpg
    137.9 KB · Views: 2
  • b6db2edd88ad7810260c9c1b9aacef18.jpg
    b6db2edd88ad7810260c9c1b9aacef18.jpg
    129.7 KB · Views: 2
  • 704dcf10421068f0ad37465dc9cef47e.jpg
    704dcf10421068f0ad37465dc9cef47e.jpg
    129.6 KB · Views: 2
  • ad4331e11bc3148a49614c02ef03b162.jpg
    ad4331e11bc3148a49614c02ef03b162.jpg
    130.3 KB · Views: 2
Last edited:
OP
B

BlueBomber

Well-known member
Joined
Sep 14, 2013
Messages
3,201
Location
Outside Boston, MA
I had three different friends over helping me today and boy did it make a difference!

Here's what we started with:

b28b5901831ddfab2a398c8308194ff7.jpg

Here's where we finished:

45cd1926f659e940035bfe094043966b.jpg

We had a misstep on the door wall section where I forgot that the door opening was 3' 4" wide, NOT 3'. Yeah, I shoulda known better, but we figured it out before it got too messy.

b7c190b2ffa6285c4264d1e40756e278.jpg

We spliced the garage door LVLs over the center wall section by cutting the 1.75" thick beams at staggered lengths and then screwing them together with 12 deck screws.

acaca1362f63e11706438e50e0a5a9cf.jpg

Scott got checked out on the scissor lift and agreed it's the best tool ever.

3251aa7e2564a6f18066cdc9e5223d31.jpg

The front wall was wobbly and out of alignment right up until we got the last top plate on. We made extensive use of ratchet straps to pull walls into the vertical.

16d7d699581a00c5e1d63b20e9bbd240.jpg

Fortunately, we checked the top measurement before we nailed in the second header and realized the walls were leaning out by 1-1/2"! So, we strung together three ratchet straps to pull the two side walls back to vertical and shortened our header by 3/4".

At the end of the day, Scott ran the lift all the way up to enjoy the view.

6b4bee8993427cc923f7dd402a4ce010.jpg


Sent from my SM-G950U using Tapatalk
 

Attachments

  • b28b5901831ddfab2a398c8308194ff7.jpg
    b28b5901831ddfab2a398c8308194ff7.jpg
    117.2 KB · Views: 2
  • 45cd1926f659e940035bfe094043966b.jpg
    45cd1926f659e940035bfe094043966b.jpg
    189.8 KB · Views: 2
  • acaca1362f63e11706438e50e0a5a9cf.jpg
    acaca1362f63e11706438e50e0a5a9cf.jpg
    154.1 KB · Views: 2
  • 3251aa7e2564a6f18066cdc9e5223d31.jpg
    3251aa7e2564a6f18066cdc9e5223d31.jpg
    167.1 KB · Views: 2
  • 16d7d699581a00c5e1d63b20e9bbd240.jpg
    16d7d699581a00c5e1d63b20e9bbd240.jpg
    175.7 KB · Views: 2
  • 6b4bee8993427cc923f7dd402a4ce010.jpg
    6b4bee8993427cc923f7dd402a4ce010.jpg
    131.9 KB · Views: 2
  • b7c190b2ffa6285c4264d1e40756e278.jpg
    b7c190b2ffa6285c4264d1e40756e278.jpg
    190.1 KB · Views: 2
Last edited:

jakemac

Well-known member
Joined
May 21, 2013
Messages
9,035
Location
New England
Subscribed.

Wow BB, I missed the start of this build while I was running back and forth to Maine last August. I just found it. I remember when you were telling bobcat and I about it earlier this summer. Now it's actually becoming reality.

Sorry I've missed out on lending a hand.


I may be a little late but, I'm wondering how the back wall will hold up to downhill water. You may need to dig around the foundation and fill with crushed stone to help it drain. Alternately, digging 3' back from the foundation all the way around and putting a rock wall in to hold back the hill might also help. My grandfather did this at his house and it worked wonders. (Dragging the boulders with a lawn tractor from the woods was a PITA) There is still the occasional water in the basement, but not the frequent floods every time it rained that he got before the excavation.

(PS - still keeping an eye out for a lift. Pickings have been slim.)
 
Last edited:
OP
B

BlueBomber

Well-known member
Joined
Sep 14, 2013
Messages
3,201
Location
Outside Boston, MA
Thanks for the compliments, Jake, and for being willing to help out. If I get into a spot where I need more hands, I'll give you a holler.

As for the site grading and water, I did contemplate that issue. The garage slab is about 2 and a half feet below grade on the back side, but there isn't a lot more "up hill" behind my property. I had the foundation crew paint the backside with a water barrier, so that should help. The stem walls are also about 8 inches thick. I had to insist (several times) that the concrete guys put the poly plastic layer under the slab. The plans called for optional water drainage tubes down along the base of the foundation footers, but I would have had to dig trenches allthe way down around the existing garage to give it any place to go. I elected not to include them. So far, no signs of leakage or water intrusion, but I did notice the newly prepped driveway in front of the garage door openings on the new garage were very soggy and spongey yesterday morning after a medium rain. I'm hoping I don't regret not putting in the foundation drains.

I'm also not thrilled with the grading the paving company did between the new garage and the old garage--I think there's too much continuous slope downhill to the first existing garage bay. I'm calling themthis morning and will ask them to regrade it a bit to encourage the water to go down towards the gardens and not into my wife's parking bay.
 
OP
B

BlueBomber

Well-known member
Joined
Sep 14, 2013
Messages
3,201
Location
Outside Boston, MA
I had a great day yesterday with a large group of friends who helped me "raise the roof" on my garage!

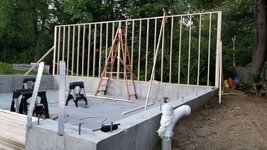
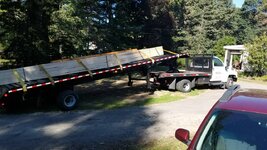
Sunday's weather forecast had a front moving through before noon, so I got out early and got a little more sheathing up before the waterworks turned on. My friends were all set to start coming over at noon, so during the rain I ran to Home Depot for another load of lumber to use for blocking between the roof trusses. Folks started arriving by 1130, and by early evening we had up to 12 people helping to heft the trusses around. While we were prepping for the first truss, I divvied up the helpers into crews, either cutting blocking or adding bracing for the walls and gable truss. I even put one father-son pair to work cutting out my window openings with the Sawzall.

eb89b3d113a772f5e389bff8cad13302.jpg
2a5c735f871b2b813e7f42f6d534c743.jpg

Finally, we were able to start on the first gable truss. My plans called for cutting notches in the top beam of the gable truss for 2x4 "lookouts" to support a 1-foot eave. They tie into the next truss on the other side, so we cut a pile of 3-foot long boards for these lookouts. We did the work on the saw horses and nailed in the lookouts before prepping for the lift.

e6aa18d5867db33c70351648ecdfc3fb.jpg

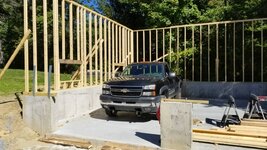
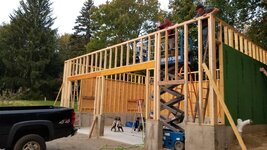
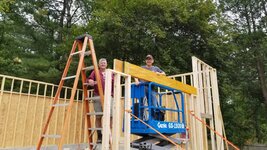
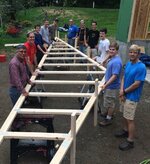
Here's the whole crew lined up for the first lift. That's your's truly on the far end, left side. The trusses span a 32-foot room width, and with one-foot hangovers for eaves, they are substantial. The spec sheet says they are supposed to weigh only 120 pounds, but I suspect they are more than twice that.

bd4b7fff196358825c55229e24ffd78d.jpg

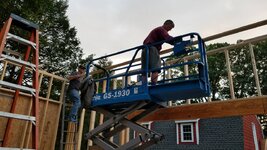
We did the lift by bringing the truss in through the garage opening the upright position, and then had one person carry one end up a ladder and onto the far wall. I put one person on the skyhook to help steady the top and then used the scissor lift to do the rest of the lifting. Along the back wall, my bracing team put to gether an L-beam brace sticking up into space in the middle of the wall to "catch" the truss once it was stood up. We also added two scraps of 2x4 sticking up at each end to act as stops for the far ends of the truss. Folks on ladders along the back side helpd position the truss and hold it steady while I toenailed the bottom to hold it in place. Unfortunately, we had no pictures of the lifting phase, because it was all hands at stations to keep the truss where it was supposed to be.

d123c19561d7b142693d8287259adbd5.jpg
ec7c4212dcba534082cc799b2bbb902c.jpg

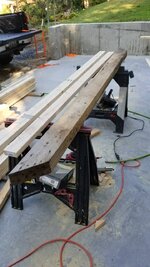
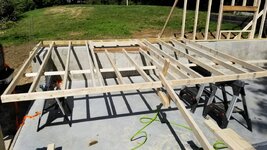
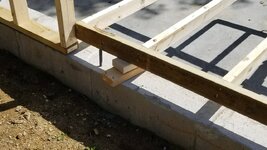
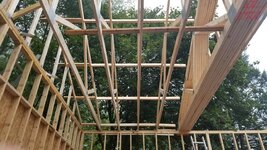
I elected to add blocking between each truss at 4-foot intervals to better support the Zip roofing panels, as well as to help ensure the trusses are correctly spaced on 2-foot centers. I added the blocking on the ground so that it would already be in place when we hoisted it in the air.

bb7c6b26020d7ee3a414f24f60069442.jpg
44e1627e943b787b1d7537291020bad8.jpg


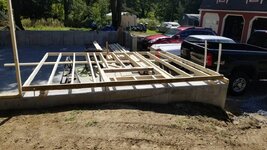
The blocking-on-the-ground technique worked okay, but it added time, and we were starting to run out of daylight. Plus, my technique would have run out of manuevering room as we aproached the opposite wall. After about five trusses and several folks peeling off for evening activities, I changed strategies and asked the remaining volunteers to just help me get the rest of the trusses up on the walls, stacked against the five trusses we managed to install and brace. We got done just as twilight was fading into darkness. I thanked everyone profusely and said good night.

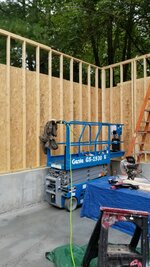
All in all, it worked better than perhaps it sounds. Having lots of extra hands and the lift on hand was definitely effective, and the lift gave us versatility for both lifting the load and workers to where they needed to be. It certainly wasn't as easy as hiring a crane and crew, but at $600 for a week's rental on the scissor lift, it was a good investment for a number of tasks.

Here are this morning's pictures of our work. The eagle-eyed amongst you will probably note that although the trusses are tied and clamped together, they are not secured to the rest of the trusses! After taking the pics, I went up and added a ratchet strap between the nailed-in trusses and the "loose" ones to make a more positive connection.

3761aee3392c1ebb9d74de5f7fbeb753.jpg
9cdeef30a0ea9153bdb16318518d14a9.jpg
cc73558bbe857f5953282fb216bcd9d3.jpg

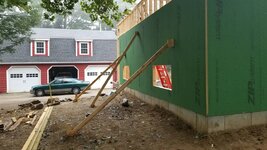
The scissor lift gets picked up on Wednesday, but today's a washout and I go back to work on Tuesday. To get the remaining trusses placed, I will probably build a temporary wall down the middle of the garage at ceiling height and then, starting at the far end, drag the trusses one at a time down to the far end and work back to the middle.

The other thing I obviously need to do is to get the Zip sheathing finished and taped before too much moisture gets into the seams. That will be one of my top priorities inthe next week.
 

Attachments

  • eb89b3d113a772f5e389bff8cad13302.jpg
    eb89b3d113a772f5e389bff8cad13302.jpg
    141.1 KB · Views: 2
  • 2a5c735f871b2b813e7f42f6d534c743.jpg
    2a5c735f871b2b813e7f42f6d534c743.jpg
    96.4 KB · Views: 2
  • bd4b7fff196358825c55229e24ffd78d.jpg
    bd4b7fff196358825c55229e24ffd78d.jpg
    95.3 KB · Views: 2
  • d123c19561d7b142693d8287259adbd5.jpg
    d123c19561d7b142693d8287259adbd5.jpg
    89.1 KB · Views: 2
  • ec7c4212dcba534082cc799b2bbb902c.jpg
    ec7c4212dcba534082cc799b2bbb902c.jpg
    81.5 KB · Views: 2
  • bb7c6b26020d7ee3a414f24f60069442.jpg
    bb7c6b26020d7ee3a414f24f60069442.jpg
    62.8 KB · Views: 2
  • 44e1627e943b787b1d7537291020bad8.jpg
    44e1627e943b787b1d7537291020bad8.jpg
    95.1 KB · Views: 2
  • 3761aee3392c1ebb9d74de5f7fbeb753.jpg
    3761aee3392c1ebb9d74de5f7fbeb753.jpg
    150.7 KB · Views: 2
  • 9cdeef30a0ea9153bdb16318518d14a9.jpg
    9cdeef30a0ea9153bdb16318518d14a9.jpg
    188.3 KB · Views: 2
  • cc73558bbe857f5953282fb216bcd9d3.jpg
    cc73558bbe857f5953282fb216bcd9d3.jpg
    88.3 KB · Views: 2
  • e6aa18d5867db33c70351648ecdfc3fb.jpg
    e6aa18d5867db33c70351648ecdfc3fb.jpg
    83.8 KB · Views: 2
Last edited:
OP
B

BlueBomber

Well-known member
Joined
Sep 14, 2013
Messages
3,201
Location
Outside Boston, MA
Just to be clear, I am no expert. I only learned what a king stud was a few weeks ago. Hopefully someone else will chime in.

Personally, I would have just extended the header all the way to the first place you can get a full jack stud in followed by your king. In your case it would have meant extending your header about 3". But again, I am still learning.

Hey, I ruminated on your observation and elected to redesign the one window opening to avoid the sill j-bolt altogether.

a98109b76eb3a42778535927bab411c6.jpg

Thanks again!
 

Attachments

  • a98109b76eb3a42778535927bab411c6.jpg
    a98109b76eb3a42778535927bab411c6.jpg
    162.3 KB · Views: 2
Last edited:

C_F

ALLIANCE MEMBER
Joined
Jan 21, 2005
Messages
9,675
Location
Utah...SNOW BLOWS!
That's great that you had so many helpers! It's sure coming along now, how many more trusses to you need to get up? The redesign for the window looks really good, too.
 
To avoid these ads, REGISTER NOW!
Top Bottom