To avoid these ads, REGISTER NOW!

Board & Batten - How'd they do that?

skidadil

Member
Joined
Nov 11, 2012
Messages
10
Location
PA
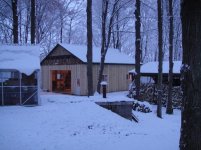
I've pretty much decided that I want to go all out with the barn look on my garage and shed and will put board and batten siding on both of them. I've been looking at a lot of pictures, and something about how board and batten is put together on the gable side of a structure is puzzling me. I really like this particular look, but I'm not quite sure yet how it's done. Basically what there is is a clear division between the BnB on the walls and the BnB attached to the gable truss. Basically the top part sticks out a bit. Here's a picture to better highlight what I'm referring to:

21.jpg


I really like this look vs having the boards and battens run in a continuous line from bottom to top. The only theory I've come up with so far is that the bottom part uses 1x10 boards and the top part uses 2x10 boards. I suppose that's one way to get the top to kind of stick out like it does. Does anyone know if that's how it's done? Or is it something else? If it is done with 1x10's and 2x10's, any suggestions on how to seal the gap between the two? Is that just a simple job for some caulk?

Thanks!
 
To avoid these ads, REGISTER NOW!

willymakeit

Well-known member
Joined
Apr 27, 2009
Messages
1,242
Location
Springfield Mo.
The gable is offset as noted with furr strips.
Traditionally there is a gap between the boards. The board is nailed in the center to allow expansion contraction. The batten then is nailed over the board thru the gap, which allows the board to move.
 

Thumper68

Well-known member
Joined
May 16, 2013
Messages
5,134
Location
Duluth MN
they did the gable end incorrect. Likely used plywood, therefor the offset. If using long enough material this wouldn't of happened.

The off set is to create a drip edge between the upper and lower boards. Looks to me as if they used rough cut cedar.
 
OP
S

skidadil

Member
Joined
Nov 11, 2012
Messages
10
Location
PA
Thanks for all the replies. I guess you're right: I was over thinking it. Fur strips it is. I suppose the 1x10 and 2x10 combo would produce a similar look, but it would certainly cost more in lumber.
 

efinley

Member
Joined
Sep 3, 2014
Messages
21
My childhood home was board and batten. But when we remodeled the addition was done with "rough sawn" 3/4" plywood with furring strips attached 10" o.c. I'm willing to bet the offset in that picture is where the 8' sheet of plywood ended... But plywood and bat is by far the most cost effective way of getting that look, but make sure you get the rough sawn ply or it won't look right.
 

southalabama

Well-known member
Joined
Jan 10, 2011
Messages
5,530
Location
Brewton AL
Board and batten was historically used where green lumber was used. As explained above it's design allows for movement
 

Norcal

Well-known member
Joined
Mar 16, 2008
Messages
13,752
My shop & board & batt, the batts were applied to 5/8" plain rough sawn doug fir siding, & made the batts from 1X12X16 # 3 cedar fencing.


The photo was taken when it was being repainted.


Cyberbear

Well-known member
Joined
Nov 23, 2013
Messages
1,524
Location
California
The old batt and board style was so the solid wood boards could expand and contract with the ambient moisture content. I was told in my building practices class that often one vertical board edge was nailed and the other held in place by the batt. This allowed the board to move w/o splitting.
 

CNGsaves

Well-known member
Joined
Sep 26, 2012
Messages
13,233
Location
KS and OK
The Pic by OP looks to be "cosmetic" board & batten, rather than actual wide boards with batten over the seam. The doors aren't right either with the X on them rather than functional Z which helps hold up the door.

I always think of barns for true board and batten. Thus, lots of examples if you Google . . . . barn board batten

Here is an example barn:
http://newlywoodwards.com/2013/08/true-board-and-batten-barn-siding-barn-raising-progress.html

Old school barn battens were actually uniquely shaped with router-style edge on both sides so middle of batten protruded out. Those are very expensive to obtain actual reproductions.
 
Last edited:
OP
S

skidadil

Member
Joined
Nov 11, 2012
Messages
10
Location
PA
I definitely intend to do a traditional board and batten with rough sawn lumber. The picture I originally posted was intended to show the offset between the two sections of siding. I just grabbed the first picture I found after a quick search, so I didn't really pay attention to the materials used. :) I happen to have a lumber store not one mile from my house that sells mostly rough sawn cypress, so that'll be my first stop when I start pricing out my project. My understanding is that traditional board and batt uses 1x10 boards with either 1x3 or 1x4 battens. And yes, the battens will be nailed through the space inbetween the boards like willymakeit talked about.

This is a more accurate picture of what I'm going after for my shed (props to Lapp Structures in PA):
20121025_115211_01919.JPG
 

theoldwizard1

Well-known member
Joined
Feb 22, 2011
Messages
43,077
Location
SE MI
The gable is offset as noted with furr strips.
Traditionally there is a gap between the boards. The board is nailed in the center to allow expansion contraction. The batten then is nailed over the board thru the gap, which allows the board to move.

Good info ! :thumbup: (Not that many people do traditional BnB any more. :sad: )
 

jnkpile

Well-known member
Joined
Feb 13, 2014
Messages
154
The overhang you like is created for a drip edge (like before mentioned) instead of butting the boards together. This is done either because longer lumber was not available to use clear boards or possibly to avoid excessive lumber waste.ImageUploadedByTapatalk1416425431.979997.jpg
I've got only the boards on mine so far, gonna wait until warm weather to paint it before installing my batts. Picked up 1000 board feet of rough saw pine for $350 from a somewhat local guy I found on kijiji. Saved huge!
Cheers!
 
Last edited:

HAY YOU

Well-known member
Joined
Nov 19, 2012
Messages
585
The trouble with tradition board & batten construction is the bottom edge can’t be sealed. So every batten spacing becomes a highway for mice to enter your barn.
 
To avoid these ads, REGISTER NOW!

Chilliwack Murray

Well-known member
Joined
Dec 10, 2012
Messages
1,501
Location
Chilliwack BC
I put cedar board and batton over plywood and used strips of fibreglass screen between the boards to keep bugs and mice out.

Regarding the overhang on the gable, my first house that was built in 1950 had a 4" overhang on the gable which would have provided a drip edge as others mentioned but it was also left open on the bottom and provided much of the attic venting.
 

jnkpile

Well-known member
Joined
Feb 13, 2014
Messages
154
The trouble with tradition board & batten construction is the bottom edge can’t be sealed. So every batten spacing becomes a highway for mice to enter your barn.


If this is a worry, a board can be run horizontally along the bottom of the wall for the vertical boards to **** up against, then the batts will overlap the vertical gap as well as the lower horizontal board. It looks very clean but is a little more time consuming.
 

HAY YOU

Well-known member
Joined
Nov 19, 2012
Messages
585
If this is a worry, a board can be run horizontally along the bottom of the wall for the vertical boards to **** up against, then the batts will overlap the vertical gap as well as the lower horizontal board. It looks very clean but is a little more time consuming.

It's not a worry with me at all. I was just stating what happens with TRADITIONAL board & batton as witnessed in my 100 yr. old barn.
 

gahrajmahal

Well-known member
Joined
Dec 12, 2008
Messages
2,519
Location
Cincinnati, Ohio
I'd like to see an in construction shot, a close-up or drawing. I think I get it, but need more clarification of the board and batton process. I get the overhang bit.
 

404

Well-known member
Joined
Aug 23, 2014
Messages
3,463
Location
Mass
It may be pretty, but it ***** for keeping water out of the siding and the structure. Overlays on ply will keep moisture in the interface. Real b and b lets water wick into the wall. There is a reason this design became less popular.

Regards,
404
 

Scott H in Wheaton

Well-known member
Joined
Mar 18, 2013
Messages
3,155
Location
Plainfield, suburb of Indianapolis
On my 90 yr old barn I've replaced two walls that had a strange kind of board and batten. 1x10 for the board, then metal corner reinforcing strips for the batten to cover the gap. It had a very rough surface to try to paint and the carpet tack sized nails they used on the metal strips came out very easily.

My replacement is 1x10 that has both edges rabbited 3/8" wide and 3/8" deep. I overlap the boards 1/4" in the middle, leaving me 1/8" gap on the front and 1/8" gap on the back for expansion and contraction. Gives me a very smooth surface for rolling paint. I might go back and caulk the outside before painting. So far its pretty tight but I do get some drafting on the heavy winded days.
 

willymakeit

Well-known member
Joined
Apr 27, 2009
Messages
1,242
Location
Springfield Mo.
It may be pretty, but it ***** for keeping water out of the siding and the structure. Overlays on ply will keep moisture in the interface. Real b and b lets water wick into the wall. There is a reason this design became less popular.

Regards,
404
It can leak. If your ever around blower tests or any membrane test, you will find that all sidings or overlays leak to some extent. The key is to allow the water out once in.
Some of the new water barrier systems are a absolute pain to deal with. Lots of detailing. Ive dealt with it on Historical and new projects designed to look old.
You are right that it is less popular.
 

willymakeit

Well-known member
Joined
Apr 27, 2009
Messages
1,242
Location
Springfield Mo.
On my 90 yr old barn I've replaced two walls that had a strange kind of board and batten. 1x10 for the board, then metal corner reinforcing strips for the batten to cover the gap. It had a very rough surface to try to paint and the carpet tack sized nails they used on the metal strips came out very easily.

My replacement is 1x10 that has both edges rabbited 3/8" wide and 3/8" deep. I overlap the boards 1/4" in the middle, leaving me 1/8" gap on the front and 1/8" gap on the back for expansion and contraction. Gives me a very smooth surface for rolling paint. I might go back and caulk the outside before painting. So far its pretty tight but I do get some drafting on the heavy winded days.
Never seen the metal strips, maybe a weather seal. We used to put backer rod in the gap. Did an old historical church[150 yrs] and caulked the vertical battens. The paint all peeled because of trapped moisture migrating thru. Was an expensive redo and learning curve.
Was the metal thin like weather seal in a door seal?
 

BFBOB

Well-known member
Joined
Sep 20, 2011
Messages
5,073
The doors aren't right either with the X on them rather than functional Z which helps hold up the door.
.

The Z brace helps keep the door from sagging, but the X brace also helps keep it flat. On his shed, they're probably decorative, appliques on plywood. Real X braces are complicated, with half-lap joints in the center. Even on plywood, if properly made, they do function to help keep the plywood panel flat. Emphasis on "help" of course, since nothing made of wood ever keeps its shape perfectly.
 

railfancwb

Member
Joined
Sep 10, 2014
Messages
10
Don't count on caulking doing much good with any wood which is decay resistant because of internal oils. Western cedar, probably red cedar, red wood, cypress, etc. Paint doesn't stick well either in my experience.

Wads of steel wool are useful to discourage mice and other vermin from entering behind the battens.
 

lilredex

Well-known member
Joined
Apr 29, 2006
Messages
5,949
Location
Toronto
A lurker here but I am finishing up my outbuilding with channel cut cedar. Seemed more efficient than B&B and it turned out pretty nice.

Let's see some pictures...we like pictures!! Welcome too!!

This is the pile of 1 X 10" pine that was made into channel siding.


The result, a much better looking garage.


yeldogt

Well-known member
Joined
Jan 2, 2012
Messages
18,184
I have a place in Bucks County. PA .... part of my barn is 140 year old B & B. Back then it was all 1" + thick hemlock -- 10" 12" wide -- cut nails -- **** boards with wide batten. The battens are nailed through the boards. This style is now often faked using plywood --- 8' is not long enough. In a lot of the german barns the timber frame sits above the facia line -- so the upper gable has to be out past the lower section .. some of these have a fancy edge on every other board - and a hole in the others .. all decoration. The used long boards for all the other areas.

I fixed a whole section about 5 years ago -- using hemlock and cut nails .. Looks great.
 

CNGsaves

Well-known member
Joined
Sep 26, 2012
Messages
13,233
Location
KS and OK
^ ^ Beautiful shop you've got there S Ontario !! Hope you've got a woodburner in there.

LOVE the pic with the snow. :thumbup:
 

s_ontario

Well-known member
Joined
Jan 5, 2006
Messages
552
Location
canada
Last edited:

xx78

Member
Joined
Jun 30, 2014
Messages
5
Let's see some pictures...we like pictures!! Welcome too!!

This is the pile of 1 X 10" pine that was made into channel siding.


The result, a much better looking garage.


Here are 2 while I work on writing up my 16X24 pole barn project. Enjoy!


xx78

Member
Joined
Jun 30, 2014
Messages
5
A progress photo of my channel cut being installed. I need to write this up in another thread instead of hijacking this one!! :)


To avoid these ads, REGISTER NOW!
Top Bottom