To avoid these ads, REGISTER NOW!

Between 485 & 705 SQ/FT Bob Heine's Auto Emporium

Workspaces between 485 and 705 squarefeet.
OP
B

Bob Heine

ALLIANCE MEMBER
Joined
Oct 24, 2009
Messages
10,709
Location
Boca Raton, Florida
Sorry for my delayed response. I thought I finished my taxes but discovered I had enough itemized deductions to make a $1,000 difference in my favor. Finished on Friday and e-filed. Patted myself on the back and put all the papers away.

I'm not super superstitious but it might have been a bad idea to file my taxes on Friday the 13th. Maybe I have a long-lost Knights Templar relative because the IRS rejected my return. I forgot to enter the IP PIN in my return so I guess their computer thought my computer was fake. Re-filed electronically today and it was accepted so I am done for this year.


That line-up looks like a group of European soccer hooligans waiting to kick some ****, taking it easy before the match. Luckily, there is a little "peacemaker."

A good family photo.
Philip, looks can be deceiving. My son and I are pretty peaceful but the guy in the middle just won his first two professional martial arts matches. He competes in Grappling and Brazilian Jiu Jitsu. That's why I gave the newest Heine this starter outfit:
attachment.php

That's a great photo, the apple sure don't fall far from the tree, the four ages of Bob.
:rocker::):)

The other photo (you know which one) not so much. I'm not sure you're not grooming us, I've been warned about people posting inappropriate photos.
:lol::lol::lol:

Thanks for the laugh :beer:
Steve.
Steve, thanks for the compliment. I'm not sure about the GJ rating on the other photos but I know for sure some of the ones from the beach would be inappropriate.
The multigenerational photo is great! You look better than I remember.
Andy, I owe it all to photo editing software. Unfortunately I'm not very good at it.
Bob, that is a top family photo..:thumbup:
Thank you Steve!
Yes, sure is a great family photo. Not sure about the others and will be having a discussion later with 1/2 Cup about moderation as to are they GJ suitable. :lol:
Simon, I'm hoping they will pass the litmus test. At least I didn't participate in the Full Monty skit -- guaranteed X rating.
HOTFR8, I will PM you over the post as it may be a bit risqué for the GJ:lol_hitti
Steve, I was more worried about affecting members who were about to or just finished consuming food or were thinking about going to sleep. :puke:
That 4 gen pic is awesome :bowdown:
Thank you Kirk, my grandson pointed out how rare 4-generation pictures are. I feel blessed in so many ways.
Yup spit out my coffee again !!!!!!!! that darn pencil sharpener story [sound like the bosses from my job] !!!! the 4 generation shot great but what happens in Paris should definitely stay in Paris, lost my coffee again........wish I had half your energy and a quarter of your smarts...........good heakth Bobbycoke
Sorry Bobbycoke, I try to keep it under control but that train severely damaged the impulse control part of my brain.
Bob nice family photo. I had a pair of shoes like that but they were not shop friendly. I actually wore them for my Airframes Mechanic Apprenticeship graduation photo! If only Johnny Carson would have been aware of such talent? No Andy, I will not post the photo unless you can solicit enough requests to put my thread over one million.:willy_nil
Bobby, I don't comment on the current style lest I be reminded of living in a bell-bottom world. You should find those shoes and strike a pose in front of the saw (lying down on the bed?).
Great photo Bob. I would caption it, A Couchfull of Heines. :willy_nil
Jim, I like that (better than Heineful)
A good title, very suitable. :thumbup:
:thumbup:
And I thought they were just Heinekins.
OK Andy, I like that too. Maybe its a Heinekindergarden.
Thanks Jim... the tears of mirth have reduced the earlier burning in my eyes. :thumbup:

That photo is definitely a keeper(compared to some others) and good to see a strong line of Heine heirs! :thumbup:

I was not really prepared to see Bob's 'big reveal' from orange jumpsuit to pink frilly tutu! Never mind that he always gets me with that eye injury... so much that my sphincter is developing muscle memory! :spit:
Guster, maybe I should change my avatar to the safety glasses reminder photo so it isn't such a shock (or so big).
Glad to know I'm not the only one in Boca that gets their hands dirty :)
Karl, thanks for stopping by. I'm sure we aren't the only two but I'm pretty sure we're in the minority. Where are you in Boca -- East or West of I-95?
 

Attachments

  • Brazilian Jiu Jitsu.jpg
    Brazilian Jiu Jitsu.jpg
    35.4 KB · Views: 566
To avoid these ads, REGISTER NOW!

HOTFR8

Banned
Joined
Mar 2, 2007
Messages
24,498
Location
Castlemaine, Victoria. The Hot Rod Centre of Austr
Simon, I'm hoping they will pass the litmus test. At least I didn't participate in the Full Monty skit -- guaranteed X rating.

Full Monty :wtf: No.....We can not have that.
Steve, I was more worried about affecting members who were about to or just finished consuming food or were thinking about going to sleep. :puke:

As was I.
 
OP
B

Bob Heine

ALLIANCE MEMBER
Joined
Oct 24, 2009
Messages
10,709
Location
Boca Raton, Florida
Rather than fix my income tax yesterday, I turned off the computer and went to the workshop. A lot of my woodworking projects are going to involve two foot wide pieces of plywood. At first I thought I would make a big sled for the table saw but used the track saw instead.

Rather than sacrificial pieces of wood on the sawhorses I used up some salvaged wood from my stash. A ripped piece of shelving about 1" x 3/4" made a couple of crossbars and a couple of pieces of salvaged 1" x 4" donated by a neighbor (are you throwing that out?) made the end pieces.
attachment.php


It worked pretty good. My goal was to cut plywood without having the cut piece tear off that last little bit when nearing the end of the cut. Oh, and not having the piece fall to the floor and ****** a corner. Not that any of those things has ever happened. :dunno:
attachment.php


Now I have the top, bottom and two side pieces for the audio/ice maker cabinet. Need to buy more 3/4" (23/32") and 1/4" plywood for the dividers and shelves.
 

Attachments

  • Audio Cabinet 1.jpg
    Audio Cabinet 1.jpg
    66.7 KB · Views: 543
  • Audio Cabinet 2.jpg
    Audio Cabinet 2.jpg
    65.1 KB · Views: 539

sawduststeve

Well-known member
Joined
Oct 7, 2016
Messages
2,139
Location
Havering-Atte-Bower,London/Essex boarders, England
Now I have the top, bottom and two side pieces for the audio/ice maker cabinet. Need to buy more 3/4" (23/32") and 1/4" plywood for the dividers and shelves.

Musical ice, this is gonna be good.
I still order all my timber in imperial sizes, we've only been metric for 47yrs :lol:, although today I've mostly been using 3/8 ply or 9mm as the suppliers like to call it.:roll eyes: I order all my glass in metric, but when I started work it was ordered by weight, in ounces.
Keep up the good work and I might have to offer you a job.:beer:

Steve.
 
OP
B

Bob Heine

ALLIANCE MEMBER
Joined
Oct 24, 2009
Messages
10,709
Location
Boca Raton, Florida
We have some five generation photos around, I was a great grandfather for about ten years before my dad died. But no more.

I like your wood work.
Andy, that's amazing! The paternal side of my family hasn't had much luck making it to 60 -- I'm the canary -- my cousins are watching with great interest as I crawl through my 70s.

My wood work is improving mostly because of Garage Journal. Otherwise I would still be sharpening both sides of chisels and plane irons [you mean my knife sharpener isn't the right tool?].
Musical ice, this is gonna be good.
I still order all my timber in imperial sizes, we've only been metric for 47yrs :lol:, although today I've mostly been using 3/8 ply or 9mm as the suppliers like to call it.:roll eyes: I order all my glass in metric, but when I started work it was ordered by weight, in ounces.
Keep up the good work and I might have to offer you a job.:beer:

Steve.
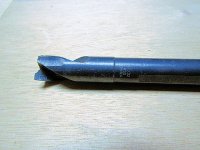
Steve, I feel like I have turned a corner. I now own a tape measure and a square with metric and imperial scales. I blame my carpentry failures on my inability to deal with weird fractions. It takes me forever to figure out my 64th increment drills. I have 1/16, 3/32, 7/64, 1/8 sizes worked out but then I open the box of Silver& Deming drills and wonder if I should buy a replacement 17/32 bit (broke second time I used it).
attachment.php


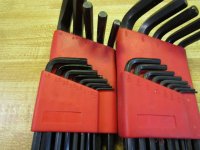
My greatest confusion is with allen-head hardware. With most things being made in China I never know if the allen screw is metric or imperial. I start with one imperial key and if it isn't a perfect fit, try the next size. If that isn't perfect I try the metric key. I quickly learned to put the keys back right away -- the size is marked on the key but I need a magnifying glass for the small ones and you don't want to be trying to make a metric key fit an imperial socket.
attachment.php

I did leave my two measurement bathroom scale behind in Australia. I thought it was in pounds and kilos but it was kilos and stones! Boy did I feel skinny when I saw my weight in stones.

What is this Job thing you are offering. Is it 240v or 120v? I only have a couple of 240v outlets. :confused:
 

Attachments

  • 17-32 Silver + Deming.jpg
    17-32 Silver + Deming.jpg
    105.3 KB · Views: 411
  • Allen Keys.jpg
    Allen Keys.jpg
    82.1 KB · Views: 411
OP
B

Bob Heine

ALLIANCE MEMBER
Joined
Oct 24, 2009
Messages
10,709
Location
Boca Raton, Florida
Boy, 10 days passed quick! I haven't done much and today I went to the workshop for two hours because I was feeling guilty. Spent the first hour putting stuff away, including the new router. I think I have six now.

I was looking for a base plate for my Ryobi laminate trimmer router. I was hoping to find one that would accept an industry standard Porter Cable guide bushing. No luck but I did find a couple that I thought might fit but turned out to be the wrong mounting pattern. As I searched for base plates a Makita compact router kept popping up. It's a 1-1/4 hp unit with two bases. One is a plunge base and the other is fixed but it takes standard guide bushings. It's also variable speed (10,000 to 30,000 rpm). I have never been a fan of the screaming routers that sound like they are going to self destruct. It seemed like a good deal at $139 so it has joined the others. I did have to label the wrenches because there are quite a few in the router drawer.
attachment.php


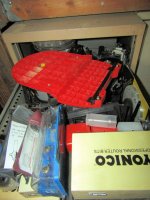
My router drawer has reached its capacity. Now I need to review LilScorpion's Tooling (Re)Organization thread to see if I can do something about this (besides not buying any more routers, attachments or bits).
attachment.php
 

Attachments

  • Router Saga 12.jpg
    Router Saga 12.jpg
    79.9 KB · Views: 420
  • Router Saga 13.jpg
    Router Saga 13.jpg
    96.4 KB · Views: 412

oldironfarmer

Well-known member
Joined
Jun 25, 2016
Messages
6,664
Location
Terlton, Oklahoma
How did you break that drill bit? That's like almost a 1/2" bit!!:eyecrazy:

Allen wrenches are an issue. With manufacturing tolerances it is tough to even measure one in a few of the close sizes. I solved my problem with them by making a board and mix them all in by size small to large (or is it large to small?) so I don't care what the manufactured standard was, if it's too small I use the next larger one.
 

oldironfarmer

Well-known member
Joined
Jun 25, 2016
Messages
6,664
Location
Terlton, Oklahoma
Now I like that router. I may have to have one to go in my 3D router. Variable speed is cool.

The router storage drawer looks fine to me, what was 1/2 Cup's hesitation?
 
OP
B

Bob Heine

ALLIANCE MEMBER
Joined
Oct 24, 2009
Messages
10,709
Location
Boca Raton, Florida
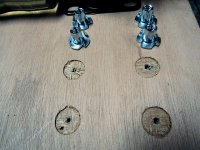
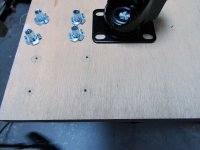
I spent my second hour in the workshop getting casters installed on the base of the Musical Ice Machine cabinet. At first I planned to screw in those threaded brass inserts but having never successfully installed them chose the simple T-nuts that I have used before. After marking the holes for the casters (offset by the 23/32 side panel) I drilled four 1/8" holes.
attachment.php


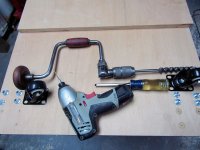
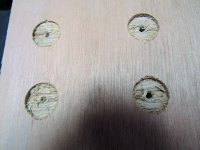
I wanted the T-nuts to fit flush with the plywood so I got out the brace and a #10 bit (I think that's 10/16" or 5/8"). I also got out the auger bit file and sharpened the cutting edges on the bit. I was hoping it would cut a neat circle in the oak veneer without ripping it to shreds. I figured cutting through the veneer to the next cross-ply would be enough to counter-sink the T-nuts. I was amazed at how well it worked but I still had to do a little chisel work to make the circle flat.
attachment.php


All I used was the brace&bit, chisel and power drill. I did use the long, skinny step-drill (old faithful) to enlarge the 1/8" hole to 3/16" to fit the 1/4" T-nut shafts. Also drilled out the hole from the bottom to reduce the oak tear-out. It isn't a big deal because the caster base will hide the holes on the bottom (where no one will see them anyway).
attachment.php


The final step was to tighten the 3/4" long 1/4-20 bolts to pull the t-nut teeth into the plywood. I ran out of hardware and time so this will continue on the weekend (when Amazon delivers the hardware). I'm happy with the result.
attachment.php
 

Attachments

  • Audio Cabinet 6.jpg
    Audio Cabinet 6.jpg
    64.5 KB · Views: 415
  • Audio Cabinet 5.jpg
    Audio Cabinet 5.jpg
    81.4 KB · Views: 415
  • Audio Cabinet 4.jpg
    Audio Cabinet 4.jpg
    119.5 KB · Views: 415
  • Audio Cabinet 3.jpg
    Audio Cabinet 3.jpg
    78.1 KB · Views: 415
OP
B

Bob Heine

ALLIANCE MEMBER
Joined
Oct 24, 2009
Messages
10,709
Location
Boca Raton, Florida
Bob, your Makita router looks the goods..:thumbup:

No comment on the router drawer..
Steve, I gave it a try on a small piece of wood and it was great. A 1/4" bit running at 10,000 rpm sliced a very neat slot with no burning, chattering or wandering. I look forward to using it for some real work.

I know it's a different model in Australia but I bet they have a similar one with similar specs.

https://www.amazon.com/gp/product/B00HAQMHEO/?tag=atomicindus08-20

I am taking baby steps, with some wooden boxes to start but one day I hope to be able to build drawers for the workshop with better organization than just a dump. For the moment they are all in one place and not collecting unnecessary dust.
How did you break that drill bit? That's like almost a 1/2" bit!!:eyecrazy:

Allen wrenches are an issue. With manufacturing tolerances it is tough to even measure one in a few of the close sizes. I solved my problem with them by making a board and mix them all in by size small to large (or is it large to small?) so I don't care what the manufactured standard was, if it's too small I use the next larger one.
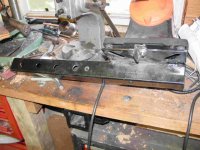
Andy, best I can recall, it was a simple project. I had a 2x2" receiver to be mounted under a workbench. The vise mount I bought didn't have a hole in the right place so I drilled a new hole. It went through one side of the hitch tube and was working its way through the other side when it bound up. The 1/2" B&D drill kept going, I started spinning and suddenly the Chinese drill bit snapped. I thought I was being so smart using a 17/32 bit for the hole intended to accept a 1/2" pin but I should have worked my way up through the sizes.
attachment.php

Now I like that router. I may have to have one to go in my 3D router. Variable speed is cool.

The router storage drawer looks fine to me, what was 1/2 Cup's hesitation?
Andy, I don't have a lot of experience with it but I am impressed with this router's ability to run at less than supersonic speeds.

I have seen Steve's workshop and I understand his hesitation completely. I also appreciate his kindness for not commenting in ALL CAPS! I have also seen your many workshops and appreciate your kindness as well.

I may live long enough to rectify the router drawer situation but that would mean a lot of other projects not making progress.
 

Attachments

  • Vice Mount Modified.jpg
    Vice Mount Modified.jpg
    97.7 KB · Views: 411

Guster

Well-known member
Joined
Mar 11, 2012
Messages
1,543
Location
Auckland, New Zealand
I was looking for a base plate for my Ryobi laminate trimmer router. I was hoping to find one that would accept an industry standard Porter Cable guide bushing. No luck but I did find a couple that I thought might fit but turned out to be the wrong mounting pattern. As I searched for base plates a Makita compact router kept popping up. It's a 1-1/4 hp unit with two bases. One is a plunge base and the other is fixed but it takes standard guide bushings. It's also variable speed (10,000 to 30,000 rpm). I have never been a fan of the screaming routers that sound like they are going to self destruct. It seemed like a good deal at $139 so it has joined the others. I did have to label the wrenches because there are quite a few in the router drawer.
attachment.php

Is the guide bushing to large for the metal part of the base? Otherwise easy to modify the plastic wear plate. To modify the metal part we need to find you a local with a milling machine! My Makita laminate trimmer has a clamshell base construction that uses custom inserts for which I've just made my own. None of this would fit on my larger Makita router so I ended up removing the wear plate and making a similar clamshell plate out of some scrap perspex. Turned out to be so handy I never put the old plate back. Those PC guide bushings do look handy and not very expensive(some sitting in my Amazon cart right this very minute) :lol:

Drillbits break, you buy new ones and resharpen the stub in the mean time. It is the great re-cycle of life! Least it is nowhere near as frustrating as a broken tap. :lol_hitti
 

oldironfarmer

Well-known member
Joined
Jun 25, 2016
Messages
6,664
Location
Terlton, Oklahoma
Drilling that receiver tube is not an easy job regardless. And harder with a hand held drill.

Now that I've lost all my desire to be a craftsman, the last one I did was with the step drill. Boy I love those things.

Augers are sized by the 16th. Did you sharpen the spur? Looks like it (or they) didn't cut the veneer too cleanly. But great job overall.:thumbup:
 

BBChevro

Well-known member
Joined
Jan 24, 2014
Messages
2,235
Location
Brisbane, Qld., Australia
I can live with broken drill bits - as long as the broken end isn't still stuck deep down inside the hole [emoji34]

Which usually only happens when there is no alternative location for said nasty hole. [emoji15]

Looking forward to the finished musical ice maker cabinet.

Sent from my SM-J105Y using The Garage Journal mobile app
 
OP
B

Bob Heine

ALLIANCE MEMBER
Joined
Oct 24, 2009
Messages
10,709
Location
Boca Raton, Florida
Is the guide bushing to large for the metal part of the base? Otherwise easy to modify the plastic wear plate. To modify the metal part we need to find you a local with a milling machine! My Makita laminate trimmer has a clamshell base construction that uses custom inserts for which I've just made my own. None of this would fit on my larger Makita router so I ended up removing the wear plate and making a similar clamshell plate out of some scrap perspex. Turned out to be so handy I never put the old plate back. Those PC guide bushings do look handy and not very expensive(some sitting in my Amazon cart right this very minute) :lol:

Drillbits break, you buy new ones and resharpen the stub in the mean time. It is the great re-cycle of life! Least it is nowhere near as frustrating as a broken tap. :lol_hitti
Guster, the guide bushing fits the Makita perfectly -- it attaches to the plastic wear plate. My problem is with the old Ryobi trimmer and the hole is too large. It has a 4-screw mount as do a number of other trim routers. Unfortunately the 4 holes are a couple of millimeters off. I may someday elongate the holes but for now I have the new Makita to play with. I bought a set of bushings from Amazon. I also bought a Porter Cable dovetail jig and it came with four guide bushings as well as dovetail and straight bits.
Drilling that receiver tube is not an easy job regardless. And harder with a hand held drill.

Now that I've lost all my desire to be a craftsman, the last one I did was with the step drill. Boy I love those things.

Augers are sized by the 16th. Did you sharpen the spur? Looks like it (or they) didn't cut the veneer too cleanly. But great job overall.:thumbup:
Andy, I rarely drill holes in steel in one shot and this confirmed my tried and true technique of sneaking up on the finish size hole. The step drills have been a godsend because they seem to stay true -- starting the hole in the middle means it is likely to end up in the right spot. That wasn't always the case with switching bits.

I haven't given up completely but I will probably never reach an apprentice skill level. I buy more and better tools but it's no substitute for skill.

I noticed the auger bits are sized like AN fittings, in 16ths. I did sharpen the spur but obviously not very well. That auger bit file is sharp and pretty aggressive so I quit before the bit had a good knife edge. I gave it another try and the second set of holes were a little cleaner. That red oak veneer is pretty fibrous.
attachment.php

I can live with broken drill bits - as long as the broken end isn't still stuck deep down inside the hole [emoji34]

Which usually only happens when there is no alternative location for said nasty hole. [emoji15]

Looking forward to the finished musical ice maker cabinet.

Sent from my SM-J105Y using The Garage Journal mobile app
Mark, you made me shiver. I don't know where I would even start to extract a 17/64" bit. Luckily it was an open tube so I could just grab the broken piece with a pair of needle-nose pliers.

My drill bits always break off in the hole I can't see.

I started marking dimensions on the not-to-scale and no resemblance to reality sketch I free-handed.
 

Attachments

  • Audio Cabinet 6A.jpg
    Audio Cabinet 6A.jpg
    84.7 KB · Views: 213
OP
B

Bob Heine

ALLIANCE MEMBER
Joined
Oct 24, 2009
Messages
10,709
Location
Boca Raton, Florida
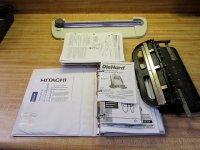
While waiting for some stuff for the Musical Ice Box to arrive I filed the instructions for my recent purchases. Many of the instructions are printed on 8.5x5.5-inch booklets so I bought some small 3-ring binders. These binders filled quickly and it looked like I needed to buy another. The small binders are two or three times more expensive than the standard sizes so I was reluctant to spend the money. As I was flipping through the instructions, I realized many of them had English, French and Spanish sections. I started cutting them up and in less than an hour I had less than half the pages I started with.
attachment.php
 

Attachments

  • Manual Reduction.jpg
    Manual Reduction.jpg
    102.4 KB · Views: 461
OP
B

Bob Heine

ALLIANCE MEMBER
Joined
Oct 24, 2009
Messages
10,709
Location
Boca Raton, Florida
I noticed some water on the sprinkler control valve the other day and thought it was rainwater. Turned around when I realized it hadn't rained for more than a week. The electric control valve is 30 years old and made of plastic so I suspected it was getting ready to burst.
attachment.php


That picture is from about a year ago when it was still dry most of the time. The air bleeder valve o-ring was weeping so I replaced it but now it looked like it was weeping from under the screws. Rather than take it apart again, I decided to buy a new valve and swap the plumbing.
attachment.php


Some of you will recognize a common GJ symptom -- the corroded 1.25" check valve had to visit the wire-wheel bench grinder before I could re-install it. As with all projects this one had an unexpected consequence. Tightening the ring on the green indexing valve caused a crack to open up in the top of the valve. Upon closer inspection there is also a crack in the base of the valve at the first screw (next to the ring). Waiting on the new valve and some unusually expensive slow setting PVC cement. I need the slow setting stuff to have any chance getting all six 1.5-inch PVC pipes seated in the valve at the same time. If this doesn't work, I will be digging a very large hole with a very small trowel so I can cut all the pipes well back from the valve and connect them one-at-a-time to a replacement base (that's how I installed the current one). :rocker:
 

Attachments

  • Sprinkler Control 1.jpg
    Sprinkler Control 1.jpg
    101.9 KB · Views: 211
  • Sprinkler Control 2.jpg
    Sprinkler Control 2.jpg
    109.9 KB · Views: 213
To avoid these ads, REGISTER NOW!
OP
B

Bob Heine

ALLIANCE MEMBER
Joined
Oct 24, 2009
Messages
10,709
Location
Boca Raton, Florida
Great idea on taking out the unused languages. I have the manuals and the notebooks, just need to find an open Saturday to put them together.


Sent from my iPhone using The Garage Journal mobile app
Stewart, I have 50 inches of manuals in the cabinets over the workbench in the garage. If I was really serious I would throw away the manuals for the tools I no longer own and that would save a lot more space.
Bob, as above. :thumbup:

Every thing we purchase the manuals and warranty are all filled for future reference.
Steve, I also have all the purchase receipts but as part of this exercise I actually threw out the warranties that were expired (at least the ones that expired in the last century). If the tools need to be fixed, it's on me and most of the manuals have parts diagrams.
 

oldironfarmer

Well-known member
Joined
Jun 25, 2016
Messages
6,664
Location
Terlton, Oklahoma
While waiting for some stuff for the Musical Ice Box to arrive I filed the instructions for my recent purchases. Many of the instructions are printed on 8.5x5.5-inch booklets so I bought some small 3-ring binders. These binders filled quickly and it looked like I needed to buy another. The small binders are two or three times more expensive than the standard sizes so I was reluctant to spend the money. As I was flipping through the instructions, I realized many of them had English, French and Spanish sections. I started cutting them up and in less than an hour I had less than half the pages I started with.
attachment.php

Now you've gone and done it. Hoo Boy, what a goober. You've made those tools worthless to future owners in Boca Raton who don't speak English. How could you? I thought you cared about other people, and now we find you'll just trod over them for your own personal convenience. People you don't even know!! I suppose you cut up the hammer instructions too, big boy? You know the warranty was on the last page.

I need some time to settle down.


In other news:

Tough job on the sprinkler system. Good luck getting all six in one shot.
 
OP
B

Bob Heine

ALLIANCE MEMBER
Joined
Oct 24, 2009
Messages
10,709
Location
Boca Raton, Florida
I may have to test the slow-setting PVC cement before doing the big job. The reviews are mixed and if it doesn't work, it's a $35 mistake and another delay -- with no easy way to water the lawn.

For therapy, I went to the workshop and made some sawdust.

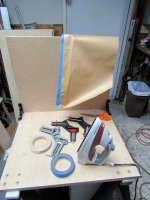
I had to do some ironing before I could make sawdust. I want the edges of the top and bottom to be flush with the sides and the top and bottom will be biscuit-joined to the sides. It seemed to me that the edge banding needed to be on the exposed edges of the top and bottom pieces before cutting the biscuit slots.

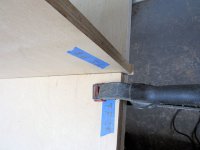
Clamped the top and bottom together at 90-degrees, cut the oak banding to size (plus) and taped it in place. The edge banding has hot glue applied to one side so it just needed some painters tape to hold it in alignment and a piece of masking paper to keep the glue from getting on the iron.
attachment.php


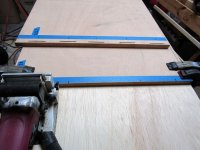
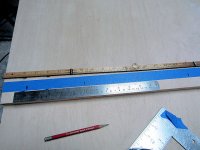
With two edges on the top and bottom pieces I put a strip of painters tape on the panel and marked the five biscuit locations. Corner-clamping the edge tight against another piece of plywood, I cut the slots. Marked another piece of tape with the five slot locations (offset by 1/2-inch) and cut the slots in the edge of one of the side pieces.
attachment.php


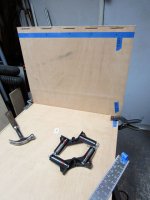
Dry-fit the top with the first side and clamped it together. I am trying to do all the work slowly and carefully. That means mumbling to myself and imagining each cut and assembly step before I do it. So far so good. I have one joint for two pieces successfully completed.
attachment.php


I want the front of the top piece to overhang the sides by 1/2-inch. If I put a glass door on the cabinet I want it to close without its top edge being exposed.
attachment.php


The back side of the top is going to be inset by that same 1/2-inch. I plan to have a removable 1/4-inch plywood back on the Music section of the Ice Box. I hope having the 1/4-inch slot set back 1/4-inch from the back edge of the sides and the bottom fixed shelf.
attachment.php


It's amazing how fast the hours pass doing this kind of work. Then again, visiting with our new homeowner neighbor and chores around the house ate up a significant chunk of the day as well. Hopefully I can get back to it this weekend (I did the tree pruning last weekend) but you never know what surprise plans a wife, home and garage full of vehicles awaits the innocent bystander.
 

Attachments

  • Audio Cabinet 11.jpg
    Audio Cabinet 11.jpg
    87.2 KB · Views: 423
  • Audio Cabinet 10.jpg
    Audio Cabinet 10.jpg
    65.8 KB · Views: 423
  • Audio Cabinet 9.jpg
    Audio Cabinet 9.jpg
    70.7 KB · Views: 419
  • Audio Cabinet 8.jpg
    Audio Cabinet 8.jpg
    83.5 KB · Views: 419
  • Audio Cabinet 7.jpg
    Audio Cabinet 7.jpg
    83.9 KB · Views: 413
OP
B

Bob Heine

ALLIANCE MEMBER
Joined
Oct 24, 2009
Messages
10,709
Location
Boca Raton, Florida
Now you've gone and done it. Hoo Boy, what a goober. You've made those tools worthless to future owners in Boca Raton who don't speak English. How could you? I thought you cared about other people, and now we find you'll just trod over them for your own personal convenience. People you don't even know!! I suppose you cut up the hammer instructions too, big boy? You know the warranty was on the last page.

I need some time to settle down.


In other news:

Tough job on the sprinkler system. Good luck getting all six in one shot.
Andy, I downloaded those manuals to my computer when I couldn't remember where I filed the printed ones. I was planning to print the relevant language sections for potential buyers from Quebec and Mexico. My new neighbor is from Mexico so I know how important this will be.

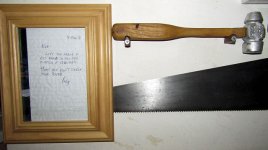
Oh ye of little faith!!!! I framed the hammer instructions (and warranty[?]), knowing the hammer would only be priceless with them kept together.
attachment.php


FULL DISCLOSURE: The frame also contains a group photo with some relatives who may or may not come for a visit. In the event they give fair warning, your instructions and warranty[?] will be temporarily transferred to a less prestigious location and the photo prominently displayed in the guest room.
 

Attachments

  • Wall of Fame 6.jpg
    Wall of Fame 6.jpg
    58 KB · Views: 473

bolensboneyard

Well-known member
Joined
Nov 22, 2013
Messages
3,074
Location
South East
Bob I have often thought manuals on computer could save me some much needed space. However, I knew I would never walk across the street to look things up as I would probably forget what I saw before I got back to the shop? Looking good down in Florida!
 

Craptain

Well-known member
Joined
Apr 18, 2013
Messages
4,032
Location
Tampa Bay FL
I only have real paper copies of manuals when I buy new. Which is rare. All the rest are on my computer or phone with a little help from Google.

Sent from my SM-G930T using Tapatalk
 
OP
B

Bob Heine

ALLIANCE MEMBER
Joined
Oct 24, 2009
Messages
10,709
Location
Boca Raton, Florida
Bob, you are doing well. Slow and steady wins the race..:thumbup:

I must get my self a set of corner clamps like yours, just another thing on list.

Cheers
Thank you, Steve. I have to go slow to reduce the number of mistakes. The down side is it prevents me from asking for help. Just about everyone starts twitching when they watch me work -- they know they can do it faster. Then they take over and make the mistake I make on a previous attempt and we are looking for a new piece of wood or metal to start over.

I've had one corner clamp (the bare aluminum one) for 40 years but GJ convinced me I needed three more. Amazon had corner clamps for $9.99 but only two in stock. The picture showed one bare aluminum clamp like the one I have so I ordered two:
attachment.php


https://www.amazon.com/gp/product/B0007GIN24/?tag=atomicindus08-20

The order arrived with two display cards, each with two Bessey corner clamps.
attachment.php


I thought $9.99 was a reasonable price for one but a real bargain for two. I decided not to file a complaint and request a refund when I clicked on another Amazon listing:

https://www.amazon.com/dp/B01N1TJGL4/?tag=atomicindus08-20
Bob I have often thought manuals on computer could save me some much needed space. However, I knew I would never walk across the street to look things up as I would probably forget what I saw before I got back to the shop? Looking good down in Florida!
Bobby, it turns out it's even worse. When I'm covered in grease, sawdust or sewage, going inside SWMBO's lair to look up something on the office computer is a capital offense. To prolong my life I had to buy a cheap ($150) refurbished laptop for the garage -- and another for the shop. That's some expensive reading material.
I only have real paper copies of manuals when I buy new. Which is rare. All the rest are on my computer or phone with a little help from Google.

Sent from my SM-G930T using Tapatalk
Andrew, I had a small problem Googling in the shop. Apparently it's out of my office WiFi's range. Ordered a WiFi extender and tried to install it. The installation instructions were simple and clear -- if the office setup recognized the extender. It didn't, so the alternate installation instructions had to be followed. That's when the instructions and web site became completely useless, telling me only what a successful connection looked like. I don't like calling the HELP number because it turns into a very long and fruitless waste of my time. If my call is so important, why am I listening to elevator music between recorded (and cheerful) "Please hold and we will be with you shortly!" interruptions.
Your music on ice seems to be coming along well. And well thought out, is Liane guiding you?
Andy, Liane's guidance is more than helpful: "Why are you making a box?"; "Why is it taking you so long?" and "Don't you have better things to do?"
 

Attachments

  • Corner Clamp 1.jpg
    Corner Clamp 1.jpg
    30.1 KB · Views: 358
  • Corner Clamp 2.jpg
    Corner Clamp 2.jpg
    29.2 KB · Views: 358
OP
B

Bob Heine

ALLIANCE MEMBER
Joined
Oct 24, 2009
Messages
10,709
Location
Boca Raton, Florida
"Progress is our most important problem." -- said one of my GE appliances.

I pulled out one of my favorite tools yesterday. I often have to make marks that are evenly spaced and dividing measurements by 3, 5 or 7 doesn't always come out very even. I wanted 5 biscuits at each corner of the Music on Ice Box. It's 24-inches wide so 24/5=4.8. Fine, but I don't want biscuits showing on the edge of the corners. Two inches or 2.5-inches (make that 3-inches on the top front) from the edge means 20- or 19-inches divided by 5... aaagh. I bought a center finder ruler a few years ago and it solves the problem. I want a biscuit in the middle (12-inches) and biscuits near the edge. From those two marks I just line up the same numbers and fractional lines on those two marks and make a mark at the 0 on the ruler.
attachment.php


I found mine on an online hobby store but Amazon sells them by the pair:

https://www.amazon.com/dp/B0019N9ZLM/?tag=atomicindus08-20

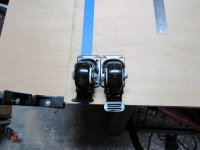
Two of the casters are locking (wheel and swivel lock) and I didn't want to rip my toe off walking by. The pedal sticks out when it's unlocked (and hopefully my toe swivels the wheel rather than tear itself off). When the caster is locked, the pedal is under the box. The rear casters don't lock but they are under the box regardless of their position.
attachment.php


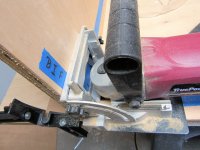
I had a momentary issue cutting the biscuit slots at the outside corners of the top and bottom pieces. The corner clamps are in the way so I moved them behind the piece on one side, cut the slot, re-installed the corner clamp and repeated on the other side.
attachment.php


Yes, I marked all the important sides on a piece of painter's tape. BIF is Bottom Inside Front and the R or L is hidden behind the biscuit joiner fence. I also used painter's tape to mark the plywood. Started out marking the plywood with a pencil but that started looking like a series of bar graphs. Fresh tape means fewer marks and less confusion.

Once all the biscuit slots are done, it was time to cut dados for the fixed shelf that fits over the Ice Maker. I marked both sides of the slot (20.25 inches from the bottom and a 23/32" slot.

Set up the Makita router and the Bora track, testing the depth of cut with the router jig. It was pretty intense and I didn't want to stop to take pictures so all I have to show is the finished dado on one side.

Before cutting the other side I wanted to make sure the shelf would be in the right place. Carried the side and the scrap up to the garage and tested it for fit. I believe this side is done.
attachment.php


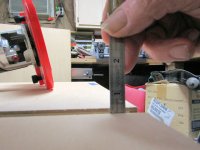
The dado isn't perfect. For some reason the dado is deeper at the end of the cut than the beginning. The first hint something was wrong was the additional ply removed on the right side of the dado.
attachment.php


I think it was something under the Makita baseplate so it dropped further into the template when it vibrated out. Here's the deep end and it looks like it's 3/8-inch deep.
attachment.php

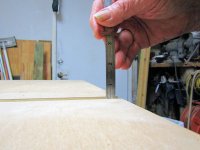
The other end of the dado is 1/4-inch deep. I will have to set up the track again and make sure everything is clean and clear and then make the entire dado 3/8-inch deep. Here's the other end of the dado.
attachment.php


Rather than push it, I quit for the day. Starting fresh may mean better results.
 

Attachments

  • Audio Cabinet 16.jpg
    Audio Cabinet 16.jpg
    79.7 KB · Views: 353
  • Audio Cabinet 14.jpg
    Audio Cabinet 14.jpg
    90.6 KB · Views: 357
  • Audio Cabinet 13.jpg
    Audio Cabinet 13.jpg
    68.8 KB · Views: 355
  • Audio Cabinet 12.jpg
    Audio Cabinet 12.jpg
    86.9 KB · Views: 359
  • Audio Cabinet 17.jpg
    Audio Cabinet 17.jpg
    81.4 KB · Views: 355
  • Audio Cabinet 18.jpg
    Audio Cabinet 18.jpg
    72.6 KB · Views: 354
  • Audio Cabinet 19.jpg
    Audio Cabinet 19.jpg
    66.1 KB · Views: 355

sawduststeve

Well-known member
Joined
Oct 7, 2016
Messages
2,139
Location
Havering-Atte-Bower,London/Essex boarders, England
Evening Bob,

Good work on the cabinet, biscuit jointers are ideal for this type of work, also when you have the router track in place why not made a couple of passes, it'll ensure your dado is correct every time, I think I would. :thumbup:
23/32nds, whats that in mill, you must have better eye sight than me, I doubt if I can see a 32nd any more.:lol:

Have a good week,
Steve :beer:
 

oldironfarmer

Well-known member
Joined
Jun 25, 2016
Messages
6,664
Location
Terlton, Oklahoma
I hope Amazon's loss doesn't sink them. They've been doing so good until now. Bessey clamps are great!

Fine progress on the cabinet. I have a biscuit jointer but never use it. I'm doing something wrong, the biscuits are loose in the slot so I make spline joints which are tight.
 

Craptain

Well-known member
Joined
Apr 18, 2013
Messages
4,032
Location
Tampa Bay FL
Fine progress on the cabinet. I have a biscuit jointer but never use it. I'm doing something wrong, the biscuits are loose in the slot so I make spline joints which are tight.

Maybe using the wrong size. I never had a problem. The biscuits are not tight when you test fit. But the glue swells them up.

Sent from my SM-G930T using Tapatalk
 
OP
B

Bob Heine

ALLIANCE MEMBER
Joined
Oct 24, 2009
Messages
10,709
Location
Boca Raton, Florida
Evening Bob,

Good work on the cabinet, biscuit jointers are ideal for this type of work, also when you have the router track in place why not made a couple of passes, it'll ensure your dado is correct every time, I think I would. :thumbup:
23/32nds, whats that in mill, you must have better eye sight than me, I doubt if I can see a 32nd any more.:lol:

Have a good week,
Steve :beer:
Hi Steve, thank you for stopping by and commenting.

This is my first biscuit joiner and my second project using it (scrap-wood box was first). I think you are right on the multiple passes with the router. Google tells me 23/32-inch is 0.71875-inches and 18.2562-mm. None of those numbers is simple (to me).

When my right eye cataract was bad enough for surgery, the eye doctor thought it would be good to let it get worse so my double-vision wouldn't be a distraction. I told him that after 50 years I was used to double vision but it would be helpful to have a reading lens so I could see fine print. Now I can read the fine print on those pill bottles (I scan them for skulls and cross-bones).
attachment.php

I hope Amazon's loss doesn't sink them. They've been doing so good until now. Bessey clamps are great!

Fine progress on the cabinet. I have a biscuit jointer but never use it. I'm doing something wrong, the biscuits are loose in the slot so I make spline joints which are tight.
Andy, I tried to make it up by buying some spices my local grocery store no longer stocks. For a moment I thought I was in Costco because Amazon's Choice was a 6-pack of 22-ounce bottles. I like the Badia Southern Blend Poultry Seasoning but 8.25 pounds of the stuff should be more than enough for all my children, grand children and great-grandchildren into the next century.

https://www.amazon.com/dp/B00F02VMTQ/?tag=atomicindus08-20

I think my Bessey clamps are from their "Economy" collection (pretty lightweight). I threw out the card they were zip-tied to so I don't know what the part number is but two for $10 was cheap.

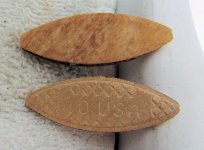
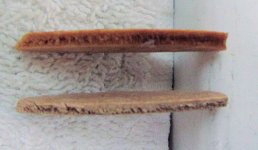
I agree with Andrew (vv) because my #20 biscuits are loose in the slots when dry but swell up when they get wet from glue (or water). The biscuit is apparently compressed in the manufacturing process. I put one in some hot water to speed the process. It swells up quite a bit.
attachment.php


attachment.php


Maybe using the wrong size. I never had a problem. The biscuits are not tight when you test fit. But the glue swells them up.

Sent from my SM-G930T using Tapatalk
Andrew, thanks for visiting and posting! Apparently it doesn't take a lot of moisture or time to swell them quite a bit. One of the #20 biscuits in the container was either not compressed completely or got a little wet because it wouldn't go in the slot without some help from a hammer.
 

Attachments

  • Pill Bottle.jpg
    Pill Bottle.jpg
    78 KB · Views: 258
  • Biscuit Front.jpg
    Biscuit Front.jpg
    81.4 KB · Views: 258
  • Biscuit Side.jpg
    Biscuit Side.jpg
    65.4 KB · Views: 257
OP
B

Bob Heine

ALLIANCE MEMBER
Joined
Oct 24, 2009
Messages
10,709
Location
Boca Raton, Florida
As a charter member of the Mangled Toe Club, I have been looking for "reasonably priced" steel toed shoes for years. Drives recent toelio post made it a little more urgent.

I have only recently joined the Over $100 Tools Club so shoes for my feet can't cost more than the price of a pair of Knipex pliers. I was shocked to find a pair of suede slip-on steel-toed shoes for $19.99. Even more shocked to find them in EE width (the older I get, the more my feet grow sideways). I have been wearing them for a few hours and they are more comfortable than I expected. They are slightly smaller than other shoes I have purchased in my size so I ordered a second pair 1/2-size larger for those swollen extremities days (forget to take water pill).

I may retire the $8 Basic Editions when a hole in their sole develops.
attachment.php


I found the steel-toed shoes here:

https://www.academy.com/shop/pdp/br...steel-toe-work-boots#repChildCatSku=023867856
 

Attachments

  • Shoes.jpg
    Shoes.jpg
    97.2 KB · Views: 417

jimreed2160

Well-known member
Joined
Aug 7, 2016
Messages
3,589
Location
Tallahassee FL
Bob, your shoe post made me giggle a bit. It is amazing how barking dogs (feet) will insist that you throw some money at the problem. A few months ago my feet and legs began hurting. For awhile I chalked it up to old age but then I remembered that the shoes I was wearing came from LOWES. They were on an endcap in the handtool section and were somewhere in the $25 range.

So I upgraded (substantially) to a stout pair of workboots and the dogs have been super quiet. Perhaps the home improvement store is not the first place to look for high quality footwear.
 

oldironfarmer

Well-known member
Joined
Jun 25, 2016
Messages
6,664
Location
Terlton, Oklahoma
I learned something today, about biscuits. I didn't give them a chance to swell.

So finish my lesson. I was making a table top when I tried using the biscuits the only time I tried. When I clamped the boards together I couldn't get them to align easily because the biscuits were loose. Had I left them clamped, would the biscuits have aligned the boards under pressure before the glue took a set?
 
To avoid these ads, REGISTER NOW!
Top Bottom