To avoid these ads, REGISTER NOW!

Body Work for a Noob

boom_bap

Well-known member
Joined
Feb 29, 2020
Messages
614
Location
Idaho
I need to do some body work and hoping I can get some tips an tricks from some of the veterans out there.

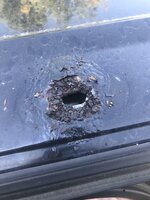
I noticed some bubbling paint under my roof rack. I pulled it off and took a chunk with it where the rivnut went through. Now I've got a small hole and surrounding rust. Given I want to this repair once and to it right, I guess I'll need to sand down the area and find where the rust ends? Cut out the rusty section, cut a piece of sheet and **** weld it in with tig. On the inside I'd need to remove the headliner and sand down the inside and hit it with some paint?

When cutting it out, what are the best/recommended tools to use to avoid damaging other paint and windows, cutoff wheel would spark, nibbler maybe, snips? Or is it better to lay blankets or paper all over the place?
 

Attachments

  • IMG_0545 2.jpg
    IMG_0545 2.jpg
    829 KB · Views: 178
  • IMG_0546 2.jpg
    IMG_0546 2.jpg
    513.1 KB · Views: 178
To avoid these ads, REGISTER NOW!
OP
B

boom_bap

Well-known member
Joined
Feb 29, 2020
Messages
614
Location
Idaho
O and the secondary hole underneath is factory for the bolt that holds the roof rack down likely. It is thick and likely much more structural than the sheet metal that is rusted. No rust on it, since its on the inside.
 

txvwnut

Well-known member
Joined
Jan 1, 2015
Messages
7,663
Location
Bedford, Texas
Die grinder with a cutoff disc is the weapon of choice for most. If sparks are going to be flying near the glass a welding blanket or heavy drop cloth should suffice.
 

K13

Well-known member
Joined
Oct 24, 2007
Messages
2,233
Location
St. Albert, AB Canada
Not to discourage but that is not a repair for a noob. The rust is going to be right up to the pinch weld at the door. You are going to need to be able to put those jogs in the panel or find a replacement roof to take a piece out of. It is also a large flat panel that you will warp like crazy when you weld it unless you are very skilled at sheet metal work and being that there is probably limited access to the back in that area it is going to be very difficult/impossible to metal finish and a spot you will be tightening something down on top of is not a spot you want to put a bunch of filler on.
 
Last edited:
OP
B

boom_bap

Well-known member
Joined
Feb 29, 2020
Messages
614
Location
Idaho
Warping is going to happen no way around it. I'd 100% use chill blocks I'm not going to let it rip. My plan is to spend way to much time on fit up and then if my fitup is good enough autogenously weld it so I can just go in with Bondo afterward. I'd have filler in hand to dap when needed. Noob as in noob on car body work. I can weld pretty well. Went to welding school for 3 years and did a bit of stainless welding projejcts for customers after that, but I appreciate the caution.

I guess I could get a quote, but I figure they'd just overcharge me as well even if I did the prep work they'd claim that it wasn't how they'd do it (which is likely true) and then they'd bill be for prep anyways..

I hear you on the sheet metal work, the good thing is that its all in the bends are in the same plane, so puttinng jogs in shouldn't be too crazy. Also the roof rack is going back on top so it doesn't need to look perfectly factory. I could go to the yard and cut out a piece too.
 
Last edited:

gorilla

Well-known member
Joined
Dec 13, 2007
Messages
1,656
I recommend two things to minimize distortion first make the patch round if possible square corners tend to buckle and TIG weld the patch in with silicon bronze rod. I've done this many times with good results/
 

BORING HOP YARD

Well-known member
Joined
Jan 13, 2007
Messages
1,105
Location
Boring Oregon
Greetings!
You might want to read through "welding patch panels" if you haven't yet. Lots of good information about warpage and heat affected zones. Robert from MP&C has a lot of knowledge that he shares.
 
OP
B

boom_bap

Well-known member
Joined
Feb 29, 2020
Messages
614
Location
Idaho
Wow thanks for that thread, lot of excellent information in there. Going to take me a minute to read it all !
 

kaymccampbell

Well-known member
Joined
Feb 27, 2015
Messages
29,622
Location
Upstate New York
To keep panels from warping too bad, I like really short skipped welds and the blow gun to cool the metal between welds. It takes me a bit longer, but I've welded some really ****** tin and got away with it.
 

NYBODYMAN

Well-known member
Joined
Sep 10, 2013
Messages
4,901
Location
NY
What type of vehicle is this? If you are able to get a piece from a donor roof/vehicle, I would panel bond it on. It will be structurally sound, water tight, and since it is covered by the roof rack, aesthetically it will look fine.
 
OP
B

boom_bap

Well-known member
Joined
Feb 29, 2020
Messages
614
Location
Idaho
03 suburban, plenty in the yard near me. Any more info on that. Pros vs cons of weldin vs panel bond?
 
To avoid these ads, REGISTER NOW!

durk_2007

Well-known member
Joined
May 31, 2019
Messages
58
Location
GB Kansas
Panel bond is simple if you can clamp it. It will be water tight and no warping. But if you are that good with tig go slow and cool it between spots would make a more "proper" repair. Be sure to self etch and undercoat the backside to prevent further rust.
 
OP
B

boom_bap

Well-known member
Joined
Feb 29, 2020
Messages
614
Location
Idaho
I'll report back in a few weeks time. Will be tackling this in my time off during the holidays. :ROFLMAO:
 
OP
B

boom_bap

Well-known member
Joined
Feb 29, 2020
Messages
614
Location
Idaho
Ok so reporting back in.

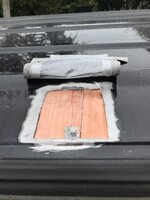
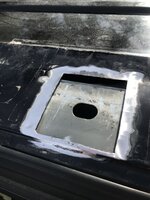
Cut out the rot. I left a little bit where the sheet bends upwards, but its mostly on the surface there. It was a bit pitted, so grinding it didn't do too much. I'll tackle that in 10 years if it gives me trouble.

Otherwise the repair went pretty smoothly.

As mentioned, cut out the bad bits. Then took about 1-2 hours getting a piece cut out and fitted into that gap. In hindsight should probably cut my patch first, and put it on top and cut around it, saving hours hah..

Next I lowered the headliner down, and was able to get some sheet copper between the structural member seen and the actual roof sheet metal. The root sheet is 18ga. The copper worked really well and I was also able to use it as my ground. The copper is a piece of copper tubing I just cut a piece off and cut it open and hammer it into flat sheets for backing to **** out a lot of heat.

Next I TIG welded in the patch, settings were 45 amps, .045 filler wire. I had .035 on hand but my test pieces using the 045 went really well so I didn't even test with 035.

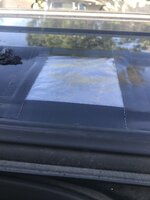
Overall pretty minimal warpage. A little bit on the top of the picture there, but not too bad, and a roof rack will be on top of it.

Next steps are going to be grinding down the weld where I added filler and wasn't autogenous.

I'm not sure if I should bondo it and get it smoothed out. I don't want to take too much of the surrounding paint off since its still good. Any advise there? Bondo or just go straight to paint?

Cheers!
 

Attachments

  • IMG_0769.jpg
    IMG_0769.jpg
    635.2 KB · Views: 77
  • IMG_0768.jpg
    IMG_0768.jpg
    541.3 KB · Views: 71
  • IMG_0750 2.jpg
    IMG_0750 2.jpg
    730.8 KB · Views: 74
OP
B

boom_bap

Well-known member
Joined
Feb 29, 2020
Messages
614
Location
Idaho
ALso no idea how I'll get paint on the backside of the patch panel. I may just have to blindly shoot in in there..
 

NYBODYMAN

Well-known member
Joined
Sep 10, 2013
Messages
4,901
Location
NY
Dress your welds, feather edge the paint, and apply a thin coat of fiberglass filler to "waterproof" the weld area. After sanding the fiberglass filler, then a layer of body filler and finish for paint. As for the back area, if you can't get to the back from under the headliner then get a can of cavity wax. Find a hole near the repair area on the inside under the headliner and spray the **** out of it.
 

BORING HOP YARD

Well-known member
Joined
Jan 13, 2007
Messages
1,105
Location
Boring Oregon
I have used these two products below in the past. Just like NYBODYMAN said a thin coat then use go to a regular body filler.
I find the fiberglass type sand easier. Make sure you shop around Amazon my not be the best place to shop for these.
The putty you are showing is old school, you simply apply and let cure, is a one-part filler lacquer based that cures when the lacquer evaporates, think mud puddle drying up.
Glazing compound is a thinner 2 part filler that is applied over body work to remove sand scratches and such. 2 part base and accelerator creating a chemical reaction/bond that cures faster.


gahrajmahal

Well-known member
Joined
Dec 12, 2008
Messages
2,545
Location
Cincinnati, Ohio
Wow, nice job for a noob! I’m unfamiliar with the two different type of body filler method mentioned, but don’t dismiss that it may be correct.

As far as paint, find a good auto body paint supply store in your area and follow their recommendations. Secondly, look up “Paint Society” on YouTube. You will find many many tutorials on priming, gun selection and painting methods.

Its a shame you didn’t get some weld through primer on your patch panel and the underlining surface, but since you didn’t, spray whatever you can possibly using a straw type spray can adapter. Eastwood has several versions of this.

Nice job! And thanks for finishing the story with a follow up.
 

man-a-fre

Well-known member
Joined
Nov 1, 2007
Messages
363
Location
Nebraska
I prefer metal to metall or allmetal applied over welds instead of fiberglass filler , the fiberglass filler always seems to mottle on me or shadow later on .
 
OP
B

boom_bap

Well-known member
Joined
Feb 29, 2020
Messages
614
Location
Idaho
I ended up shooting a bunch of rustoleum automative primer in the same gap I used to put the sheet copper backing in. I think it worked out pretty darn well actually. Plus it will be covered up by a head liner so I'll probably leave it at that.

On to the top finish work.
 
To avoid these ads, REGISTER NOW!
Top Bottom