To avoid these ads, REGISTER NOW!

Between 705 & 1200 SQ/FT 'Bout Time Garage Build

Workspaces between 705 and 1200 squarefeet.

vdub8

Active member
Joined
Oct 24, 2020
Messages
30
Location
SLC, UT
Hello Garage Journal members. I've been a member of the GJ forum for a few years now and tonight decided it was 'bout time I share what's happening in my world (as it relates to garages) and hopefully make some small contribution to the community which has been such a great resource to me in recent years.

I began my garage/shop journey roughly three years ago, well sort of. It has been a long time ambition to one day have a shop, detached from the house, which would allow me to tinker the way I like to tinker and be unobstructed by all the usual attached garage stuff (you all know what I mean). Then in 2018 I finally decided the property I was on (my first home of some 20 years) was not adequate and was not going to facilitate the garage I desired. And while I was perfectly comfortable where I was (apart from the desire shop), I wasn't getting any younger so I decided it was 'bout time I did something about it. So began the search for a new place which would allow me a bit more space to stretch my legs and accommodate the shop. The process was not easy as the local economy (Northern Utah) was bustling and real estate prices were soaring, with no end in sight. I overturned a lot of rocks for many months trying to find a place that would work. Finally, I found a suitable subdivision, roughly one mile from my then current home. The lot sizes were not ideal, but I could make it work and the opportunity ticked off many other non future shop criteria as well. Fast forward roughly a year and the house was built and I was finally moved in.

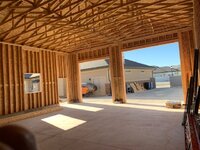
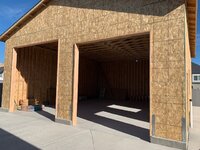
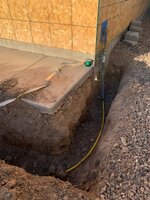
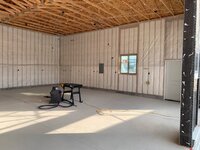
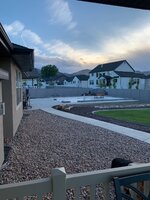
One of the first orders of business at the new place was an RV pad extending to the back of the house. I was fortunate enough to come across a concrete professional I really liked and while we were talking about the RV pad plans, I decide it was 'bout time I take action on the garage/shop. Behind the lot was empty field and easily accessible by the heavy equipment and trucks needed for footings and foundation, at least it was for a relatively short window of time. Future phases of the subdivision would place houses on my rear boarder before long and I knew chances were high I would regret not taking advantage of the opportunity to lay the foundation while access was easy. And so I pulled the trigger. A building permit later and many hours grading prepping the back lot and the concrete work began on the 31' wide X 35' deep detached garage/shop. That was the summer of 2019, almost three years ago. Little did I know what was around the corner...a pandemic, insane real estate market in Northern Utah, material supply issues, building supply costs through the roof, contractors with way more demand than they can handle, and the madness goes on.

Fast forward to two months ago when I approached the city about extending my building permit (again) and was met with a much less sympathetic response. The building department in essence told me one more extension and they may need to re-reveiw the permit. In a sense they were telling me it's bout time to get the project back on track. And so I will.

Thanks for letting me share the journey to date and stay tuned for more in the coming weeks/months.
 

Attachments

  • IMG_5105.jpg
    IMG_5105.jpg
    412.6 KB · Views: 408
To avoid these ads, REGISTER NOW!
OP
V

vdub8

Active member
Joined
Oct 24, 2020
Messages
30
Location
SLC, UT
Time to finalize the electrical service. There is a 100' run of 2" conduit already in place and current bids are for 100 amp electrical service to the garage with 12 or 20 circuit interior breaker panel (likely need 20 circuit based on list below). For this distance will #2 URD (2-2-2 AL) with #8 THHN ground wire be sufficient feeder cable?

Capacity planning:
(2) 220 outlets 30A - 4 post lift and expansion for compressor.
(1) 220 outlet 50A - welder and plasma cutter
(2) 120 20A outlet circuits
(2) interior light circuits
(1) exterior light circuit
(1) 20A circuit for garage door openers
(1) 20A circuit for 65,000BTU propane heater (ceiling mount)
(1) 20A circuit for ceiling fan

The compressor is currently installed in the house attached garage. The larger 3" conduit (see photo) runs to the back of the attached garage near the compressor, so my thought is to run air line through that conduit. That keeps the compressor out of the main shop.

What am I missing?
 

Attachments

  • IMG_5114.jpg
    IMG_5114.jpg
    361 KB · Views: 253
  • IMG_5115.jpg
    IMG_5115.jpg
    318.8 KB · Views: 203
  • Garage layout (1).pdf
    235.8 KB · Views: 37

jbrentd

Well-known member
Joined
Jul 8, 2015
Messages
1,039
Location
Northeast Oklahoma
Thanks for sharing your build. Looking forward to seeing it progress. In my area, for a garage, code only allows 2 outlets per circuit. Not sure what it is for your area, but 2 circuits may not be enough.
 

spokanegarage

Member
Joined
Apr 29, 2022
Messages
7
This is outstanding! Congrats on getting your project started. Looking forward to following along with your build.
 

dmittz

Well-known member
Joined
Dec 2, 2016
Messages
1,298
I look forward to seeing your progess on it, thanks for sharing!
 

adespain

Member
Joined
Feb 22, 2018
Messages
6
Very nice. It's definitely a struggle getting out there getting things built right now. It looks like you are over on the west side of the valley? I used to live in South Salt Lake.
 
OP
V

vdub8

Active member
Joined
Oct 24, 2020
Messages
30
Location
SLC, UT
adespain - yes, southwest side of Salt Lake Valley. Don't know how long you have been away, but growth/development in this area has been insane for quite a few years.

Should be an active weekend on the project. Framer is scheduled to get started tomorrow morning. Lumber and trusses are on site. Looking forward to this finally taking shape.
 

Attachments

  • IMG_5194.jpg
    IMG_5194.jpg
    483 KB · Views: 133
  • IMG_5195.jpg
    IMG_5195.jpg
    257.8 KB · Views: 172

ScottW

Well-known member
Joined
Mar 9, 2021
Messages
109
Location
WA State
I like the layout of the shop on your property, it looks like it will really break up the “everyone looks in everyone else’s backyard” nature of that development. How close are you allowed to build to the property lines? Your electrical is pretty similar to mine. In my most likely to be heavily used outlets, where I think my workbenches will be, I had the electrician put in quad 110V outlets split between different circuits so they would be harder to overload. Look forward to seeing your progress.
 
OP
V

vdub8

Active member
Joined
Oct 24, 2020
Messages
30
Location
SLC, UT
Framing is coming along. Sheeting the roof and soffit framing is all that remains on this portion of the project. I expected they would be framing 16' on center, but turns out they used 12" on center. This will make electrical a little more challenging and insulation plans may need to be modified.
 

Attachments

  • IMG_5199.jpg
    IMG_5199.jpg
    299.6 KB · Views: 171

Clemson13

Well-known member
Joined
May 30, 2015
Messages
425
Framing is coming along. Sheeting the roof and soffit framing is all that remains on this portion of the project. I expected they would be framing 16' on center, but turns out they used 12" on center. This will make electrical a little more challenging and insulation plans may need to be modified.
Pretty sure I would rather have 12OC in a shop though, so you win!
 

adespain

Member
Joined
Feb 22, 2018
Messages
6
Excellent progress. The excessive framing seems odd, but it's only a few extra bucks in wood and fasteners. Installing batt insulation is going to be a royal pain, unless you are doing blown-in or spray foam. At least mounting things to the walls should be easy once everything is done.
Also, it looked like the copper pit in the background. I framed a house in Herriman 15ish years ago and there was a lot more open field than there is now.
 
OP
V

vdub8

Active member
Joined
Oct 24, 2020
Messages
30
Location
SLC, UT
I've wondered if 24" batting spilt lengthways in half would work, but still the the thought of cutting over 600 linear feet (over 1,200 if worse case) of batting is painful enough that I'm looking into bids for blown in. I'm sure there will be a premium, but might be worth it to avoid the batting modification. More progress on the shop this week as the asphalt roof is now up. Will take photos this weekend and post. Electrical is scheduled for mid August which will seem like an eternity. The electrician did not offer much hope of fitting me in before then. I'm not known for being patient:whistle:.
 
OP
V

vdub8

Active member
Joined
Oct 24, 2020
Messages
30
Location
SLC, UT
Took a few photos this morning.

Todays project is to install insulation baffles. The framer installed blocking between each truss, which is a good thing, but did almost entirely close the gap between trusses all the way up to the roof sheet. So, my plan is to drill 1 1/2" holes through the blocking to allow for air flow. Followed by stapling the insulation baffles up. The framer wants to come out next week and simply knock out every fourth block for ventilation purposes, but I'm not sure I like the idea of three closed truss channels in a row. My OCD must be flaring up.
 

Attachments

  • IMG_5206.jpg
    IMG_5206.jpg
    54.9 KB · Views: 138
  • IMG_5205.jpg
    IMG_5205.jpg
    110.1 KB · Views: 124
  • IMG_5204.jpg
    IMG_5204.jpg
    78.7 KB · Views: 122
  • IMG_5203.jpg
    IMG_5203.jpg
    105.6 KB · Views: 120

ScottW

Well-known member
Joined
Mar 9, 2021
Messages
109
Location
WA State
It looks so good! I’m with you on boring the ventilation holes evenly distributed, around here they use bird blocking which is like what you are describing but with screen over the holes.
 

Attachments

  • DF9954FC-2FBF-4D4E-AED2-A2E0388BDDDA.jpeg
    DF9954FC-2FBF-4D4E-AED2-A2E0388BDDDA.jpeg
    38.2 KB · Views: 128
OP
V

vdub8

Active member
Joined
Oct 24, 2020
Messages
30
Location
SLC, UT
Scott- Thanks for feedback and photo. That's exactly what I had in mind. The screen is a great idea for keeping out insects although I was not planning to seal all cracks and crevices in those eves anyway.
 
OP
V

vdub8

Active member
Joined
Oct 24, 2020
Messages
30
Location
SLC, UT
While it feels like this project is slow going, I did cross a milestone off the list with a successful 4-way inspection this past Friday. Inspector was great and had only one finding, cross bracing of trusses per plan which my framer missed. It's an easy fix while the ceiling is still open. Everything else, including rough electrical and gas line passed with no issues. I'm cleared to finish exterior and insulate walls.

I waffled on whether to spend time and money up front to run the LP gas line from the meter out to the shop rather than continue down the path of dual 120lbs propane tanks. When I discovered outright purchase of these tanks would be half the cost of the gas line install and read a few blogs about how difficult local LP providers are to deal with (one headache I don't need), my mind was made up. Here are a couple of pics of the 3/4" PEX line in the trench.

This morning, before it got too hot, I covered the line with a few inches of crushed rock.
 

Attachments

  • IMG_5258.jpg
    IMG_5258.jpg
    104.6 KB · Views: 94
  • IMG_5259.jpg
    IMG_5259.jpg
    94.7 KB · Views: 91
  • IMG_5260.jpg
    IMG_5260.jpg
    115.6 KB · Views: 88
  • IMG_5262.jpg
    IMG_5262.jpg
    106.2 KB · Views: 103

Jon69RagTop

Well-known member
Joined
Jan 23, 2014
Messages
56
Looking good. What size is this garage, not seeing the dimensions anywhere.
also, on single garage doors like this, when they get taller like your doing, do the also get a little wider? I’m in the infancy of planning my garage build, so that’s what’s leading to my questions.
Thank you
 
To avoid these ads, REGISTER NOW!
OP
V

vdub8

Active member
Joined
Oct 24, 2020
Messages
30
Location
SLC, UT
Garage is 31' wide 35' deep. The front of the garage will have two doors. I opted for a 12' X 12' door on one side and 11' (tall) x 10' (wide) on the side closest the house. To answer your question, I'm not sure what if any limitations there are on garage door dimensions, but I would assume much of the door size/layout is determined by intended use, overall garage layout, owner preference and budget. In my case, the main access to the building is on the front side (not a drive through), so I wanted plenty of garage door access on front of building, including for a mid size RV if need be (thus the 12' door). I do have plans for a lift (likely two post) in the bay closer to the house, which is also where the main work surface will be. That said, I did not see any reason to have the door closer to the house be as large as the 12' door. It's possible I might regret that decision down the road, we'll see.
 

hardtop5000

Well-known member
Joined
Apr 26, 2021
Messages
98
Location
Ngunnawal country
I waffled on whether to spend time and money up front to run the LP gas line from the meter out to the shop rather than continue down the path of dual 120lbs propane tanks. When I discovered outright purchase of these tanks would be half the cost of the gas line install and read a few blogs about how difficult local LP providers are to deal with (one headache I don't need), my mind was made up.
Bottled gas is good, mains gas is 10 times better. The gas plumbing will be another asset for what looks like a first-class facility.
 
OP
V

vdub8

Active member
Joined
Oct 24, 2020
Messages
30
Location
SLC, UT
Thanks for the positive reinforcement, Justin. Makes me feel better about spending the extra $$$ to go with LP gas.

Should be surrounded in scaffolding by end of week for exterior finishing (fingers crossed). The stucco contractor reiterated today that concrete is still a scare resource in these parts and warned not to be surprised if it takes a few extra days to get the exterior siding completed.
 

loganb

ALLIANCE MEMBER
Joined
Dec 29, 2011
Messages
5,524
Location
Omaha, NE
Just joining in on this one, looks like a great and well thought out build...great work! Another vote in ya did the right thing on trenching the gas line. LP is a solution when other fuel sources aren't viable... but when you have nat gas available it's an easy choice for me.
 
OP
V

vdub8

Active member
Joined
Oct 24, 2020
Messages
30
Location
SLC, UT
Got a call from my HVAC contractor tonight who wanted to check in to see how things were going (he's a good dude) and as we're talking about schedule lineup, he mentions it would a good idea to have sheetrock hung on the walls before the finish coat of stucco. This is to reduce the amount of stucco cracks resulting from wall vibration during sheetrock installation (process of attaching sheetrock to studs whether nail or screw method would generate a fair amount of vibration). He suggested having sheetrock hung between brown coat and final stucco. Anyone have thoughts or suggestions on this? I've reached out to the sheet rock contractor to inquire about the order of events, but given we are now into the weekend, I'm not sure I'll get a response before Monday.

Oh and the scaffolding is up. Paper and wire install Monday or Tuesday. Wall insulation on Friday next week. Transformation continues...
 
OP
V

vdub8

Active member
Joined
Oct 24, 2020
Messages
30
Location
SLC, UT
Prewire for PoE cameras completed today. A friend who is in the automation industry once told me why run one CAT6 when you can run two. Ever since all my low voltage CAT6 wiring has included two different colors to every source. One box is for external camera(s) and the other will be internal camera. Have not decided on the junction/coms box yet, so Just coiled the wire and noted location.
 

Attachments

  • IMG_5270.jpg
    IMG_5270.jpg
    172.7 KB · Views: 64
  • IMG_5271.jpg
    IMG_5271.jpg
    161.8 KB · Views: 63
  • IMG_5272.jpg
    IMG_5272.jpg
    178.5 KB · Views: 91
OP
V

vdub8

Active member
Joined
Oct 24, 2020
Messages
30
Location
SLC, UT
Progress this week on both interior and exterior. Paper and lath installed around the building and stucco and masonry barrier inspection passed. Brown coat should be going on this coming week. On the interior, insulation guys came out yesterday and blew the insulation in the walls and installed vapor barrier. Funny thing, the insulation crew took one look at the garage and said "this will be easy." I wanted to say, is there a discount for that, but I didn't. Inspector scheduled for Monday to give insulation and those truss cross braces, mentioned in post #16, a look before sheetrock goes up.
 

Attachments

  • IMG_5325.jpg
    IMG_5325.jpg
    92.4 KB · Views: 85
  • IMG_5328.jpg
    IMG_5328.jpg
    131.8 KB · Views: 111
OP
V

vdub8

Active member
Joined
Oct 24, 2020
Messages
30
Location
SLC, UT
When the framing started back in July, I set a goal to have the shop fully closed up and insulated by Thanksgiving. Happy to report not only was it sealed and insulated, but the heat was on. The next objective is to be moving into the shop before year end. With heat on, I've been able to get roughly 125' of trim board painted. This weekend's project is installing trim around man door and beginning prep for floor coating. Speaking of floor coating, I placed an order for the Nohr S Polyurea system from Legacy Industrial coatings, taking advantage of their cyber Monday sale. Unfortunately, I may have jumped the gun on this as I've just learned from Legacy Industrial support that the penetrating sealer applied to the concrete a couple of years ago, may be a show stopper. Will grind a test patch and water test this weekend to determine if the Polyurea coating is off the table. If anyone reading has experience with epoxy or polyurea coating over substrate previously treated with a penetrating sealer, please share.
 

Attachments

  • IMG_5414.jpg
    IMG_5414.jpg
    95.2 KB · Views: 80
  • IMG_5413.jpg
    IMG_5413.jpg
    37.3 KB · Views: 86
OP
V

vdub8

Active member
Joined
Oct 24, 2020
Messages
30
Location
SLC, UT
It's move in weekend, well sort of. Picked up shelving from Costco (their version of "industrial" rack/shelves was on sale for $199 ea) and moved a few big items. My plan is to get trim installed around the man do and base of the sheetrock and finish the ceiling fan install. Storage racks will follow.

Update on the garage floor coating...before the Holidays, I had a concrete flooring contractor out to inspect the floor and discuss my options. I thought the polyurea system purchased from Legacy Industrial would be off the table. After water testing and evaluating the concrete, his assessment was not concerned with adhesion as long as a grinder was used to prep the concrete and create the proper profile for the epoxy. So, rather than do the prep work and apply the coating myself, we worked out a reasonable price on having him install the Nohr S kit. The arrangement included me prepping the expansion joints and have the floor ready for the grinder.

Prepping the joints proved more time consuming that I thought it would be. Roughly two years ago I had caulked those joints with small backer insulation and Sika self leveling concrete caulk. As such, the first order of business was to remove all the caulk. That took some time and more razor blades than I care to count. Initially I took a grinder with a concrete cutting wheel and attempted to cut through the caulk. This worked, but made a mess and sent enough shredded caulk into my grinder that before long it was smoking something fierce (which just created a new repair project). In the end plunge cutting both sides of the saw cut with a box knife proved the best option. Fortunately, when I pulled the caulk out, the backer rod stayed put. This allowed me to fill the saw cut joints with sand easier, and I used a lot less sand than I otherwise would have. Even with the backer rod, I had 3/4"-1" deep void filled with sand. Once the cracks were filled with play sand, my Dad and I mixed the epoxy and poured it over the sand allowing it to soak in. The epoxy used was the XtremeSet-100 joint and crack filler also from Legacy Industrial. The epoxy working time was so short (it sets up fast - 5-7 mins), that I was worried the epoxy would not soak into the sand and bond. So, I resorted to mixing half the recommended amount at a time. This means I mixed twice the number of batches, but had less issue with epoxy thickening and not penetrating the joints.
 

Attachments

  • IMG_5496.jpg
    IMG_5496.jpg
    41.3 KB · Views: 50
  • IMG_5499.jpg
    IMG_5499.jpg
    26.6 KB · Views: 61
OP
V

vdub8

Active member
Joined
Oct 24, 2020
Messages
30
Location
SLC, UT
Photos of clear primer coat and clear final polyurea coating. No flakes used. We did use fine silica for texture in the top coat of polyurea, which provides plenty of grip when wet, but not so coarse that it feels like 50 grit sandpaper.
 

Attachments

  • IMG_5505.jpg
    IMG_5505.jpg
    32.6 KB · Views: 63
  • IMG_5506.jpg
    IMG_5506.jpg
    87.5 KB · Views: 67
  • IMG_5507.jpg
    IMG_5507.jpg
    118 KB · Views: 91

ScottW

Well-known member
Joined
Mar 9, 2021
Messages
109
Location
WA State
Wow, really like the look of your clear finish! It looks like a lot of the aggregate is showing through, was that a result of the prep grinding? I like it.

I’ve been looking into having a local company apply polyurea, they moisture tested my two virgin untreated floors when doing the estimate. They said one of the two is borderline too damp internally to apply without some sort of a sealer, so I was trying to understand how you were told a sealer was bad. Maybe they have a poly-friendly sealer they would use, I don’t know. All I got was it may be required for warranty and it would cost an extra $1K to do the one floor if the moisture levels haven’t gotten better by then.
 
Last edited:
OP
V

vdub8

Active member
Joined
Oct 24, 2020
Messages
30
Location
SLC, UT
Scott, Thanks. The exposed aggregate look is a result of the grinding process. In hind sight, I should have asked them to go one or two more passes with the grinder to make it even more uniform. Still I'm happy with the way it turned out. What I didn't expect is that it would darken in color as much as it did. While still opaque, it's quite a bit darker than the natural concrete color.

That is interesting the local contractor suggested pretreatment with a sealer. Perhaps they do make a sealer that is universally friendly to non-permeable coatings (epoxies or polyuria). I don't know enough about them to say one way or another. Frankly, I'm not sure if the sealer I applied years ago is in the friendly category or not. I reached out to the manufacture of that sealer, WR Meadows, and one of their chemists simply said they have not tested non-permeable epoxy coatings applied on concrete previously treated with the penetrating sealer product I used. I took that to mean, we are washing our hands of this question, you're on your own.

My brother runs a company that manufactures polyurea product for containment projects (oil, gas, water, etc.) and his read was, no one will want to guarantee anything. He rightly predicted what all parties would tell me, "not tested", "not advisable", "at your own risk", "good luck", etc. No one wants any type of liability for what works or does not work. I'm not blaming any of them, I get it. At the end of the day it was a risk I took after consulting with my local concrete guy. He was fairly confident he could get below any remaining sealer (in the grinding process) and get the right profile to make the epoxy/polyurea to adhere (so a calculated risk). That said, even he made it a point to say "I will not warrantee the floor because I have no experience with the Nohr-S product." I could have used one of the epoxy coatings he uses, a local company, and he would warrantee the floor, but not products he does not have experience with. Again, he was limiting his liability. And while there are positive indications that it did work, only time will tell if it holds up. And if it doesn't, I basically have no recourse for warranty work. Hopefully, it doesn't come to that.

Regarding the moisture testing, my concrete guy also mentioned it's best to do this as well. However, given the location of my garage, surrounding grade and other circumstances he felt it would be unlikely that moisture from below would be an issue...another calculated risk.
 
OP
V

vdub8

Active member
Joined
Oct 24, 2020
Messages
30
Location
SLC, UT
Paint work completed today, with exception of the the man door which will be a Spring paint project. Foundation wall has been painted and finished the trim work today.
 

Attachments

  • IMG_5522.jpg
    IMG_5522.jpg
    426.2 KB · Views: 50
  • IMG_5523.jpg
    IMG_5523.jpg
    464.4 KB · Views: 49
OP
V

vdub8

Active member
Joined
Oct 24, 2020
Messages
30
Location
SLC, UT
Upper cabinets ordered on Black Friday finally came in this week. Installed two of the cabinets today. Still need to adjust the doors a bit, but at least they're hung any ready for storage. The other cabinets will have to wait until the workbench is built.
 

Attachments

  • IMG_5533.jpg
    IMG_5533.jpg
    340.3 KB · Views: 48
OP
V

vdub8

Active member
Joined
Oct 24, 2020
Messages
30
Location
SLC, UT
New resting place for the four post lift. My father and brother came by this afternoon and helped relocate the lift from the attached garage to the shop. Guaranteed to see more traffic in its new home. Should have done this 6 months ago.
 

Attachments

  • IMG_5960.jpg
    IMG_5960.jpg
    940.2 KB · Views: 20
  • IMG_5962.jpg
    IMG_5962.jpg
    452.5 KB · Views: 23
To avoid these ads, REGISTER NOW!
Top Bottom