To avoid these ads, REGISTER NOW!

BP&B Hobby Shop

OP
H

HD FLHX

Well-known member
Joined
Jul 10, 2011
Messages
1,100
Location
Central Iowa
Joe,

Thanks for taking the time to share your projects with us. Your attention to detail is obvious and by sharing those details, we can all hopefully learn something. It appears you do most of your work in the main part of the shop as opposed to the dedicated paint booth. Can you explain why? I would think the booth is an ideal way to contain the dust, overspray, etc. I would love to have a similar setup someday and I am trying to understand your process. Thanks again for taking the time to photograph and comment on your work.

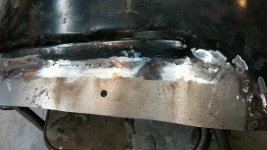
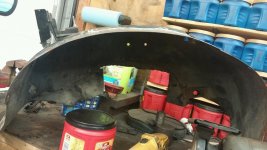
I'll prime parts in both areas, just kinda depends on what it is. The cab for instance while on the frame is just easier to do where its at rather than move it into the paint room. The main reason most everything has been primed on the shop side lately is because the paint room is being used for parts storage at the moment.


Its just not worth the effort to move everything out just to etch prime a few parts. I just open up the small door and turn the exhaust fan on to get the overspray out of the shop side.

As for doing bodywork in there, thats a bad idea. You'll never get it clean enough again when it comes time to do paint work.
 
Last edited:
To avoid these ads, REGISTER NOW!
OP
H

HD FLHX

Well-known member
Joined
Jul 10, 2011
Messages
1,100
Location
Central Iowa
A productive weekend on the F100. Worked on getting the bodywork done on the drivers door and it into primer. When a door is bare steel small imperfections can be easily overlooked. I go over the panel with 80 grit on a block. Any low areas will remain a darker shade so they are easier to spot. One I missed on this door was by the door handle shown in the pic below.


On a dent like that I use a stud gun.


As you can see it does a nice job pulling the ding out. Cut the stud off, grind it smooth and only a small amount of filler will be needed.


This door had some minor pitting on the upper sections left from the surface rust so I skim coated the entire door with a 3M flowable finishing glaze after the bodywork was done on the lower section


Sanded and finished out to 150 grit. Ready for primer


Onto the left fender next.


Signs of an old repair on the front corner by the headlight


Since it has came up in the past about how I chemical strip a panel I took some pics of the process I use. Like I've said before I use AirCraft paint remover from Klean Strip and apply it with a 2" brush


This particular fender took two applications to get the majority of the paint removed. Once the paint is removed I wash it with dish soap and scrub it down with a red scotch brite pad.


Thoroughly rise with water


It maybe overkill, but before I do any filler work on the panel I will scrub it again with lacquer thinner and a scotch brite pad just to make sure no residue is left before I start the bodywork.


A good reason to always strip panels to bare is to find all the old hidden repairs. The repair on the front is a pretty old repair. You can tell by the holes left from the slide hammer and the red stuff is 3M spot putty. Pretty common from 70s/80's repairs.

What was left after the filler was removed :wtf:


An attempt at rust repair on the rear of the fender. At least they used galvanized metal to hold the filler in place. Patch panels are available for this area so I placed an order for a pair tonight from LMC


Last edited:

C_F

ALLIANCE MEMBER
Joined
Jan 21, 2005
Messages
9,675
Location
Utah...SNOW BLOWS!
I can see that when I used paint stripper (I think it was even that brand), I didn't slather it on nearly thick enough. Yours came off much easier than mine did.
Are you going to end up sand blasting the back side of the fender?

I need to get a stud gun, those look like they work slick!:thumbup:
 
OP
H

HD FLHX

Well-known member
Joined
Jul 10, 2011
Messages
1,100
Location
Central Iowa
57-60 Ford trucks are notorious for the inner fender braces rotting out. Nobody repops any so the only way to fix it is make your own. I just finished one for the left fender. It is made out of 18ga.


Used my shrinker/stretcher with shrinking dies to make the curve to fit the fender shape


I didn't get any pics of the next part & I wish I would have. To form the lower curved section I made a wood buck and hammer formed it.


After the lower section was formed I went back to the S/S with stretching dies this time and stretched the bottom so it would fit flat against the bottom of the fender. Then made a 90* bend on the very bottom to cap the end.


Welded in. The side won't be welded until the outer patch is installed


Added a 3/8ths bolt for the lower fender mount and put it on for a test fit


Last edited:

C_F

ALLIANCE MEMBER
Joined
Jan 21, 2005
Messages
9,675
Location
Utah...SNOW BLOWS!
I love the work on the brace! I wondered how that lower, narrower part was going to work out...you made it look almost effortless.
 

Wanna Ride

Well-known member
Joined
Jul 28, 2010
Messages
2,790
As always, awesome work. I love following these threads. You my have already said, and I missed it... what color are you going with?

Do you think you'll have it together in time for Good Guys?
 
OP
H

HD FLHX

Well-known member
Joined
Jul 10, 2011
Messages
1,100
Location
Central Iowa
As always, awesome work. I love following these threads. You my have already said, and I missed it... what color are you going with?

Do you think you'll have it together in time for Good Guys?

I haven't nailed down an exact color, but I'm leaning toward an era correct solid green with a charcoal grey roof and grill. A few green trucks I've saved for some inspiration

This one has the roof two toned the way I'm planing on


KC's F100 from Gas Monkey


I'm going back & forth between a lighter green like the top truck and the green on KC's f100. I doubt it'll make Goodguys this year. I would need to be pretty close to being ready for paint by now to have any chance of it being done by the 4th weekend.
 
OP
H

HD FLHX

Well-known member
Joined
Jul 10, 2011
Messages
1,100
Location
Central Iowa
I done some repair work on the front of the fender while I was waiting on the lower patch panel to show up. The backside is inaccessible in that area due to the headlight bucket, which meant I had to use my stud gun to pull out the dent.


Unfortunately the metal was too thin and stressed at the front from the damage and cracked along the edge as I was pulling it out.


This left me with a couple options, weld it up and fiberglass it, cut out a section and replace it with a new piece or weld the crack and holes from the dent puller up then lead it. I chose to lead it.


I feel it was the best option in this situation for a long lasting permanent repair. The lower patch panels also showed up from LMC today so I'll have something to do this weekend. :thumbup:


Wanna Ride

Well-known member
Joined
Jul 28, 2010
Messages
2,790
And then he whips out the lead and goes at it like an old-school pro. Impressed yet again. Nice work sir.

I was really hoping you were going to stay true and go two-tone... using a grey or silver... even better. C'mon, we're waiting for more pics!
 

66 NAILHEAD

Member
Joined
Sep 16, 2014
Messages
13
Nice job with the lead. That's one thing I have never tried. Always wanted to. That's looks as good as the lead king bill Heinz. I love those greens too. Kc's ford is such a awesome truck.


Sent from my iPhone using Tapatalk
 

1969

Well-known member
Joined
Jan 8, 2010
Messages
1,412
Location
East Coast
Back in the 60's my boss had a Ford pickup that he was building and that was the only time I ever saw anyone work with lead. If I remember correctly, the bodyman used a product called tallow he would put on the wood paddle before smoothing out the lead. I think I am remembering this correctly........... has been a long time ago!
 

TimeWarpF100

Well-known member
Joined
Aug 21, 2010
Messages
6,784
Location
not here
I haven't nailed down an exact color, but I'm leaning toward an era correct solid green with a charcoal grey roof and grill. A few green trucks I've saved for some inspiration

This one has the roof two toned the way I'm planing on


KC's F100 from Gas Monkey


I'm going back & forth between a lighter green like the top truck and the green on KC's f100. I doubt it'll make Goodguys this year. I would need to be pretty close to being ready for paint by now to have any chance of it being done by the 4th weekend.

The Mercury looks great with the Green and White Trim.
 

TimeWarpF100

Well-known member
Joined
Aug 21, 2010
Messages
6,784
Location
not here
I done some repair work on the front of the fender while I was waiting on the lower patch panel to show up. The backside is inaccessible in that area due to the headlight bucket, which meant I had to use my stud gun to pull out the dent.


Unfortunately the metal was too thin and stressed at the front from the damage and cracked along the edge as I was pulling it out.


This left me with a couple options, weld it up and fiberglass it, cut out a section and replace it with a new piece or weld the crack and holes from the dent puller up then lead it. I chose to lead it.


I feel it was the best option in this situation for a long lasting permanent repair. The lower patch panels also showed up from LMC today so I'll have something to do this weekend. :thumbup:


Pretty much the same way I would do it. In the 30+ years of messing with lead I may be brain dead but never had a lead type failure, (body work failure where lead was used) Some of those jobs approaching 30yrs with no issues.

Back in the 60's my boss had a Ford pickup that he was building and that was the only time I ever saw anyone work with lead. If I remember correctly, the bodyman used a product called tallow he would put on the wood paddle before smoothing out the lead. I think I am remembering this correctly........... has been a long time ago!

Basically wax which is in tin next to torch with paddle in it.keeps lead from sticking to paddle
 

wasfast

Well-known member
Joined
Apr 10, 2014
Messages
874
Location
San Diego CA
The first truck/color of light green and white is totally great. The color is good but the look of the truck is really awesome. The only potential issue is how the color will be perceived in 10 years.
 
OP
H

HD FLHX

Well-known member
Joined
Jul 10, 2011
Messages
1,100
Location
Central Iowa
I worked on finishing the rust repair on the left fender today. I tried to make an effort to take pics throughout the entire process. I was somewhat successful for about a half of the day :dunno:

As I had mentioned earlier I bought lower fender patch panels from LMC. They weren't the cheapest source for these panels, but they are the closest being that they are out of Kansas. I started out by cutting out the rusted out area from the fender to use as a pattern.


On repairs like this I like to use layout die so I can get a more accurate cut line. Once scribed I cut it a little short and then use a grinder to work my way up to the scribe line.


Once I'm happy with the fit I'll clean off the die and prep the part to be welded. This included priming the backside of the inner brace and patch panel with etch primer.


I'll tack it in a few spots then reinstall it and check its fit.


After the welding is done I'll start to finish off the weld with a cutoff tool with a thick blade. When I get the top knocked off the weld I'll switch to a die grinder with a 2" 36 grit disc. then move onto a 50 grit all while working the weld flat with a hammer and dolly. I didn't get many pics after this point till it was done.


Another area that had to be repaired


The repair done looking at it from the top side


Metalwork done and ready to start the bodywork on it tomorrow

 
Last edited:
To avoid these ads, REGISTER NOW!

Bears Fan

Well-known member
Joined
Jan 26, 2012
Messages
3,438
Location
Indiana
Not only is the Ford just an awesome project! but so to is this thread! what great details you go into when showing the progress of the body work, this should be a great tutorial for anyone to follow when doing some of their own body work. I really enjoy this this thread and just putting in my vote for the color, I vote for this one :)


FB_IMG_1452883507903_zpsxkj0qdqn.jpg
 
Last edited:

xtremek

Well-known member
Joined
Apr 13, 2012
Messages
11,603
Location
St. Johns, Mi
Looks sweet. I'm totally jealous of your talent. I'm patching the inner fender on my daughter's and I spot welded (played connect the dots until I had a continuous weld) a patch in. The problem is I can't tell where its' off and which direction to go. If I post pics, do you think you can help, or this something that has to be a hands on thing?
 

C_F

ALLIANCE MEMBER
Joined
Jan 21, 2005
Messages
9,675
Location
Utah...SNOW BLOWS!
I am jealous too! :lol:
Excellent progress, thanks so much for taking the time to post all these detailed pics and information.
 

TimeWarpF100

Well-known member
Joined
Aug 21, 2010
Messages
6,784
Location
not here
I haven't nailed down an exact color, but I'm leaning toward an era correct solid green with a charcoal grey roof and grill. A few green trucks I've saved for some inspiration

This one has the roof two toned the way I'm planing on


KC's F100 from Gas Monkey


I'm going back & forth between a lighter green like the top truck and the green on KC's f100. I doubt it'll make Goodguys this year. I would need to be pretty close to being ready for paint by now to have any chance of it being done by the 4th weekend.

Here is a darker green with wimbledon white that looks pretty neat.

I like the stock look but a power plant upgrade. 5.0 Coyote. Even the interior is pretty stock looking.

B689AA55-B8B9-4D92-AD0B-A837E09E0923.jpg

1C51DBDF-2025-4E1A-AAEE-4A940BEE989E.jpg

9D004B0B-3993-49E9-9594-63753515585C.jpg

04D86CDB-C0DC-4566-ABAB-5DB221F869E1.jpg
 
OP
H

HD FLHX

Well-known member
Joined
Jul 10, 2011
Messages
1,100
Location
Central Iowa
Here is a darker green with wimbledon white that looks pretty neat.

I like the stock look but a power plant upgrade. 5.0 Coyote. Even the interior is pretty stock looking.

B689AA55-B8B9-4D92-AD0B-A837E09E0923.jpg

1C51DBDF-2025-4E1A-AAEE-4A940BEE989E.jpg

9D004B0B-3993-49E9-9594-63753515585C.jpg

04D86CDB-C0DC-4566-ABAB-5DB221F869E1.jpg


I actually saved a pic from a Model A with a green close to that.
Its a color I like. I was planning on using the charcoal grey that's in the wheels as the two tone which I think would go better with a lighter green. IDK I'm still up in the air...I usually don't decided till its darn near time to put it in a gun.

On side side note that is one nice F1. I always loved the 51/52 grills. I'm impressed they squeezed a coyote in there and kept stock looking. Unassuming trucks are just to cool. I think I would have went with a different color choice on the seat & door trim though.
 

TimeWarpF100

Well-known member
Joined
Aug 21, 2010
Messages
6,784
Location
not here


I actually saved a pic from a Model A with a green close to that.
Its a color I like. I was planning on using the charcoal grey that's in the wheels as the two tone which I think would go better with a lighter green. IDK I'm still up in the air...I usually don't decided till its darn near time to put it in a gun.

On side side note that is one nice F1. I always loved the 51/52 grills. I'm impressed they squeezed a coyote in there and kept stock looking. Unassuming trucks are just to cool. I think I would have went with a different color choice on the seat & door trim though.

Color looks identical.
I did not care for the red/gray interior choice but rest of it made up for it. It's a local AZ truck. It takes me a long time in color choice too.
 

bulletpruf

Well-known member
Joined
Nov 28, 2013
Messages
10,941
Location
San Antonio
I'm impressed they squeezed a coyote in there and kept stock looking.

I can understand LS swaps (as long as it's a GM product), but the Coyote swaps make me scratch my head. If you're going to shoehorn something that large into an engine bay, why not a Boss '9 or SOHC? I guess Coyote's are cheaper and easier to find, but a well built Windsor will run circles around one and you don't need to get the "hot wrench" out to shoehorn one into a vintage Ford.

Scott
 

TimeWarpF100

Well-known member
Joined
Aug 21, 2010
Messages
6,784
Location
not here
I can understand LS swaps (as long as it's a GM product), but the Coyote swaps make me scratch my head. If you're going to shoehorn something that large into an engine bay, why not a Boss '9 or SOHC? I guess Coyote's are cheaper and easier to find, but a well built Windsor will run circles around one and you don't need to get the "hot wrench" out to shoehorn one into a vintage Ford.

Scott

Boss 9's start around 25k, A SOHC starts around 35k.

A 351w will cost more for same power as the Coyote. If you add EFI the 351 will be a lot more expensive. When it gets to 110+ deg in the phx sun carbs are not very user friendly vs the EFI stuff. yes ran them for years but only carb'd version I will have left will be the 427 truck.

New 5.0 Crates start at 6,000.00 and make 426hp. Add some tuning and boost and the windsor just cant keep up for the $$. Not to mention double the MPG at that power level.
 

bulletpruf

Well-known member
Joined
Nov 28, 2013
Messages
10,941
Location
San Antonio
Boss 9's start around 25k, A SOHC starts around 35k.

A 351w will cost more for same power as the Coyote. If you add EFI the 351 will be a lot more expensive. When it gets to 110+ deg in the phx sun carbs are not very user friendly vs the EFI stuff. yes ran them for years but only carb'd version I will have left will be the 427 truck.

New 5.0 Crates start at 6,000.00 and make 426hp. Add some tuning and boost and the windsor just cant keep up for the $$. Not to mention double the MPG at that power level.

Boss 9 (505 ci) crate for $18k: http://www.ebay.com/itm/CUSTOM-BUIL...ash=item4af47c14aa:g:AnkAAOSwbdpWU50J&vxp=mtr

You're right on the SOHC - looks like these start at $35k.

Windsor with aluminum heads and EFI isn't much more expensive - http://www.ebay.com/itm/BluePrint-B...ash=item58d7042815:g:dgMAAOSwZQxW3ymU&vxp=mtr HP and torque should be comparable.

Scott
 

kbs2244

Well-known member
Joined
Nov 11, 2006
Messages
14,065
I lke the dark green with cream color combo.
(My DD is that way)
 

xtremek

Well-known member
Joined
Apr 13, 2012
Messages
11,603
Location
St. Johns, Mi
Here’s some pics of what I’m doing. This fix seems to have gone much better than my usual panel repairs, not as much warpage. I’m guessing because it’s curved? I usually have significant amounts of warpage. So I guess this isn’t a good example to ask questions on.
 

Attachments

  • inner fender.jpg
    inner fender.jpg
    146.1 KB · Views: 174
  • side view inner fender.jpg
    side view inner fender.jpg
    144.7 KB · Views: 169
OP
H

HD FLHX

Well-known member
Joined
Jul 10, 2011
Messages
1,100
Location
Central Iowa
Here’s some pics of what I’m doing. This fix seems to have gone much better than my usual panel repairs, not as much warpage. I’m guessing because it’s curved? I usually have significant amounts of warpage. So I guess this isn’t a good example to ask questions on.

Do you do all your welding then go back and finish it off all at once? I break it up, meaning I'll weld about 20% of the patch moving around of course, Then stop knock the head off with a grinder, work the seam with a hammer and dolly then proceed welding again. Most panels of any size I'll do that at least 4 or 5 times. It also gives the metal a chance to cool and makes for a better weld.
 
OP
H

HD FLHX

Well-known member
Joined
Jul 10, 2011
Messages
1,100
Location
Central Iowa
Some of the progress I've made in the last week. Finished up the bodywork on the left fender. I reshaped the wheel opening a bit on the fender hoping to gain some tire clearance. Originally the area around the wheel opening tapered in towards the wheel


I reshaped it so most of that taper is gone and also rolled the inner lip some. I was able to gain a little over an inch between to two.


Worked on finishing up the inside of the drivers door. No door panels on this truck so that means bodywork both inside and out.


Also put the fender into primer


Rehung the door and fender. I'm pretty happy with the fitment of both. Probably better gaps then it ever had new from the factory.


As previously mentioned I decided to run an EFI setup on the 289. I had originally ordered the fuel command center so I could still run the stock fuel tank. The more I looked at the engine compartment the more I disliked the idea of having to run a fuel line from the mechanical pump to the center then another fuel line off that to supply the throttle body. It was on backorder so I cancelled that order and purchased a 22 gallon EFI ready tank for a 69 Mustang. It is already setup with an in tank electric fuel pump with a return line. Got word from Jegs that the FiTech EFI system in on backorder with an anticipated ship date of 6-15. FiTech put out a note on their facebook page saying they are investing in more equipment and manpower to try and meet demand. They are expanding production by 20% each week and hope to be up to full production within the next month with the new equipment online by then.


Lastly started working on the passengers door. Pulled all the guts out in preparation of media blasting the inside and stripping the outside. Still amazes me how clean all the parts were that came out of it.


Unlike the drivers door, this one cleaned up very nice with only a little bit of rust on the bottom front corner.


I had to cut a portion of the outer skin off to gain access to do the inner shell repairs. It is welded in, but I ran out of time last night to finish it out.


C_F

ALLIANCE MEMBER
Joined
Jan 21, 2005
Messages
9,675
Location
Utah...SNOW BLOWS!
As always, fantastic work! I like the subtle customization to the wheel arch, that's a change that most folks wouldn't even clue into.
 

TimeWarpF100

Well-known member
Joined
Aug 21, 2010
Messages
6,784
Location
not here
Amazing work! Really like those door gaps. The 61-66 trucks generally have poor door gaps in comparison.

Wish I could send you a couple projects of mine to finish up . . my body guy/painter is on strike once again . .
 

xtremek

Well-known member
Joined
Apr 13, 2012
Messages
11,603
Location
St. Johns, Mi
Thanks for the advice. I usually weld it about 90%, then grind it down and go back and hit the holes and gaps. As always, your work is SWEETTTT!!!!!
 
OP
H

HD FLHX

Well-known member
Joined
Jul 10, 2011
Messages
1,100
Location
Central Iowa
WOW, just spent two hours reading this from the first post.

Awesome work Joe, from a fellow Joe!

Thanks for taking an interest :beer:

Not a lot of progress this week. Spent to much time getting some spring yard work done and cutting down several pine trees that have just gotten to big over the last few years.

In F100 news, I did receive my gauges from Auto Meter yesterday. They are a special order 6 gauge package. The speedo & tach are 3 1/8th and the rest are 2 1/16th. I have a dash insert on order that will house them.


Also hung the passengers door to check for fit.


At first glance the gap between the door & cab don't seem bad, but it wonders a bit in a few places. I'll end up adding some material (tig rod) to the door edge to get it evened out. I hope to get to that later today, so maybe tomorrow I'll be able to show the results.

 
To avoid these ads, REGISTER NOW!
Top Bottom