To avoid these ads, REGISTER NOW!

BP&B Hobby Shop

To avoid these ads, REGISTER NOW!
OP
H

HD FLHX

Well-known member
Joined
Jul 10, 2011
Messages
1,100
Location
Central Iowa
A bit of an update. The last month or so life has gotten in the way so progress has been slow. I just finished up bodywork on the hood. Top was chemical stripped and the underside was media blasted with a fine glass bead.


Before and After hood lines


C_F

ALLIANCE MEMBER
Joined
Jan 21, 2005
Messages
9,675
Location
Utah...SNOW BLOWS!
Hey lookie there, a body panel that you didn't have to do any welding on!:D 
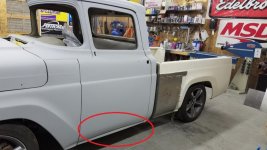
Great work on the body line with the fender & hood too, I bet none of them left the factory that closely matched.
 
OP
H

HD FLHX

Well-known member
Joined
Jul 10, 2011
Messages
1,100
Location
Central Iowa
Not a lot of new progress, but a little bit.


Dug the bed out of the corner and set it up on the scissor lift. Ready to get started on it this weekend


I've had a distraction the last few weeks and finally got word today that it was a go. In the downtown area of the little town that I live just outside of is a building I've been eyeballing for a while. The original front section was a gas station built in 1935. Additional bays were added on in the back and was used as a Montgomery Ward service center. During the Mid-80's the shop areas were closed up and converted into retail space. I plan on putting the overhead doors back in making it a shop again. The front is going to be restored back into a 40/50's era gas station complete with an original pump and signage. Once I take possession I will start a new thread in the garage gallery detailing its transformation.


C_F

ALLIANCE MEMBER
Joined
Jan 21, 2005
Messages
9,675
Location
Utah...SNOW BLOWS!
Wow, how cool is that? That building looks great, I can't wait to see what you make of it.
Is that your Galaxie wagon in the pic?
 

Bears Fan

Well-known member
Joined
Jan 26, 2012
Messages
3,437
Location
Indiana
You are a master at getting those body lines perfect on the ole' Ford! Looks great! And congratulations on the new building! Looks great like it is, But I'm sure you will make it even better...should be a cool thread to follow :thumbup:
 
OP
H

HD FLHX

Well-known member
Joined
Jul 10, 2011
Messages
1,100
Location
Central Iowa
Wow, how cool is that? That building looks great, I can't wait to see what you make of it.
Is that your Galaxie wagon in the pic?

It is...thats another thing that followed me home about a month ago. Its a 63 Country Sedan. Original paint and unmolested other than the centerlines and lower altitude. 352 FE with a cruise-o-matic. Runs drives great. Just bought it as a driver no major plans for it, just enjoy it as is.


OP
H

HD FLHX

Well-known member
Joined
Jul 10, 2011
Messages
1,100
Location
Central Iowa
You are a master at getting those body lines perfect on the ole' Ford! Looks great! And congratulations on the new building! Looks great like it is, But I'm sure you will make it even better...should be a cool thread to follow :thumbup:

Thanks man :thumbup: a lot of effort went into getting those lines.
 

xtremek

Well-known member
Joined
Apr 13, 2012
Messages
11,603
Location
St. Johns, Mi
I want to say I hate you, but you're such a great teacher with this thread. Those are incredible finds. What the heck, "YOU ****!!":thumbup::beer::bounce:
 
Last edited:

bulletpruf

Well-known member
Joined
Nov 28, 2013
Messages
10,929
Location
San Antonio
Love the wagon!

Looking forward to the shop build! Are you going to keep your day job or do you plan to open up a restoration business?

Question on bodywork -- I know you prefer to do bodywork on top of bare metal. And once that's done, you prime it. You use an etching primer, right? What's next? Will you spray it with a high build primer or epoxy primer? What if you find a low spot after you've already sprayed with etching primer -- can you put filler on top of etching primer or do you have to strip that spot?

Sorry for the 20 questions!

Scott
 
To avoid these ads, REGISTER NOW!

itgoze211

Member
Joined
Aug 26, 2015
Messages
12
Location
Keller, Texas
Phenomenal work!

I'm starting on my first restore project once the weather down here decides to make it below 3 digits...no AC in the garage. It's a '72 F100 and there's plenty of work, so I'll be using this thread as a 'how-to' for sure.

I do have a question regarding paint stripping...what do you generally do with the paint/remover mixture once you have gotten off of the body part? I guess what is the disposal process? I assume it's probably not safe to throw in the garbage...(at least not knowingly?????) Just wondered if you put it in an old bucket or something.

Again...fantastic work.
 

C_F

ALLIANCE MEMBER
Joined
Jan 21, 2005
Messages
9,675
Location
Utah...SNOW BLOWS!
Wow, the wagon is in amazing shape! I would have brought it home too, it's a no-brainer. Congrats on finding that one!
 
OP
H

HD FLHX

Well-known member
Joined
Jul 10, 2011
Messages
1,100
Location
Central Iowa
Love the wagon!

Looking forward to the shop build! Are you going to keep your day job or do you plan to open up a restoration business?

Question on bodywork -- I know you prefer to do bodywork on top of bare metal. And once that's done, you prime it. You use an etching primer, right? What's next? Will you spray it with a high build primer or epoxy primer? What if you find a low spot after you've already sprayed with etching primer -- can you put filler on top of etching primer or do you have to strip that spot?

Sorry for the 20 questions!

Scott

No plans to open a business just looking for more space.

For the most part I do as you described..bodywork on bare followed by an etch primer. When using an etching primer it goes on very thin, your not looking for build. Its sole purpose is to provide a base to build off of. So it can easily be scuffed off if additional work is needed, After etch I follow with a polyester primer or a 2k build primer. The grey primer on the cab now is a polyester primer. It will be blocked then the final primer will be a 2k primer.

That being said sometimes I will skip the etch primer and go straight to a polyester first. Poly is also a DTM type primer. So why do I use an etch sometimes and not other times you ask, because I typically do my work one panel at a time then reassemble and fit as I go. Cab..then doors..then fenders..etc. It may take a few months to get through the process so by etching each piece individually it seals them off and keeps any rust from starting. Once everything is together and I'm happy with the fit I'll scuff the etch and prime everything at once with a polyester.

When I done the hood I skipped the etch and went straight to polyester first because it was a single panel.

 
OP
H

HD FLHX

Well-known member
Joined
Jul 10, 2011
Messages
1,100
Location
Central Iowa
Phenomenal work!

I'm starting on my first restore project once the weather down here decides to make it below 3 digits...no AC in the garage. It's a '72 F100 and there's plenty of work, so I'll be using this thread as a 'how-to' for sure.

I do have a question regarding paint stripping...what do you generally do with the paint/remover mixture once you have gotten off of the body part? I guess what is the disposal process? I assume it's probably not safe to throw in the garbage...(at least not knowingly?????) Just wondered if you put it in an old bucket or something.

Again...fantastic work.

It may vary by state, but here as long as its a solid matter it can be thrown in the garbage. I use an old box. After a day or so the stripper evaporates and the mixture will dry up. At that point I just throw it in the garbage.
 
OP
H

HD FLHX

Well-known member
Joined
Jul 10, 2011
Messages
1,100
Location
Central Iowa
The damage to the front corner off the bed turned out to be worse than I had initially thought. When it was hit it caught the front corner and pushed it in diagonally.


I tried pulling it out, but wasn't having much luck with the resources I have. A frame rack sure would come in handy on this one.


I looked for a solid front section, but wasn't able to come up with anything. So I ended up having to make a repair panel from scratch.


Damage to the bed floor caused by an inner brace


Inner piece welded on. The outer skin is just clamped on to check for fit. It will be trimmed down and fit for a **** weld


Leadfot

Well-known member
Joined
May 17, 2011
Messages
179
Location
Norway
Is it a camera optical illusions making me see the bottom of the door dentet or em i just tired and cant see straight?

Keep up the good work.
 

Attachments

  • 20160807_202457_zpss2ghilcn.jpg
    20160807_202457_zpss2ghilcn.jpg
    76 KB · Views: 120
OP
H

HD FLHX

Well-known member
Joined
Jul 10, 2011
Messages
1,100
Location
Central Iowa
Is it a camera optical illusions making me see the bottom of the door dentet or em i just tired and cant see straight?

Keep up the good work.

What your seeing the bottom of the door has a bit too much roll in the center and that angle exaggerates it. It just something I haven't got around to fixing yet.
 

Leadfot

Well-known member
Joined
May 17, 2011
Messages
179
Location
Norway
Good to know. I would realy be angry at myself if i noticed it and dident say anything and it dident get fixed.
 
OP
H

HD FLHX

Well-known member
Joined
Jul 10, 2011
Messages
1,100
Location
Central Iowa
Some progress on the bed. The repair section has been welded in and I media blasted and epoxy primed the underside.


Next is fixing the rust in the rear bed corners


For those interested in the new shop I started a thread in the garage gallery section called 1935 Gas Station Resurrection. Any Facebookers can find my page by searching Perry Sinclair Station. It will be updated as the renovation progresses.
 

wasfast

Well-known member
Joined
Apr 10, 2014
Messages
874
Location
San Diego CA
Perhaps I missed it but why the rectangular cutout in the middle of the bed floor?

Re: the 1935 gas station, it must have taken some nerve to do new construction on a business in the middle of the Depression.
 

white6589

Well-known member
Joined
Feb 27, 2011
Messages
351
Location
Maryland
Snipped: Perhaps I missed it but why the rectangular cutout in the middle of the bed floor?

Might have something to do with this,
20151115_152728_zpseitqgeoz.jpg
 
OP
H

HD FLHX

Well-known member
Joined
Jul 10, 2011
Messages
1,100
Location
Central Iowa
Perhaps I missed it but why the rectangular cutout in the middle of the bed floor?


For clearance of the frame notch. I haven't decided if I going to build a tunnel for lack of a better term between the wheel wells or build a raised false floor finished with bed wood.


TankMech88

Member
Joined
Aug 1, 2016
Messages
22
Location
Fort Riley
I say put the bed wood down on the current bed floor, leave the cutout and frame it out with some angle steel. You could show off your skills and it would also be different. Lol sorry just a totally off the wall idea.
 

60 weight

Member
Joined
May 25, 2016
Messages
23
Location
Coastal N.C.
Great Tread! read every page.Not being a welder,i noticed every time you patched in a panel i see you use small u shape clamps or sometimes brass bullet looking things (not the stud gun tabs).I'm not sure if they have to do with alignment or welding the panel in.Please explain when you have the time.Your building is gonna be great,so much more room than you currently have.We all really appreciate you stopping and taking the time to take pics and loading them with details as we know this slows you down after already working a full time job days.Not only are you proud of your work, but you enjoy teaching others.You probably had some good mentors when you were young and appreciated it enough to help the next guy.Thanks
 
OP
H

HD FLHX

Well-known member
Joined
Jul 10, 2011
Messages
1,100
Location
Central Iowa
Not being a welder,i noticed every time you patched in a panel i see you use small u shape clamps or sometimes brass bullet looking things (not the stud gun tabs).I'm not sure if they have to do with alignment or welding the panel in.Please explain when you have the time

Both of things you were asking about are types of clamps. The U-shaped one is a **** weld clamp. There is actually a bar that slides in a tab on the underside and as you tighten the wingnut the bar gets pulled up tight to the underside and holds each piece of metal level to each other.


The brass bullet shaped one is a cleco. They come from the aviation industry. They are used on a lap type joint to hold two pieces together. On this type of clamp you drill an 1/8th inch hole through both pieces. Clecos have a special plier that when compressed will allow the cleco to pass through the hole and when released will clamp the pieces of metal together. Pictures will probably make more sense of it than me trying to explain them.


For the most part I have been self taught. Coming from a family of mechanics I have always been very mechanically inclined. Growing up in the dealership with my dad and grandpa I was able to spend a lot of time hanging out in both the service dept and the body shop. There were a couple old time bodymen that in their own ways were always there to lend guidance when needed.
 
To avoid these ads, REGISTER NOW!
Top Bottom