To avoid these ads, REGISTER NOW!

Brewster's Styleline Stable

Brewsterg6

Well-known member
Joined
Mar 18, 2010
Messages
69
BREWSTER'S STYLELINE STABLE

IMG_0450.jpg


I've been lurking around for a few years now, and have decided it's time to get a little more serious about the direction my garage is going to go. The structure is an oversized detached two car garage. It was built some time in the early 1950's. The building permit is still hanging on the wall, but was not filled out! I'm the second owner of the house, the first being the parents of a local guy that has made his millions in the gravel and concrete business. You wouldn't know by the condition of the garage floor! Anyway, the garage is now home to a couple vintage Chevrolets. A 1951 Styleline Deluxe sedan which has been in my family since it was new, and a 1950 Styleline Deluxe Convertible are now part of the stable. I've always had old junk, but am now going to get serious about collecting genuine items that suit the period that I enjoy collecting from. Some short term goals are to get some of the older tools cleaned and painted up, and to hopefully build a garden shed to get the lawn tools and patio furniture out of the way of the cars and into their own storage area. Long term, I want to build some cabinets, cut down on some clutter, and find more clutter to add!

Here's the most recent pic (Apr '14)...


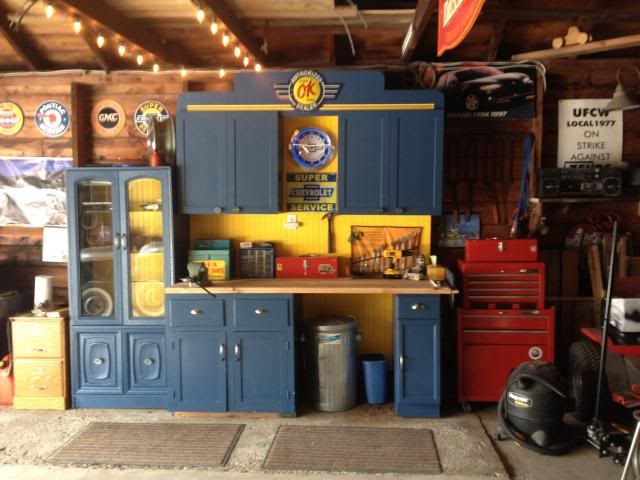
Here's the back wall area. I built the curio cabinet in high school, now it holds the Genuine GM parts. The Massey's are a mix of '66 and '68 10hp models.

IMG_3228.jpg


garage016.jpg
 
Last edited:
To avoid these ads, REGISTER NOW!
OP
B

Brewsterg6

Well-known member
Joined
Mar 18, 2010
Messages
69
The first project that I took on was to clean and paint up the work bench vice. It was so covered in grease and dirt that I never noticed the raised writing on the side. It says No.4 Canadian. I'm not sure if there's a brand name other than that, or who retailed it, or even what year it's from. Any info would be appreciated. It originally had blue paint, but I went for a sage green. The head on it is ruined. Both of the grip areas have been welded on, and are broken. I'll have to figure out how I'm going to fix that later. I also forgot to take a before pic... the best I have is on the end of the bench in the above post. Here it is after I washed it...

IMG_3231.jpg


IMG_3232.jpg


...and here's the finished product.

IMG_3246_zpsdccf3e9f.jpg
 

snipes

Active member
Joined
Dec 24, 2009
Messages
27
Very nice garage, I am digging the lawn tractors. What is the story on those?
 
OP
B

Brewsterg6

Well-known member
Joined
Mar 18, 2010
Messages
69
Lawn tractors are a dangerous hobby to get into! They seem to multiply like rabbits! I started out with a little John Deere 130 that was a freebie because it was going to the dump. It had been stored outside, and had a good coat of surface rust, and a ****** that slipped a bit. I took it apart, had it blasted and painted it with rattle cans. It mowed my lawn for three years. A great investment for the $60 or $70 bucks I threw at it.

The first Massey was parked in the garage for storage by a friend. It had been repainted and stickered with the wrong hood decal. It had no mower deck, and didn't run, as the gas had gone bad and ruined all the rubber in the carb. It looked as pictured in the last picture of my first post above. It is a 1968 MF10. This is where I learnt the secret to tractor trading! An old tractor is worthless without the implements that go with it. I needed at least a mower deck. The decks would all rust out over time, as the moist grass would sit up under them. It's very hard to find just a deck to buy, and the deck will cost more than the tractor! The solution?... Buy a whole tractor with a deck on it! A friend in my car club had the second one in his garage, and I made an offer. Let's just say I got the good friend price! It came with a spare Tecumseh motor as well. It's a 1966, and a rare first half of the year model. It's different because it has an aluminum dash, and hood ring, and it also is equipped with a combination starter/generator... or Starterator. The head on the motor was cracked, hence the spare motor. My project was to strip them both down to the frame, and rebuild one good tractor. I used the frame, fenders and dash of the '68, and the hood, starterator, mower deck, and PTO gear from the '66. The motor is the spare one with parts from all three added to it. I didn't paint it because I needed to use it to mow the lawn right away! I sold the John Deere for $300, and gave the money to my friend that donated the first Massey. The beautiful thing about these tractors is that you can do a fairly decent rebuild in a weekend! I don't want to call it a restoration, as I know there is a lot wrong with it. Someday I'll tear it down again, and restore one right!

Here's a pic of the rebuild...

IMG_0390.jpg


And here's the Deere after I painted it up.

IMG_0391.jpg
 
OP
B

Brewsterg6

Well-known member
Joined
Mar 18, 2010
Messages
69
I've been sanding and painting away at my bench grinder now. I'm going to paint it up to match the vice. The ends of the motor will be black, and all of the guards are a darker metallic silver. I touched up the tag with some gloss black as well. Masking it peeled some of the black off. Lesson learned!

Here's the before pic...

IMG_3252.jpg


All sanded and primed...

IMG_3262.jpg


It's going to go on this stand. The stand is now sage green.

IMG_3251.jpg


Here's the motor, and guards after painting. Black coats yet to come...

IMG_3263.jpg

IMG_3264.jpg
 
OP
B

Brewsterg6

Well-known member
Joined
Mar 18, 2010
Messages
69
This past summer Jane and I went to the VCCA's (Vintage Chevrolet Club of America) 50th Central Meet in Port Huron, Michigan. While we were there we hit a Hobby Lobby...a treat for us since there are none in Canada. I bought these drawer pulls, and brought them home knowing I would have to find a garage project to use them on.


This past week I arrived home from work, and my new project was waiting for me at the end of the driveway! The neighbours across the road had this entertainment centre sitting outside waiting for garbage day. I quickly scooped it with my dolly and brought it home.


A trip to the paint store yielded the colours that will fit my garage theme. I took my tin sign and GM parts paper up there with me to match the chips.

 
OP
B

Brewsterg6

Well-known member
Joined
Mar 18, 2010
Messages
69
I sanded the cabinet down, and applied a primer coat. I also got rid of the veneer back board and cut some pine bead board.


Here's where I'm at now. I still have some work to do to figure out where it will fit in the garage, and how I'm going to adopt more shelving and some logos to it....


j p smith

Well-known member
Joined
May 22, 2013
Messages
1,213
Location
Glendale, Arizona
Brewster where are you located? Nice job on the cabinet. I have a Massey and am looking for wheels. ( you are right, garden tractors breed when you aren't looking, I am down to just the Massey and the wifes John Deere)
 
OP
B

Brewsterg6

Well-known member
Joined
Mar 18, 2010
Messages
69
Hey JP... I'm up here in Ontario, Canada. I'd love to help you out on the wheel problem, but need to keep the ones I have. Both my Massey's I found with the factory tires, and my drivers are getting pretty worn. I had to buy one front tire, and I couldn't find a factory style one. I'm down to just 3 spares now!
 
OP
B

Brewsterg6

Well-known member
Joined
Mar 18, 2010
Messages
69
Another couple of days of painting. Waiting for drying time is no fun! I had this little base cabinet in the basement, and gave it 3 coats of paint and new hardware...


Also had this base cabinet that the former owner of my house left behind. It was full of old glass fuse boxes and 1950's yellow and black tiles for the bathroom!


The workbench top has been in this garage since the 1950's. If only it could tell stories! I went over it really carefully and pulled all of the nails, screws and staples out of it, and then "cleaned" it by running it through the planer. Fortunately it was about an inch and a half thick because it took 8-10 trips through to make it presentable. Then I cut it down to the new size and routered a new edge onto it. I may still stain or clear it as well...


Here's where I'm at. The basement is still full of partly painted upper cabinets...

 
Last edited:
OP
B

Brewsterg6

Well-known member
Joined
Mar 18, 2010
Messages
69
Thanks rmckee! I also forgot to mention... In August I had a new shed built. It has taken all of the bigger spare car parts, the spare tractor and all of the garden tools out of the way. Since this pic was taken I have painted and skirted it. I'll have to get a recent one later...

 
Last edited:

-Brent-

Well-known member
Joined
Dec 23, 2009
Messages
4,709
Location
Utah
I like where you're going with this. Keep up the good work.

Have your neighbors seen the cabinet yet?

You've inspired me to post up a thread about my garage.
 
To avoid these ads, REGISTER NOW!
OP
B

Brewsterg6

Well-known member
Joined
Mar 18, 2010
Messages
69
Brent... It's a retirement home across the road. I'm not sure which one of them ditched it! There may be 40 rooms there...
 
OP
B

Brewsterg6

Well-known member
Joined
Mar 18, 2010
Messages
69
Today things started to move a little more quickly. It's surprising how much you can do once you don't have to wait for drying time any more. All I had left to paint this morning was one more coat of yellow for the bead board. While it was drying I started to bring the upper cabinets out and frame up the wall to attach them too.


For those of you that actually thought I was keeping a neat work space, I took this shot of the other half of the garage to dis spell that myth!


I put the cabinets up, and nailed in the bead board. My wife went to the States shopping, and texted to tell me that she found four more of the bow tie handles. I'll add them tomorrow. I still have to make a top for above the cabinets, but that will have to wait a bit. Here's where it sits now...


Mr. 360

Well-known member
Joined
Nov 23, 2012
Messages
662
Location
Bowmanville, Ontario
Thanks for stopping by my thread, can't believe I've missed yours!

You and I seem to be cut from the same cloth. I love the look of your main bench area, and repurposing old furniture is a great way to gain usable space. I 'restored' a late 70's Sears mower back in my early teens, it was a lot of fun!

Typically I'm partial to old Willys trucks and stuff, but I quite like your 51 Styleline hardtop, looks good in the garage too!

The beadboard looks pro too, and the colours work great together.

Subscribed!
 
OP
B

Brewsterg6

Well-known member
Joined
Mar 18, 2010
Messages
69
I've ordered new siding and a sectional door. I'm removing the old aluminum siding myself, and having the new stuff put on by a siding company. They are also re-insulating the house and siding it to match.

Before...


during...

 
OP
B

Brewsterg6

Well-known member
Joined
Mar 18, 2010
Messages
69
Well, things are a bit of a mess. We had a huge ice storm here in Southern Ontario, and were without power for 4 days leading into Christmas. All of the poplars behind the garage have come down onto it. Two of them snapped off, with one landing on the roof, and the other bigger one dropping right between the garage and the shed. I couldn't have done a better job dropping it with a saw... I really dodged a bullet there! I have to get this cleaned up as fast as possible, as the siding guys are to be here on Jan. 6 for the garage and house!


Mr. 360

Well-known member
Joined
Nov 23, 2012
Messages
662
Location
Bowmanville, Ontario
Glad to see you managed to escape any real damage to your garage there, and that your power is back on. I know that for the last few days I have had no less than 2 chainsaws and 7 axes in my car in case I came across impassable roads or had to help out neighbours. One thing I can say for this storm was it was nice to see complete strangers in the community pulling together.

Would love to see pics once the new siding is up, it can make a huge difference!
 

ralphy99

Member
Joined
Aug 4, 2013
Messages
19
Are you going to insulate the garage? It would be kinda cool to put some kinda insulation on the outside of the garage wall before you put up the siding. That way you could possibly keep the interior walls with the cool looking wood with no insulation covering it up. Just my thoughts. Just kind of thinking out loud as it were.
 
OP
B

Brewsterg6

Well-known member
Joined
Mar 18, 2010
Messages
69
I've been thinking the same thing, Ralph! Not sure if I'll get that taken care of in time, but I may try. I don't think it will hold any heat though, as there is no ceiling. You're right about the inside looking cool though. I have no intention of messing with that...
 
OP
B

Brewsterg6

Well-known member
Joined
Mar 18, 2010
Messages
69
Siding job is all complete. The new door as well. Now I need spring to arrive so I can paint the small door and get the old door off the yard!

 
OP
B

Brewsterg6

Well-known member
Joined
Mar 18, 2010
Messages
69
Thanks, Rom's!!

I made it outside today and finished up the door by installing the carriage handles and hinges. I cut the old door in half, and flagged down a scrapper to have it hauled off for free. He even lifted it himself! The '50 got a battery charge as well since it was a nice day!

 
OP
B

Brewsterg6

Well-known member
Joined
Mar 18, 2010
Messages
69
The past couple of days have been really nice to work out in the garage, so I decided to finish up my bench. I used leftover pieces of the original workbench to whip this cap up. Some details with the router, and some paint...


OP
B

Brewsterg6

Well-known member
Joined
Mar 18, 2010
Messages
69
I started phase two… working on the back wall of the garage. The plan is nicer shelving, and a spot to display a 1951 Chevrolet dealership silk banner. Also need a better spot to keep my GM parts bins. I took all of the old shelving down. I love the 1950's… why use 2 nails when 7 will do??!!

Before:


After:


48RON54

Well-known member
Joined
Dec 27, 2013
Messages
2,666
Location
Inland Empire, CA
Thanks, Rom's!!

I made it outside today and finished up the door by installing the carriage handles and hinges. I cut the old door in half, and flagged down a scrapper to have it hauled off for free. He even lifted it himself! The '50 got a battery charge as well since it was a nice day!


Does your vert still have the old straight 6 in it? If so, is it 3 on the tree or PG? Sorry, nice garage and all that but my interest is in the cars! lol
 
OP
B

Brewsterg6

Well-known member
Joined
Mar 18, 2010
Messages
69
Hey Ron… Nice '54 in your profile pic! Yes, both of my Chevrolet's are all factory stock. Straight six power, and 6 volt electrics. Both of them are 3 speed cars, so have 216's. I've got the engine out of the '51 right now, and am painting and detailing it while the rest of the car is in the paint shop.
 
To avoid these ads, REGISTER NOW!
Top Bottom