To avoid these ads, REGISTER NOW!

Broken Compressor Fitting!

BlackwaterDSM

Active member
Joined
Dec 6, 2023
Messages
32
Hi all, had a little sitcheee-ation happen and could use some advice as I’m fresh outta ideas. The pressure switch on my compressor took a dump on me and whilst trying to unthread it from the 4” tall galvanized steel riser (grrrrrrrreat design by the way! Yes, that was sarcasm), it decided it wanted to break off inside the bung instead because it’s called that bung-hole it’s “home” since 2004. Tried all the techniques I know so far. Soaked it in PB Blaster over night and tried pipe extractors which just tore the inner lining of the broken pipe up and still couldn’t get enough torque to break it free even with a 6’ jackstand handle over my wrench. Hit it with a torch and repeated the extractor, no luck. Tried filling the tube with my Mig torch and welded a 19mm nut on top, and the nut and part of the weld-core just busted off again at the top of the bung. Tried running some Nascar laps with a hammer and chisel, but galvanized steel is not as soft as the brass drain plugs are and just kept chipping micro-pieces off and taking the bung threads with it. Now I’m like a 1/16” down into the hole maybe and ran my 1/2” drill bit into it just a teeeeeny bit to clean everything up and try something else. Problem I’m now facing is the hole is slightly off center due to the extractor eating into one side of the broken pipe instead of evenly biting all around (Yes, it was the right size, I just had to use a 6’ handle for leverage which placed the load on one side of the extractor). Any ideas would be helpful. I can weld…. But I really don’t trust myself on a 60 gallon, 200psi pressure vessel that I stand 5’ from while working. I’d like to live, please. So that removes the option of just welding a new bung on or anything that would compromise the tank. This is on my treasured 60gal compressor, so I also don’t wanna destroy it (any further) in the process. Thanks for any and all suggestions!
 
To avoid these ads, REGISTER NOW!

LopezBart

Well-known member
Joined
Oct 13, 2023
Messages
2,585
Location
Lopez Island, WA
For our steam boats, boiler ******* ( a lot like pressure tank *******) are always schedule 80 (until the first shutoff valve) for this exact reason - schedule 40 pipe is too thin to handle much in the way of mechanical loads. No fun being 3 miles off-shore and watching all the steam empty out of one's boiler.
Note that if the fitting that's welded into the tank that has the '********' has plenty of diameter, drilling oversize and tapping for 3/8" NPT is a relatively easy fix.
 
OP
B

BlackwaterDSM

Active member
Joined
Dec 6, 2023
Messages
32
You try gently grinding out all the ****** but the threads with a die grinder. Then pick out the remains with a dental pick.

If you've already ruined the threads, then you could drill out the mess, and tap to the next size.
Run a 1/4" pipe tap down it, and tap some new threads a little deeper in.
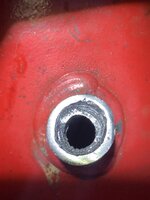
This is where it currently sits. You can see the threads down below, but I’m much closer to the threads on the other side because of the wonky extractor attempt.
 

Attachments

  • 8B9AD48F-B79C-42E6-A0D0-21C71A37C805.jpeg
    8B9AD48F-B79C-42E6-A0D0-21C71A37C805.jpeg
    568.6 KB · Views: 67
  • 08202266-1EE9-4863-A7C2-D84A7D0090F0.jpeg
    08202266-1EE9-4863-A7C2-D84A7D0090F0.jpeg
    493.2 KB · Views: 66
OP
B

BlackwaterDSM

Active member
Joined
Dec 6, 2023
Messages
32
For our steam boats, boiler ******* ( a lot like pressure tank *******) are always schedule 80 (until the first shutoff valve) for this exact reason - schedule 40 pipe is too thin to handle much in the way of mechanical loads. No fun being 3 miles off-shore and watching all the steam empty out of one's boiler.
Note that if the fitting that's welded into the tank that has the '********' has plenty of diameter, drilling oversize and tapping for 3/8" NPT is a relatively easy fix.
I don’t think the wall is thick enough to safely accommodate stepping up to a 3/8” NPT. See pics I posted in last reply. I had to remove the 2” bushing on the bottom once before and it was practically welded in much like this pipe was. That took a torch and same 6’ jackstand handle over a massive pipe wrench. I guess after 20 years of daily service, these things have found a home and wanna stay in it. Lol
 

American Locomotive

Well-known member
Joined
Jan 8, 2017
Messages
11,166
Location
Rhode Island
This is where it currently sits. You can see the threads down below, but I’m much closer to the threads on the other side because of the wonky extractor attempt.
Eh, don't think it really matters all that much. Pipe threads are tapered, as are the taps. Just send it down, try to cut some threads, thread in a new ****** with plenty of tape, and see if it works.

It will either work, or it won't. Your only other option is to drill it out bigger and tap to 3/8".
 

LopezBart

Well-known member
Joined
Oct 13, 2023
Messages
2,585
Location
Lopez Island, WA
Looking at the picture now, I'd agree. I'd try retapping further in for 1/4" pipe, and if all else fails for getting it to seal, screwing a black pipe ****** in as far as possible and then welding it in is safe enough. The force pushing the 1/4" pipe out is about 50 lbs at 200 psi.
 
OP
B

BlackwaterDSM

Active member
Joined
Dec 6, 2023
Messages
32
Looking at the picture now, I'd agree. I'd try retapping further in for 1/4" pipe, and if all else fails for getting it to seal, screwing a black pipe ****** in as far as possible and then welding it in is safe enough. The force pushing the 1/4" pipe out is about 50 lbs at 200 psi.
I think that sounds like a good option possibly. There are still some threads down below the broken pipe that might still be usable, so maybe I’ll try tossing a de-burr on my dremel and see if maybe I can even up the wonky hole enough to try to run some new 1/4” threads in. That way even if I ruin the upper half of the threads, I can bite down into the lower ones with a slightly longer pipe.
 

rallenc

Well-known member
Joined
Jul 7, 2009
Messages
383
Location
Southern New Jersey
Just had the same issue. Picked up the Ridgid 883 pipe extractor set and it cam out with ease. Just get the 1/4 and maybe 3/8 since the hole has been enlarged. Zoro/Grainger sell them seperately
 

kaymccampbell

Well-known member
Joined
Feb 27, 2015
Messages
29,936
Location
Upstate New York
I think that sounds like a good option possibly. There are still some threads down below the broken pipe that might still be usable, so maybe I’ll try tossing a de-burr on my dremel and see if maybe I can even up the wonky hole enough to try to run some new 1/4” threads in. That way even if I ruin the upper half of the threads, I can bite down into the lower ones with a slightly longer pipe.
You'll need to grind out the extra pipe left on the one side. If you don't, the remaining slip of pipe threads could shift and make a mess. Small carbide is your friend here.
 

The Cobbler

Super Moderator
Staff member
Joined
Oct 24, 2013
Messages
26,247
Location
Niagara Region, Ontario, Canada
do your best to get as much of that old pipe out, then drill & run a tap in a bit deeper . remember that the bottom threads ( the small end of the taper) are the "perfect threads " and do the sealing. just a few threads at the bottom do the sealing , they are the important ones. the rest are strength basically . some good loctite thread sealer and let it cure . I've even had good luck with crazy glue in buggered threads for air
 
OP
B

BlackwaterDSM

Active member
Joined
Dec 6, 2023
Messages
32
You'll need to grind out the extra pipe left on the one side. If you don't, the remaining slip of pipe threads could shift and make a mess. Small carbide is your friend here.
do your best to get as much of that old pipe out, then drill & run a tap in a bit deeper . remember that the bottom threads ( the small end of the taper) are the "perfect threads " and do the sealing. just a few threads at the bottom do the sealing , they are the important ones. the rest are strength basically . some good loctite thread sealer and let it cure . I've even had good luck with crazy glue in buggered threads for air
Yeah, I’m gonna jump back on it today and see how much I can get out with my dremel. I’d love to use my air-powered die grinder, buuuuuuut. Lol. I’m kinda thinking worst case scenario if I can’t cleanly get to those lower threads to run a cleaning-tap, I’ll just fill the entire bung with weld again, center-punch, and re-drill/tap a new 1/4” hole. Not enough material to go up to 3/8”, unfortunately, cause that would have been a super quick mission. Now it’s a project. Hahaha!

P.s. Thanks for all the ideas everyone!
 

MoonRise

Well-known member
Joined
Nov 5, 2010
Messages
4,046
Location
NJ
Looking at the picture now, I'd agree. I'd try retapping further in for 1/4" pipe, and if all else fails for getting it to seal, screwing a black pipe ****** in as far as possible and then welding it in is safe enough. The force pushing the 1/4" pipe out is about 50 lbs at 200 psi.
NO!!!!!

Unless you have an ASME R-stamp (and all the paperwork AND the material specs/certs AND the REQUIRED NDT)

YOU

DO

NOT_NOT_NOT

WELD

ON/TO

A PRESSURE VESSEL!!!!!!!

Carefully remove the buggered pipe (die grinder, small die grinder aka Dremel, etc), tap or retap the pipe threads (same existing size or worst-case scenario you ****** too much of the original bung then retap to the next bigger size), install new pipe into the pipe threads with appropriate thread sealer compound, done (after appropriate level of cursing and swearing is applied during the processes).

(although the air pressure may induce a force of 'only' 50-100 lbs on the pipe/****** in the bung, the heat of ANY welding WILL cause a HAZ to possibly change the base material properties of the bung reinforcement or the tank wall. Which means the tank is now condemned as a pressure vessel until full ASME R-stamp procedures are followed, which probably aren't going to happen after the fact. Which means the tank is then no long a valid pressure vessel, but is scrap or maybe a BBQ or smoker/grill or yard art.)

Frack! You said you already tried to weld a nut to the remains of the pipe in the *********? The tank is now suspect and should be condemned. Sorry. You f'd with the metallurgy of the tank and bung to some extent when you applied welding level heat to them. Since I do not KNOW exactly what alloy steel your bung and tank are made of or exactly how much heat you put into them and what temperature they got up to during your welding, the tank is now suspect and condemned and Out-of-Service as a pressure vessel.
 

LopezBart

Well-known member
Joined
Oct 13, 2023
Messages
2,585
Location
Lopez Island, WA
Frack! You said you already tried to weld a nut to the remains of the pipe in the *********? The tank is now suspect and should be condemned.

Really? Did you see any discoloration of the paint on the tank? What temperature will cause this proposed degradation of the tank or bung material? This is not part of a nuclear reactor, or built out of exotic alloys with all sorts of post-weld heat treatments. It's a piece of pipe stuck in a bung welded into a common compressor tank. This isn't a longitudinal weld on the pressure vessel itself.

People who never drain their tanks of accumulated moisture are taking much larger risks.

- Bart
 
To avoid these ads, REGISTER NOW!
OP
B

BlackwaterDSM

Active member
Joined
Dec 6, 2023
Messages
32
NO!!!!!

Unless you have an ASME R-stamp (and all the paperwork AND the material specs/certs AND the REQUIRED NDT)

YOU

DO

NOT_NOT_NOT

WELD

ON/TO

A PRESSURE VESSEL!!!!!!!

Carefully remove the buggered pipe (die grinder, small die grinder aka Dremel, etc), tap or retap the pipe threads (same existing size or worst-case scenario you ****** too much of the original bung then retap to the next bigger size), install new pipe into the pipe threads with appropriate thread sealer compound, done (after appropriate level of cursing and swearing is applied during the processes).

(although the air pressure may induce a force of 'only' 50-100 lbs on the pipe/****** in the bung, the heat of ANY welding WILL cause a HAZ to possibly change the base material properties of the bung reinforcement or the tank wall. Which means the tank is now condemned as a pressure vessel until full ASME R-stamp procedures are followed, which probably aren't going to happen after the fact. Which means the tank is then no long a valid pressure vessel, but is scrap or maybe a BBQ or smoker/grill or yard art.)

Frack! You said you already tried to weld a nut to the remains of the pipe in the *********? The tank is now suspect and should be condemned. Sorry. You f'd with the metallurgy of the tank and bung to some extent when you applied welding level heat to them. Since I do not KNOW exactly what alloy steel your bung and tank are made of or exactly how much heat you put into them and what temperature they got up to during your welding, the tank is now suspect and condemned and Out-of-Service as a pressure vessel.
Really? Did you see any discoloration of the paint on the tank? What temperature will cause this proposed degradation of the tank or bung material? This is not part of a nuclear reactor, or built out of exotic alloys with all sorts of post-weld heat treatments. It's a piece of pipe stuck in a bung welded into a common compressor tank. This isn't a longitudinal weld on the pressure vessel itself.

People who never drain their tanks of accumulated moisture are taking much larger risks.

- Bart
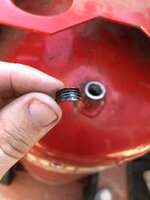
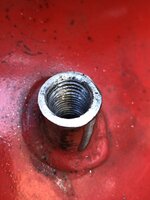
I used my Mig welder on an extremely low voltage to slowly build-up tacks inside the broken off pipe-piece inside the bung. Very low voltage indeed, because I did not want to “weld” the broke piece to the bung. It wasn’t even enough heat to really discolor the paint, as Bart mentioned. Used a copper sleeve at the top to keep the weld inside the piece and create a little stub to set the nut on, and welded the nut to said stub. That failed and just broke the stub off upon trying to twist it out. Ended up just re-drilling a 7/16” hole into the whole mess and re-tapping to 1/4” NPT. As I was cutting new threads, large chunks of the old pipe piece started coming out on my tap, proving the fact that it wasn’t even enough heat to melt the base pipe, better yet the bung. Pics:
 

Attachments

  • 0AF2B137-09FF-41E8-829F-CB7450E807F7.jpeg
    0AF2B137-09FF-41E8-829F-CB7450E807F7.jpeg
    478.1 KB · Views: 33
  • 1A19D343-F3BC-4B3B-8CEF-8AD31992A208.jpeg
    1A19D343-F3BC-4B3B-8CEF-8AD31992A208.jpeg
    426.8 KB · Views: 29
  • 88864E53-906A-417A-AE09-5571777ABB63.jpeg
    88864E53-906A-417A-AE09-5571777ABB63.jpeg
    330.9 KB · Views: 25
  • B388DE12-E058-4D4B-8FF4-46F5B65D68B3.jpeg
    B388DE12-E058-4D4B-8FF4-46F5B65D68B3.jpeg
    337.7 KB · Views: 25
  • 7509604A-19F9-451B-8871-23709EDED104.jpeg
    7509604A-19F9-451B-8871-23709EDED104.jpeg
    404.5 KB · Views: 25
  • 4E1EAC38-3908-4566-9735-871F3C04F793.jpeg
    4E1EAC38-3908-4566-9735-871F3C04F793.jpeg
    502 KB · Views: 30

The Cobbler

Super Moderator
Staff member
Joined
Oct 24, 2013
Messages
26,247
Location
Niagara Region, Ontario, Canada
super. now just hope you can get a nice seal on the threads. I would try to see if you get a seal the way it is, if not I would cut down some of the bung with an angle grinder and run your tap in again ( a bit deeper) you have lots of height on that bung to play with .
 
OP
B

BlackwaterDSM

Active member
Joined
Dec 6, 2023
Messages
32
NO!!!!!

Unless you have an ASME R-stamp (and all the paperwork AND the material specs/certs AND the REQUIRED NDT)

YOU

DO

NOT_NOT_NOT

WELD

ON/TO

A PRESSURE VESSEL!!!!!!!

Carefully remove the buggered pipe (die grinder, small die grinder aka Dremel, etc), tap or retap the pipe threads (same existing size or worst-case scenario you ****** too much of the original bung then retap to the next bigger size), install new pipe into the pipe threads with appropriate thread sealer compound, done (after appropriate level of cursing and swearing is applied during the processes).

(although the air pressure may induce a force of 'only' 50-100 lbs on the pipe/****** in the bung, the heat of ANY welding WILL cause a HAZ to possibly change the base material properties of the bung reinforcement or the tank wall. Which means the tank is now condemned as a pressure vessel until full ASME R-stamp procedures are followed, which probably aren't going to happen after the fact. Which means the tank is then no long a valid pressure vessel, but is scrap or maybe a BBQ or smoker/grill or yard art.)

Frack! You said you already tried to weld a nut to the remains of the pipe in the *********? The tank is now suspect and should be condemned. Sorry. You f'd with the metallurgy of the tank and bung to some extent when you applied welding level heat to them. Since I do not KNOW exactly what alloy steel your bung and tank are made of or exactly how much heat you put into them and what temperature they got up to during your welding, the tank is now suspect and condemned and Out-of-Service as a pressure vessel.

As you can see on the broken pieces coming out on my tap, they had threading on both sides as they were thinned-out “existing” threads snagged by my tap. I do in fact know the golden rule of “Don’t F%#* with Pressure Vessels” as I stated in my initial post. There is still about 1/2”-3/4” of UNTOUCHED bung area full of rusty threads between my repaired threads and the area where the bung meets the tank, so even if some heat got in, I highly doubt it was enough to ruin the tank and factory weld area of the bung. It probably sees that much heat sitting in the sun on a hot day. Again, I built-up “tacks” only with significant cooling time between each in the top area of the bung. Not sure I wanna throw a $1500+ 60gal air compressor in the trash over a bit of heat in the ********. Lol
 
OP
B

BlackwaterDSM

Active member
Joined
Dec 6, 2023
Messages
32
super. now just hope you can get a nice seal on the threads. I would try to see if you get a seal the way it is, if not I would cut down some of the bung with an angle grinder and run your tap in again ( a bit deeper) you have lots of height on that bung to play with .
Yeah, I’m gonna use some pipe-dope as I feel it will give me a better seal than PTFE tape. Hell, maybe a bit of both! Lol
 

MoonRise

Well-known member
Joined
Nov 5, 2010
Messages
4,046
Location
NJ
Agreed that not draining water from a compressor tank is a BIG risk and leads to corrosion and then failure (hopefully only a leak and not a catastrophic tank failure, but the catastrophic failures DO still occur).

Since I do not KNOW what the OP's exact tank material is and I do not KNOW the preheat or interpass temperature of his tank's steel during his welding, there is no way to KNOW what has happened to the steel.

Maybe it's safe, but I do not KNOW.

And if you do not KNOW, the tank is considered unsafe and condemned. Conservative approach for sure, but the energy stored in a compressed air tank of 60 gallons @ 200 psi is not to be underestimated. It is a LOT more than most people realize.

Glad you got the old remains out.

Tip for when you tap something and want/need to minimize the chips getting into things is to grease the tap to help hold onto the chips. Back the tap out regularly and remove the grease and chips, apply more new grease and repeat.

Clean out the chips from the inside of the tank. They will corrode in the condensed moisture/water in the tank and cause even more rust in the bottom of the tank.

Use some good pipe dope on the threads, snug it up, and check for leaks. Not at 200 psi to start with though. :lol:
 
OP
B

BlackwaterDSM

Active member
Joined
Dec 6, 2023
Messages
32
Both actually seems work work well for damaged threads.
Agreed that not draining water from a compressor tank is a BIG risk and leads to corrosion and then failure (hopefully only a leak and not a catastrophic tank failure, but the catastrophic failures DO still occur).

Since I do not KNOW what the OP's exact tank material is and I do not KNOW the preheat or interpass temperature of his tank's steel during his welding, there is no way to KNOW what has happened to the steel.

Maybe it's safe, but I do not KNOW.

And if you do not KNOW, the tank is considered unsafe and condemned. Conservative approach for sure, but the energy stored in a compressed air tank of 60 gallons @ 200 psi is not to be underestimated. It is a LOT more than most people realize.

Glad you got the old remains out.

Tip for when you tap something and want/need to minimize the chips getting into things is to grease the tap to help hold onto the chips. Back the tap out regularly and remove the grease and chips, apply more new grease and repeat.

Clean out the chips from the inside of the tank. They will corrode in the condensed moisture/water in the tank and cause even more rust in the bottom of the tank.

Use some good pipe dope on the threads, snug it up, and check for leaks. Not at 200 psi to start with though. :lol:
Not that it matters as you couldn’t see any metallurgical micro-cracks from a photo, but here’s the inside of the tank. I’m also gonna replace that rusted-out 2” bushing up top if it decides it wants to come out easier than the bottom one did. All the HAZ (heat affected zone) you see around all the welds, match the pics I took before I started as I wanted to make sure I didn’t see anything different. It looks a little darker around the bung mostly because the cutting oil has coated the area making it appear brighter. As Bart said, the weld was in the top 1/2” maybe of the bung, nowhere near the tank itself, not to mention another 1/4” pipe will get threaded in there which will also help reinforce the area because although it’s 200psi, not that much volume can get between the threads, especially if I dope them. Next step is to clean out the tank. I used some cutting oil which did kinda make a mess of the top dome in the tank (see pics), but I was working vertically, so I’m sure most of the chips fell to the bottom. Since I want to pressure test this full of water to be safe (see, I still have at least 4 brain cells left, Lol), I’m sure most chips and oil will wash out the bottom when I pull the 2” plug, then I’ll let everything air dry with the plug out for a day or two. Should I coat the tank with anything, or will a good air dry be okay? Also, I’ve had this compressor since 2004 and drain my tank literally every single time I use the compressor. Once I’m done using it, I let it get down to a lower psi and just open the drain tap, so it gets drained frequently. I also usually leave the drain valve open till the next use (some people say that’s wrong, but it’s always kept my tanks nice internally). Tank looks pretty good inside for 20 years of service!
 

Attachments

  • DBEE5BBC-A239-4DCA-8BEC-0B12062E38CD.jpeg
    DBEE5BBC-A239-4DCA-8BEC-0B12062E38CD.jpeg
    587.4 KB · Views: 23
  • 6AD9DFE6-66E5-494A-AF41-94571D1E740D.jpeg
    6AD9DFE6-66E5-494A-AF41-94571D1E740D.jpeg
    689.1 KB · Views: 23
  • F1715A8F-F241-4803-9551-8CBED7E7D5A2.jpeg
    F1715A8F-F241-4803-9551-8CBED7E7D5A2.jpeg
    627.8 KB · Views: 22
  • E1191CB5-6E72-42A1-A341-B234CE26278E.jpeg
    E1191CB5-6E72-42A1-A341-B234CE26278E.jpeg
    397.9 KB · Views: 32

Jswain

Well-known member
Joined
Apr 26, 2013
Messages
2,467
Location
Calgary, AB
NO!!!!!

Unless you have an ASME R-stamp (and all the paperwork AND the material specs/certs AND the REQUIRED NDT)

YOU

DO

NOT_NOT_NOT

WELD

ON/TO

A PRESSURE VESSEL!!!!!!!

Carefully remove the buggered pipe (die grinder, small die grinder aka Dremel, etc), tap or retap the pipe threads (same existing size or worst-case scenario you ****** too much of the original bung then retap to the next bigger size), install new pipe into the pipe threads with appropriate thread sealer compound, done (after appropriate level of cursing and swearing is applied during the processes).

(although the air pressure may induce a force of 'only' 50-100 lbs on the pipe/****** in the bung, the heat of ANY welding WILL cause a HAZ to possibly change the base material properties of the bung reinforcement or the tank wall. Which means the tank is now condemned as a pressure vessel until full ASME R-stamp procedures are followed, which probably aren't going to happen after the fact. Which means the tank is then no long a valid pressure vessel, but is scrap or maybe a BBQ or smoker/grill or yard art.)

Frack! You said you already tried to weld a nut to the remains of the pipe in the *********? The tank is now suspect and should be condemned. Sorry. You f'd with the metallurgy of the tank and bung to some extent when you applied welding level heat to them. Since I do not KNOW exactly what alloy steel your bung and tank are made of or exactly how much heat you put into them and what temperature they got up to during your welding, the tank is now suspect and condemned and Out-of-Service as a pressure vessel.
Feel free to send me all your condemned "junk".
 

LopezBart

Well-known member
Joined
Oct 13, 2023
Messages
2,585
Location
Lopez Island, WA
Since I want to pressure test this full of water to be safe (see, I still have at least 4 brain cells left, Lol), I’m sure most chips and oil will wash out the bottom when I pull the 2” plug, then I’ll let everything air dry with the plug out for a day or two.
When I welded up the boiler in my 19' steam launch, I hydrotested it at 200% of safety valve setting - nearly 400 psi. Every (operational) year, it gets hydro'd to 150% of working pressure. If you have a small compressor, you can force the water out faster with a bit of pressure; this will help flush out chips as well.

-Bart
 
OP
B

BlackwaterDSM

Active member
Joined
Dec 6, 2023
Messages
32
Feel free to send me all your condemned "junk".
He got some dust on an 80gal Quincy…. Threw it straight in the trash. Lmao! Jkjk… I do understand the safety aspect, but some go wayyyy overboard with that. There’s being cautious, then there’s being ridiculous. Not gonna go spend $1500-$1800 on a comparable compressor because some bung threads got messed up.
 
OP
B

BlackwaterDSM

Active member
Joined
Dec 6, 2023
Messages
32
When I welded up the boiler in my 19' steam launch, I hydrotested it at 200% of safety valve setting - nearly 400 psi. Every (operational) year, it gets hydro'd to 150% of working pressure. If you have a small compressor, you can force the water out faster with a bit of pressure; this will help flush out chips as well.

-Bart
Thanks for the info, Bart. You’ve been very helpful. Last question I have is do you just let it air dry, or do you like “fog” it with some kind of spray to prevent rust afterwards? Do you leave your drain plug open when not in use? As I said, I’ve done it daily on this one and there’s very little rust in the tank. This will be the first time I hydro-test this one though.
 

LopezBart

Well-known member
Joined
Oct 13, 2023
Messages
2,585
Location
Lopez Island, WA
I just let it dry out, but boilers live full of water, and oil is bad in boilers as it coats, chars and insulates the heating surfaces. Your tank will get oil as carry-over from the compressor, and water from condensation. You can try oiling the inside - a bit of light oil during the hydro will be deposited on the tank surfaces when you drain the tank - but you'll get some from the compressor anyway. Use good quality oil in the compressor, and change it as mfg. recommends.
 
OP
B

BlackwaterDSM

Active member
Joined
Dec 6, 2023
Messages
32
I just let it dry out, but boilers live full of water, and oil is bad in boilers as it coats, chars and insulates the heating surfaces. Your tank will get oil as carry-over from the compressor, and water from condensation. You can try oiling the inside - a bit of light oil during the hydro will be deposited on the tank surfaces when you drain the tank - but you'll get some from the compressor anyway. Use good quality oil in the compressor, and change it as mfg. recommends.
Makes sense. I guess steam trains 100 years ago didn’t have plastic tanks. Hahaha. I’ve always just kept them drained daily and let nature take it’s course I guess. I’m very religious with my maintenance on everything from my race cars to my hand tools, so I change the oil in it more frequent than even required. I’m the type to work on my car, then spend an hour wiping each wrench I used one by one with a WD-40 coated rag to clean/protect, then a dry one after just to take off the excess. That’s why I was so bummed when this happened. Everything on this compressor is all original from 2004 and running well still. All I’ve had to do is change the oil, the belt, and maybe 3-4 drain plugs over the years. Thanks for all your help and advice, it’s greatly appreciated my friend! So glad I joined this forum. =)
 

MoonRise

Well-known member
Joined
Nov 5, 2010
Messages
4,046
Location
NJ
IF I ever weld on an air compressor tank, it's already been condemned and is being turned into something that is not a pressure vessel. :D

:beer:

(having seen the aftermath of a 'small' air compressor tank letting loose, failing suddenly and catastrophically, and breaking someone's femur, I ain't f'ing around with safety on a pressure vessel. No welding except the OEM factory stuff on that one, and the tank zippered itself open from corrosion weakening on the bottom seam of the horizontal tank.)
 

LopezBart

Well-known member
Joined
Oct 13, 2023
Messages
2,585
Location
Lopez Island, WA
No welding except the OEM factory stuff on that one, and the tank zippered itself open from corrosion weakening on the bottom seam of the horizontal tank.
Yup... the manufacturer should not have placed the welded seam down, since that area is known to be subject to corrosion. This "zippering" failure is similar to the failure seen in the gas explosion in San Bruno, CA in 2010 - the pipeline workers had cobbled together a longitudinal seam in the field back in 1956 when the pipeline was installed. The welds weren't perfect, and the utility didn't inspect it for many many years.

For details on the pipeline explosion, and some mention of the misbehavior of PG&E, see https://en.wikipedia.org/wiki/San_Bruno_pipeline_explosion.
 
To avoid these ads, REGISTER NOW!
Top Bottom