To avoid these ads, REGISTER NOW!

Broken off bolts, extraction and re-thread question

Raym

Member
Joined
Mar 28, 2016
Messages
11
Location
Ohio
I am kind of stuck on which way to go, I have four 12 MM bolts sheared off in the side of a tractor where a Front end loader mounted. I have tried using an extractor but they will not budge. So I tried drilling just one out all the way through using a slightly smaller bit than the bolt itself. Drilling it out was not too bad. I know I will not be able to drill all four of them straight enough to either not mess up the threads or leave too much bolt. I have not tried re-tapping anything before . So my question is:

Should I try and drill out close as I can to the original size and try and re-tap the original 12 MM x 1.50 and see if that will remove the remaining bolt and leave enough threads. ( The next size up of bolt is 14 MM which is way too Big)

or

Try and go up to a 1/2 SAE bolt and re-tap. I am not sure what my options are If I need to upsize the hole for new threads.

Or is there any kind of insert that would work. I was thinking of going up to a SAE grade 8 bolt or a metric 10.9 since there is so much torque on the mount. Any advice appreciated.

Thanks
Ray
 
To avoid these ads, REGISTER NOW!

GSRinmyCRX

Well-known member
Joined
Jun 10, 2014
Messages
201
Location
Western, NY
look up Keensert. its basically a high end helicoil. they run about 10-15 buck a piece but you will not be disappointed. this will allow you to keep your original bolt size just as long as you have enough real estate to put it in.

Levi
 

sberry

Banned
Joined
Jun 18, 2005
Messages
35,747
Location
Brethren, Michigan
I very rarely use an insert. Been at this a long time and could count them on one hand. I remove them. I wish I would have saved some dandys, they get shoved off to the scrap.
 

Attachments

  • bolt removal.JPG
    bolt removal.JPG
    30 KB · Views: 144
  • tap washer.JPG
    tap washer.JPG
    23.9 KB · Views: 110
  • tap washer 2.JPG
    tap washer 2.JPG
    22.4 KB · Views: 94
Last edited:
OP
R

Raym

Member
Joined
Mar 28, 2016
Messages
11
Location
Ohio
Thanks both or you for your replies, I just took a look at a YouTube video on Keensert and how to install them. That does look like the way to go. That way I can drill and not worrying about preserving the threads. It looks like they have a few install tools for setting the locking pins etc. I do have a LOT of metal left around the bolt holes . The mounts have about an inch of metal around each hole I'm sure anticipating a lot of torque. Too bad they did not use a better grade of bolt to begin with. I'll start looking to see where I can get the Keensert and the tool, and figure out tap and drill bit size for the insert.

Thanks
Ray
 

sberry

Banned
Joined
Jun 18, 2005
Messages
35,747
Location
Brethren, Michigan
Ray, what kind of tractor is this, how new etc? If I was going to the trouble and there was meat as you said, go out to 1/2, it will be 2x as strong. No fuggin with fussy parts and uses all common tools.
 

GSRinmyCRX

Well-known member
Joined
Jun 10, 2014
Messages
201
Location
Western, NY
I have never use the pin set tool but I have only ever installed them in aluminum. I just used a small punch and tapped them in one at a time. since you are putting them in steel it might be worth the cost of the tool.

when its all said and done maybe you can put a washer and extra nut on the backside of things to give you a little more strength and sort of bridge the gap between the keenset and the existing metal to beef up the connection.

I think of the keenset like those sharkbit fittings for plumbing, yes there is a cheaper way to do things but you know that this method will work 100%.

Levi
 
OP
R

Raym

Member
Joined
Mar 28, 2016
Messages
11
Location
Ohio
Hi Sberry

It is a 1985 Massey Ferguson MF-1030. They did gave a lot of support around the 4 bolt mounts. I cannot get behind it as they go into the side of the engine\transmission assembly. If I went to a 1/2 " you think there would be enough difference between the 12 MM and the 1/2 to get hole drilled out and tapped to hold?

Thanks
Ray
 

LXCam

ALLIANCE MEMBER
Joined
Apr 23, 2013
Messages
19,092
Location
AZ
If they were sheared off and not bottomed out you should be able to remove them fairly easy with a chisel and hammer. Or just drill most of the meat out and then try again with a little bit if heat.
 

MoonRise

Well-known member
Joined
Nov 5, 2010
Messages
4,028
Location
NJ
Step #1 is to remove the existing broken bolts.

Step #2 is to figure out if/what/how to 'make it stronger'.

For Step #1, take your time and don't rush the job. Rushing leads to more grief.

You sheared off the bolt heads and the body of the bolts are stuck in the (blind) threaded holes?

Bolt/screw extractors are a bit 'iffy'. When they do work, usually something else would have worked too. When they don't work, they can make for more grief removing them and the original stuck bolt/screw.

One of the 'best' ways to remove broken and/or 'stuck' threaded items (screw, bolt, tap, extractor, etc) from a threaded hole is to do like sberry showed.

Weld to the 'exposed' nub. The intense heat of the welding really helps to loosen up the 'stuck' item (thermal expansion and then contraction) and you can weld on something to let you grip or wrench onto.

If some soaking with a good penetrating oil (I like Kroil, one of, if not the 'best' ones IMHO, otherwise try 50/50 ATF/acetone) doesn't do the job of helping to loosen/lubricate and let me wrench the stuck threaded fastener out, and/or some localized intense heat (thermal expansion and then contraction) to help loosen it up, or if the bolt/screw head is 'gone' (broken or buggered up), then out comes the welder.

Carefully drilling out the center of the fastener and then removing the remaining threads or whatever is usually not my general procedure. Only sometimes will I go that route.

Like I said, Step #1 is to remove the broken/stuck bolts.

As to Step #2, if the original female threads are 'damaged' and you want/need to keep the 'original' thread size, then a threaded insert is often the way to go. Keensert, Keysert, Time-Sert, or Helicoils, depending on the application.

If you have the 'space', drilling out the OEM female threads and tapping to a larger size is sometimes an option.

But, I don't think trying to go from an M12 female thread to a 1/2" thread is a viable choice. You would have to (carefully) drill out the existing M12 threads and then tap to 1/2". But once you drill out the M12 threads, your hole diameter is too big to tap to 1/2" !!! (tap drill sizes for M12 and 1/2" are both listed as 27/64", which is 0.421") Once you drill out the M12 threads, your hole diameter is too big for 1/2" threads. NoGo on that approach.

And if something was originally metric or SAE threads, I will usually try to keep the same 'style' (metric or SAE). Not a fan of mixing metric and SAE on the same 'item'. If I'm reaching for or using metric wrenches/tools on something, I usually don't want to stop in the middle of the job and then start reaching for SAE wrenches. (Yes, I know it is done. I don't like it though.)

As to the original M12 bolts breaking (shearing off, you said?), was it the actual bolt shanks shearing or was it the heads 'shearing' off when they were trying to be removed?

If the actual bolts sheared in use, then that indicates to me that the front end loader was probably 'overloaded' (too much weight in the bucket or smashing/scraping too hard).

Got pics? We like pics, and it also can help others recommend possible approaches.

:beer:
 

jt777

Well-known member
Joined
Feb 16, 2016
Messages
215
Location
Canada
Like said try some good penetrating oil then either a chisel or center punch with a hammer. If not pull out oxy acetylene torch.
 

sberry

Banned
Joined
Jun 18, 2005
Messages
35,747
Location
Brethren, Michigan
Lotso shears come from loose bolts. I think common eze out may work, they weld out good in blocks, a block drills and taps easy but needs to be at least 1.5 diam the bolt size deep You can test fit another hole with drill bit and see how close it all comes but I bet the math works out pretty close for a 1/2 conversion.
Keeping it 100% stock isn't likely a concern here, a neat upgrade by a sliver wouldn't bother me.
I couldhave went to different size and thread bolts for this loader kept coming loose but finally drill 2 more good holes and add a extra set of bolts vs making it all critical.
 

Attachments

  • more bolts.JPG
    more bolts.JPG
    54.2 KB · Views: 48
OP
R

Raym

Member
Joined
Mar 28, 2016
Messages
11
Location
Ohio
Here is a picture of what I have, The bottom left shows a broken extractor that I have to remove ( First try) the bottom right show one I drilled out to try that method after the extractor method did not look so good. I did try heating them and PB Blaster for a day or so but I think I need to get a hotter torch. I was only using propane but I can get an acetylene and re-try.
I think what happened was over the years I probably broke a couple off and did not notice. Then when I was moving a lot of crushed limestone and bouncing across the field I bounced it too hard and bang. The bolts are broke off pretty much flush.

Once I get the extractor removed I need to then go over all the options everyone has proposed. The bolts seem to be really in there though, I have tried a chisel and hammer a little bit but it did not move. I am approaching it cautiously so far as not to screw it up so bad I have no good options. I cannot go up too big in size of bolt because I have about an 1 1/4" of plates to pass the bolts through to hold the front end loader frame and power steering plate they decided to attach it all to.

I suppose if I cannot get them out without drilling then the inserts are the way. I will try the torch first and then maybe welding something on. I have a small mig welder.

http://www.garagejournal.com/forum/attachment.php?attachmentid=540473&stc=1&d=1459198578
 

Attachments

  • bolts.jpg
    bolts.jpg
    75.2 KB · Views: 115
Last edited:

theoldwizard1

Well-known member
Joined
Feb 22, 2011
Messages
43,106
Location
SE MI
First, do you have access to a MIG welder ? If you do and there is some "meat" above the surface place a nut approximately the same size on top and the carefully weld it on. Fill the entire nut with weld. Heat the PISS OUT OF IT. Lots of iron so you are probably going to need oxy-acetylene. When you start getting some color in the surrounding area, apply the wrench.

If you don't have access to welding equipment, start by grinding what is left down flush. Use a good punch and carefully center punch it.

Now use a centering drill bit to make the first hole. Now use a LEFT HAND DRILL BIT. Start small and work your way up. I'll bet you can easily go 1 size over.
 

WhiffySpark

Well-known member
Joined
Oct 22, 2009
Messages
6,252
I never had luck getting a weld to stick. Would it help to drill it out some and fill it up while welding a nut on?
 

totaledmyGN

Member
Joined
Jun 16, 2013
Messages
5
First, do you have access to a MIG welder ? If you do and there is some "meat" above the surface place a nut approximately the same size on top and the carefully weld it on. Fill the entire nut with weld. Heat the PISS OUT OF IT. Lots of iron so you are probably going to need oxy-acetylene. When you start getting some color in the surrounding area, apply the wrench.

If you don't have access to welding equipment, start by grinding what is left down flush. Use a good punch and carefully center punch it.

Now use a centering drill bit to make the first hole. Now use a LEFT HAND DRILL BIT. Start small and work your way up. I'll bet you can easily go 1 size over.

Sometimes it might be easier to weld a flat washer to the broken bolt then weld a nut to the flat washer. Just my 2 cents.
 
To avoid these ads, REGISTER NOW!

mrolds88

Well-known member
Joined
Feb 17, 2010
Messages
117
Location
WV
Raym, that small mig should work for you. Weld the heck out of that nut, then after it is cool to the touch, take an impact set on low to start, then after hitting it on low a bit, then move up the power settings. As nice and clean as the area looks it should come out easily.
 

owenst7

Well-known member
Joined
Oct 19, 2011
Messages
632
Location
Anchorage/Reno
Flux core usually works better for the weld method in my experience. Only takes enough juice to get a good arc. You're not trying to melt the bolt out of there. I usually end up doing a series of tacks to build the material up more than a continuous weld.

The weld method is my goto, even if the fastener is snapped 1/4" below flush.
 
Last edited:

Ole Slewfoot

Well-known member
Joined
Feb 22, 2016
Messages
5,098
Location
Freedom, CA
How I do it, sorry for wall o text.
Quoting myself from an old post on another forum, I had an awful potato camera then.

So you've broken your exhaust stud

They say you have to pull the head, and pay a million dollars, not so fast!
Drilling, and easy outs, I pretty much don't even try.
Here one method using the welder is described in post #6.
I do it a little different.
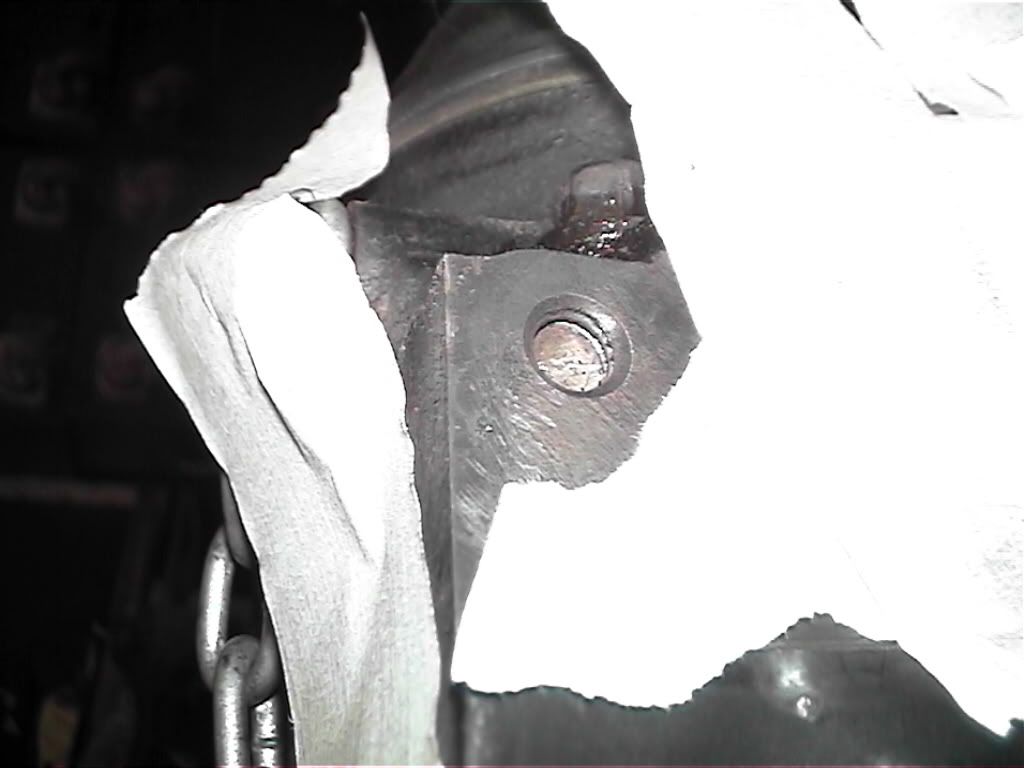
Here is a typical broke a bit below deck manifold stud.

Get any oil, flammables, and other contaminates off the immediate area.
I taped off the neighboring areas to reduce cleanup from MIG spatter, because I am a flux core *****.

DVC00669.jpg


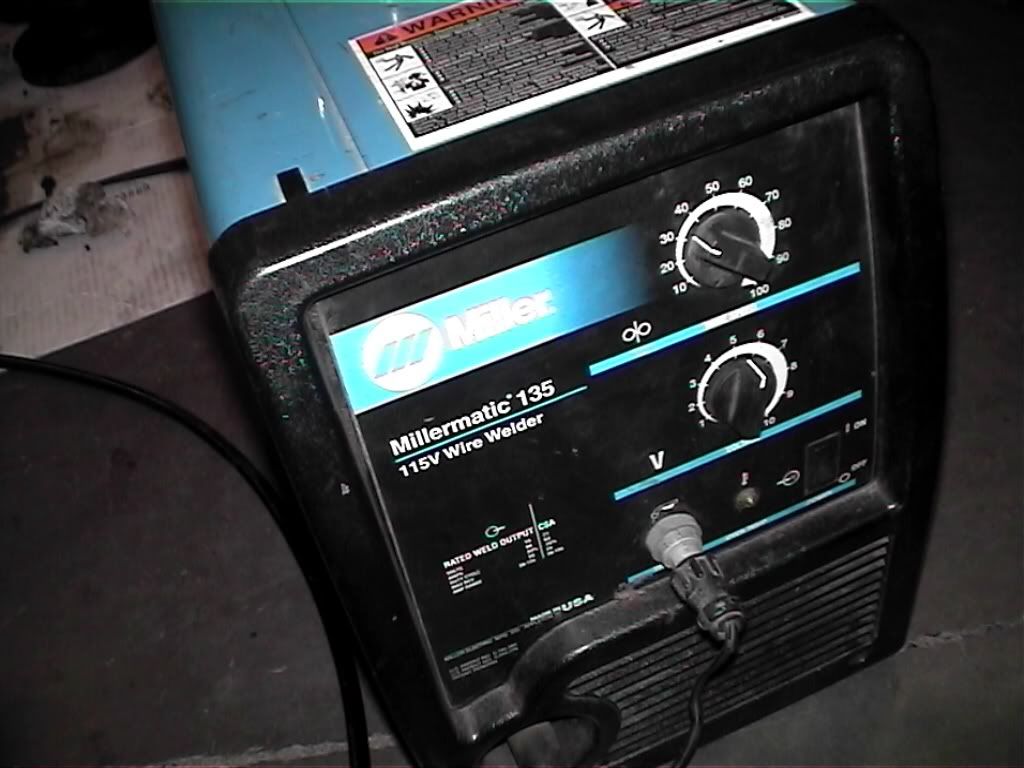
I go pretty high power, not much wire, bigger fastener, more power.
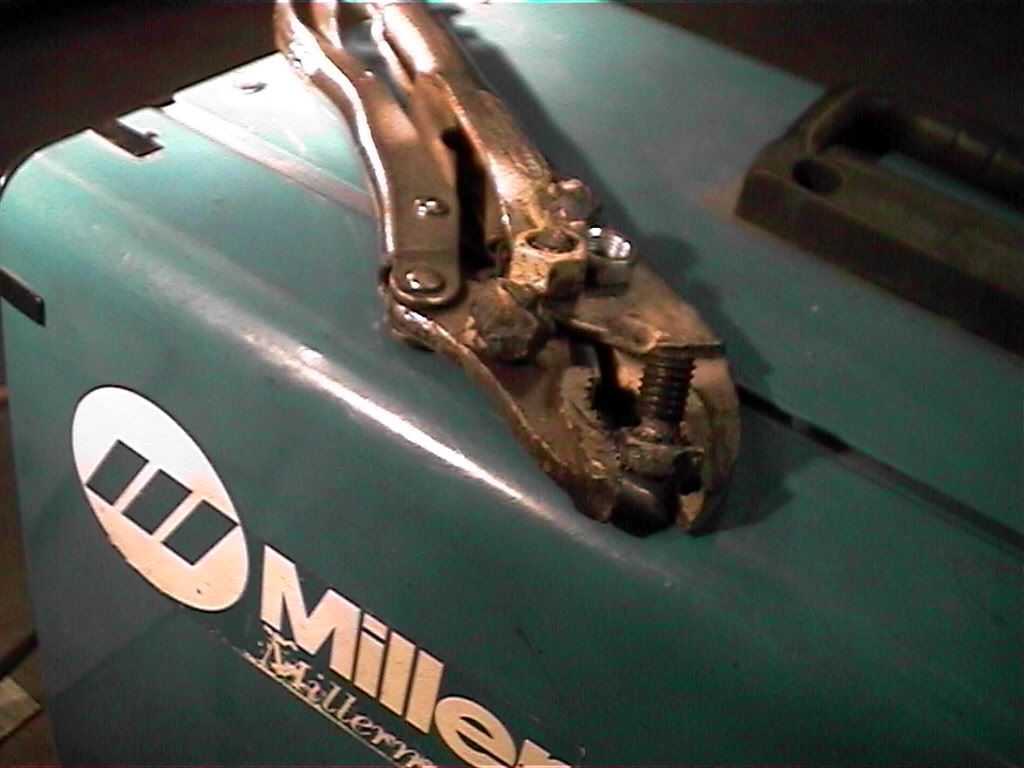
This is a portable 110V unit running 032 flux core wire.
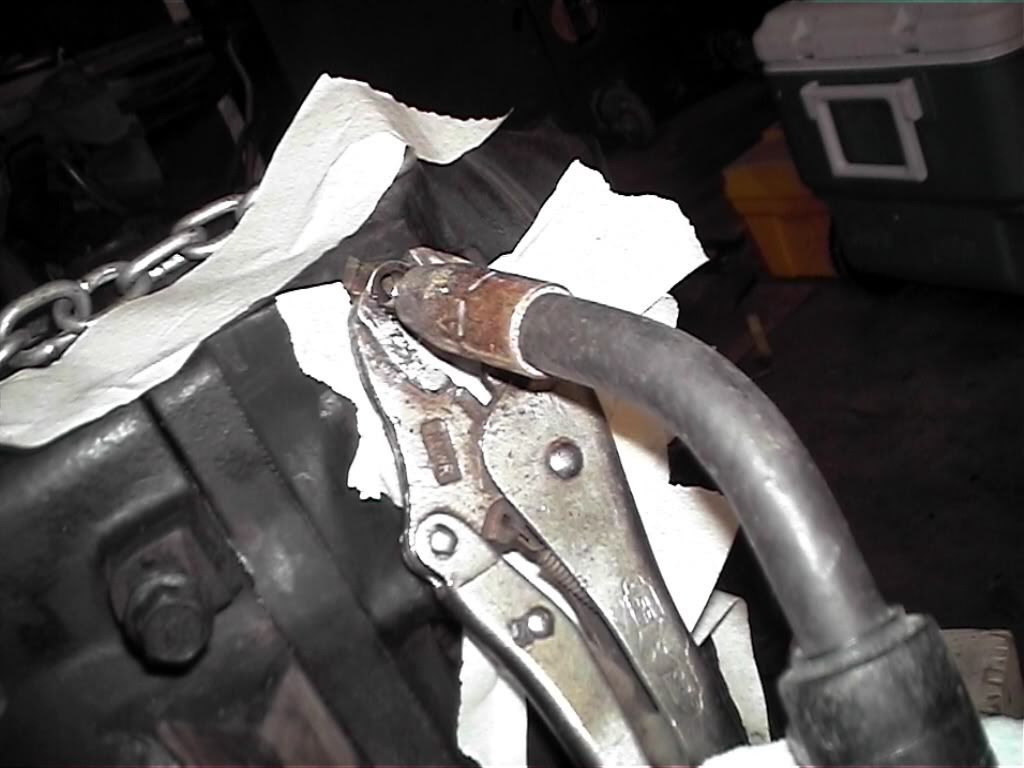
Now you are set
DVC00674.jpg


Now you are set up, take a nut about the size of the broken fastener in you Vice-Grips, and hold it flush with the hole.
Aim your MIG through the nut(down is easiest, but not mandatory, upside down ***** balls) and fire away.

Theory; Any fastener that is glowing cherry red will deform enough to unthread with the greatest of ease. That state can be a bit hard to achieve when a bolt is broken inside your motor, but each heat cycle will loosen its grip a bit.
Weld only sticks to hot metal, and the block is a huge sink. This works in our favor, we can add material to the bolt, and being liquid,it builds up to the existing threads, but doesn't bond to them. Heat doesn't want to jump the microscopic gap at the edge of the thread, so most of it goes down the fastener, making our job easier.

DVC00671.jpg


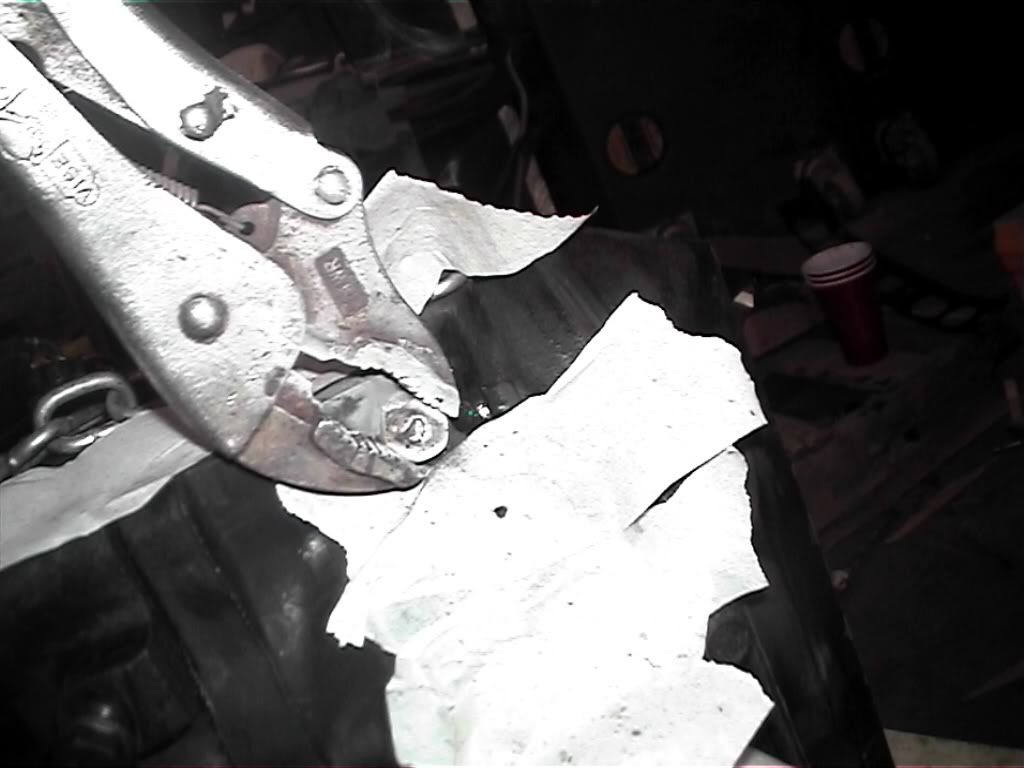
Burn into the broken face of the fastener, up to the deck, then you want to circle a bit, filing the nut, and doming the top to send as much heat as possible down to the threads.
Quick, while it is still glowing give it a wiggle, and unthread it if you can.
Sometimes I use the 'Grips, sometimes a ratchet or impact.
If the weld just breaks off, don't worry, you just added 100* to that nasty bolt, and the next nut will add 100 more. The heat differential will pull PB down the threads if you want to try that.I don't think I've ever used more than 7 nuts on one hole.

DVC00672.jpg


Yay, unthreading:dance:

DVC00676.jpg


Carnage.
Aluminum goes the same, most times you don't even need to rethread the hole.

Flanged nuts are nice to use, because they hold themselves flat a little easier.
Sometimes I'll taper the inside of the nut with a drill so I don't have to shoot such a narrow tunnel.

Why do studs fail? More theory;
A stud should be threaded in, then backed off 1/16 turn.
Then the nut is tightened over the part to provide clamping force.
Clamping force necessarily equals stretch on the stud

As an exhaust manifold heats up, it grows longer, the through holes may jam up on the stud, adding shear force to the already (however slightly) stretched stud, and POP, out of the blue, you are missing half a stud, or a permanent weak point is created where the part threaded into the head couldn't move.

Later, When you go to remove the nut, dissimilar metals have bonded after thousands of heat cycles, somebody forgot to use anti seize,and/or that weak spot is still there, at the narrow spot a thread or 3 in.
Use copper or brass nuts on your exhaust even though they cost more.

If you overtighten the nut, and break a properly installed stud, all tension is released, and you can push a pencil eraser down the hole, and spin the broken nub out....

If the stud or bolt was run to the bottom of the hole, and given another 1/4 turn, not so much. The bottom can no longer turn, the top of the thread is the weak point, and twists off. Now there is no handle, and the nub is seriously jammed into the hole. You can heat it till it changes shape, or you can jumpstart things a bit by taking a hammer(and a punch if appropriate), and driving the stuck fastener straight into the hole.
1 This sends a seismic shock through an bond that may have formed along the threads,
2 both male and female threads are momentarily distorted, but they only spring back part way, threading action just got smoother.
3 the bottomed part of the fastener is mushed against the end of the hole, but since it doesn't spring back 100%, the jam is not as strong as it was.
4 Threads area ramp twisted into a circle,the fastener can't go far from your many hammer strike, but on recoil, it sees ramp, and wants to unwind.

This works on all stuck nuts and bolts. Hammer a tight lug nut straight at the wheel for 15 minutes, and you will find it is not even finger tight.


Disclaimer;
If you are a bonehead, and light yourself, your car, or your neighborhood on fire, I am not liable, responsible, or even sympathetic. Use common sense, and don't get in too far over your head.


If I save you $1000, you can PP me a 6pack
Good luck!
 
Last edited:
OP
R

Raym

Member
Joined
Mar 28, 2016
Messages
11
Location
Ohio
Thanks everyone for the posts, and especially ole Slewfoot for the fantastic details and pictures. I do have a MIG welder and I do have fluxcore I am definitely going to try the weld\nut method on the three that I have not drilled out. Now I wish I had asked the question before drilling :) If I can get the remaining 3 with the weld\nut method out then I can deal with the last one somehow. I'll give it a try in the next day and post back the results.

Thanks
Ray
 
OP
R

Raym

Member
Joined
Mar 28, 2016
Messages
11
Location
Ohio
I have to also say what a fantastic group, I never expected so much help and ideas. Hopefully something I know will be relevant and I can give to back to someone's questions on the forums.
 

MoonRise

Well-known member
Joined
Nov 5, 2010
Messages
4,028
Location
NJ
Like I and others have said (nice write up Slewfoot :thumbup: ), weld a nut onto the end of the bolt.

If you twist the nut off and the bolt remains are still in the hole, only some minor muttering is appropriate. Just repeat until you have success.

I don't think I've had to go to seven nuts on one bolt/stud. Yet. :lol: Best/worst IIRC was three or four on the same bolt remains.

Get that weld on there nice and hot. You want to get a nice weld puddle to the bolt end and also melt into the threads or ID of the nut. Fill the 'center' of the nut ID with nice molten steel after getting the weld puddle started to the bolt end (have to have that connection to the bolt or the nut will just pop right off as soon as you torque the nut).

ViceGrips are usually also my go-to tool to hold the nut in place while welding it to the bolt/stud end and also to twist the welded nut-bolt-stud out.

Just don't weld the nut to the engine block. :lol:

The first nut I may be impatient and try to remove while things are still red hot. If it works, great. If not, repeat welding a nut on but this time let it all cool off (go get a cold drink or just stand up and take a few nice deep breaths and stroll around the dangnabit piece of machinery that is giving you some temporary difficult, confident that you, master of fire and molten metal, will win. :D ). Once cool (you and the nut/bolt/stud), remove the bolt/stud remains. Should come out. If not, take a few more deep breaths and repeat. The bolt/stud remains will come out. Eventually. :lol:

:beer:
 

owenst7

Well-known member
Joined
Oct 19, 2011
Messages
632
Location
Anchorage/Reno
Another trick with consider where your ground clamp is and if it will pull the arc in the direction you want. Once I get tacked to the broken fastener, sometimes I will clamp my ground to the pliers holding the nut/washer. Sometimes that makes it easier to throw more heat/weld to it without blowing it out.
 

Tig Master

Well-known member
Joined
Sep 9, 2012
Messages
106
Location
Where it snows
Quench the weld with a candle and let it cool to the touch the wax seeps in and when cool is the lubricant.Let it cool to the touch before trying to remove.I have removed hundreds over the years and haven't been stumped yet.I use my tig welder with foot pedal and linger on for a while to get good penetration.

T
 
OP
R

Raym

Member
Joined
Mar 28, 2016
Messages
11
Location
Ohio
I need more welding practice, I am not getting a hot enough weld. It just twists off the face of the bolt, I'll keep at it tonight :)
 
Last edited:

Batman tech

New member
Joined
Oct 13, 2015
Messages
1
Raym if your having trouble with welding the nut, try welding a large flat washer to the broken bolt first. Using the same techniques that others have posted. Completely fill in the center. Then tack on a nut and turn it out. All the other tips are great definitely going to use those too.
 

AndrewDouglasBird

Well-known member
Joined
Oct 15, 2013
Messages
217
Location
Vancouver, WA
Half the reason welding works is because the heat helps break the bolt loose. I'd try a torch and an extractor. Make sure to center punch the bolt before drilling so that the drill goes into the center.
 
OP
R

Raym

Member
Joined
Mar 28, 2016
Messages
11
Location
Ohio
I have a Lincoln 135 115 Volt MIG. I got my Dad's torch last night and I'll go tonight and get some washers and more nuts and give it another shot. I've been trying the various things, with washers I can linger a bit longer on the bolt face and with the torch I can try and really heat up the bolts. On one of my first attempts , I have one bolt drilled out and snapped the extractor off. I managed to get the extractor out but even the remaining threads seem to be stubborn. I have four of these things to remove and cannot even get one out :)

Thanks
Ray
 
To avoid these ads, REGISTER NOW!
Top Bottom