
You are using an out of date browser. It may not display this or other websites correctly.
You should upgrade or use an alternative browser.
You should upgrade or use an alternative browser.
Broken Old Garage Gets New Life
- Thread starter Bull
- Start date
Foul
Well-known member
In the western part of the state, about two hours or less from Bennington.
It's a mighty kind offer, and if I decide to go with concrete then I will have to consider. That's hard work to volunteer to help a stranger with.")
I'm of the opinion that if somebody needs help, you offer it. Doesn't matter if they're a stranger or your best bud.
Great progress, btw.
dan
That's an old-school philosophy, for sure.
Is that Teddy Roosevelt in your avatar?
Is that Teddy Roosevelt in your avatar?
I'm of the opinion that if somebody needs help, you offer it. Doesn't matter if they're a stranger or your best bud.
Great progress, btw.
dan
I removed the old wiring from the garage today so the builder will not have to deal with it. Minor progress. This circuit was live until recently. Scary, given the appearance of the boxes, switches, and connections 
Here is where the power enters the building. Just regular old Romex that pops up out of the ground outside the garage, slips under the siding, then enters these antiquated boxes.

This switch is kind of neat...I've never seen one before.

Here is the wiring for the old goose-neck fixture on the front of the garage. Looks like a pro did it.

And here is that gooseneck fixture. I'd like to save it, but it was ******* me off today.It looks like it's just a piece of metal conduit bent into that shape. The end of the conduit goes through the gable of the garage and passes through a stud that someone drilled through for it. The end of the conduit is threaded, and there were two "nuts" on it. I removed both of them, but the conduit was stuck TIGHT in that hole when I tried to pull it out. I wiggled it back and forth vigorously from the front of the garage, and seemed to make it a tad bit looser. Went inside the garage and hammered pretty heavily on the end of the conduit (with a nut back on it to protect the threads) to try and push it back through the hole in the stud. Nothing. Maybe the wood has fused itself to the metal after all these years, I don't know. I might decide it is not worth messing with and just break it to get it out and buy a replacement.

My builder will be doing some other work here, hopefully this week (installing gutters and cleaning up my fascias.) He is supposed to do the garage right after that, so maybe I'll have some more exciting progress to share before too long.
Here is where the power enters the building. Just regular old Romex that pops up out of the ground outside the garage, slips under the siding, then enters these antiquated boxes.
This switch is kind of neat...I've never seen one before.
Here is the wiring for the old goose-neck fixture on the front of the garage. Looks like a pro did it.
And here is that gooseneck fixture. I'd like to save it, but it was ******* me off today.It looks like it's just a piece of metal conduit bent into that shape. The end of the conduit goes through the gable of the garage and passes through a stud that someone drilled through for it. The end of the conduit is threaded, and there were two "nuts" on it. I removed both of them, but the conduit was stuck TIGHT in that hole when I tried to pull it out. I wiggled it back and forth vigorously from the front of the garage, and seemed to make it a tad bit looser. Went inside the garage and hammered pretty heavily on the end of the conduit (with a nut back on it to protect the threads) to try and push it back through the hole in the stud. Nothing. Maybe the wood has fused itself to the metal after all these years, I don't know. I might decide it is not worth messing with and just break it to get it out and buy a replacement.
My builder will be doing some other work here, hopefully this week (installing gutters and cleaning up my fascias.) He is supposed to do the garage right after that, so maybe I'll have some more exciting progress to share before too long.
e-tek
Well-known member
Love that goose neck. Great progress!
Uncle Buck
Banned
Buck, this one measures approximately 22x18, so a bit smaller than yours. Are your house and garage from the same era as mine i.e. the '30s? The roof is not that common, I don't think. Certainly not in modern building.
Bull, I missed this! Yes, AFAIK my house was built in 1929, the house is an airplane bungalow, brick, craftsman style. The roof on my house has a matching detail at the very front.
My garage is matching brick to the house, and for it's time a brick two car would have been a bit upscale. The real problem with a brick garage is if you are on a smaller city lot, a brick garage in great shape can pose some issues if you want to add on and not totally destroy the period look of your property which is exactly my problem. Most of that stuff piled up in my garage are good tools/equipment machines. I am just flat out of room and will do my best to get buy with the cramp for awhile more till I can pull off a move to a place that will give me more room to expand, or already has a bigger outbuilding to accomodate my accumulation of tools/machines. I think you will be pleased once you get your project pulled together there.
Uncle Buck
Banned
I removed both of them, but the conduit was stuck TIGHT in that hole when I tried to pull it out. I wiggled it back and forth vigorously from the front of the garage, and seemed to make it a tad bit looser.
May not help, but what about spraying silicon all around from the inside and out and then trying? Just a thought.
Thanks, guys. The way I see it, there is no way to make the building any worse than it is!
Come on out this way, Buck...I'd love to have a cool neighbor for once, and I'm sure we could find you a place with some room for your stuff!
Come on out this way, Buck...I'd love to have a cool neighbor for once, and I'm sure we could find you a place with some room for your stuff!
May not help, but what about spraying silicon all around from the inside and out and then trying? Just a thought.
Lube does usually make things better, eh?

I'll try it.
Now, there is no reason why there would be anything holding the fixture in place on the front side, as in under those shakes, right? I'm assuming that the only thing keeping it in place is the friction in the hole and the nuts that were on the back side of the conduit.

jwhcars
Well-known member
I suspect a plate under the shakes attached to the pipe.
I suspect a plate under the shakes attached to the pipe.
Damn, I was hoping not to have to remove any of them to check.
rieferman
Well-known member
just sawzall flush with the outside of the building, and figure out how to reconnect later.. you'll only be losing a few inches of pipe and it looks like the gooseneck is more than long enough to be able to absorb the lost material
I knew bookmarking cool items on this site would pay one of these days. If you're in the market for a gooseneck light check this out:
http://www.affordablequalitylighting.com/docs/outdoor/wall/subindex.html#03
There are a few different types along with different colors. They are very affordable and several Garage Journal members have posted about them.
If you're in the market for a gooseneck light check this out:http://www.affordablequalitylighting.com/docs/outdoor/wall/subindex.html#03
There are a few different types along with different colors. They are very affordable and several Garage Journal members have posted about them.
Thanks for that link. The one that most closely resembles the light I have is only $50. I'm sure mine is of higher quality (hey, it's old an US-made) but for $50 I might be better off picking up a new one.
I knew bookmarking cool items on this site would pay one of these days.
http://www.affordablequalitylighting.com/docs/outdoor/wall/subindex.html#03
There are a few different types along with different colors. They are very affordable and several Garage Journal members have posted about them.
thomask
Well-known member
Great post and pics. You should be very proud of your saving an old building. You seem very organized and not scared to go after a big project with great reward 
Last edited:
Ok, life has gotten busier for me since last week, but that just means I need to be more efficient and eat my Wheaties!
My builder started doing some other work on my house, so while he is doing that I had him show me where I need to dig for the footings for this project. We need three new footings in the front of the garage for the 8' door and the entry door. These need to be 4'8" down because of the frost here. He said we could get away with 4' since he knows digging these by hand will be a ball buster for me, but I told him no, if we need 4'8" then that is what I am going to provide.
This is as far as I got today...this hole is not deep enough yet, but it's all I had time to do. Was busy with other things until about 3pm, then started on this. Two of the new footers will be going in here. Once I finish this, I'll move on to the other holes I need to dig.


There are a few reasons why the digging is hard:
1: 90 degree temps
2. The first two feet are coarse sand and rocks...lots and lots of rocks from big to small. Plus, old broken concrete chunks. This is what whoever built this structure in the first place used for fill.
3. After the rock/sand layer, you hit hard, hard clay. Got to break it with a pick before you can shovel it out.
Here is a small number of the rocks that I pulled just from that one hole so far. Many others, the smaller ones, were carted away in the wheel barrow to the back of the garage where I am piling the dirt for now. The trash can lid gives some sense of scale:

Speaking of trash cans, I decided not to put these nasty old things back in the garage once it has been renovated. Who wants rotten trash smell inside? Not me! So, I am having my builder make a simple little enclosure on the east side of the building. I'm picturing a "gate" on the front that swings open to remove the cans when full. I believe he will also extend the roof over the enclosure to keep water from pouring onto them. I am having him make it long enough to hold four of the large Rubbermaid cans. These stakes are where I will need to dig two 4'8" holes for the posts:

Should be easier digging because there should not be so many rocks...just heavy clay.
I received an e-mail from Photobucket saying that me free account is approaching the limit of my bandwidth for the month. If I go over, my picture links will not be available until my limit is rest on the 6th of next month. Just an FYI.
Thanks for looking at my humble project.
My builder started doing some other work on my house, so while he is doing that I had him show me where I need to dig for the footings for this project. We need three new footings in the front of the garage for the 8' door and the entry door. These need to be 4'8" down because of the frost here. He said we could get away with 4' since he knows digging these by hand will be a ball buster for me, but I told him no, if we need 4'8" then that is what I am going to provide.
This is as far as I got today...this hole is not deep enough yet, but it's all I had time to do. Was busy with other things until about 3pm, then started on this. Two of the new footers will be going in here. Once I finish this, I'll move on to the other holes I need to dig.
There are a few reasons why the digging is hard:
1: 90 degree temps
2. The first two feet are coarse sand and rocks...lots and lots of rocks from big to small. Plus, old broken concrete chunks. This is what whoever built this structure in the first place used for fill.
3. After the rock/sand layer, you hit hard, hard clay. Got to break it with a pick before you can shovel it out.
Here is a small number of the rocks that I pulled just from that one hole so far. Many others, the smaller ones, were carted away in the wheel barrow to the back of the garage where I am piling the dirt for now. The trash can lid gives some sense of scale:
Speaking of trash cans, I decided not to put these nasty old things back in the garage once it has been renovated. Who wants rotten trash smell inside? Not me! So, I am having my builder make a simple little enclosure on the east side of the building. I'm picturing a "gate" on the front that swings open to remove the cans when full. I believe he will also extend the roof over the enclosure to keep water from pouring onto them. I am having him make it long enough to hold four of the large Rubbermaid cans. These stakes are where I will need to dig two 4'8" holes for the posts:
Should be easier digging because there should not be so many rocks...just heavy clay.
I received an e-mail from Photobucket saying that me free account is approaching the limit of my bandwidth for the month. If I go over, my picture links will not be available until my limit is rest on the 6th of next month. Just an FYI.
Thanks for looking at my humble project.
Kevin54
MEMBER EMERITUS
Should be easier digging because there should not be so many rocks...just heavy clay.
I received an e-mail from Photobucket saying that me free account is approaching the limit of my bandwidth for the month. If I go over, my picture links will not be available until my limit is rest on the 6th of next month. Just an FYI.
You KNOW that right under the second hole will be a rock lurking there just to prove you wrong.

As far as pics...sign up to ImageShack. It's free and will let you host quite a few pics.
thomask
Well-known member
"My builder started doing some other work on my house, so while he is doing that I had him show me where I need to dig for the footings for this project. We need three new footings in the front of the garage for the 8' door and the entry door. These need to be 4'8" down because of the frost here. He said we could get away with 4' since he knows digging these by hand will be a ball buster for me, but I told him no, if we need 4'8" then that is what I am going to provide."
Hey BULL, I feel for you guys up north with all that frozen ground to deal with. Down south here you would hit water if you dug that deep.
Good luck, this is really a great project.
Tom
Hey BULL, I feel for you guys up north with all that frozen ground to deal with. Down south here you would hit water if you dug that deep.
Good luck, this is really a great project.
Tom
Thanks, Tom I appreciate the pat on the back.
Having to dig so dang far for frost sure does ****...about as bad as 10 degree temps in the winter ****. And I have a high water table here, so my holes do have water in them...not a whole lot, but some.
My wife just laid some financial realities on me tonight, so I might have to go less far with this project this fall than I hoped. I was envisioning finishing off the inside and wiring it before winter. But now I might have to settle for making it structurally sound, re-doing the front gable end, painting the exterior, and putting down my gravel floor.
I hate money. Only because I don't have enough, of course.
wrigh003
Well-known member
Those financial realities do tend to ****, quite a bit- I spend a lot of time thinking about them, too. Tearing into something like that is the first (and hardest, yet most necessary) step, though. I have found through renovating my house in the land of the eternal shoestring budget that the slower you go, the more likely you are to be able to think about what you really want, plan it through in your head, and wind up with a good result. Goes for just about anything, really- after all, what's the hurry, in the end?
thomask
Well-known member
Those financial realities do tend to ****, quite a bit- I spend a lot of time thinking about them, too. Tearing into something like that is the first (and hardest, yet most necessary) step, though. I have found through renovating my house in the land of the eternal shoestring budget that the slower you go, the more likely you are to be able to think about what you really want, plan it through in your head, and wind up with a good result. Goes for just about anything, really- after all, what's the hurry, in the end?
You are right on point. I built a 26x18 Sunroom onto our house for our kids and grandkids. It took two years to complete working out of pocket. It was very rewarding even though it took way too much time but the bank was not a partner in this build, persistence was.
Hey BULL, just keep the goal in mind and one day you will look up and say "I did that" and be proud of your work and savings.
Some minor progress to report. A few days ago, I finished digging the giant holes for the new footings for the south gable end of the garage. Started digging the first of two holes on the east side of the building for my trash can storage deal.
My builder began fiddling with the garage today...just coming up with a plan of attack and doing some preliminary work. I was in the barn working on my car when he called me over to the garage to show me that he had gotten the back wall perfectly plumb...it had to be pulled to the west three full inches. He said it will be the easiest wall to fix.
Here are a few pics to show what things look like now:
Hard to tell in this pic, but the back wall is perfect:

He's set up two adjustable threaded rod things on the back wall...they are actually used for tweaking newly framed walls in new construction, but worked for this purpose, too.


Cable coming through the west wall and wrapping around a 2x brace that spans a few studs:
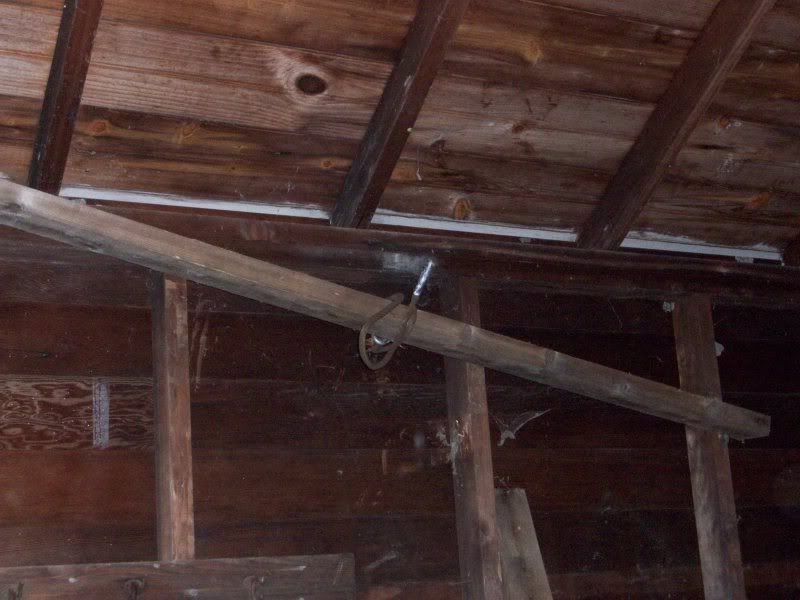
This tree is supposed to come down, but I guess it's good I have not taken it down, yet. Serving a nice purpose here:

My builder began fiddling with the garage today...just coming up with a plan of attack and doing some preliminary work. I was in the barn working on my car when he called me over to the garage to show me that he had gotten the back wall perfectly plumb...it had to be pulled to the west three full inches. He said it will be the easiest wall to fix.
Here are a few pics to show what things look like now:
Hard to tell in this pic, but the back wall is perfect:
He's set up two adjustable threaded rod things on the back wall...they are actually used for tweaking newly framed walls in new construction, but worked for this purpose, too.
Cable coming through the west wall and wrapping around a 2x brace that spans a few studs:
This tree is supposed to come down, but I guess it's good I have not taken it down, yet. Serving a nice purpose here:
thomask
Well-known member
Looking good Bull, looking good....


tcianci
Well-known member
Bull, the siding you have on your garage is called Novelty siding and it was very popular on outbuildings in the 30's and 40's in our area. Do a web search you can find sawmills that make the stuff. I have also heard of the stuff being called Dutch Lap siding but I think Novelty is really the correct term. And, while I'm not a fan of OSB for an interior wall finish, applying OSB to the interior of your building or letting in a wind brace at each corner will make it nice and rigid and keep it from racking again. The Novelty siding provides little to no resistance to racking because of the small vertical dimension if the boards. The frame of the building should have been constructed with wind bracing let in at every corner. That coupled with the large front opening and the subsequent settling of the foundation will let a building like that really go to pot . The reduced opening and additional sheathing you have provided in the front will help somewhat in stabilizing the building. No matter what you use on the inside of the studs to keep it from racking, (even diagonally applied ledger board would suffice) you may also want to consider an X brace diagonally from corner to corner at the ceiling plane.
BTW, one other thing I noticed in your pictures is that the long walls are bowed out at the center. I suspect that because of this you may also notice a corresponding sag in the roof ridge. The best way to correct it is to rig a come-along from top plate to top plate at the mid point of the building. Drawing the walls together will put an even force on the ridge and bring things back into line. Consider leaving a cable or turnbuckle in place to keep things stable.
One other question for you....Have you been able to determine that the existing footings are based below frost depth?. That may be the root cause of the racking of the structure. Like I mentioned earlier that type of construction offers little resistance to racking and if the footings move around it will take the building with them, which is all the more reason to make the structure ridgid, so that it moves in unison. If in fact the original footings are subject to frost heaving, the new footings you installed in your man-door area could even make the problem worse because now you have a section of the wall that will not move with the rest of the building when it is subjected to frost movement.
Last edited:
Tom,
Thanks for taking the time to write the thoughtful and detailed post. You've got a good eye. Yes, the middle of the long walls do bow out, and my builder said that while he'd try to improve that, he's not sure how successful he'll be. That's ok, because when he and I spoke initially I told him I was not trying to make the structure perfect. There is also a corresponding sag in the roof, as you guessed. I thought I included a pic of this, but I see I did not: he did put a come-along/turnbuckle inside the building, in the middle, going from top plate to top plate. He's cranked on that thing pretty good and let it sit for about a week. To walls just don't want to come in enough to get rid of the bow/sag.
As for the footings, I saw the bottom of one near the SW corner of the building when I was digging one of the giant holes for the new footers. It definitely was not down 4+ feet like it should be, which is no surprise. The old barn here is the same way. The way I figure it, though, addressing that issue takes this project to a whole new level and well beyond the $3k I am spending now (floor/interior finishing not included). I'm looking at it like this: the building has avoided collapsing for seventy years despite questionable original construction practices, poor drainage, and lack of maintenance. By fixing some of the problems structurally, and improving drainage around the building so water has less of a chance to pool against the walls/get under the floor and freeze/heave, I'm hoping to allow the building to last for another few decades at least.
For the interior, I am leaning towards finishing the walls with regular plywood, not OSB. Maybe 1/2"? I think I will have one continuous seam about the mid-point, instead of staggering them. That way, I could just trim the seam to hide it. I hope that would not detract too much from the additional rigidity you get from the staggered seams.
rieferman
Well-known member
I'm loving this thread - it's so fun to read all the problem solving etc.
tcianci
Well-known member
Bull, Sounds like you are on the right track and I agree with you 100% about how far you can take the place for a given amount of money! I wasn't suggesting that you do anything with the footings, just an observation. Your statement about how long it has lasted in spite of the deficiencies is a perfect example of what lots of people seem to miss and your approach is thoughtful and will yield a result that should serve you for many years.
I mentioned OSB simply because everyone here seems to love the stuff and the only reason I can figure is that it is cheaper than plywood. Personally, I would go with 1/2 inch plywood. Plywood installed with the vertical seams staggered will give you the result you are looking for, no need to stagger the horizontal joints, you are simply duplicating the same application that is used on the outside of the studs in a new construction.
I was thinking about your floor. I recall putting in driveways for people years ago that consisted of compacted "crusher run". The stuff packs like a dream and with some care you can get a nice flat surface. An example of this is the bases that guys are constructing in preparation for installing pavers, you can get the stuff like glass. Once we were done with the driveway, we would break open a bag of masonry cement on the tailgate of the truck and while one guy would creep the truck down the driveway, another would stand on the back of the truck and cast the cement with a shovel over the surface. Then we would turn a lawn sprinkler on it. It seemed to "crust up" the surface and just make it more solid.
No matter how you finish it out, I applaud you for accepting the building for what it is and developing a workable plan. The success of a project sometimes is measured in how much new whiz-bang stuff and features are jammed into it. The real success is whether you got a finished product that meets your needs for a cost that you are comfortable with. Also looks like you got a thoughtful contractor to work with you, that's always a plus and it helps to show that not all of us contractors are scum.
I know you had posted to me about the garage door openers I had in the classifieds, Since they have been such a hot item...I still have them! C'mon down and get 'em, free. It looks like you will give at least one of them a good home. I would send them up UPS or something but the rail is one piece and I think the shipping would be knida spendy.
Take care,
Tom
I'm loving this thread - it's so fun to read all the problem solving etc.
Thanks, Bob! It's certainly not as cool as your barn, but it is another old building saved from collapse and despair!
Tom, since you are a contractor yourself, and one who is passionate about the craft, I appreciate your praise. I will be using your advice about the 1/2 plywood and seams, and if I can find some of this "crusher run" to be delivered locally then it sounds like what I want. Would you guys use a plate compacter to compact it, or just muscle and a hand tamper?
Another question regarding the floor is how far down I have to dig out the soil that is in there now (a sand/clay mix) before I start bringing in the top layer of crusher run? I know with concrete, you need to go down rather deep and replace with gravel to compact it into a solid, stable base so the concrete does not shift/heave. But, is this the same process for what I am doing with a dry aggregate for my final layer?
Tom, I know a good deal when I see one, and a free garage door opener or two is a good deal. How quickly do you want to move them? I'm not out in the Walpole area much at all (ever) but I do drive east on Rt.2 and then pick up Rt 13 when I go to visit my brother in NH. I could work in a stop to your place the next time I am coming from or going up there. Oh, and thank you for the offer, too.
I hope you don't feel like people perceive contractors to be scum in general. There are obviously lots of them who are not on the level, but that's true for any group. I'd guess you are well removed from that segment of the profession! I am certainly glad that I found this guy to work with last year. Very friendly, trustworthy, and likes to do good work. He's also willing to do projects like this, that a lot of guys wouldn't touch with a ten foot pole.
Gotta run for now, thanks again guys.
tcianci
Well-known member
Bull, If you have a base of sand and clay you will probably be OK with about 6 inches of crusher run. The whole trick is this... you can get by with cardboard for a floor if it is on something stable. If you think the sand/clay mixture will drain well enough then just back out the rubble until you have enough space for about six inches, it will compact somewhat. If you think there is a chance that there is too much clay in the mix, dig a few more inches out and fill it with 3/4 washed stone and then top it off with the crusher run. In this instance you can go with more stone than crusher run. Rent a plate compactor. The evenness of your finished product will depend on the evenness of the thickness of the installed material, but with a good eye and a steady hand, you can get it quite dense and flat. As long as the base is well drained, it will not heave and even if it did, it will return to normal when it thaws. It's not going to be concrete, but more like a well used gravel driveway, without the ruts. Rolling cars and landscaping equipment across it will be a snap, it's not going to move around like dirt or pea-stone.
I recall you mentioning that you were going to make sure the grade around the building was correct. That's key to your project.
Any materials supply company that asphalt paving contractors use should be able to supply the crusher run. The easiest way to put this stuff down is to let the guy meter it out into your wheelbarrow through the trap door in his tailgate, just like they do with the blacktop pavement. He may not want to hang out long enough to do that but maybe he could be bribed. I'm sure a guy named Bull probably doesn't have too much of a problem man-handling a few tons of crusher run around but why bother if you don't have to. Otherwise, have the guy dump it as close to the opening as possible and you can just fling it toward the back of the building. It will be especially helpful if he can actually dump it right into the garage as much as possible, that way when you have shoveled off the top to fill in the floor, you have a piece of the floor as big around as the original pile already done for you. I spent many years on the ***-end of one of my fathers' wheelbarrows. Speaking of which, and not to insult your intelligence, always point the wheelbarrow in the direction you want to go BEFORE you load it. Don't ask me why I know, and heap as much of the load as possible directly over the wheel, you need to push it ALL but you only need to lift SOME of it!
Also, you may want to consider a 4x6 piece of PT that is rated for ground contact as a sill for the new garage door to land on and also contain the open edge of your compacted floor. That sill will give you a nice straight line to finish to and ensure that you get a decent seal when you close the door. I use the term "seal" loosely, obviously a building like this is not going to hold a vacuum! But having a nice straight level surface for the door to close on will certainly look sharp and get rid of a potential seasonal maintenance exercise.
I have a brother that lives in Mont Vernon NH and I am usually up there the last Sunday of every month for a swap meet in Amherst. Rt 13 goes right near there. PM me and I will supply you with my cell number and we can talk about meeting to deliver the openers.
Last edited:
Well, progress has been made, although I have not had time to update each step. Here are some new pics.
Here is the new facade of the building. You can see that I have also stripped most (but not all) of the old paint, which I did with a pressure washer. Good enough for a garage, and waaaayyyy better than hand scraping. Wish I could use the method on my house.


Here is my pile of gravel (11 yards) for the base of the floor. The top will be a local product from a rock crushing plant just a couple miles up the road from me.

Here is a smaller pile of gravel (11 yards was too much!) and two coats of 100% natural linseed oil paint on the shakes on the south gable end. Still needs one more coat. This will match my house. The color (lichen) clashes with the red roof on the garage, but it doesn't leak, so I'm not replacing it just to color coordinate.


Gravel base for the floor. It's not pretty or glamorous, but I am happy with it.


I am so stoked to see this building being reborn. I can't even describe the enjoyment that I am getting from using a little bit of money and a lot of sweat equity to save what otherwise would have disintegrated and have myself some extra space!!
I plan to trench the short distance between the garage and the house the run a cable for power. How far down does the cable have to be (buried in conduit, of course.) Is it 18"?
Here is the new facade of the building. You can see that I have also stripped most (but not all) of the old paint, which I did with a pressure washer. Good enough for a garage, and waaaayyyy better than hand scraping. Wish I could use the method on my house.
Here is my pile of gravel (11 yards) for the base of the floor. The top will be a local product from a rock crushing plant just a couple miles up the road from me.
Here is a smaller pile of gravel (11 yards was too much!) and two coats of 100% natural linseed oil paint on the shakes on the south gable end. Still needs one more coat. This will match my house. The color (lichen) clashes with the red roof on the garage, but it doesn't leak, so I'm not replacing it just to color coordinate.
Gravel base for the floor. It's not pretty or glamorous, but I am happy with it.
I am so stoked to see this building being reborn. I can't even describe the enjoyment that I am getting from using a little bit of money and a lot of sweat equity to save what otherwise would have disintegrated and have myself some extra space!!
I plan to trench the short distance between the garage and the house the run a cable for power. How far down does the cable have to be (buried in conduit, of course.) Is it 18"?
Stu.C
Member
Just wanted to say thanks for a thoroughly enjoyable half hour whilst I caught up on your progress - you're doing great and I reckon it's the more money-conscious, real-world, get-inventive-with-solutions builds that I find most interesting.
rieferman
Well-known member
nice, this turned out great. you should keep your eye on craigs list for good deals on landscaping pavers.. with that compacted base, it'd be an easy, permanent, cheap solution in there. But in any case, the gravel will be great on its own too.
btw, saw that shed you built in another thread someplace. skills man, skills
btw, saw that shed you built in another thread someplace. skills man, skills
twostory
Well-known member
I plan to trench the short distance between the garage and the house the run a cable for power. How far down does the cable have to be (buried in conduit, of course.) Is it 18"?
18" if the wire is inside of conduit.
24" if the wire is direct burial cable (no conduit)
wagonmaster
Well-known member
Great stuff! Thanks for sharing! It's really getting to look good!
thomask
Well-known member
BULL when you get your new paint on that siding you will REALLY be surprised.
That will be like a 90210 makeover on TV.
Post up a before and after picture for us when you get to paint her.
SUPER
That will be like a 90210 makeover on TV.
Post up a before and after picture for us when you get to paint her.
SUPER
tcianci
Well-known member
Bull! That building rocks, man! You have really pulled it back from the edge. I can only imagine what your back feels like by the end of one of your workdays! I'm headed up to NH this Sunday. I sent you my phone number a while back, give me a call before then and I can meet you so I can give you those door operators. I downloaded all the manual stuff and wiring diagrams so you should be good to go!
BTW, you can paint roofing shingles!
Tom
BTW, you can paint roofing shingles!
Tom
It is really nice of you guys to encourage me with such compliments. Thank you, and I am glad that even a few people are enjoying the salvage of an old, crusty building.
I have considered pavers for the floor. Found some listed on CL, but they were gone by the time I found the ad. I doubt I'd be able to get them as cheap as what the gravel/crished stone floor will cost me though. I only have $150 in it right now for the 11 yards of gravel, delivered. I'm hoping the top layer does not add too much more. I can always dig back down to gravel and do pavers later, too.
I will post a side-by-side when the whole shebang is done, absolutely. That's a good idea.
Tom, I have not forgot about the openers...just have not been up to see my bro in a while now. Not sure when I'm going up there next...things need to settle down here.
How do you paint roofing shingles? I had no idea that could be done.
Again, thanks to all for the feedback, it feels nice.
Oh, one pic from today. I should have gone out and worked on my broken car after work today, but first I just had to get a coat of paint on the siding on the front of the garage, to see some more progress. Two more coats needed on the bottom, one on the top, then I need to do the trim and the other three sides of the building! I'm sort of tempted to buy a Wagner sprayer, but don't know if it will work well with my expensive linseed oil paint.

I have considered pavers for the floor. Found some listed on CL, but they were gone by the time I found the ad. I doubt I'd be able to get them as cheap as what the gravel/crished stone floor will cost me though. I only have $150 in it right now for the 11 yards of gravel, delivered. I'm hoping the top layer does not add too much more. I can always dig back down to gravel and do pavers later, too.
I will post a side-by-side when the whole shebang is done, absolutely. That's a good idea.
Tom, I have not forgot about the openers...just have not been up to see my bro in a while now. Not sure when I'm going up there next...things need to settle down here.
How do you paint roofing shingles? I had no idea that could be done.
Again, thanks to all for the feedback, it feels nice.
Oh, one pic from today. I should have gone out and worked on my broken car after work today, but first I just had to get a coat of paint on the siding on the front of the garage, to see some more progress. Two more coats needed on the bottom, one on the top, then I need to do the trim and the other three sides of the building!
I'm sort of tempted to buy a Wagner sprayer, but don't know if it will work well with my expensive linseed oil paint.