To avoid these ads, REGISTER NOW!

Buffalo No. 15 drill press refurb

TXNinAZ

Well-known member
Joined
Oct 9, 2011
Messages
507
Location
Phoenix, AZ
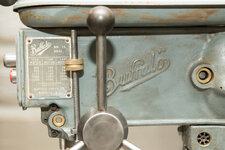
Hi all, thought I'd share my just completed refurb/refresh of a Buffalo No 15 and maybe help someone with an idea or technique.

Bought the press at an estate sale. Last of acres of junk included the drill press and not much else. Took it home for $100, which is a great deal for old iron around here.
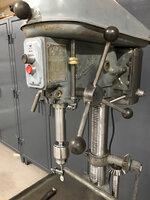
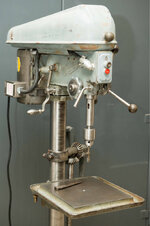
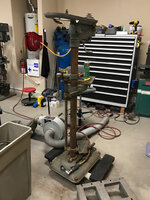
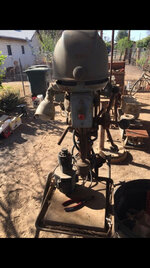
How it sat:
9c79ea83085866db0567319ee4ee3270.jpg

50698e73c58b5ed670b11491c3a452bb.jpg

Getting it apart was a giant mess. It was covered in dirt, oil, and rust.

35f860d99ac13ecf51a3b090e586cba8.jpg

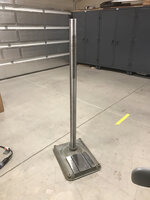
The most stubborn disassembly was removing the column from the base. Clamping bolts above and below base, and a thick layer of rust. A small sledge and aluminum pusher got it down though. The column is solid cast iron, not a pipe. Put it on my shipping scale: 96 lbs!

b62b8b1727b7b5cfe8dfd35bfc6ecf84.jpg

Made a new friend on the motor.

3c2df2b90f16ae84674e0e8d1da66ea3.jpg

FYI brake cleaner kills spiders.

I made a huge mistake at this point- I didn't test the motor before cleaning it inside and out. Spent $18 on LectraMotive cleaner and a whole lot of time wire wheeling hardware only to find the motor was toast. Fired it up and the smoke tried escaping. Fortunately I planned for this possibility and bought a 1 horse Baldor 1740 rpm motor on Craigslist that would be a replacement for the 1/2 horse GE.

Time to get the very heavy column cleaned up. The last drill press I did this to, I used a plumbers test plug and a drill to spin it, and nylon casters as a spinning rest. This time I have a lathe, but no steady rest yet. So I used two fixture plates (1-1/2" thick each) and used toe clamps to hold down those same casters as a roller rest. Worked out fine, though it would have been a lot easier with a proper steady rest. Unfortunately the cheapest one I can find is $850 on eBay.

0341fc56ff8ee17cbe85e882306df8bd.jpg

1884141cec36a7fa1a7752b7f5a8dc4f.jpg

A lot of labor, but a combination of a die grinder with wire wheel, emory cloth strips, scotch brite, a nylon stripping wheel and a lot of cleanup did the job. Unfortunately my lathe chuck jaws grooved the end of the column as I was slowing it down against the chuck, but nothing a sanding wheel couldn't fix.

db7285b93a89d3ebac110a78faa9092f.jpg

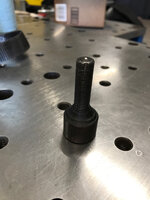
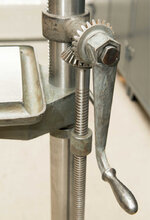
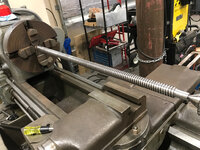
The mechanism for raising the table is beautifully engineered. The lead screw is an inch in diameter and has a very heavy layer of rust on it.

3814e34a52308b33c680801aad836855.jpg

So back in the lathe. This time I wrapped some 8 gauge copper wire on the chucked end of the screw to prevent damage, and in the live center on the tailstock.

c6fea25f8044b9652bc2b1b082fe4b4d.jpg

Took a lot of time. Ordered some abrasive cord which helped a lot, and ground a tool down to cut down into the corners of the threads.

5ee22082427181420ad4d5b872bcaacf.jpg
 

Attachments

  • 50698e73c58b5ed670b11491c3a452bb.jpg
    50698e73c58b5ed670b11491c3a452bb.jpg
    543.7 KB · Views: 0
  • 35f860d99ac13ecf51a3b090e586cba8.jpg
    35f860d99ac13ecf51a3b090e586cba8.jpg
    752.7 KB · Views: 0
  • b62b8b1727b7b5cfe8dfd35bfc6ecf84.jpg
    b62b8b1727b7b5cfe8dfd35bfc6ecf84.jpg
    129.6 KB · Views: 2
  • 3c2df2b90f16ae84674e0e8d1da66ea3.jpg
    3c2df2b90f16ae84674e0e8d1da66ea3.jpg
    611.9 KB · Views: 1
  • 0341fc56ff8ee17cbe85e882306df8bd.jpg
    0341fc56ff8ee17cbe85e882306df8bd.jpg
    729.7 KB · Views: 2
  • 1884141cec36a7fa1a7752b7f5a8dc4f.jpg
    1884141cec36a7fa1a7752b7f5a8dc4f.jpg
    784.6 KB · Views: 1
  • db7285b93a89d3ebac110a78faa9092f.jpg
    db7285b93a89d3ebac110a78faa9092f.jpg
    593.4 KB · Views: 1
  • 3814e34a52308b33c680801aad836855.jpg
    3814e34a52308b33c680801aad836855.jpg
    783.6 KB · Views: 1
  • c6fea25f8044b9652bc2b1b082fe4b4d.jpg
    c6fea25f8044b9652bc2b1b082fe4b4d.jpg
    783.5 KB · Views: 1
  • 5ee22082427181420ad4d5b872bcaacf.jpg
    5ee22082427181420ad4d5b872bcaacf.jpg
    765.8 KB · Views: 4
  • 9c79ea83085866db0567319ee4ee3270.jpg
    9c79ea83085866db0567319ee4ee3270.jpg
    552.3 KB · Views: 3
Last edited:
To avoid these ads, REGISTER NOW!
OP
T

TXNinAZ

Well-known member
Joined
Oct 9, 2011
Messages
507
Location
Phoenix, AZ
Started reassembly and tidying the electrical. Used new SO wire from the switch to the motor, and a new cord to the wall. New belt as well.

Making an adjustment to the table raising mechanism which is where the real trouble started. Cranked down the clamp just a little too much and *pop* goes the cast iron.

9efb5f81b2209dee251cb722c50664a4.jpg

Ugh. Didn't bother checking eBay for a replacement. Time to put the TIG brazing skills into practice. Clamped broken part in place. Then a carbide burr to remove a V for bronze. Preheat to about 500 degrees, and then pile it on there. Cool down in a sand box to moderate temps and prevent cracking.

60bda7e88462bae0ea21d7d843faf3ae.jpg

Run against the pedestal grinder to remove the bulk of it.

0e7d4cb2df664abd84a4e474475aeda7.jpg

Then back to the rotary carbide burr for sculpting. Final step is to use a needle scaler to dimple the surface to make it more like the porous casting surface.

804e86e345900a18de8fc9b685b33e0c.jpg

As strong as ever.

ddf17d3e605978414c86d9ed4f33e6aa.jpg

Now that we have that fixed, back to reassembly. Chased threads in spindle clamp nut, drilled and replaced broken screw on the wire clamp, and dumped motor mount socket cap screws with grade 8 hex bolts, wire wheeled to remove the un-period correct finish.

The last problem to solve was the depth stop screw. The brass nuts were good, but the steel mounting nuts were galled badly. Unfortunately they used a 7/16-24 thread, which is not a tap size available in Phoenix Arizona. Time to learn how to single-point thread on my new lathe and make a thread chaser.

Started with a 1" diameter hardened cold rolled. Used that because it was already indicated in the lathe and my 4 jaw wouldn't clamp down on a piece of 1/2 without bushing it up. Turned down to .4375 and cut threads. Fortunately the brass nuts were good- don't think I have any other 7/16-24 anywhere to use as a thread tester.

aabaf58e9bfd8f9aeff0594870a76688.jpg

Parted off. Yes, I know. I should have relieved the threads but A. that didn't matter, and B. I was so happy to have successfully cut fine threads that I just moved on.

6dc85b8666ac61cd95cad7cf514092cd.jpg

Now for heat treating to harden it a bit. Quenched in oil.

2d1bfb782013a42f6f9c5284e89423df.jpg

And ground relief on two sides for the chips.

3f04ae39c98ea3e4d3b195ce1a85f01b.jpg

Worked like a charm!

adacd374b33df6ee4ea4beb92676a351.jpg
 

Attachments

  • aabaf58e9bfd8f9aeff0594870a76688.jpg
    aabaf58e9bfd8f9aeff0594870a76688.jpg
    597.3 KB · Views: 3
  • 9efb5f81b2209dee251cb722c50664a4.jpg
    9efb5f81b2209dee251cb722c50664a4.jpg
    613.3 KB · Views: 2
  • 60bda7e88462bae0ea21d7d843faf3ae.jpg
    60bda7e88462bae0ea21d7d843faf3ae.jpg
    599.3 KB · Views: 2
  • 0e7d4cb2df664abd84a4e474475aeda7.jpg
    0e7d4cb2df664abd84a4e474475aeda7.jpg
    618.8 KB · Views: 3
  • 804e86e345900a18de8fc9b685b33e0c.jpg
    804e86e345900a18de8fc9b685b33e0c.jpg
    629.3 KB · Views: 3
  • ddf17d3e605978414c86d9ed4f33e6aa.jpg
    ddf17d3e605978414c86d9ed4f33e6aa.jpg
    615.3 KB · Views: 3
  • 6dc85b8666ac61cd95cad7cf514092cd.jpg
    6dc85b8666ac61cd95cad7cf514092cd.jpg
    621.2 KB · Views: 3
  • 2d1bfb782013a42f6f9c5284e89423df.jpg
    2d1bfb782013a42f6f9c5284e89423df.jpg
    616.8 KB · Views: 2
  • 3f04ae39c98ea3e4d3b195ce1a85f01b.jpg
    3f04ae39c98ea3e4d3b195ce1a85f01b.jpg
    584.9 KB · Views: 2
  • adacd374b33df6ee4ea4beb92676a351.jpg
    adacd374b33df6ee4ea4beb92676a351.jpg
    645.8 KB · Views: 4
Last edited:
OP
T

TXNinAZ

Well-known member
Joined
Oct 9, 2011
Messages
507
Location
Phoenix, AZ
All done. Decided from the beginning not to repaint it. The paint under the filth was actually pretty good, and I have a tendency to over-restore things, so this time I throttled back. I think it came out great.

92c99bfcb82ade4c8e06ffde174899c9.jpg

3625091521c8f34dd33f0dc246b27d22.jpg

86cd897dcc5a1b780c4493ecd566cd22.jpg

883ca216d24a54dd1bbd00aa66ea4103.jpg

96a2f0b40e68fe48d102f28a373c0d1c.jpg

1687a960d056d7a6d2bc28b8bcdcee6c.jpg

Hope you guys like it!
 

Attachments

  • 883ca216d24a54dd1bbd00aa66ea4103.jpg
    883ca216d24a54dd1bbd00aa66ea4103.jpg
    556.7 KB · Views: 2
  • 86cd897dcc5a1b780c4493ecd566cd22.jpg
    86cd897dcc5a1b780c4493ecd566cd22.jpg
    455.7 KB · Views: 3
  • 3625091521c8f34dd33f0dc246b27d22.jpg
    3625091521c8f34dd33f0dc246b27d22.jpg
    520.2 KB · Views: 2
  • 92c99bfcb82ade4c8e06ffde174899c9.jpg
    92c99bfcb82ade4c8e06ffde174899c9.jpg
    731.4 KB · Views: 2
  • 1687a960d056d7a6d2bc28b8bcdcee6c.jpg
    1687a960d056d7a6d2bc28b8bcdcee6c.jpg
    726.1 KB · Views: 2
  • 96a2f0b40e68fe48d102f28a373c0d1c.jpg
    96a2f0b40e68fe48d102f28a373c0d1c.jpg
    702.1 KB · Views: 2

ALLFAST

Well-known member
Joined
Feb 20, 2017
Messages
1,233
Location
Northern California
Awesome work Aaron. Good tip on the needlegun for texture. Exactly how much torque split the clamp? Hand snug plus 1/4 turn or was it more ?

Thanks,
Shawn
 
OP
T

TXNinAZ

Well-known member
Joined
Oct 9, 2011
Messages
507
Location
Phoenix, AZ
Awesome work Aaron. Good tip on the needlegun for texture. Exactly how much torque split the clamp? Hand snug plus 1/4 turn or was it more ?

Thanks,
Shawn


Thanks Shawn. The needle gun does such a good job on bronze. Really gives the right amount of texture for mimicking the sand cast. I'm not sure exactly how far I snugged the clamp bolt when it broke. I was trying to bring the whole assembly up about 4", so I wanted it snug enough not to slip down while I adjusted the lower mount. Just a bozo moment and I cranked it too much. A very sad moment in the shop yesterday [emoji24]
 

Mike W.

Well-known member
Joined
Sep 30, 2015
Messages
178
Coming along really really well. Look forward to see the next set of pics!
 

1982fxr

Well-known member
Joined
Jan 7, 2012
Messages
10,007
Location
Phoenix
Awesome write up. Pretty sure I'm jealous of your shop.

Was that a recluse spider!?
 
OP
T

TXNinAZ

Well-known member
Joined
Oct 9, 2011
Messages
507
Location
Phoenix, AZ
Awesome write up. Pretty sure I'm jealous of your shop.


Was that a recluse spider!?


Thanks man! I don't think it was a recluse, but spiders belong outside. I want them eating all the bugs so the scorpions don't have any food and go somewhere else [emoji23]
 
To avoid these ads, REGISTER NOW!

CrotalusAtrox

Well-known member
Joined
Mar 5, 2016
Messages
796
Location
The Great Southwest
Great job on the restoration that's is a solid machine, my back remembers unloading it. Its nice seeing some older equipment left in their original condition when they have a lot of there original paint left on them. I know that feeling when something breaks feels like someone kicked you in the gut. Great job on the repair.
 

larry4406

Well-known member
Joined
Jan 27, 2006
Messages
19,193
Location
Northern Virginia
Beautiful job! I like the functional restoration aspect vs over restored. The contrast between the faded paint patina and the shiny metal bits is awesome.
 

Packard V8

Well-known member
Joined
Mar 16, 2009
Messages
7,380
Location
Spokane, WA
Nice work. We don't see many Buffalo machines this far west. The table raising mechanism is way cool,

jack vines
 
OP
T

TXNinAZ

Well-known member
Joined
Oct 9, 2011
Messages
507
Location
Phoenix, AZ
Thanks guys! It was a lot of work, but it's a great machine. And special thanks to CrotalusAtrox for helping get it out of the truck. Would have been screwed getting it into the shop on my own!
 

schor

Well-known member
Joined
Apr 16, 2013
Messages
531
Location
Ajax, Ontario
Just found this thread so a little late to the party, nice job. Can you tell me the od of the depth stop nuts? I have the proper tap and I want to make some nuts for my press.
 

txlonghorn1989

Well-known member
Joined
Feb 27, 2017
Messages
2,786
Very nice job on the restoration! I also like that you didn't repaint it. The original paint is surprisingly solid. Congrats on the find and the work on cleaning it up! Wish I had your metalworking skills and machines! ;-) I also wish I had your Buffalo DP!!
 

zzhjn9

New member
Joined
Apr 11, 2019
Messages
1
Location
Canada
That is an awesome rebuild. I just bought a Buffalo 15 and am going to pick it up. I only have an SUV, so I am planning to take the top and base off when I get there. Can you let me know what tools I will need so I can get it partially disassembled? Any tips you might have would also be helpful. Its a couple hours away so I only get one shot at it and would hate to make the trip and come back empty handed.
 

Maui

Well-known member
Joined
Sep 16, 2012
Messages
2,864
Location
Upstate NY
Nice work! Those vintage Buffalo drill presses are built like tanks, and are impressively accurate. I have a floor standing model that I am currently restoring, and am looking forward to completing it hopefully later on this summer.

Maui
 

1982fxr

Well-known member
Joined
Jan 7, 2012
Messages
10,007
Location
Phoenix
That is an awesome rebuild. I just bought a Buffalo 15 and am going to pick it up. I only have an SUV, so I am planning to take the top and base off when I get there. Can you let me know what tools I will need so I can get it partially disassembled? Any tips you might have would also be helpful. Its a couple hours away so I only get one shot at it and would hate to make the trip and come back empty handed.

Any way you can get a trailer?

Being in Canada, was it ever outside? Rust...?

If I was driving several hours I would not want to chance it on needing disassembly to load.
 
To avoid these ads, REGISTER NOW!
Top Bottom