To avoid these ads, REGISTER NOW!

Between 705 & 1200 SQ/FT Build Thread: 20x40x12

Workspaces between 705 and 1200 squarefeet.

jasondavidmann

Well-known member
Joined
Aug 16, 2009
Messages
162
Location
Manitoba, Canada
Hello, I've been a long time lurker here at GJ and now have something to contribute. This thread will cover the build process of our new workshop in Manitoba Canada.

We moved last summer to a place in a small town with a bigger lot and bigger house. We left behind our first house and the 16x32x10 garage that I built. Our new place has a 2.5 attached garage but we have decided to build a dedicated workshop.

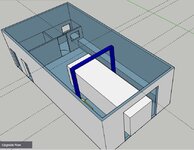
The maximum sq ft I am allowed in town is 800sq ft so that is what our workshop will be. 20'wx40'lx12'h.
 
To avoid these ads, REGISTER NOW!
OP
J

jasondavidmann

Well-known member
Joined
Aug 16, 2009
Messages
162
Location
Manitoba, Canada
First picture is from Sketchup, as you can see there is a 'shed' section with it's own door as well as an office. There will be storage above this area.

The big white box is rough dimensions of a Crew Cab Long Box, the biggest vehicle I'd ever work on. You can also see a workbench down one side and plans for a hoist.

One 10x10 overhead door with windows and one small window for the office.


I am mostly interested in vehicles but that will not be the only purpose of the workshop as it will be for the whole family. Also we don't plan to use the workshop for large amounts of storage.


I'll update this thread from time to time. I am currently preparing the pad before concrete so more details to come.
 
OP
J

jasondavidmann

Well-known member
Joined
Aug 16, 2009
Messages
162
Location
Manitoba, Canada
2fb6e3a48f73341c9fee46dadad4f155.jpg

Here is a photo of where the workshop (yellow) will be on our property.


Sent from my iPhone using Tapatalk
 

Attachments

  • 2fb6e3a48f73341c9fee46dadad4f155.jpg
    2fb6e3a48f73341c9fee46dadad4f155.jpg
    19.1 KB · Views: 65
Last edited:
OP
J

jasondavidmann

Well-known member
Joined
Aug 16, 2009
Messages
162
Location
Manitoba, Canada
006d85a6a81d73f44297518fc4fa3792.jpg
First thing is moving the shed out of the way. I traded with a friend who is going to supply 4” insulation for under the slab. More than necessary, but the price is right and you cannot have too much insulation.


Also you can see the 30hp skid steer that we purchased. It will be sufficient for the pad preparation and with a set of bucket forks it is very useful. I’ll be doing most of the work on this workshop solo so anything that will make things easier is appreciated.


Sent from my iPhone using Tapatalk
 

Attachments

  • 006d85a6a81d73f44297518fc4fa3792.jpg
    006d85a6a81d73f44297518fc4fa3792.jpg
    205.5 KB · Views: 44
OP
J

jasondavidmann

Well-known member
Joined
Aug 16, 2009
Messages
162
Location
Manitoba, Canada
5010935cbd777a33d8f8854cd2c48f4a.jpg
I cut down some trees and set out the batter boards.


Sent from my iPhone using Tapatalk
 

Attachments

  • 5010935cbd777a33d8f8854cd2c48f4a.jpg
    5010935cbd777a33d8f8854cd2c48f4a.jpg
    206.6 KB · Views: 29
OP
J

jasondavidmann

Well-known member
Joined
Aug 16, 2009
Messages
162
Location
Manitoba, Canada
1c8407f78be718fa57260ed1bd115a03.jpg
Started scraping the top layer of soil off.


This is where I am in the progress so far. The pad is a mono pour with a 18x18 thickened edge so I’ll need to do some more digging around the perimeter before putting the gravel in.


Sent from my iPhone using Tapatalk
 

Attachments

  • 1c8407f78be718fa57260ed1bd115a03.jpg
    1c8407f78be718fa57260ed1bd115a03.jpg
    156.4 KB · Views: 28
OP
J

jasondavidmann

Well-known member
Joined
Aug 16, 2009
Messages
162
Location
Manitoba, Canada
1d834b71ad2d568e10dcf5539c451581.jpg
My HVAC contractor is coming today to work on estimates for a few different options. Here is the floor plan I will give them to use while creating the pex loop plans.


Unfortunately my gas service (and electrical) enters the house at the furthest point from the new shop so it is costly to run gas.

3 options that I will need to choose between:

1- run gas line and use gas boiler $$$$
2- use electric boiler, running power to the shop anyway and electricity is relatively inexpensive here in Manitoba. $$
3- replace the house furnace with a boiler in the basement with a zone to a coil in the house ductwork. Then run a second zone to the shop (feed and return glycol lines) from the far end of the house to the shop. $$$$$ but also get a new house heater that I will need soon anyway.


Sent from my iPhone using Tapatalk
 

Attachments

  • 1d834b71ad2d568e10dcf5539c451581.jpg
    1d834b71ad2d568e10dcf5539c451581.jpg
    73.2 KB · Views: 38
Last edited:

grant00

Well-known member
Joined
Feb 12, 2011
Messages
205
Location
Littleton, CO
Interested to see how this turns out as my plans are for a 22w x 40l x 12h also.

4" of insulation under the slab will be great. For 800 sqft are you not required to do a stem wall foundation? Generally down here I believe we can only do monolithic slab up to 600 sqft. anything over requires stem wall.
 
Last edited:
OP
J

jasondavidmann

Well-known member
Joined
Aug 16, 2009
Messages
162
Location
Manitoba, Canada
Interested to see how this turns out as my plans are for a 22w x 40l x 12h also.

4" of insulation under the slab will be great. For 800 sqft are you not required to do a stem wall foundation? Generally down here I believe we can only do monolithic slab up to 600 sqft. anything over requires stem wall.


f6997fddaeddccdaa43ec6570d0a28e7.jpg
Here are the concrete details from my municipality. 18x18 thickened edge with a 6” slab and plenty of rebar.


Sent from my iPhone using Tapatalk
 

Attachments

  • f6997fddaeddccdaa43ec6570d0a28e7.jpg
    f6997fddaeddccdaa43ec6570d0a28e7.jpg
    37.7 KB · Views: 43

Syborg tt

Well-known member
Joined
Jul 9, 2007
Messages
118
Here is my 20 x 40

I put the lift in the right hand corner so I could still have the garage door open on nice day.

5b186c51cabe1c3a7c6e0c0b6681b042.jpg

I also added a curtain wall to separate the two areas.

fb926c572e105b57000c7390d1a24a0c.jpg

f5ca38d3fc4016f0f77acc4d95e4d5c7.jpg


Sent from my iPhone using Tapatalk
 

Attachments

  • 5b186c51cabe1c3a7c6e0c0b6681b042.jpg
    5b186c51cabe1c3a7c6e0c0b6681b042.jpg
    55.6 KB · Views: 28
  • f5ca38d3fc4016f0f77acc4d95e4d5c7.jpg
    f5ca38d3fc4016f0f77acc4d95e4d5c7.jpg
    76 KB · Views: 24
  • fb926c572e105b57000c7390d1a24a0c.jpg
    fb926c572e105b57000c7390d1a24a0c.jpg
    64.3 KB · Views: 120

RogueFab

Well-known member
Joined
Jun 27, 2013
Messages
430
Location
Oregon
Nice plans! 800 SF is limiting, but having a little loft will really help!

I like cyborg's idea on the lift location. Depends how full your shop will be. Near the door is always accessible.

You can blur/erase the road names on your map screenshot if you want to keep your exact location harder to pinpoint. Just an FYI in case you care.

Keep the pics coming!
 
OP
J

jasondavidmann

Well-known member
Joined
Aug 16, 2009
Messages
162
Location
Manitoba, Canada
Syborg, how wide is your door?

After some reading on GJ I’m almost convinced to get a 4 post lift. Due to bad knees the idea of bending down to set the arms is a big negative amongst the positives of the 2 post lift.

If I go 4 post I’ll be able to place it anywhere. For now I need to plan for a 2 post so that I don’t run any glycol lines where I could possibly drill later.


The mezzanine will only be about 5ft tall but should be very useful. I’m planning for the air compressor to sit above the shed area.


Sent from my iPhone using Tapatalk
 
Last edited:

Syborg tt

Well-known member
Joined
Jul 9, 2007
Messages
118
Syborg, how wide is your door?

If I go 4 post I’ll be able to place it anywhere. For now I need to plan for a 2 post so that I don’t run any glycol lines where I could possibly drill later.


I agree 100% on the 4Post lift they are worth there weight in gold as for the door it is your standard residential 16 x 8 and it works perfect. I also have a full door with screen door that comes down when I need it. I will try to take a picture of it tonight.
 

Attachments

  • 2021 02-06 Clean Garage Floor (2).jpg
    2021 02-06 Clean Garage Floor (2).jpg
    151.1 KB · Views: 205

grant00

Well-known member
Joined
Feb 12, 2011
Messages
205
Location
Littleton, CO
I’m interested to see more of that fold down screen door! That would be great to have the door open but keep leaves etc. out.

16 ft wide door would be about the limit I bet on the 20 ft wide front. With only 1 foot on either side of the door you’re pretty limited on shear wall capacity requirements I think.


Sent from my iPhone using The Garage Journal mobile app
 

Syborg tt

Well-known member
Joined
Jul 9, 2007
Messages
118
This is the best picture I could find right now.
13e303cbd978539b88f69a479deae4a3.jpg


Sent from my iPhone using Tapatalk
 

Attachments

  • 13e303cbd978539b88f69a479deae4a3.jpg
    13e303cbd978539b88f69a479deae4a3.jpg
    116.3 KB · Views: 92
OP
J

jasondavidmann

Well-known member
Joined
Aug 16, 2009
Messages
162
Location
Manitoba, Canada
Looks great Syborg.


After talking with my HVAC contractor we decided to go with an electric boiler.

It is important to consider how inexpensive electricity is in Manitoba! A rough calculation is that it will cost close to $600/year to heat the shop with an electric boiler.

Maybe after about 14 years the gas boiler would start saving me money, maybe.

Having said all that it was suggested that we design the system so that it can be changed over to a gas boiler in the future if prices change drastically. Mostly this includes adding a drain line before the pour to accommodate a condensing gas boiler. The drain could also be used if I wanted AC in the future.


If you're in Manitoba and need any HVAC work please consider Southern Comfort.https://www.southerncomfortmechanical.ca/
 

grant00

Well-known member
Joined
Feb 12, 2011
Messages
205
Location
Littleton, CO
Looks great Syborg.


After talking with my HVAC contractor we decided to go with an electric boiler.

It is important to consider how inexpensive electricity is in Manitoba! A rough calculation is that it will cost close to $600/year to heat the shop with an electric boiler.

Maybe after about 14 years the gas boiler would start saving me money, maybe.

Having said all that it was suggested that we design the system so that it can be changed over to a gas boiler in the future if prices change drastically. Mostly this includes adding a drain line before the pour to accommodate a condensing gas boiler. The drain could also be used if I wanted AC in the future.


If you're in Manitoba and need any HVAC work please consider Southern Comfort.https://www.southerncomfortmechanical.ca/

Not to mention you are already running electrical to the building no matter what. The electric boiler will save you the cost of running a gas line up front.
 
OP
J

jasondavidmann

Well-known member
Joined
Aug 16, 2009
Messages
162
Location
Manitoba, Canada
I finished scraping the top layer of grass and organic material. We went out tonight and shot some levels to make sure the pad would end up at the correct height. The municipality required a lot grading permit in which they tell me how high my finished floor height is.

Here you can see I marked out where to dig the thickened edge and extended apron area for insulation outside the perimeter.

Soon I’ll be ready for gravel. I’ll get 20yds delivered next week. 2619000b8d6467272dafa9864c80f385.jpg


Sent from my iPhone using Tapatalk
 

Attachments

  • 2619000b8d6467272dafa9864c80f385.jpg
    2619000b8d6467272dafa9864c80f385.jpg
    203.8 KB · Views: 29
To avoid these ads, REGISTER NOW!
OP
J

jasondavidmann

Well-known member
Joined
Aug 16, 2009
Messages
162
Location
Manitoba, Canada
The catch basin that I ordered arrived today. It is 20Gal. Because I cannot have a drain I will let this fill up and then pump it out with a roofers pump as required.


There won’t be too many updates for a few days. Fishing season opens Saturday morning here in southern Manitoba and that is all I will be doing. fe5cb8407cc9b254381e559d9bb73d02.jpg


Sent from my iPhone using Tapatalk
 

Attachments

  • fe5cb8407cc9b254381e559d9bb73d02.jpg
    fe5cb8407cc9b254381e559d9bb73d02.jpg
    210.8 KB · Views: 18
OP
J

jasondavidmann

Well-known member
Joined
Aug 16, 2009
Messages
162
Location
Manitoba, Canada
b24cd20805c47dfc9b68f0a5f2c38c84.jpg
Today I worked with the skid steer. Dug around the edges for the thickened edge of the concrete and the insulation around the perimeter. If you can make out any green dots they are where I marked grade.

The dry clay soil was extremely hard and made my 30hp skid steer work! Actually I’ll need to repair a few broken welds after today.

At this point I am ready for gravel. I’ll pack the exterior and set grade and then I can put up the concrete forms. From there I’ll use compacted gravel and insulation to build up the pad portion of the concrete.


Sent from my iPhone using Tapatalk
 

Attachments

  • b24cd20805c47dfc9b68f0a5f2c38c84.jpg
    b24cd20805c47dfc9b68f0a5f2c38c84.jpg
    259.7 KB · Views: 19

Balor

Well-known member
Joined
Feb 2, 2014
Messages
452
Location
Florida
daddffcd369c8a061ab31319515bdffa.jpg
I’m back working on the shop again today. I’ve been working so hard my boots fell apart! Lol

This clay soil is challenging! Another update to come later today.


Sent from my iPhone using Tapatalk

I had this happen to me in Wildflecken Germany going thur a training exercise
 

Attachments

  • daddffcd369c8a061ab31319515bdffa.jpg
    daddffcd369c8a061ab31319515bdffa.jpg
    218.1 KB · Views: 22
OP
J

jasondavidmann

Well-known member
Joined
Aug 16, 2009
Messages
162
Location
Manitoba, Canada
5b27e5474ea2dacebea0f5ae5ed11ca3.jpg
I did some welding on the damaged bucket and attach plate.
Between not being able to plug in my big welder and not having a 20amp 120v outlet for this little guy I am ready to move into the new shop. But that will still be months away.


Sent from my iPhone using Tapatalk
 
OP
J

jasondavidmann

Well-known member
Joined
Aug 16, 2009
Messages
162
Location
Manitoba, Canada
026cedab19f055497ca061d44f4aaabd.jpg


My roof trusses arrived today. I went with the raised heel design to help fit the ceiling insulation in at the walls.

In order to lock in lumber prices and even availability I’ve had to purchase and accept delivery of all the lumber for this build. Regardless I have nothing but good things to say about dealing with Jeff at Olympic Building Centre (https://olympicbuildingcentre.ca/)


Sent from my iPhone using Tapatalk
 

Attachments

  • 026cedab19f055497ca061d44f4aaabd.jpg
    026cedab19f055497ca061d44f4aaabd.jpg
    188.9 KB · Views: 19
OP
J

jasondavidmann

Well-known member
Joined
Aug 16, 2009
Messages
162
Location
Manitoba, Canada
Looks like a cool project! I'll be following this one.

What are you planning for an outside finish on the walls? Steel?

Thank you.

I haven’t decided on finish yet. I’m thinking maybe a combination of Hardie Board on the gable ends and vinyl siding on the sides. My house is a combination of brick and stucco and I would at least like the house and shop to compliment each other aesthetically.


Sent from my iPhone using Tapatalk
 
Last edited:
OP
J

jasondavidmann

Well-known member
Joined
Aug 16, 2009
Messages
162
Location
Manitoba, Canada
c92871099410abe3cbcbdc1ee4e9e73b.jpg
20yds of 3/4 down limestone was delivered today. It really doesn’t look like much until you start spreading it.


Sent from my iPhone using Tapatalk
 

Attachments

  • c92871099410abe3cbcbdc1ee4e9e73b.jpg
    c92871099410abe3cbcbdc1ee4e9e73b.jpg
    183.2 KB · Views: 17
OP
J

jasondavidmann

Well-known member
Joined
Aug 16, 2009
Messages
162
Location
Manitoba, Canada
e80586c05afb34464c2acd5aad00922b.jpg
First layer of gravel is spread and ready to be compacted. After the perimeter is complete more gravel will be brought in to raise the centre of the pad.


Sent from my iPhone using Tapatalk
 
OP
J

jasondavidmann

Well-known member
Joined
Aug 16, 2009
Messages
162
Location
Manitoba, Canada
369c0f7d1ef68f677e913b43d26da255.jpg
I spread and packed the rest of the gravel today. The perimeter is pretty close to grade and the centre will need to be raised significantly, but I got another truckload of gravel delivered this evening.

I placed the concrete forms in the general area, I’ll set them over the next few days and that will setup the remainder of the slab work.


Sent from my iPhone using Tapatalk
 
OP
J

jasondavidmann

Well-known member
Joined
Aug 16, 2009
Messages
162
Location
Manitoba, Canada
2a4c036449e465714ea3e08d05483ffd.jpg
The picture doesn’t look much different today but I did have a long workday!

The forms are all set to the correct grade and the pad is squared to within 1/4” and I can live with that.

I’m hoping to meet with my concrete contractor tomorrow and make some plans. Currently we are hoping to pour the first week of July.


Sent from my iPhone using Tapatalk
 

Attachments

  • 2a4c036449e465714ea3e08d05483ffd.jpg
    2a4c036449e465714ea3e08d05483ffd.jpg
    192.9 KB · Views: 20
Last edited:
OP
J

jasondavidmann

Well-known member
Joined
Aug 16, 2009
Messages
162
Location
Manitoba, Canada
Not worthy of a picture, but today I started raising the gravel in the center to 10" below the top of floor. That is equal to 6" of concrete and 4" of insulation. I'm very close to desired grade and should finish the gravel work tomorrow.
 
OP
J

jasondavidmann

Well-known member
Joined
Aug 16, 2009
Messages
162
Location
Manitoba, Canada
52C26CED-8C39-4DE6-8098-2501BB050488.jpegMeasure twice, cut once!

Well I didn’t measure and if caught up to me. I bought my concrete forms used off a guy who had been using them as boards for his kid’s skating rink, but I think they were forms at some point. The listing said they were all 18”x8’ = perfect for my thickened edge. When I bough them I realized some were actually 24”but that was ok because I wouldn’t need all of them and those would make a good workbench later.

I didn’t measure the 18” ones and while I was placing them the last few days it was obvious they are actually 16”.

There are few problems that cannot be solved with time and money. So I picked up some 2x3’s and remedied the situation.

Also today I made a jig and made sure the perimeter gravel is perfect.

it is looking like I’ll be finished gravel work this week! Thank goodness!
 
OP
J

jasondavidmann

Well-known member
Joined
Aug 16, 2009
Messages
162
Location
Manitoba, Canada
702A4280-09CB-48A2-A679-6B7170A74C3A.jpeg627F4730-C68F-4B21-BF9A-FBF9138BE8C6.jpeg

I finished the gravel on the pad yesterday, but picture isn’t necessary.

We took some time away from the shop build today to work on my friend’s micro excavator. He bought it from France and had it delivered to my house. It comes in pieces and supposedly takes 10hrs to assemble.
 
OP
J

jasondavidmann

Well-known member
Joined
Aug 16, 2009
Messages
162
Location
Manitoba, Canada
053B8B77-0C48-431F-8D15-007A50479B0B.jpeg5BFD01FF-96FA-488D-816A-42C20E1384D3.jpeg4BD74B19-7204-4825-8867-01EFA88F662A.jpeg

Pictures from today. We moved the shed off my property. Having a friend with a tilting trailer is pretty great!

I picked up some insulation.

Finally, I pounded about half the stakes for my concrete bracing = exhausting! Please comment if you have something to say about my forms (note the braces aren’t nailed yet). I don’t have a lot of confidence in my concrete knowledge.

I’ll finish up the bracing and start on the insulation next week.
 
OP
J

jasondavidmann

Well-known member
Joined
Aug 16, 2009
Messages
162
Location
Manitoba, Canada
It has been a while since I last updated the thread.

I’ve finished the bracing for the forms and still need to move some stuff around to make room for the concrete trucks to get around the far side of the pad.

I also finished the catch basin. Dug a hole and corrected the slope of the gravel to keep the pad thickness consistent. Imagine the shop in two halves. The rear 20x20 will be perfectly flat and the front 20x20 will have a catch basin in the middle. 2” of drop over 10’ might be overkill but I’ll be bringing in snowmobiles and snowy trucks throughout the winter.

Finally I started putting down some insulation for the pad. There will be no insulation under the thickened edge. After the forms are removed I’ll had vertical insulation and then more horizontal insulation around the perimeter. (Note the rebar in the picture is just to keep the wind from moving the insulation.)

Next step is to finish the insulation, then poly, then rebar and pex loops.
 

Attachments

  • ECACDCF7-050B-4125-8210-F36CE368957E.jpeg
    ECACDCF7-050B-4125-8210-F36CE368957E.jpeg
    657.9 KB · Views: 110
  • 3D73FD79-0C57-4319-86C6-CC73BC0C555B.jpeg
    3D73FD79-0C57-4319-86C6-CC73BC0C555B.jpeg
    585.1 KB · Views: 121
  • 82A4D7D0-64EF-49D1-A97F-DD7B346C02AA.jpeg
    82A4D7D0-64EF-49D1-A97F-DD7B346C02AA.jpeg
    736.6 KB · Views: 120
To avoid these ads, REGISTER NOW!
Top Bottom