To avoid these ads, REGISTER NOW!

Build Thread - 30x40

rok_hunter

Well-known member
Joined
Apr 10, 2020
Messages
153
Location
home
Someone recently asked if I considered a build thread for my under-construction enclosed pole barn, so here it is.

This thread comes with some caveats and assumptions, at my end and yours.

1) The build has already started. Feel free to tell me all the things I've done wrong, the poor choices I've made, and the changes I should have done - and don't be upset if I ignore it because I'm past that point.

2) Where I live there are specific things that had to be done per local code. The plans for this build needed to have an engineering review & approval done before permits could be pulled, so know that someone considerably smarter than me - and probably most of my audience - has reviewed the entire design and determined it meets requirements for the hurricane/wind zone I live in. Your requirements may vary.

Now that that's out of the way: my specs!

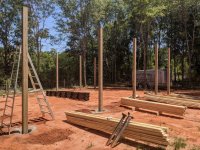
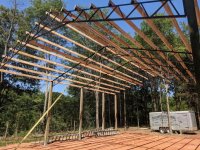
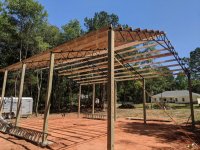
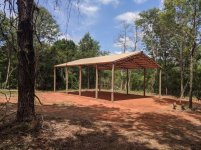
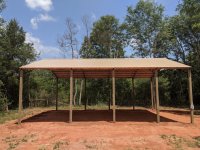
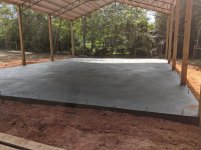
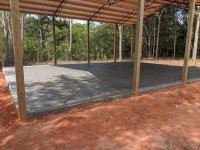
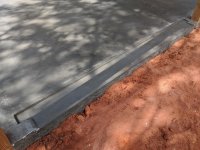
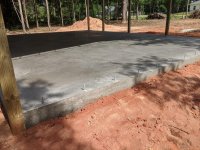
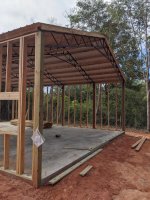
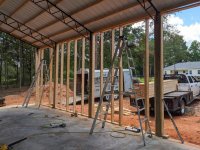
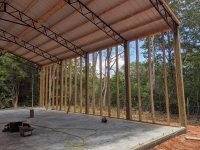
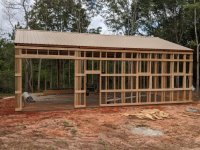
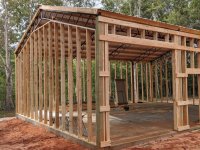
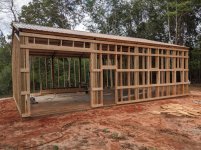
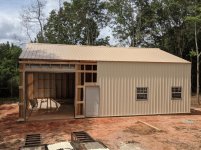
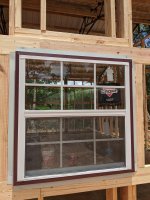
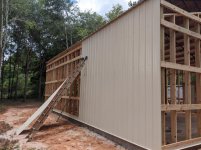
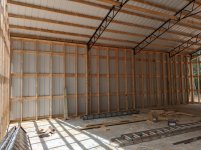
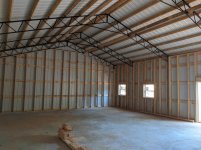
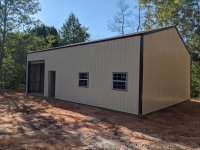
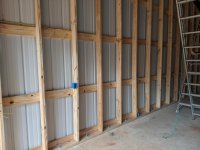
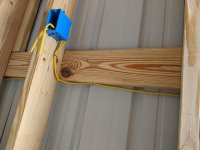
I'm building a 30x40x12 enclosed pole barn in Northwest Florida. To say "I" am building it isn't totally accurate, it's being built by a very highly rated pole barn company from a couple hours down the interstate. It'll have a 4", 3,000 psi slab, single walk-through door, 10x10 roll-up door, and two windows. The base frame is 6"x6" posts and the wall framing is 2x6 studs on 24" centers, with 2x6 horizontal girts that will hold the 29ga steel exterior. Five engineered steel trusses, also with 2x6 stringers on 24" centers, will hold the 29ga steel roof panels at a 4:12 pitch.

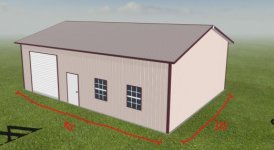
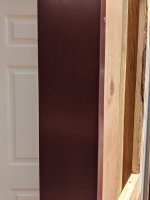
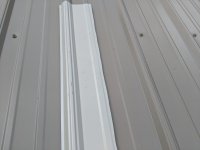
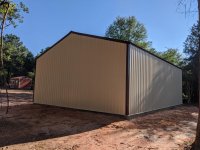
When I was talking to the local sheet metal company (that happens to be three blocks down the road), I asked for colors that would help minimize heat retention in the building - turns out they had a list of their available colors, WITH reflectivity ratings (SSR Value and SSI Rating)! Based on that I chose Sierra Tan and Ivory for the roof and wall colors, both among the highest rated, and Berry (dark maroon-ish) trim.

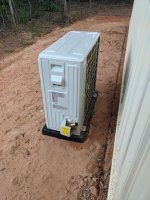
For insulation I'm planning 2" closed-cell spray foam on the walls, and 3" closed-cell spray foam on the ceiling. HVAC will be handled by a single 36K MrCool DIY Mini-Split system, rated for 1500sf.

Lighting was strongly influenced by the "The Best Lighting Feature Ever" thread here on GJ (https://www.garagejournal.com/forum/showthread.php?t=278420), using the 3-d Illumination Tool recommended there by Platonic Solid. Based on those recommendations, that tool, my budget, and online reviews I've settled on two rows of six 96" Lithonia Lighting LED strip lights, suspended 12' from the floor, on three switches. You can see the lighting/electrical plan in the attachments. This setup should give me 86fc of illumination on a 36" work plane, which is where my workbenches will be.

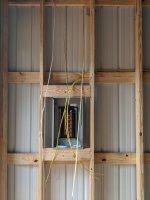
Speaking of that lighting/electrical plan, I'm planning 110v outlets around the barn at approximately 7.5' intervals. I'll have two 220v outlets, one at the front for a welder and any other high-voltage accessory, and one at the back for the mini-split. The outlets on the bottom right corner of my plan are clustered closer together because that's where the workbench will be, and I expect to have lots of gadgets there. I'll also have a single 110v outlet on each exterior wall. I've talked to a lot of people who say "you can never have enough outlets!", and others who say "yeah, I've got a lot, and over half of them are covered behind stuff.". My outlet plan is a nice compromise and meets MY needs. Again, yours may vary.

So, as of today, what would I change about my design? First and foremost, I think I'd like to have my roll up (Drive-in) door 3-4' from the end wall so I can pull a vehicle in and have plenty of room to walk around while I'm working on it. My design has it only about 1' from the end wall - this maximizes the storage space and open floor space in the rest of the barn, which is mostly what I need it for, but it will force me to pull a vehicle in at an angle to get full walk-around working space. Not a deal breaker by any means, but something to think about on my next build.

Ok; enough words. Time for pictures!
 
To avoid these ads, REGISTER NOW!
OP
R

rok_hunter

Well-known member
Joined
Apr 10, 2020
Messages
153
Location
home
Design, initial electrical plan.

Setting the poles and trusses.
 

Attachments

  • 1.jpg
    1.jpg
    153.4 KB · Views: 272
  • 2.jpg
    2.jpg
    151.1 KB · Views: 261
  • 3.jpg
    3.jpg
    156.9 KB · Views: 288
  • 4.jpg
    4.jpg
    156 KB · Views: 259
  • 5.jpg
    5.jpg
    158.7 KB · Views: 250
  • IMG_20200607_141916.jpg
    IMG_20200607_141916.jpg
    146.9 KB · Views: 317
  • Barn Design.jpg
    Barn Design.jpg
    19.5 KB · Views: 135
Last edited:
OP
R

rok_hunter

Well-known member
Joined
Apr 10, 2020
Messages
153
Location
home
Roof Sheeting.
 

Attachments

  • 8.jpg
    8.jpg
    158 KB · Views: 234
  • 7.jpg
    7.jpg
    151.6 KB · Views: 205
  • 6.jpg
    6.jpg
    150.3 KB · Views: 232
OP
R

rok_hunter

Well-known member
Joined
Apr 10, 2020
Messages
153
Location
home
Slab! I like the notch they cut in for the door.
 

Attachments

  • 10.jpg
    10.jpg
    152.1 KB · Views: 286
  • 11.jpg
    11.jpg
    151.9 KB · Views: 273
  • 12.jpg
    12.jpg
    148.2 KB · Views: 333
  • 13.jpg
    13.jpg
    149.4 KB · Views: 256
OP
R

rok_hunter

Well-known member
Joined
Apr 10, 2020
Messages
153
Location
home
Exterior Wall Construction - Part I
 

Attachments

  • 17.jpg
    17.jpg
    147.2 KB · Views: 235
  • 15.jpg
    15.jpg
    157.7 KB · Views: 240
  • 16.jpg
    16.jpg
    155.6 KB · Views: 233
  • 14.jpg
    14.jpg
    154.7 KB · Views: 271

PNWguy

Well-known member
Joined
Jan 3, 2018
Messages
494
Location
Near Grants Pass, OR
Thanks for sharing - and congratulations.

Do you have a model number on those lights? I'm building a 32 x 40 x 12, and figuring out the lighting has been a headache.
 

78SC4X4

Well-known member
Joined
Apr 21, 2018
Messages
370
Location
Port Orchard Wa
Subscribed. I always think it's interesting to see the different building styles around the country and the different factors that must be dealt with.

Looks like a great building.
 
OP
R

rok_hunter

Well-known member
Joined
Apr 10, 2020
Messages
153
Location
home
Thanks for sharing - and congratulations.

Do you have a model number on those lights? I'm building a 32 x 40 x 12, and figuring out the lighting has been a headache.
Man, lighting was a lot harder than I expected for me, too. What's the challenge? Find something rated good from the big box stores, check and see if it's got reviews on Amazon, and buy 4-6 or so from whoever has the best price, right? can't be more than a few hundred bucks - definitely don't want to blow the whole electrical budget on lights. But wait - let's see if there's ideas and suggestions online. Watch four weeks of your life disappear in research, comparisons, and self-doubt about your choices. Change your mind at least once a week during this time, preferably twice.

I know your pain [emoji1787].

I settled on Lithonia model no. MNSLL962LL40K80CRI, item #1034041 at Lowes. Highly rated everywhere I looked, LED with good color rendering and lumens, hard wired (THAT was hard to find too, seemed a lot of these style lights are plug-in), can be suspended, and while expensive, only cracked the bank a bit instead of breaking it.

Sent from my Pixel 2 XL using Tapatalk
 

PNWguy

Well-known member
Joined
Jan 3, 2018
Messages
494
Location
Near Grants Pass, OR
Man, lighting was a lot harder than I expected for me, too. What's the challenge? Find something rated good from the big box stores, check and see if it's got reviews on Amazon, and buy 4-6 or so from whoever has the best price, right? can't be more than a few hundred bucks - definitely don't want to blow the whole electrical budget on lights. But wait - let's see if there's ideas and suggestions online. Watch four weeks of your life disappear in research, comparisons, and self-doubt about your choices. Change your mind at least once a week during this time, preferably twice.

I know your pain [emoji1787].

I settled on Lithonia model no. MNSLL962LL40K80CRI, item #1034041 at Lowes. Highly rated everywhere I looked, LED with good color rendering and lumens, hard wired (THAT was hard to find too, seemed a lot of these style lights are plug-in), can be suspended, and while expensive, only cracked the bank a bit instead of breaking it.

Exactly.

Oddly, the 3dvisualizer keeps telling me I need 15 of them for the same size building. Looks like they are about $100 each. Have you installed your yet?
 
OP
R

rok_hunter

Well-known member
Joined
Apr 10, 2020
Messages
153
Location
home
Exactly.

Oddly, the 3dvisualizer keeps telling me I need 15 of them for the same size building. Looks like they are about $100 each. Have you installed your yet?

Yep, they were $89 each at my Lowes, and I think it dropped to $80 each when you bought 10 or more.

It took a solid hour or so of research to find this exact light in the 3D Visualizer program so I could get the actual specs loaded rather than just manually entering the lumens and wattage. Other things that may impact it are the reflectivity settings (I left mine at default because I have no idea what settings actually reflect spray foam insulation) and work plane height, the default is 30" and I set mine to 36". Mine are not installed yet, hopefully that'll happen within a week or two.
 
OP
R

rok_hunter

Well-known member
Joined
Apr 10, 2020
Messages
153
Location
home
Update, working around the weather. Thanks, Christobol :mad:

Girts are going up, doors and windows framed/installed, end walls in work.
 

Attachments

  • 18.jpg
    18.jpg
    155.8 KB · Views: 226
  • 24.jpg
    24.jpg
    151 KB · Views: 193
  • 23.jpg
    23.jpg
    154.9 KB · Views: 193
  • 22.jpg
    22.jpg
    158.7 KB · Views: 199
  • 21.jpg
    21.jpg
    155.8 KB · Views: 195
  • 20.jpg
    20.jpg
    156.4 KB · Views: 206
  • 19.jpg
    19.jpg
    152.4 KB · Views: 203
OP
R

rok_hunter

Well-known member
Joined
Apr 10, 2020
Messages
153
Location
home
The weather finally cleared up and builders were able to accomplish quite a bit. Girts were finished up, door and window installation was finished, and steel paneling is going up.

I mentioned earlier about picking the colors based on energy/heat reflectivity. The roof is "sierra tan", the walls are "ivory", and the trim is "berry" (which also has the lowest efficiency rating, but hey, it's only the trim!).

From many angles the roof and walls appear to be the exact same color. I sent the company manager an email and photo asking about it and promptly received a call back - he said he looked at the photo and thought "awwww sh*t" too, until he looked at the invoices and confirmed they're different colors, but only slightly. I ferried a piece of the wall metal to the roof and verified it, and feel much better. Lighting can be a b*tch sometimes! The trim color will really make it 'pop', and I like the detail around the windows and doors.

Oh yeah - the inside feels HUGE now.
 

Attachments

  • 31.jpg
    31.jpg
    114.1 KB · Views: 174
  • 30.jpg
    30.jpg
    152.3 KB · Views: 210
  • 29.jpg
    29.jpg
    127.5 KB · Views: 180
  • 28.jpg
    28.jpg
    155.5 KB · Views: 188
  • 27.jpg
    27.jpg
    151.1 KB · Views: 190
  • 26.jpg
    26.jpg
    154.4 KB · Views: 177
  • 25.jpg
    25.jpg
    153.8 KB · Views: 183
OP
R

rok_hunter

Well-known member
Joined
Apr 10, 2020
Messages
153
Location
home
Couple more photos, including the wall color laid against the roof color. Distinct in the right light!
 

Attachments

  • 32.jpg
    32.jpg
    53.7 KB · Views: 159
  • 33.jpg
    33.jpg
    152.6 KB · Views: 192
  • 34.jpg
    34.jpg
    154.1 KB · Views: 185
  • 35.jpg
    35.jpg
    63.9 KB · Views: 173

wannabelikemike

Well-known member
Joined
Aug 27, 2018
Messages
52
Location
Brunswick, GA
Building is looking great! Crazy how the light makes the walls and roof look the same, but you can definitely tell the difference when laying them on top of one another.
 
To avoid these ads, REGISTER NOW!
OP
R

rok_hunter

Well-known member
Joined
Apr 10, 2020
Messages
153
Location
home
Even when I laid the wall sample against the identically colored wall, they looked like distinctly different colors until the sample was within just a few degrees of being flat against the wall surface. I was surprised how much justa slight change in lighting angle changed the overall color.

Sent from my Pixel 2 XL using Tapatalk
 
OP
R

rok_hunter

Well-known member
Joined
Apr 10, 2020
Messages
153
Location
home
The barn structure itself is officially done (and paid for!), just waiting for permits to close out. Once that is done the electrician will be in, as well as the gutter installer. I'll be breaking out the tractor to dig the trench for power and water, running the water to the building, and working the mini-split install.
 

Attachments

  • 39.jpg
    39.jpg
    150.6 KB · Views: 293
  • 38.jpg
    38.jpg
    151.3 KB · Views: 210
  • 40.jpg
    40.jpg
    159.7 KB · Views: 246
  • 37.jpg
    37.jpg
    153.8 KB · Views: 216
  • 36.jpg
    36.jpg
    154.5 KB · Views: 237

Woodee955

New member
Joined
May 28, 2020
Messages
3
Location
Georgia
Building looks awesome, I have the same type i am building. Did they attach the 2x6 to the bottom of the steel truss on the end wall?
 

Jcrock

Well-known member
Joined
Jun 27, 2019
Messages
266
Location
Kansas
Great looking building! I did a similar size and researched your steel truss style a bit before pulling the trigger with a local company. Looking at your pictures if I ever build another one I might look at this harder. The 2x6s would definitely make insulating and finishing the interior easier.

Sent from my SM-G970U using The Garage Journal mobile app
 
OP
R

rok_hunter

Well-known member
Joined
Apr 10, 2020
Messages
153
Location
home
Great looking building! I did a similar size and researched your steel truss style a bit before pulling the trigger with a local company. Looking at your pictures if I ever build another one I might look at this harder. The 2x6s would definitely make insulating and finishing the interior easier.

Sent from my SM-G970U using The Garage Journal mobile app
A lot of the builds I see only have the 6x6 posts and the 2x6 girts running around the outside to strap the sheet metal to. I think the internal vertical 2x6's on my build may have been driven by wind load requirements for hurricanes in my area, it's engineered to somewhere around 130-140mph loads. On the plus side it IS making electrical easier (places to hang boxes, route wires) and gives me some stand-off space for insulation.

Sent from my Pixel 2 XL using Tapatalk
 

StangSpace

Well-known member
Joined
Jan 24, 2011
Messages
47
Location
Panhandle of FL
I'm glad I stumbled across your thread. I just started trying to find someone to build the exact same shop as you (30 x 40 x 12). I too am in Northwest Florida (Okaloosa County). It has been difficult to get anyone to answer a phone in the permit office. Can you answer a few questions for me?

When you went for your permits did you already have plans purchased for the shop? I looked into Blackwater Truss today and they want $750 for the plans.

Did you have to source a concrete company or did Backwoods take care of everything? Also did you have a foundation plan?

What made you choose the pole barn over a metal building with the same wind ratings?

I really appreciate any help and advice you can give me in getting this project started. I don't want to buy plans and the county deny them for X reason.
 
OP
R

rok_hunter

Well-known member
Joined
Apr 10, 2020
Messages
153
Location
home
Building looks awesome, I have the same type i am building. Did they attach the 2x6 to the bottom of the steel truss on the end wall?

They did, 2x6's are bolted to the bottom of the end trusses.

(edited to add a couple photos)
 

Attachments

  • 52.jpg
    52.jpg
    114.4 KB · Views: 177
  • 51.jpg
    51.jpg
    92.6 KB · Views: 155
Last edited:
OP
R

rok_hunter

Well-known member
Joined
Apr 10, 2020
Messages
153
Location
home
I'm glad I stumbled across your thread. I just started trying to find someone to build the exact same shop as you (30 x 40 x 12). I too am in Northwest Florida (Okaloosa County). It has been difficult to get anyone to answer a phone in the permit office. Can you answer a few questions for me?

When you went for your permits did you already have plans purchased for the shop? I looked into Blackwater Truss today and they want $750 for the plans.

Did you have to source a concrete company or did Backwoods take care of everything? Also did you have a foundation plan?

What made you choose the pole barn over a metal building with the same wind ratings?

I really appreciate any help and advice you can give me in getting this project started. I don't want to buy plans and the county deny them for X reason.

I am in Okaloosa County as well, just a few minutes outside of Crestview. Depending on if you are within city limits anywhere you may have more permitting to go through (I'm county, so that was it), but I haven't interfaced with the permit offices at all other than to get a time window on when the inspector was coming by for the final inspection. Everything has been handled by Backwoods in regards to that.

The plans were put together by Backwoods as well; I sent them my desired dimensions, a rough layout I had built from an online garage building website (see that computer generated image back in the first couple of posts), and they put together an estimate for me. Once I was under contract they generated the plans and sent a copy to me for proofing, then pushed them to an engineering firm for the engineering stamp - this was a county requirement, I assume because of our hurricane/wind load codes. The engineered plans included the concrete foundation (mine is 4" slab, 3,000 psi fiber reinforced, 12" footer).

Backwater took care of everything from then on. They had a concrete company out of Bonifay (maybe Chipley? I can't remember) that came and took care of the slab once the basic "pole barn" was up, who handled all the form building, footer trenching, moisture barrier, and rebar installation around the footers. The contract/pricing was 100% inclusive of all that.

As for why I went enclosed pole barn vs metal: All but a couple of the metal buildings I pulled quotes for, I would have had to build/assemble myself. Prices varied between around $1k-$6k cheaper than what I ultimately paid depending on the cost of shipping, level of pre-fab, contractor-installed vs. DIY, if it came with windows & doors, slab options, etc. I also would have had to source a concrete contractor for the slab, and have a foundation plan drawn up/certified/approved for permits. I would have been responsible for pulling any other required permits for most as well, except for the one or two who had crews to do the assembly - but I'd have to provide a scissor-lift for them too. Also, I wanted to be able to nail & screw things into the walls, and I know I can do that absolutely anywhere with a wooden internal structure; I've never had a steel building so I didn't know how easy it would be to do things like that, if I'd have to be mindful of screw types to avoid corrosion, etc. Between all the additional legwork the metal/steel buildings would have required me to do, and my familiarity with wooden internal structure vs metal, I decided to pay the extra money for the enclosed pole barn.

In addition to Backwoods I talked to a couple other local companies and got quotes from them (which were only slightly cheaper, and one that was over $20k more), but it was the outstanding customer reviews for Backwoods that ultimately won me over. I can emphatically say their reviews are well earned and the building is worth every penny I paid.

Finally - shoot me a PM if you'd like to come over and see it in person, and ask any additional questions. You can learn a lot by a few minutes of looking at the real thing that I couldn't cover in several pages of typing.
 

Dividing Creek

Well-known member
Joined
Nov 17, 2011
Messages
188
Location
Central Virginia
Wow, nicely done.
Like Woodee955, I'm in the process of putting up an extremely similar building.
30x40x12 with steel trusses just like yours except mine have have 12 inch over hangs. My building was purchased as a "standing roof kit" meaning no walls provided. I surface mounted the 12 ft posts to the concrete with steel brackets provided with the kit.
Link to kit I used, in case this construction style appeals to others who want to put it up themselves. https://www.buildabarnllcwv.com/apps/webstore/products/show/7276839
They swapped out the 16ft poles for 12's with surface mount brackets for the same price.


I have mine up and we are working under it with no walls yet. After seeing how your end wall was framed I will copy that method, I like it a good bit more than what I had in mind.

Really like how yours was done and will steal some ideas from how your contractor built yours.
Do you know, or could you find out what the L channel product is that they used around the lower perimeter that the steel siding sheet sits on ? I need that.
 
Last edited:

StangSpace

Well-known member
Joined
Jan 24, 2011
Messages
47
Location
Panhandle of FL
I really appreciate the response. I am going to look into Backwoods. I was in the yard today laying out flags and still trying to nail down exactly what I want and where I want it. I'm on the north side of Crestview. I was also trying to figure out today if I am considered city or county. I know my street is right after the "Crestview City Limits" sign. I am going to take you up on your offer to come by. I'll shoot you a PM once my schedule calms down.
 
OP
R

rok_hunter

Well-known member
Joined
Apr 10, 2020
Messages
153
Location
home
Wow, nicely done.
Like Woodee955, I'm in the process of putting up an extremely similar building.
30x40x12 with steel trusses just like yours except mine have have 12 inch over hangs. My building was purchased as a "standing roof kit" meaning no walls provided. I surface mounted the 12 ft posts to the concrete with steel brackets provided with the kit.
Link to kit I used, in case this construction style appeals to others who want to put it up themselves. https://www.buildabarnllcwv.com/apps/webstore/products/show/7276839
They swapped out the 16ft poles for 12's with surface mount brackets for the same price.


I have mine up and we are working under it with no walls yet. After seeing how your end wall was framed I will copy that method, I like it a good bit more than what I had in mind.

Really like how yours was done and will steal some ideas from how your contractor built yours.
Do you know, or could you find out what the L channel product is that they used around the lower perimeter that the steel siding sheet sits on ? I need that.

That looks like a pretty solid kit, and is a bit less than I paid for the same level of completion on mine (I had three draws through construction - basic pole barn/roof kit like that, then concrete, then enclosure/completion). I got a quote from another national builder who uses a similar post mounting process, mine is the old fashioned dig-a-hole & fill with concrete.

When you go to frame in your walls, you'll probably want to add anchor bolts for the bottom board. The concrete guys set most of them when they poured the slab but there was a length that didn't have them installed (I figure they ran out, or thought I was putting a door there), so the builders just drilled and installed anchor bolts there.

I've got an email in with the builder asking about the 'technical' name for that piece of metal you're interested in, and will shoot you a PM when the answer comes back.

EDIT: Regarding the trim at the base of the steel panels - the builder calls that a "rat guard", formally known as "base trim" or "base angle". It's a L-shaped piece of metal that runs 2" up and 1.5" out, with a 45° down turn on the outside lip.
 

Attachments

  • 53.jpg
    53.jpg
    121.7 KB · Views: 171
  • 50.jpg
    50.jpg
    147.4 KB · Views: 163
Last edited:
OP
R

rok_hunter

Well-known member
Joined
Apr 10, 2020
Messages
153
Location
home
I really appreciate the response. I am going to look into Backwoods. I was in the yard today laying out flags and still trying to nail down exactly what I want and where I want it. I'm on the north side of Crestview. I was also trying to figure out today if I am considered city or county. I know my street is right after the "Crestview City Limits" sign. I am going to take you up on your offer to come by. I'll shoot you a PM once my schedule calms down.

Shot you a PM with some info to help answer some of those questions. Saw your AMXS plaques on the wall of your thread - I was once a lawn dart guy, had a couple friends who worked on the black jet. Cool stuff.
 
OP
R

rok_hunter

Well-known member
Joined
Apr 10, 2020
Messages
153
Location
home
It's been a few days since my last update and while a lot has been happening, not a lot has been happening. My electrician has been working the interior electrical stuff, and I've trenched from the house sub-panel to the barn for the electrical supply line. I also trenched from my house water main to the barn to get a hose bib down there, and have all the plumbing for that done. I was pretty negligent in getting a few more pictures of the trenching for power & water; some was done with a shovel, most was done with the backhoe, and even though my soil is quite easy to dig (no rocks) it was not pleasant. I was able to sweat through three changes of clothes in one day, sitting on the back of the backhoe, just because of the heat and humidity. A couple times it crossed my mind about how tough it would have been to shovel the whole thing (220' for power, 240' for water) and the thought nearly gave me heat stroke! Man, Florida is great :mad:.

So, anyhow, the few pics I have are attached. Power is being run off of a 100A sub-panel that was installed for the pool, and as I mentioned the water line is tied into my water main. I also T'd a line to my shed between the house and the barn that will later be part of a garden/chicken coup setup. The water line/hose bibs are set against 4x4 treated posts and each have a ball valve shut-off, and will be wrapped in insulation and secured to the 4x4 with 2" horseshoe clamps.

Electrical is being handled via a 24-slot breaker panel that was being given away via facebook marketplace, saving me some dough. Outlets are spaced about every 7.5-ish feet, joist spaces permitting, and 48" high. I've got one wall that will have my workbench where I spaced some outlets closer together too - there's a photo up at the beginning of the thread that has the layout. I'll also have four exterior outlets, one on each wall, a 230V outlet between the roll-up and walk-through doors, and a 230V quick disconnect on the back wall for the mini-split.

Speaking of the mini split - I ordered a plastic "mini split condenser pad" off of the jungle website instead of building a cement pad for it, and my condenser "just" fit. I was surprised to find absolutely nothing, anywhere, about how to secure the pad to the ground - everything I saw just said to make a level spot, compact it if needed, and throw the pad on the ground. Sure enough it's working for now, but I do think I'll eventually build a concrete pad around it to help stabilize the whole thing. I won't be able to get the rest of the mini split installed until after insulation and hanging plywood on the inside.

Finally, depending on what the local weather does in in the next several minutes, gutters may be starting this afternoon....
 

Attachments

  • 57.jpg
    57.jpg
    145.2 KB · Views: 92
  • 56.jpg
    56.jpg
    145.3 KB · Views: 102
  • 49.jpg
    49.jpg
    106.4 KB · Views: 120
  • 48.jpg
    48.jpg
    146.9 KB · Views: 105
  • 47.jpg
    47.jpg
    147.7 KB · Views: 109
  • 42.jpg
    42.jpg
    146.8 KB · Views: 106
OP
R

rok_hunter

Well-known member
Joined
Apr 10, 2020
Messages
153
Location
home
Couple more photos for the mini split condenser, and some interior electrical.
 

Attachments

  • 58.jpg
    58.jpg
    140.8 KB · Views: 107
  • 59.jpg
    59.jpg
    146.6 KB · Views: 102
  • 43.jpg
    43.jpg
    84.9 KB · Views: 117
  • 44.jpg
    44.jpg
    147.6 KB · Views: 106
  • 45.jpg
    45.jpg
    111.2 KB · Views: 102
  • 55.jpg
    55.jpg
    126.3 KB · Views: 111

Dividing Creek

Well-known member
Joined
Nov 17, 2011
Messages
188
Location
Central Virginia
That looks like a pretty solid kit, and is a bit less than I paid for the same level of completion on mine (I had three draws through construction - basic pole barn/roof kit like that, then concrete, then enclosure/completion). I got a quote from another national builder who uses a similar post mounting process, mine is the old fashioned dig-a-hole & fill with concrete.

When you go to frame in your walls, you'll probably want to add anchor bolts for the bottom board. The concrete guys set most of them when they poured the slab but there was a length that didn't have them installed (I figure they ran out, or thought I was putting a door there), so the builders just drilled and installed anchor bolts there.

I've got an email in with the builder asking about the 'technical' name for that piece of metal you're interested in, and will shoot you a PM when the answer comes back.

EDIT: Regarding the trim at the base of the steel panels - the builder calls that a "rat guard", formally known as "base trim" or "base angle". It's a L-shaped piece of metal that runs 2" up and 1.5" out, with a 45° down turn on the outside lip.

Thanks for the response. Our 30x40 was an addition to an old block gambrel dairy barn built on a grade so we had to dig footers and then use wall forms (4ft of elevation change over 40 ft) to have the new pad match the grade of the original building so thats why we did surface mount brackets for the poles with 5/8's x 8inch anchors. We filled the space under the pad with recycled concrete, cheaper than gravel and compacts very well. After seeing your end wall framing will use a treated 2x6 and 3/8's x 4 anchors for the base plate.
Our structure being an "ag" building in a rural area wasnt subject to any permiting or codes, and wont be taxed as part of my assesment. Not sure how Virginia compares to Florida in costs but the ground and all the concrete work (42 yards total, pad is 5+ inches thick and well over 4kpsi was $12k, the fill $2.2k(7 tandem loads), the building kit $6.2 with additions and tax, and having a roofer install the roof (used the mylar faced bubble wrap under the metal -supposedly an R8 value but eliminates condensation on back of the metal)was $1300, with the windows ordered we're already @ $22k- putting the structure up ourselves and don't have walls yet. Going to emulate yours as best we can.
Thanks again.
 
Last edited:
To avoid these ads, REGISTER NOW!
Top Bottom