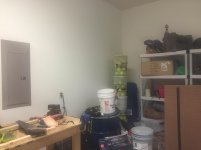
So Im still in high school so I still live with my parents. They finally are letting me modify the garage a little so after tough negotiations with my dad, he is letting me install a pegboard in the garage. Im gonna make it look really good, like it was professionally done, in hopes that he will let me do more in the garage. Im installing the pegboard with electrical and air compressor outlets. It will be 6ftx4ft. Im gonna post pictures of the project as I do it. Heres a picture of where I am going to install it.


You are using an out of date browser. It may not display this or other websites correctly.
You should upgrade or use an alternative browser.
You should upgrade or use an alternative browser.
Building a pegboard for workbench
- Thread starter mheinz
- Start date

BillK
Well-known member
Looks good so far ") Love to see younger guys getting into this type of stuff.
Love to see younger guys getting into this type of stuff.
Love to see younger guys getting into this type of stuff.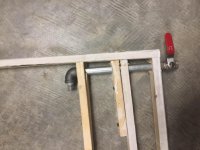
FTWingRiders
Well-known member
Good for you! I remember talking my parents into letting me re-sheet rock my room in HS. (The house was pretty old). I had a friend help, and it came out alright. Keep posting pictures!
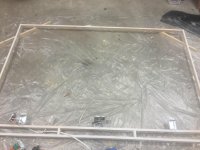
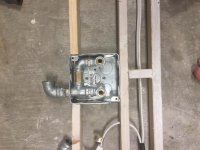
So ive started installing the piping for the air compressor outlet. Im using a 4x4in outlet box to out it in but I ran into difficulty fitting it in. I think im gonna need to move from 1/4 hex ******* to 1/4 ******* cause the hex having 2 hexes adds a good 3 centimeters. If that doesn't work im gonna move to the brass air compressor fittings just for the outlet portion since those look signifigantly smaller. Heres how im designing the outlets right now
Attachments

QwikKotaTx
Well-known member
Don't forget your pipe sealant tape. I hope my son gets involved in my hobby.
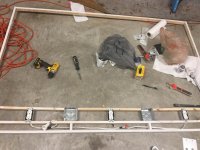
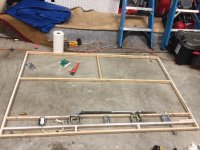
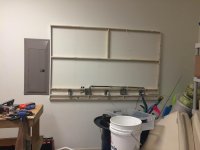
I had AP Exams today so I got a half day at school, which gave me time to work on my project. I hadn't really worked on anything since Sunday cause I was studying for my exams but Im done now and needed to some form of physical activity. So I finished all the frame work by putting in the last air outlet box, and putting in all the support pieces within the frame. You can see this in one of the pictures. Next thing I did was cut 2 ft off pegboard which took me almost an hour because I wanted to make it as straight as possible. Next thing I did was put one of outlet pipe setups I created in the outlet box so I could take measurements of where the holes should go on the metal cover. Now what I need to do is install the rest of the piping, mount the pegboard support on the wall, connect all the electrical stuff together, cut the holes for the outlets on the actual pegboard, mount the pegboard ontop of the support, and finally paint and put the outlet covers on everything to give it a nice clean look. So I have quite a bit left to go but Im making progress
Attachments


MarkWilliams60
Banned
- Joined
- Apr 23, 2016
- Messages
- 99
3cm. What country do you live in ?So ive started installing the piping for the air compressor outlet. Im using a 4x4in outlet box to out it in but I ran into difficulty fitting it in. I think im gonna need to move from 1/4 hex ******* to 1/4 ******* cause the hex having 2 hexes adds a good 3 centimeters. If that doesn't work im gonna move to the brass air compressor fittings just for the outlet portion since those look signifigantly smaller. Heres how im designing the outlets right now
To fudge things a little don't be afraid to use barbed ******* and air hose with clamps. Sometimes building everything rigid is a pain and not really worth it..
I live in the USA!!! Im gonna try building everything rigid because I have all the pipes and components and Ive already done about half of the pipe job. But since its behind pegboard and wont be visible I dont really care how it works as long as its air tight so if necessary i will use hose!!
UpNorther
Well-known member
Your project looks great Mheinz.
It'd be great if more people your age took such interest.
Just looking at your pictures; It looks like your elec wirenuts aren't in a electrical box. Just an fyi - they're supposed to be per code. It's a fire rating thing..
Looking forward to more pictures.
It'd be great if more people your age took such interest.
Just looking at your pictures; It looks like your elec wirenuts aren't in a electrical box. Just an fyi - they're supposed to be per code. It's a fire rating thing..
Looking forward to more pictures.
ford33
Well-known member
You don't mention the thickness of your pegboard. If you hang heavy items on hooks from the pegboard it tends to pull the pegboard away from the frame. Think about what and where you plan to hang items and add vertical and maybe one or two horizontal wooden support members within the frame and attached to the pegboard. These supports don't need to be big 2x4s. A 1x2 piece works well. This just provides some support to the pegboard. You don't need many supports.
Also, consider screwing the pegboard to the frame and using a large washer to spread the load on every screw connection. If you need to get to the electrical or airlines, you can easily remove the pegboard by unscrewing it from the frame.
Good luck with the project.
Also, consider screwing the pegboard to the frame and using a large washer to spread the load on every screw connection. If you need to get to the electrical or airlines, you can easily remove the pegboard by unscrewing it from the frame.
Good luck with the project.
matt_i
Well-known member
Nice start! I think having a ball valve is an excellent idea, the quick connects leak slowly, and will cause the compressor to cycle unnecessarily. Compressed air is very expensive to create and use, as you will eventually find out
AnEv942
Well-known member
Nice. I would agree, a box for the wire nuts with blind cover IF your wanting access later. Otherwise replacing right plug wire with a longer piece and wire both plugs to center plug would get rid of open connection. What your doing will work as it appears boxes are flush to frame instead of finished pegboard height, but installing plugs with pegboard on top of plugs ears, wont allow the receptacles to come up flush to plates. normally plugs set last.
Like the "air boxes".
Like the "air boxes".
Nice. I would agree, a box for the wire nuts with blind cover IF your wanting access later. Otherwise replacing right plug wire with a longer piece and wire both plugs to center plug would get rid of open connection. What your doing will work as it appears boxes are flush to frame instead of finished pegboard height, but installing plugs with pegboard on top of plugs ears, wont allow the receptacles to come up flush to plates. normally plugs set last.
Like the "air boxes".
Wait so would u recommend I bring the oulets out about an 1/8th of an inch so the actual plugs will be be flush to the plates because I didnt think of that, but it would be a pretty easy fix if I do it now. Also Im gonna put the wire nuts in a box for themselves since Im out of wire, but have an extra electrical box.
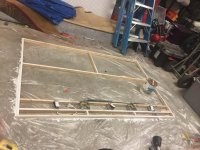
So I made a little progress yesterday despite it being mothers day. I figured out how I am going to install the piping and I have the air outlets designed. All I need to do now is put the electrical box in for the connectors. Tighten the piping, mount the support, cut the outlet holes in the pegboard, install the pegboard on the support and paint everything, then Im done. So I expect it should take about a week longer to complete.
Attachments


MarkWilliams60
Banned
- Joined
- Apr 23, 2016
- Messages
- 99
Do a leak check before you mount it. You have a load of joints in that line.
Do a leak check before you mount it. You have a load of joints in that line.
I'm saving up to buy a new conpressor so I currently do not have one. Do you happen to know of any ways to do a leak check without an air compressor? Thanks!!
mike93lx
ALLIANCE MEMBER
I'm saving up to buy a new conpressor so I currently do not have one. Do you happen to know of any ways to do a leak check without an air compressor? Thanks!!
A bicycle tire pump would work great.
Ok I got alot more accomplished yesterday. So I have all the piping done except for the part where I run the piping from the valve to the 90 degree curve. I still need to install an electrical box to cover the wire nuts, and repaint the support, then I can mount the support. I started marking where I am going to drill the holes through the drywall into the studs to mount the frame on. I tried the bike pump thing to check if there where any leaks in the piping but I couldn't pump enough air in at once to check if there was a leak. So if anyone has any other ideas on how to check for leaks please let me know. I also started cutting the holes in the pegboard for the electrical and air outlets. Then I will mount the actual pegboard, repaint everything one more time, and then Im done
Attachments

UpNorther
Well-known member
Great to follow your project coming along Mheinz, its looking good !
When you do the bike pump, try putting a really soapy water mixture over the fitting connections and watch for bubbles. If leaks are present, bubbles will slowly form (even as your pumping it).
Thats what I do on my 4 wheeler tires that only run about 8 psi. In a pinch, a big wad of spit works in my case to, but you've got allot of connections for that. Lol
Last edited:
rick carpenter
Well-known member
You don't mention the thickness of your pegboard. If you hang heavy items on hooks from the pegboard it tends to pull the pegboard away from the frame. Think about what and where you plan to hang items and add vertical and maybe one or two horizontal wooden support members within the frame and attached to the pegboard. These supports don't need to be big 2x4s. A 1x2 piece works well. This just provides some support to the pegboard. You don't need many supports.
Also, consider screwing the pegboard to the frame and using a large washer to spread the load on every screw connection. If you need to get to the electrical or airlines, you can easily remove the pegboard by unscrewing it from the frame.
Good luck with the project.
Looks good, mheinz. I was about to say the same thing about supports as ford33. I would suggest a separate piece of pegboard for the bottom section though. How are you going to fasten it to the wall keeping in mind the pulling when attaching/detaching the air lines?
After I finished installing the hardline I moved onto electrical.
i found out my extra metal box wouldnt fit where i wanted it to so I decided to rewire everything so there are no more exposed wire nuts which makes everything up to code.
i found out my extra metal box wouldnt fit where i wanted it to so I decided to rewire everything so there are no more exposed wire nuts which makes everything up to code.

Next I started working on the outlet covers which was one of the harder parts of this project. A while back I posted a thead on creating air outlets and most people didnt like my idea. But a few people had some good ideas I decided to use. I used a metal 2 gauge black outlet cover. I drilled 2 holes in it for the coupler and the pressure gague and Im later gonna paint it white. What you dont realize untill your almost done with this part is how align these holes need to be and you have to have near perfect measurements or else it will set crooked or wont fit both the coupler and the gauge through the 2 holes.But after quite a while I got the results I wanted. I still need to paint it but I think it turned out pretty good!!
Attachments

lonestarky
Well-known member
Looks good mheinz. What do you and your parents do in the garage?
Hope you didn't leave that frame sitting on the plastic after you painted. That paint is going to dry and stick to the plastic. Run a blade down the seam of wood to plastic before you ruin your paint job.
Consider running some casing or base molding around the outside to box the pegboard in. That stuff frays something terrible once it gets nicked up.
If you're painting the pegboard, careful you don't close the holes up.
Once you get all your tools laid out, consider shadowing them out to increase the 5s and professional display.
Sent from my XT1254 using Tapatalk
Looks good mheinz. What do you and your parents do in the garage?
Hope you didn't leave that frame sitting on the plastic after you painted. That paint is going to dry and stick to the plastic. Run a blade down the seam of wood to plastic before you ruin your paint job.
Consider running some casing or base molding around the outside to box the pegboard in. That stuff frays something terrible once it gets nicked up.
If you're painting the pegboard, careful you don't close the holes up.
Once you get all your tools laid out, consider shadowing them out to increase the 5s and professional display.
Sent from my XT1254 using Tapatalk
I love the ideas you have. And I thought about the paint and plastic sticking together so I used some scrap wood and put them under the 4 corners of the frame to have the frame drying 2 inches above the plastic. What do you mean by framing or casing, like can you show me an example because it sounds like a good idea? Also what do you mean by shadowing and what is a 5s? Sorry for all the questions but I want this to look good, and you seem to obviously know way more about all this then I do. Thanks!!!
Moose97
Well-known member
Hey man, you're doing a great job. Don't leave us hanging on the updates! Very impressive. Keep up the effort and don't be afraid or embarrassed to ask questions about things your not sure of. We all started at the same place. I still ask questions all the time even about stuff I know how to do. Somebody always has a better way!
Weekend_warrior
Well-known member
Nice work! If they like it you might see if they will let you do a built in wall shelf to organize some of the things to the right of your board. Just some 2x4 and OSB will do wonders in that corner. Take some time with the layout and build the shelves to fit what is needed. I'm sure they will appreciate it being organized and you will appreciate the space that it gives you to work....... "So Much room for activities"
lsc_chef
Member
its cool that your making your own board. love the air box. if you need to hang any amount of weight might i suggest http://www.wallcontrol.com/
lonestarky
Well-known member
Casing is a type of molding. Usually goes around doors and windows. It's just cheap trim, but better that get knocked and dinged then the edge of the pegboard. You could frame it out perpendicular to the wall kind of like a frame perpendicular to the pegboard, to cover the structure behind the pegboard. Or put it on top of the pegboard to frame it like a picture frame. You'll get to mitre some joints.
5s is a housekeeping or organization principle used in many factories, and a quick Google search will yield lots of info for you. shadowing is where you get all the tools hung up where you want them, then pencil or marker a thin outline around them on the board so yu can see what is supposed to go where. If something is missing, it's painfully obvious. Search shadow board or shadow tool box, you'll find it.
I'd post some links, but I'm on my phone and despite my age, I'm not that good at it.
Sent from my XT1254 using Tapatalk
Michigan Mike
Well-known member
Temporarily screw a piece of wood lengthwise across the bottom of the frame. you can set the pegboard on it. if needed you can use small shims to adjust the fit.
lonestarky
Well-known member
You can do that, or you can put a couple nails through one of the pegboard holes and get it to rest on the bottom frame in he right spot if it lines up.
Sent from my XT1254 using Tapatalk
Sent from my XT1254 using Tapatalk
fourjeepin
Well-known member
Re: Home Depot Clearance Thread 2015
There were some good deals on compressors in the HD deals thread over the last couple of months. I suggest watching it if you are watching your pennies and wanting to add some tools.
I have a bunch of peg board and love it. I would advise some additional supports in your frame. Probably no less than 20" centers.
Looking great! I really like the pressure gauge with your quick connect.
I'm saving up to buy a new conpressor so I currently do not have one. Do you happen to know of any ways to do a leak check without an air compressor? Thanks!!
There were some good deals on compressors in the HD deals thread over the last couple of months. I suggest watching it if you are watching your pennies and wanting to add some tools.
I have a bunch of peg board and love it. I would advise some additional supports in your frame. Probably no less than 20" centers.
Looking great! I really like the pressure gauge with your quick connect.