To avoid these ads, REGISTER NOW!

Building a pole barn/garage

mx842

Well-known member
Joined
Feb 24, 2011
Messages
227
Location
Richmond Va
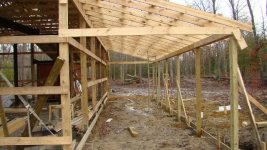
I have finally started my garage and it is to be 32x40 with medal roof and siding. Also I might add that I'm a po' white boy so I am doing everything myself to save on money that I find myself in short supply of.

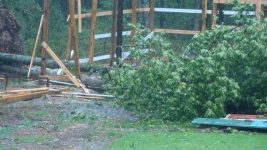
Using my old 96 bronco as a bulldozer I pulled over all the trees and stumps that were in the site and that took me a week and a half to complete.

attachment.php


attachment.php


attachment.php


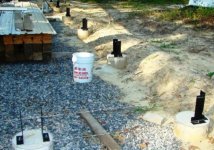
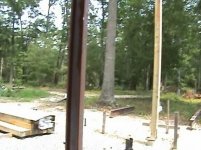
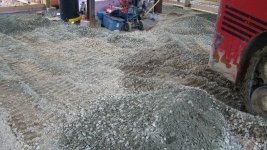
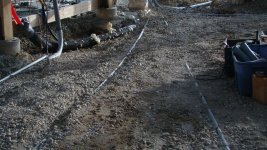
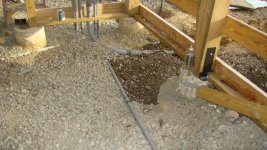
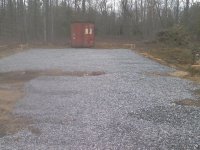
I have a really great friend that loaned me his new John Deer 3320 that has a front end loader and a box scraper on it. I used it to pull the root mat off the building site and pile the top soil in a nice pile out of the way. By the time I got the top soil off the pad I didn't have to move much dirt around but there were a couple of soft spots I had to cut out and put good dirt in and then I spread about 2 inches or so gravel over the whole pad. Believe it or not when I checked the pad was only about 2 to 3 inches out of level all over so I'm happy.

attachment.php


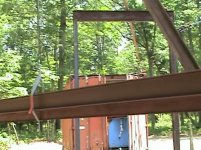
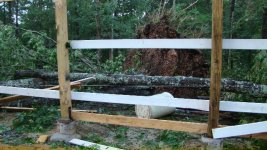
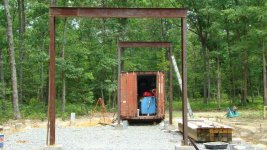
Also notice that the red container had to be moved the 40' from the front to the back wall and with all the wet loose soil getting it into place was a real chore for myself, my bronco and the JD. It was slow but I finally got it out of the way so I could lay out the building.

attachment.php


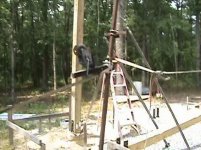
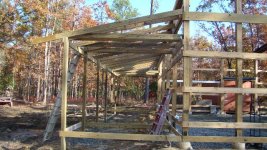
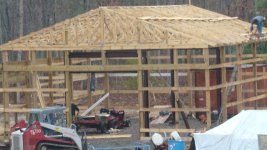
My first course of action was to erect a steel structure that will be inside the building that will be used to unload trucks at the big door and roll the material to the back part of the shop. I also want to use it to pick up stuff while I work on it that I can't get on one of my welding tables.

I had several 20' steel I beams I wanted to use to span the 40' section with. The problem is from what I have been reading the beams I have are not large enough to do this without center support. I searched 2 days looking at different sites trying to figure out if the beams I have would be enough with no luck.

After searching the web and getting beaten up by a lot of people telling me what I wanted to do was impossible I decided to forget the internet and put my plan into action and started the task of fabricating the pieces of the structure and then try to figure out how to get it set up on the 3x3' building pads that I had been working on.

attachment.php


At this point I had decided that spanning the full 40' was not necessary and that I could get by with just 30' which would help with the limited capacity of the W10x19 I beam I was using. Part of the plan was to be able to use the beam to also lift the top off one of my powder coat ovens that will be in the back of the building and the way it worked out it was actually better to just go the 30' distance.

As it turned out I came across a bunch of steel that would be better suited for my project but I had to take the structure down. I was moving out of the shop I had been in for years because business was so bad that it was costing me money to show up there everyday. I didn't have to take the tower down but my land lord had been so good to me I didn't want to leave it for him to have to worry about and besides I could use this larger steel for my home project.

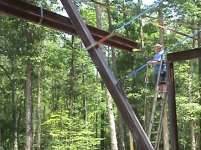
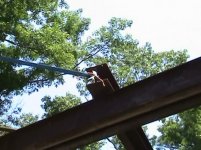
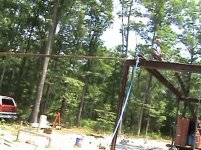
The only problem was it had to be taken down and this is when I found out that I had been in the wrong business for all these years. The cheapest estimate I got was over $10,000.00 so that meant I would have to take it down myself. This task in itself would be a worthy topic for it's own thread but I'll make it short. I knew that the foundation was weak and the reason it was dangerous to use but I didn't know just how bad it really was until I cut away the last cross section from one side to the other and once I cut that beam one of the main beams on the other side just popped out of the ground and fell over. Here I am sitting on a beam 30' in the air waiting for that side to topple over like the other side did but it stayed up there as I made my steady clime down to clean out my shorts. I had a bunch of pics I took of this operation but can't find them now but will post them once I do.

attachment.php


attachment.php


attachment.php


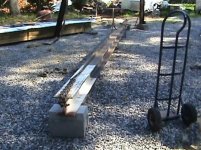
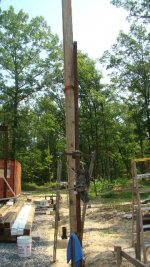
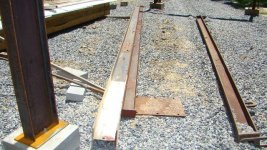
The last pic is the completed beam laying on the ground waiting to be painted and set into place. I welded a smaller 3x4" I beam on to the bottom of the larger beam for my trolly to run on and hopefully it will also add to the load carrying ability to the whole setup. The 6" beam to the right is a beam I will use to make a makeshift crane to raise the main beam to the uprights but I have to get them built and in place first.
 

Attachments

  • 0209111720.jpg
    0209111720.jpg
    104.9 KB · Views: 1,388
  • 0211111254.jpg
    0211111254.jpg
    68.8 KB · Views: 1,374
  • 0222111659.jpg
    0222111659.jpg
    123.1 KB · Views: 1,381
  • 0313111746.jpg
    0313111746.jpg
    69.9 KB · Views: 1,370
  • DSC01833.JPG
    DSC01833.JPG
    114.5 KB · Views: 1,353
  • DSC01831.JPG
    DSC01831.JPG
    100.9 KB · Views: 1,364
  • DSC01835.JPG
    DSC01835.JPG
    107.1 KB · Views: 1,359
Last edited:
To avoid these ads, REGISTER NOW!

Kma4444

Active member
Joined
Oct 27, 2010
Messages
42
I don't think the idea of the cables will help, they sound to me like they will add to the vertical load at the center of the beam as the cables are actually being held up by the center of the beam. If you replaced the cables with solid supports, think a truss running the length of your beam, then you would take the vertical load from the center of the beam and feed it up through vertical support to the solid "rafters" so to speak, and down to the end supports of the beam.

Using the trusses to support the beam would be the most likely solution, but of course the truss engineer would need to know all about your intended use.

I like the idea of having a trolley system for sure
 
OP
M

mx842

Well-known member
Joined
Feb 24, 2011
Messages
227
Location
Richmond Va
Re: Building a pole barn/garage Redneck style....

The 4 uprights for the structure I made out of the medal that I had made the first beam out of. It worked out fairly well because I cut the beam up in 4 pieces and by the time I welded the flanges and finally got the cross members up it worked out so that I could get by with the 14' high walls I had planed with a couple inches left over. Getting these things up and in place was a challenge but I finally came up with a plan to modify my engine hoist mounted to my utility trailer with the main boom extended out to around 15' to get the height I needed to set the cross members on to the uprights. The upright were easy but the cross beams were heavy so I had to build this shaky lifting device. I didn't drop one but once which knocked the fender off my trailer and luckily I saw it coming and hauled azz before it came down.

attachment.php


Now don't laugh too hard and fall out of your chair an hurt yourself cause after a few bugs were worked out and a couple minor modifications I got all three beams sitting on top of the post and bolted down without killing me and my helper Boomer. Boomer is my old lab, well he was my old lab cause he's no longer with us.....No he didn't get killed from this shaky setup, he got Lyme disease and I finally had to put him down but he was a real trooper right up to the end. Some days I had to help him get down to the building but he was by my side when he could get there.

attachment.php


I really miss the old boy and I wish he could have made it to the end of the project to see it through. I do sometimes feel he's nearby keeping an eye on things though.
 

Attachments

  • DSC01830.JPG
    DSC01830.JPG
    109.6 KB · Views: 1,332
  • DSC01823.JPG
    DSC01823.JPG
    107.5 KB · Views: 1,335
Last edited:
OP
M

mx842

Well-known member
Joined
Feb 24, 2011
Messages
227
Location
Richmond Va
Working by yourself can be a real challenge and it also means that at times you have to build or modify things that were not originally designed to do what you need to get done. As I said earlier the 4 steel upright post were fairly easy, it was the ones on the top that I had to get imaginative with and after a few trial runs and a tweak or two here and there I finally managed to get the frame up.

attachment.php


attachment.php


attachment.php

With the frame up I can now start thinking of a way to get the big beam up on top of the frame. The reason I do a lot of the things I do by myself is that I hate to make someone else tell a lie.

I have all sorts of friends that have all kinds of things and I like to do trades for work but have finally figured out that the one that gets his work done first is usually the only one that comes out. I don't know how many boat jobs I have done with hopes of getting mine in return and one of the last jobs in my old shop was a trade.

This guy has several bucket trucks that he was going to let me use and I should have figured out when he didn't come through when I was taking down that tower at the shop and had to do that with balls and brass I don't know why I thought he would come through and help me put up this tower.

Anyway, I waited a week for him to show up and then decided to just go it on my own. I was wondering why I got the lumber man to unload my load of post and other lumber needed to get the building up to the roof line where I did because it was always in the way. But one day while Boomer and I was sitting there daydreaming it came to me just what I needed to do to get that large beam in place.

This is what I came up with.

attachment.php


I know, I know, I have a lot of explaining to do but my time is short and I have to put this on hold but I'll be back with an update in a day or two.
 

Attachments

  • DSC01824.JPG
    DSC01824.JPG
    101 KB · Views: 1,318
Last edited:
OP
M

mx842

Well-known member
Joined
Feb 24, 2011
Messages
227
Location
Richmond Va
Man, I hope you have a cell phone and good reception. Some of what you're doing looks absolutely dangerous.

Me thinks you are probably right about the dangerous part and I do keep a cell phone on my hip most of the time. However the work must go on and if it is to get done I guess I have to use what tools and basic knowledge I have to complete my mission. I wouldn't recommend everybody go out and try some of these things that I have managed to do because everyone is different and has their own set of skills and desires to get things done.

Believe me I wish I could at this point afford to just hire a company to come in and build me a garage but I don't see that happening any time soon so I have to do what I have to do. I have been working on this thing for over a year now and most of the real hairy stuff has been complete but I still have a lot of work to do.

Thinking back now I probably would have done everything pretty much the same way but taking down that big boat lift the way I did. If I had that to do over again I probably would have rented some kind of lift that would reach up that high and not just clime up the post and cut away the connecting members the way I did. I just got tired of waiting for that other guy to come through with his promise and one day I just decided it had to go.
 
OP
M

mx842

Well-known member
Joined
Feb 24, 2011
Messages
227
Location
Richmond Va
I guess at this point you are wondering by looking at that last pic just what the heck am I up to now. Awhile back there was a pic of the large completed beam laying on the ground and there was another beam laying next to it. Well the angled beam in the center is that beam. You may also remember me fussing about the pile of lumber that I put right in the middle of everything, well I know now why I put it there. It ended up this pile of lumber would be a good anchor point for my soon to be lifting crane that I would lift up the main beam on to the top of the structure.

attachment.php


Now getting it into that position was a different story. It took longer to get it up in the air and securely tied off than it did to raise the beam. Actually I had almost two days in getting it set up and finally satisfied it would not pull the big tree it was tied off to over and that it would not lean to one side or the other when I had the beam 10 or 12 feet in the air.

attachment.php


There was this great big oak tree beside the building and just about in perfect line with the lumber pile and the center of the structure. So I went up in the tree and tied off with a small hoist and some ratchet straps and then to the end of the beam that I had in position laying on the garage floor. then I started to take up the straps and the hoist to try an raise up the beam but it would not start to raise up because of the angle it was on so I had to get my home made crane that I use to put the cross members on to the uprights to raise the end of the beam up about 10' or so and I could then go back to the tree and take up the straps and hoist until I got it at the angle I thought would be right to make the lift. I had to adjust it several times before it was just right and was the reason it took the extra day to get it set up.

I was then ready to try it out. OH! I forgot a few parts. Once it was set up and tied off I could then attach my Grainger electric winch to the mount I built to fit into my receiver hitch on the Bronco and then thread it through a small ****** block that was fastened to the end of the lift beam.

attachment.php


attachment.php


Now I was ready for a test run. After everything was checked and rechecked I connected the cable up and hit the switch to take up the slack. Everything was going good until the back end of the truck started to get disconnected from the ground. Yeah, the pressure from the winch and the weight of the beam was too much for the truck to hold down so I had to unhook and reposition the truck to a different spot with less of a upward angle and then from this new position it actually started to move the beam.

I had laid out the main beam where I thought was in the right position but after making all the adjustment to the lift beam in getting it into the exact position it needed to be in I had to move the main beam over and out of the way and forgot to put it back. With the truck ******* now I had no way to move it so I had to drag it through the mud and gravel about 16' before it would be at a point where it was a straight up pull and could be raised upward.

I thought about it for a minute or two and decided, What the heck! What was the worst that could happen?:dunno: 
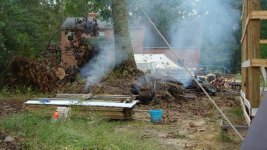
At best it would drag it through the mud and raise it off the ground. OR?? It would pull over the giant oak tree that all this mess was attached to and smash my poor ol Bronco with me along beside it. After a little thought about how long the tree had been there, probably 60 years or more and thinking about just how many storms it had endured over the years what harm could this tiny little beam do to such a huge tree.

attachment.php


So I hit the switch but have to admit I had already cleared me a clean path just in case something didn't go just right. At first I thought it was going to lift the truck up off the ground again but just before the tires left the ground the beam started to slowly move in the direction of the structure. It was really putting some major strain on the old winch and after about 5' I had to shut it down because she was getting too hot and I was afraid it was about to blow.

After a short rest and cool down period I started the pull once again and this time I ignored all the screaming and crying the winch was making because if it was going to break I wanted it to break then and not when the beam was 12' in the air. I finally got it to a point where it actually left the ground and if I was a drinking man I would have took a big ol slug of Gentlemen Jack to celebrate but a hit off the water jug would have to do. I thought about going ahead and lifting it on up and sitting it but I decided to paint it while it was on the ground so I didn't have to do anything but touch up when it was set. With this in mind I found some blocks to sit it on and spend the rest of the day painting the beam and do the lifting in the morning.

attachment.php


This is all I have time for now, be back later.
 

Attachments

  • 20070528195959(3).jpg
    20070528195959(3).jpg
    49 KB · Views: 1,284
  • 20070528195959(2).jpg
    20070528195959(2).jpg
    36.7 KB · Views: 1,291
  • 20070528195959(1).jpg
    20070528195959(1).jpg
    64 KB · Views: 1,284
  • 20070527212932(2).jpg
    20070527212932(2).jpg
    68.4 KB · Views: 1,284
  • DSC01843.JPG
    DSC01843.JPG
    103.1 KB · Views: 1,291
  • DSC01845.JPG
    DSC01845.JPG
    94.7 KB · Views: 1,292
Last edited:
OP
M

mx842

Well-known member
Joined
Feb 24, 2011
Messages
227
Location
Richmond Va
I have a few minutes so I'll add a little more to the story.

I painted the beam.....well I at least put a good coat of primer on it. The paint I was going to use for the job must have froze or something because it just didn't look right and I didn't want to use it.

attachment.php


The next morning it was the moment of truth. At first I tried to lift it with the chain attached at both ends of the beam but that didn't work out too well so I decided to just tie a choker strap close to the center with a tag line on the light end so I could control it better.

attachment.php


After I raised it about half way I had to stop and let the winch cool off and this gave me a good chance to check everything out and be sure nothing had shifted. I'm glad I did because at the time I only had 2 straps tied off at the tree to the lift beam and one of them looked to like it was starting to come undone. There was also a spot that looked like it was stretched beyond it's limits so I added 2 more straps and removed the old ratty one.

attachment.php


By this time I was ready to go the distance and went ahead and raised the beam all the way.

attachment.php


attachment.php


attachment.php


Huston....we have a problem. I thought I had angled the lift beam up high enough for the beam to clear the cross member but I ran out of cable. The beam was all the way to the ****** block and it was about an inch too short to clear. After all the engineering and thought I put into this I had miscalculated somewhere and after surveying the problem I saw my problem. I didn't figure in the amount that the tree might be pulled over due to the weight of the beam. Who would have thunk that a tree that size would have moved that much but I guess it did.

Even though it did come up short I was still able to sit it down on one end and with the help of a big pry bar, some straps and my chain hoist I was able to raise it enough to slide it on the the front cross member. If it had been another inch lower I don't think I would have been able to lift the heavy end up enough to clear the cross beam and I would have had to spend another half a day repositioning the boom of the crane.

Also one of the side bracing straps that kept the boom from falling left or right was in the way so that I couldn't slide the big beam all the way on to the cross member and I had to tie it off so that it would stay there, half on half off while I climbed down the ladder and let off the winch control so that I could reposition the strap and then jack the beam in place.

attachment.php
 

Attachments

  • 20070529145037(1).jpg
    20070529145037(1).jpg
    55.9 KB · Views: 1,273
  • 20070529150237(1).jpg
    20070529150237(1).jpg
    56.6 KB · Views: 22
  • 20070529150237(6).jpg
    20070529150237(6).jpg
    77.4 KB · Views: 1,251
  • 20070529150237(4).jpg
    20070529150237(4).jpg
    51.2 KB · Views: 1,256
  • 20070529150237(3).jpg
    20070529150237(3).jpg
    68.9 KB · Views: 1,254
  • 20070529150124(2).jpg
    20070529150124(2).jpg
    56.9 KB · Views: 1,265
Last edited:
OP
M

mx842

Well-known member
Joined
Feb 24, 2011
Messages
227
Location
Richmond Va
attachment.php


Both ends sitting on the cross member and the strap that kept me from being able to sit the beam in the exact spot it needed to be.

attachment.php


Now all I had to do was get up there and jack the beam into place with a small come-along.

attachment.php


attachment.php

That's all I have time for today..........
 

Attachments

  • 20070529150237(7).jpg
    20070529150237(7).jpg
    74.8 KB · Views: 1,250
  • 20070529150237(11).jpg
    20070529150237(11).jpg
    60.6 KB · Views: 1,243
  • 20070529150237(12).jpg
    20070529150237(12).jpg
    73.9 KB · Views: 1,248
  • 20070529150237(9).jpg
    20070529150237(9).jpg
    67.9 KB · Views: 1,247
Last edited:

Kevin54

MEMBER EMERITUS
Joined
Jan 12, 2005
Messages
29,341
Location
Urbana, Ohio
This thread makes me nervous just looking at it.

I do see that you have someone taking pics though. Are they going to be able to get you in the Bronco to take yo to the hospital when you fall off one of those beams? :eek:
 
OP
M

mx842

Well-known member
Joined
Feb 24, 2011
Messages
227
Location
Richmond Va
This thread makes me nervous just looking at it.

I do see that you have someone taking pics though. Are they going to be able to get you in the Bronco to take yo to the hospital when you fall off one of those beams? :eek:

No actually most of these pics were taken with my video camera that I had set up recording what was going on. That's why some of them are a little fuzzy I guess that is what happens when you pull still frames off video footage. I set up a camera sometimes because I wanted to look back later on at what I had to endure while I was working on the building hopefully some day I will be able to enjoy. Then too, I guess it was to record what the hell happened when my wife came home one day and found me stone cold dead laying on the ground under one of those big ol beams.:lol:
 

NUTTSGT

Super Moderator
Staff member
Joined
Sep 14, 2009
Messages
50,853
Location
Northern Central Ohio
Me thinks you are probably right about the dangerous part and I do keep a cell phone on my hip most of the time. However the work must go on and if it is to get done I guess I have to use what tools and basic knowledge I have to complete my mission. I wouldn't recommend everybody go out and try some of these things that I have managed to do because everyone is different and has their own set of skills and desires to get things done.

While it is dangerous, you admit that you realize it and accept the fact. That is the biggest reason some people get hurt. . . . . hold my beer and watch this.. . .

I must admit, it is impressive what you are overcoming by doing it yourself and with the use of a few tools. Keep up the hard work and be safe.
 
OP
M

mx842

Well-known member
Joined
Feb 24, 2011
Messages
227
Location
Richmond Va
With the beam finally sitting in it's resting place and bolted down I could now get busy and start putting up the building around it.

attachment.php


After doing a lot of research about types of construction of how to put up a building I finally decided to go with the pole barn approach. I also decided to use built up piers to sit my post on rather that sit them in the ground with dirt and concrete to support them. I also had to come up with some way to attach them to the pier. I looked at the stuff they had in the box stores but those things were really expensive so I decided to make my own out of angle iron and flat bar. I drilled all my holes on my mill then welded the flats to the angle pieces and I made 2 of these for each post. It took me about a day and a half to cut up the material, drill all the holes and weld the pieces together then prime and paint them and I was ready to drill the holes in the piers to mount the new clamps.

attachment.php


attachment.php


Once I got all the piers drilled and the clamps in place I could start to sit my post. Hooray! I had been waiting for this day for a long time and now I could finally actually start putting something up so it would finally look like I was building a building. After about 15 minutes of straining and fighting the first post I had finally met my match. My ol 64 year old body just was not stout enough to walk the post up then get them up on the pier so I had to do some thinking. I tried the lift I had used to raise up the steel post but these were just too long and could never get them tied off just right to be able to raise them up straight enough to place them where they needed to be. so I went back to the drawing board and came up with this.


attachment.php


attachment.php


attachment.php


Basically it was a piece of 2x2 heavy sq wall tube that was 17' long that I mounted this old boat winch stand to. I robbed the ****** block I used to raise the big beam up with and fitted it to the end of the tube so I could run the winch cable through and out to the post that was going to be raised up. I had to mount a bracket at the bottom for the post to push against so that it did not slip back to the operator as he was turning the winch. It looked good on paper but needed a few minor adjustments to get it to where it would actually raise the post up into position. I found out on the first lift that the two anchor bars that are out in front was not enough to keep the rig from tipping over sideways once the post got almost to it's full raised height if the rig was not set up perfectly straight. After this near miss I figured I needed some additional side bracing. For this I used nearby trees on each side that were in line with the post I was lifting. Once I got a few post up I could tie off to them and that helped to speed things up but after a few tries I finally got the first post on the pier.

attachment.php


Notice the big oak tree in the background of the last pic, well she is no longer with us. The last storm took it out along with a bunch more that I will get to in one of my later episodes but for now this looks to be a good place for a intermission, more to come later......
 

Attachments

  • pole barn piers.JPG
    pole barn piers.JPG
    108.5 KB · Views: 1,308
  • Lin's post lifting device.jpg
    Lin's post lifting device.jpg
    51.6 KB · Views: 1,304
  • Boat winch pole lift.jpg
    Boat winch pole lift.jpg
    49.8 KB · Views: 1,298
  • one down and 19 to go.jpg
    one down and 19 to go.jpg
    45.9 KB · Views: 1,285
  • bottom push block for post lifter.jpg
    bottom push block for post lifter.jpg
    127.6 KB · Views: 1,306
  • DSC01852.JPG
    DSC01852.JPG
    101 KB · Views: 1,242
  • DSC01848.JPG
    DSC01848.JPG
    107.1 KB · Views: 1,249
Last edited:
OP
M

mx842

Well-known member
Joined
Feb 24, 2011
Messages
227
Location
Richmond Va
Man! I hate computers.........Something got hung up yesterday when I was trying to add some pics to my thread and my computer locked up and once I finally got it straight I went back and about half of the pics I had already put up were gone completely. I sat down this morning and tried to put them back in and I finally ended up having to redo them all. What a pain, I think it was because they were too big so when I re-posted them I reduced them down a little and hopefully this will take care of everything. No pics today cause I have to get to work but i'll be back.
 
OP
M

mx842

Well-known member
Joined
Feb 24, 2011
Messages
227
Location
Richmond Va
I started cleaning up the trees for the site in the winter and worked mainly on getting all of my piers in place. This took me the better part of a month to complete because some of the holes were a real pain in the azz to dig. It seemed like every hole I dug ended up being right where a tree or stump had been and the roots were murder. I started making the holes 24 inches sq and 30 inches deep but most of them ended up being a lot bigger because of the roots and mud.

I started out with 19 post piers and the 4 big structure piers plus I put concrete piers under each corner of the container. When these were all complete I had mixed 306, 80lb bags of quickCrete and used up 40, 20' sticks of 1/2" rebar along with about 60, 12" cinder blocks and a dozen of the round 12" cardboard forms. I had planed to put two bags of concrete in each hole and let it sit up and then use the cardboard forms to bring it up the rest of the way to grade. This didn't work out like I had planned because just about every hole I dug was in a stump hole and ended up being a lot bigger.

I went from woods...

attachment.php


To

attachment.php


To

attachment.php


To this...

attachment.php


And this..

attachment.php


To this..

attachment.php


And finally this in around 9 months..

attachment.php


Finally I'm ready to build my truss for the roof system and the plan was to start this part first thing Monday morning.
 

Attachments

  • 0210111526b.jpg
    0210111526b.jpg
    91.5 KB · Views: 1,189
  • 0220111718.jpg
    0220111718.jpg
    96.5 KB · Views: 1,185
  • DSC01859.JPG
    DSC01859.JPG
    112.7 KB · Views: 1,187
  • 20070621172317 (4).jpg
    20070621172317 (4).jpg
    140.9 KB · Views: 1,184
  • DSC01863.JPG
    DSC01863.JPG
    106.5 KB · Views: 1,182
  • 20110820012819 (3).jpg
    20110820012819 (3).jpg
    141.8 KB · Views: 1,182
  • DSC01896.JPG
    DSC01896.JPG
    116.1 KB · Views: 1,176
OP
M

mx842

Well-known member
Joined
Feb 24, 2011
Messages
227
Location
Richmond Va
Well I know everybody has heard the old saying what goes up must come down.....but..but why did it have to happen to me? I guess though it was a good thing for it to happen before I got the truss built and the roof on. What took me 9 months to put up mother nature took care of in just a matter of a few minutes.

A late season hurricane drives up the coast and according to the weather people we were not going to get anything to speak of. They were still saying this at 11:00 AM just before the winds took out my little weather station that was on my side porch. We were getting 68 mph winds and they were still saying we probably wouldn't see but a little rain and winds of not more than 25 mph. I am surrounded, or was surrounded by thick woods and by 11:30 you could already hear huge oaks and wood crashing as they were blown over like match sticks. At 12:30 a gust tore the top out of a big oak right next to the house and it crashed on to my roof and I still don't know why it didn't come on into the living room with us. It was pushing so hard on one of our skylights that I knew it would push through any second.

Only a crazy person would go up on a roof with a chainsaw in a hurricane but I had to get that limb off the skylight. It wasn't to bad and I didn't have to make but a couple cuts to get it to lay down on the roof rather than trying to push through it. About that time I heard a loud crash in the back of the house then another and another and I had a bad feeling as I climed down off the roof. About that time my wife stuck her head out the front door and yelled you no longer have to worry about building those truss cause there are trees in your building.

before

attachment.php


10 minutes later

attachment.php


attachment.php


attachment.php


attachment.php


That big ol oak that I used to support my crane was the last to go but that didn't hit the building but it did crush my two trailers and my large powder coat oven I had stored in the back yard.

I had to rebuild half the barn but I probably would have been better off tearing the whole thing down and starting over because it pulled everything out of wack and almost impossible to get it plumbed back the way it needed to be.

Two months and a lot of cleanup later.

attachment.php


While I was putting it back together I decided to add a wing off to both sides to give me some more space and a place to park some equipment.

attachment.php


I'll post more later. Oh and the steel structure that was supposed to fall down on it own weight took a direct hit on one of the post and didn't budge. It's hard to believe too because it was only held together by 5/16 bolts at each connection point. If it had knocked that down too I think I would have given up after that.
 

Attachments

  • DSC01952.JPG
    DSC01952.JPG
    100.7 KB · Views: 1,144
  • DSC01958.JPG
    DSC01958.JPG
    113.4 KB · Views: 1,143
  • DSC01976.JPG
    DSC01976.JPG
    110.6 KB · Views: 1,140
  • DSC01977.JPG
    DSC01977.JPG
    124.4 KB · Views: 1,144
  • DSC02038.JPG
    DSC02038.JPG
    123.5 KB · Views: 1,137
  • DSC02120.JPG
    DSC02120.JPG
    120.9 KB · Views: 1,133
  • DSC02121.JPG
    DSC02121.JPG
    109.3 KB · Views: 1,134
To avoid these ads, REGISTER NOW!
OP
M

mx842

Well-known member
Joined
Feb 24, 2011
Messages
227
Location
Richmond Va
Wow, I didn't realize that you were that far along in your build. It's taking shape nicely.

Yeah, I have been so busy working on it that I have very little time to post up what has been going on. I'm kind of at a slack point right now because I have run out of money again and just doing odds and end stuff. It's nice to get a break every now and then though to deal with all my everyday chores that have been so neglected.
 
OP
M

mx842

Well-known member
Joined
Feb 24, 2011
Messages
227
Location
Richmond Va
Well once The storm hit and I had so much clean up to do I decided to sit back and rethink some of my plans. The storm put me so far behind the I decided to not build my own truss system. I had to use up all my 2x6 lumber plus a lot more to rebuild the barn to it's original position and while the roofer was hear replacing the roof on my house I decided to just go out and buy the truss and have them install them along with the roof panels while they were here. They were a little slow at the time and he gave me a super deal I could not refuse. This was when I decided to add the two 10' side sheds off the each side of the building and I worked on these while they were doing the other roof. They were pushing me pretty hard to get my work done so they could put the truss up but I put it in high gear and did manage to stay ahead of them.

attachment.php


attachment.php


I had to slow them down a little because they were catching up to me so I had them add another shed roof off the back to cover the container and give me some more room off to the side.

attachment.php


While all this was going on I talked to a friend who has a machine shop and he told me that once I got the building done he would throw all the powder coat work I could do my way and I decided that I need the extra room in back and off to the right side so I went to work framing up the shed off to the right side while they were working on the back.

attachment.php


attachment.php


attachment.php


Which brought me to this point.

attachment.php


I now have a roof over the whole thing and I can start working on getting my floor ready to pour.
 

Attachments

  • DSC02122.JPG
    DSC02122.JPG
    111.1 KB · Views: 601
  • DSC02124.JPG
    DSC02124.JPG
    118.6 KB · Views: 603
  • DSC02143.JPG
    DSC02143.JPG
    104 KB · Views: 602
  • DSC02148.JPG
    DSC02148.JPG
    105.8 KB · Views: 601
  • DSC02152.JPG
    DSC02152.JPG
    115 KB · Views: 601
  • DSC02153.JPG
    DSC02153.JPG
    108.1 KB · Views: 598
  • DSC02160.JPG
    DSC02160.JPG
    113.8 KB · Views: 604
OP
M

mx842

Well-known member
Joined
Feb 24, 2011
Messages
227
Location
Richmond Va
I thought this was going to be the easy part but it turned out just like everything else I have done with this project. I had covered the floor with about 2" of stone when I first started to give me a clean surface to work off of. We were having a really rainy season and it looked like it rained everyday. By the time I got to this stage it had dried out some and the gravel I put down in the beginning was packed so hard I thought I was going to have to rent a Cat D 9 with a big ripper to cut through it. Some places were high and needed to be cut down and I also needed to run some conduit for electrical, water lines and some plumbing in case I ever wanted to put in a bath room.

Before I started I had noticed a few soft places that I wanted to cut out also and this was where the fun started. Most of this was on the side of the building where I had to cut down so I didn't expect to run into any problems there but holy shitski' I was wrong. This was also the area where the container was sitting and I guess the few trees that had grown there over the years had bigger root systems than what I pulled out while I was clearing the pad. Anyway, with all the rain we had been getting the ground was so full of water the loose dirt that was once a stump hole was like a muck pit under this hard layer on the top. How something so hard on top be so sorry down below. The problem was that I really didn't have any place for the water to go because I had not put in any drainage because I didn't have a machine that would move that kind of dirt and all the rain that came down just went into the ground around the building and the dirt never got a real chance to settle down.

Everyplace I had to dig opened up a huge can of worms and started a month long back breaking excavation project. Before it was over I had dug holes that it took two 20 ton loads of gravel to fill.

attachment.php


attachment.php


attachment.php


attachment.php


attachment.php


A couple of the holes would fill with water as fast as I could dig out the mud so I found a old bilge pump that I got out of an old boat and pumped out the water but after three days of pumping and it not showing any signs of slowing up I pumped them down as low as I could get them and filled them up with crushed stone once I got down to solid ground.

attachment.php
[/IMG]

Some of these holes I had to dig down 7' or 8' to get to hard ground but I finally got all the muck out and then could fill the whole area with stone. By the time I got all these soft spots cut out and filled I was one tired puppy and needed a break so I took a few days off to rest.
 

Attachments

  • DSC02280.JPG
    DSC02280.JPG
    118.3 KB · Views: 13
  • DSC02279.JPG
    DSC02279.JPG
    118.9 KB · Views: 592
  • DSC02276.JPG
    DSC02276.JPG
    121.2 KB · Views: 591
  • DSC02286.JPG
    DSC02286.JPG
    123.1 KB · Views: 588
  • DSC02293.JPG
    DSC02293.JPG
    103.3 KB · Views: 589
  • DSC02295.JPG
    DSC02295.JPG
    115.9 KB · Views: 23
  • DSC02296.JPG
    DSC02296.JPG
    112.6 KB · Views: 565
OP
M

mx842

Well-known member
Joined
Feb 24, 2011
Messages
227
Location
Richmond Va
During this rest period my buddy the roofer called me out of the blue to tell me he could turn his skid steer loader loose for a few days and wanted to know if I could use it. I about fell in the floor and told him what I had just gone through and we both laughed. He had let me use it to clean up all the downed trees that were blown over by the storm and that really saved me a lot of time. It took me three years to clean up all the mess from the last storm a few years before this one and I got most of this cleaned up and burned in the few days he had the machine sitting here while they were working on my roof.

I knew he would have let me use it if he wasn't using it on a job but didn't feel right about asking him because it had already saved me several years work but since he called and asked me I told him heck yeah I'll take it for a few days because I was looking at 3 more loads of stone that needed to be put into the inside of the building and it would sure save my poor ol back and be a lot easier than this way.

attachment.php


It took less than a hour to put those three loads in the barn and get it somewhat leveled out. I could also walk it down to compact it into place a lot better with the machine also. I could put down 6 or 7 inches and then wet it down good then add some more and when I was done it was all solid as one big rock.

attachment.php


Once I got what I thought was enough stone on the inside I figured I would spend the rest of the time doing some grading around the building to get some drainage. The ground was really to wet to work but I took my time and got a lot done. Those little skid steers are pretty light on their feet but it was still hard to get a nice pretty job done but at least most of the water could get away from the building and down the slope on the other side. First I had to move a wood pile

attachment.php


Then I could get to work moving dirt.


attachment.php


I needed to fill in on the other side of the building so I used all this dirt over on that side.

attachment.php


Around back

attachment.php


Around the side where all the fill went. It needs more but I have a lot more grading to do if it ever gets dry enough and my friend can let me have his machine again at the same time.

attachment.php


My brain is about to explode I'll post some more later.
 

Attachments

  • DSC02307.JPG
    DSC02307.JPG
    107.6 KB · Views: 578
  • DSC02308.JPG
    DSC02308.JPG
    116.8 KB · Views: 579
  • DSC02318.JPG
    DSC02318.JPG
    120.8 KB · Views: 579
  • DSC02313.JPG
    DSC02313.JPG
    111.6 KB · Views: 581
  • DSC02312.JPG
    DSC02312.JPG
    93.9 KB · Views: 578
  • DSC02315.JPG
    DSC02315.JPG
    113.5 KB · Views: 578
  • DSC02316.JPG
    DSC02316.JPG
    113.3 KB · Views: 578
Last edited:
OP
M

mx842

Well-known member
Joined
Feb 24, 2011
Messages
227
Location
Richmond Va
While it is dangerous, you admit that you realize it and accept the fact. That is the biggest reason some people get hurt. . . . . hold my beer and watch this.. . .

I must admit, it is impressive what you are overcoming by doing it yourself and with the use of a few tools. Keep up the hard work and be safe.

Well it's been a challenge and at a few points along the way I'll have to admit I probably was stretched a little too thin ifin you know what I mean. There have been times like when I was trying to get that big beam up the last couple inches so it would sit on the cross member and nothing was positioned right. The ladder was a few inches too far to the left, the bar I needed to wedge the beam over had fallen to the ground and I only had this big screw driver left in my tool bag. The tag line that was tied to the end of the beam was tied off about an inch too short and was helping to keep me from raising the beam up enough. Everything was working against me and right then I was thinking just tie off the beam and go down ladder to regroup.

Just as I threw a piece of 1/2" line around the beam and put one granny knot in it a great big azz hawk came swooping down as he was zoned in on a squirrel hanging on the side of a tree and hit one of the tie straps that was holding up the crane boom and BAMB!! Feathers flew and he hit with such a force it caused the whole structure the vibrate and shake. Everything was moving back and forth and I could feel the ladder slipping a little more and then I heard the most damning sound.

The poor winch had just about all it could do just holding the weight of the beam up and this extra up and down motion was all it took for the brake on the winch start to slip. I knew that sound because I had heard it before and I also knew if it slipped too much I would never get the beam sitting on the cross member and now the ladder was leaning and about the only thing that was holding me, ladder, beam was granny and about then I was thinking why didn't this dang bird wait until the light was a little better before he took flight. It was also then that I remembered I had also taken the side strap that was in the way of putting the beam on the cross member off and the strap hook was just sitting there about to fall over the side.

I didn't have time to call Huston to describe to them what was about to happen and it was crunch time. I was already off balance and about to lose my grip on both the ladder and the beam when I wrapped my right leg around the upright post had my arm wrapped around this big heavy beam and just in the nick of time I managed to throw my other leg over the cross member and the ladder went sailing off to the side. The winch brake was screaming, the hawk was flapping in the sand and I was holding on for dear life. I was thinking that if the winch brake did go completely the other end of the beam that was sitting on the other cross member would fall off too and that would set off a chain reaction that was not going to be pretty and I didn't want that to happen. By now I had a death grip on this big heavy beam that was slowly pulling me off my perch and just before the side strap hook fell over the side I grabbed it and after that I don't know what happened. The next thing I knew I was standing on top of the cross member pulling for dear life on the 1/2" line with the granny knot tied around this 1800lb beam and by some stroke of luck managed to time the up and down motion the crane boom was making and on one of the upward swings I yanked the beam up on top of the cross member.

I was frozen in time and everything seemed to be in slow motion as I was thinking what was going to happen next. Once the weight of the beam was on the cross member and not on the crane boom all motion stopped and for the first time in what seemed like 3 hours I could relax my death grip on the beam and ponder things a bit.

I looked down at the hawk that had somewhat gotten his mess together and it seemed he was also pondering his situation. I was thinking to myself it ain't no way that bird is going to be able to fly away with all the feathers he was missing from his terrible crash but away he flew in one slow graceful leap from the ground. I guess he was thinking that if that old fart on top of that beam could keep the big accident which almost just happened from happening then flying away with a few missing tail feathers would be a piece of cake.
 
OP
M

mx842

Well-known member
Joined
Feb 24, 2011
Messages
227
Location
Richmond Va
It was about the time when I was thinking about pouring my floor that I was also thinking about what I was going to use to heat the building in the winter. I had planned to build a outdoor wood boiler once I got into the building and was going to use a couple forced air heat exchangers to do the job. However in my search for the parts I would need to build my stove someone said why don't you use radiant heat instead of the forced air stuff.

I had never given radiant heat much thought but after looking into it radiant heat did seem to have it's advantages. I talked to several people that did these systems and could tell right off the bat that I would have to go this project on my own also. At that point I had enough money to pour the floor but decided to take some of that money and and buy the bear minimum parts needed to get it to the point where I could pour the slab and buy the other parts as I got the money.

It was also about this time that I also decided to run as much electrical in the floor as I could and also add some plumbing to get water to the back of the building and maybe even plumb a bathroom in for future use. I had started the electrical and plumbing runs and that is what started the major excavation project as described before and now with the new stone base it wouldn't be too much trouble to dig the trenches for the conduit and pipping.

attachment.php


attachment.php


attachment.php


attachment.php


attachment.php


Do you know how hard it is to drive 8' ground rods in the ground?

attachment.php


After a little thought my Bosch hammer drill made short work out of this part of the project. Although I did have to make a fixture to go on the end of a sacrifice drill bit that would fit on to the top of the rods but then it was just hit the trigger and watch them sink into the soil.

attachment.php
 

Attachments

  • DSC02320.JPG
    DSC02320.JPG
    114.1 KB · Views: 535
  • DSC02324.JPG
    DSC02324.JPG
    114.2 KB · Views: 535
  • DSC02326.JPG
    DSC02326.JPG
    120.6 KB · Views: 534
  • DSC02345.JPG
    DSC02345.JPG
    84 KB · Views: 533
  • DSC02348.JPG
    DSC02348.JPG
    110.4 KB · Views: 533
  • DSC02344.JPG
    DSC02344.JPG
    105.1 KB · Views: 533
  • DSC02351.JPG
    DSC02351.JPG
    109.6 KB · Views: 532

Busted_Knuckles

Well-known member
Joined
Oct 9, 2009
Messages
2,613
Location
Northwest Illinois
Crazy story, cool build. Its too bad we are not neighbors, or we could have had a "barn raising" party. Ive got all the equipment to make putting a pole barn together a cake walk. From a hydraulically driven post hole digger, to a bucket truck, that will set trusses.

I admire your ingenuity, and drive to get-r-done, there are days, I wish I was that motivated.

As far as your "non-osha" procedures, as long as you know your limits and the equipments limits, you should be fine, or at least know where and how to "get the heck out of the way". I have a friend, who works in a similar fashion. He can overcome anything with nothing.

Keep up the good work, and excellent post and pictures :rocker:
 
OP
M

mx842

Well-known member
Joined
Feb 24, 2011
Messages
227
Location
Richmond Va
I brought the water line into the location that I wanted to place my manifold and equipment for my heating system. I stubbed it out to the outside wall but it ran along an outside wall so I put the 3/4 inch water pipe into a piece of 1 1/2 PVC pipe that had 1/4" holes drilled in it every 12". Once I got the pipe in the PVC and laid it out in the ditch I filled the PVC full of spray foam by shooting it in the first hole until it started out the next one and on down the line until it was full. Then I did the same thing with my feed lines that will go to the boiler one day. I took two pieces of 1 " pex and wrapped them with 1" pipe insulation and then put them into a piece of 4" plastic drain line with the holes in it and shot the whole thing full of spray foam while it was laid out in my ditch. This was also stubbed out to the outside wall and will be buried in the same ditch as the water line. The electrical feed line and the sewer pipe will be laid in another ditch going to the house.

This is the pex stub and the white PVC pipe beside it.

attachment.php


attachment.php


The next shows the location that I chose make my equipment closet with some of the things in place.

attachment.php


Once all the conduit and plumbing was in was in I could then start getting the sub grade right for the pad. It was then that the thought about how much insulation I was going to use under the slab. At first I was going to only put down 1" around the outside walls to about 4' and leave the center open so that the ground could be used as a heat sink. We don't have real cold winters here but every so often so I didn't see any reason to go too thick with the floor insulation.

However once I got in there with my old Gravely walk behind tractor with my snow blade on the front to push the stone around where it needed to be I found out that the whole floor needed to come up around a 1" to be on sub grade I decided that the insulation would be cheaper that to buy another load of stone so I went ahead and put the 1" pink board on the whole floor which brought it up to where it needed to be. I didn't mind if it was a little low in a few places as long as it was not high and it worked out just right. I put down 6 mil poly under the insulation then the insulation and then laid out my rebar in 2' squares all over the floor. I started my pex runs and tied my 1/2 pex to the rebar every foot with wire ties.

First I sat down and drew out the loops on paper so that once I started actually laying down the tube I would have a basic to go by and what I had on paper worked out pretty well and all my loops ended up being within 20' of each other and all coming in at around the 245' to 265' length. The pex doesn't have to be pretty when laid out but you do need to keep it fairly straight but it can run wild in some spots to work around things that are in the way. I divided my main floor into half's so that I could cut lines in the concrete without having to worry about the pex tube being in the way. But no matter how I figured it I had to cross a place in a few spots where the floor needed to be cut. In these spots I took the pex back up from one end and then put a short piece of the grey conduit around the pex and placed this at any spot the would be later cut. It was a pain in the **** to do this but I feel better knowing the conduit is around the pex in these places that I knew would be cracks.

attachment.php


attachment.php


attachment.php


attachment.php
 

Attachments

  • DSC02323.JPG
    DSC02323.JPG
    115.3 KB · Views: 526
  • DSC02322.JPG
    DSC02322.JPG
    116.9 KB · Views: 527
  • DSC02366.JPG
    DSC02366.JPG
    112.8 KB · Views: 529
  • DSC02388.JPG
    DSC02388.JPG
    131 KB · Views: 526
  • DSC02389.JPG
    DSC02389.JPG
    120.8 KB · Views: 527
  • DSC02390.JPG
    DSC02390.JPG
    121.3 KB · Views: 525
  • DSC02391.JPG
    DSC02391.JPG
    129.2 KB · Views: 527
OP
M

mx842

Well-known member
Joined
Feb 24, 2011
Messages
227
Location
Richmond Va
Wanted to add a couple things before I head off.

I had to figure out how to get all my pex and other items to stub into the small wall space I wanted to put them in and decided I needed to build up a curb where it came up from the ground to the finish grade. I tried several different things but nothing looked right to me. Along with all the stuff along the wall I also wanted a drain in this area in case I had a leak or wanted to drain the heating grid for some reason. I wanted to build up around the tubes and conduits and leave the center part lower than the outside with the drain in there to haul off any water that might leak, planned or unplanned.

attachment.php


I never could get this to where it looked alright to me so I tore it all out and started over. What's another 4 bags of concrete. I ended up putting an extension on the drain pipe and when we pour the floor I'll just pour straight through over top what I have here.

attachment.php


The drain is hard to see but it is just to the right of where the pex tubing comes in. The white 2" piece of PVC. It has duck tape over the hole and makes it hard to see. Maybe I'll take a few more pics in a day or two that shows it better.

Anyway when I pour the floor I can make it flat in that area but work the concrete down a little in a slight valley leading to the drain that would help carry off any leaks that might happen. I poured this concrete around the conduits and pipes to keep them in place while I was working on getting everything in there and where I wanted it.

My manifold setup.

attachment.php
 

Attachments

  • DSC02353.JPG
    DSC02353.JPG
    113.3 KB · Views: 517
  • DSC02393.JPG
    DSC02393.JPG
    135.1 KB · Views: 518
  • DSC02392.JPG
    DSC02392.JPG
    99.7 KB · Views: 519

mudhog

Well-known member
Joined
May 20, 2011
Messages
357
Location
south Bygod Texas
enjoyed reading your build, you sound just like me. I've been building my shop by myself also and find interesting ways to do it, that is just like yours. I don't have pictures to tell the story like yours. I made a see/saw type frame to help me lift tin up when screwing panels to the sides etc. One note: I have expanded my shop three times since I started and still don't have roll up doors on the front yet, because I'm not sure if I'm finished expanding yet. take care and I'll be looking for your updates. I use a winch on a truck and pullies to do all the lifting and tree removal.
 
OP
M

mx842

Well-known member
Joined
Feb 24, 2011
Messages
227
Location
Richmond Va
enjoyed reading your build, you sound just like me. I've been building my shop by myself also and find interesting ways to do it, that is just like yours. I don't have pictures to tell the story like yours. I made a see/saw type frame to help me lift tin up when screwing panels to the sides etc. One note: I have expanded my shop three times since I started and still don't have roll up doors on the front yet, because I'm not sure if I'm finished expanding yet. take care and I'll be looking for your updates. I use a winch on a truck and pullies to do all the lifting and tree removal.

I'm glad you had a good time reading my thread. Yes you can get all sorts of seemingly impossible task if you set your mind to it. At times I think about something for days trying to figure it out then all of a sudden it clicks and I'm off getting it done. Most times it never ends up being the same as it was when first started because of a tweek here and there but as long as you get results who cares how you got there.

I have pulled over some really big trees with my old Bronco and the biggest problem with them is the stump. I pulled over several that the root system spread out over 35' when they came up. Normally I'll yank them til they come over then go around and pull them from the other direction so I can get them out of the ground. Some have been so big I never could get them out of the ground and for those you have to give them the hot foot.:lol:

I'll fill the hole with anything I can find that will burn other smaller stumps, logs trash, brush, anything that will burn. Then set a fire in there and get a good bed of coals going then fill it up again with logs and old pieces of fire wood that are to knotty to mess with and when it is going good pull the whole tree back up and let it sit on the fire. I had one big tree that burned like that for three weeks before it finally burned up all the roots and it got to where I could handle it.

This was the tree that I had the crane beam tied to. The storm took this one down.

attachment.php


attachment.php


attachment.php
 

Attachments

  • DSC02057.JPG
    DSC02057.JPG
    114.3 KB · Views: 483
  • DSC02059.JPG
    DSC02059.JPG
    111.9 KB · Views: 485
  • DSC02058.JPG
    DSC02058.JPG
    100.6 KB · Views: 486
OP
M

mx842

Well-known member
Joined
Feb 24, 2011
Messages
227
Location
Richmond Va
Crazy story, cool build. Its too bad we are not neighbors, or we could have had a "barn raising" party. Ive got all the equipment to make putting a pole barn together a cake walk. From a hydraulically driven post hole digger, to a bucket truck, that will set trusses.

I admire your ingenuity, and drive to get-r-done, there are days, I wish I was that motivated.

As far as your "non-osha" procedures, as long as you know your limits and the equipments limits, you should be fine, or at least know where and how to "get the heck out of the way". I have a friend, who works in a similar fashion. He can overcome anything with nothing.

Keep up the good work, and excellent post and pictures :rocker:

Just my luck...I used to have a lot of equipment but in trying to keep my business afloat I ended up selling it off a piece at a time to stay alive. If I had known just how bad the economy was going to get I would have kept my equipment and let the boat business go. It's hard to let something go that you spend so much, time, money and effort into. By nature that business is so seasonal anyway and there were always up and down years as it seemed to run in cycles it was hard to see that it wasn't coming back until it was too late.

I've always tried to get as much out of everything I have to work with and as I said earlier you would be amazed at how much you can do if you just set your mind to it. You don't have to be some kind of super hero with super natural strength to do hard work you just have to use what talents the Good Lord handed down to you, take your time and work at it.

A lot of people think it's a waste of time to do this sort of thing and maybe they are right. At least a little bit anyway, that is if you have the money to pay someone else to do these things for you. However that is not my case. The way I look at it is if I do build this thing myself I know what I have and will enjoy it much more once it is done.

Also, right now is a great time to be out of work so I can work on my shop. With the economy the way it is and is likely to stay for awhile longer I'm not losing anything and my hope is to have it complete by the time we get some people in Washington that really care about getting the economy going so people can get back to work. I don't want to get started on politics though....I'll never finish my build.:lol2:
 
OP
M

mx842

Well-known member
Joined
Feb 24, 2011
Messages
227
Location
Richmond Va
After I had the insulation and about half the pex tube laid out I then found out that the pink board and the pex was not as water and UV proof as I was led to believe in the beginning. Now I find out that the insulation and pex, even though it says it has UV inhibitors written right on it, that does not seem to be the case. Someone brought this up one day on a forum somewhere and after I checked with the manufacturers it seems that letting this stuff stay exposed to sun for more than a few weeks is not a good idea.

I did have the roof on the building and it was for the most part out of direct sunlight but at some time each day about 50% of it would see direct sun at some time each day and the rain in a couple places would blow in and puddle on the insulation in a few spots.

This meant I had to shift gears and see what I could do about getting some siding on the most exposed parts of the building. My pole barn/roofer/skid steer owner/my knight in shining armor buddy had given me a lot of siding sheets that he had left over from jobs. Some were cover sheets with a few minor small dents and scratches and some looked brand new. They were all different colors but It didn't matter because I had planned to paint it and make it all one color when I was done. At first I was going to use this on the back and side of the building and was going to buy new stuff for the very front part. Sadly the front of the building and the side that I was going to use this siding for was on the side that gets the most exposure so I had to make a decision. The check book would not allow the purchase of the new siding at the time so I shoved my pride aside and started putting up what I had with hopes I could get it covered enough with what I had to work with to keep from losing the investment I had made with the floor.

At first it made me sick to put up this stuff on the front of my new building but it would make me even sicker if the $3500 I had spent on the floor would have to be replaced. So after a short while I was over it and it was business as usual. I got the front on and the short piece on the left side of the building in between the two roof sections and this took care of about 80% of the sun and water problems. I had some siding left so I decided to just keep going as long as I had full length sheets that would fit somewhere. I started out using the longest sheets in places that would reach from the top to the bottom and this meant I had to jump around from one part of the building, put up a few sheets and when I ran out of material long enough to go all the way I would move to the next place where the sheets I had left would work.

I finally ran out of material and at that point I had about half the building done. I had the sun taken care of at this point but most of the back wall was still open and rain would still blow in there so I decided to just cover it the best I could with what I had left no matter how it looked for now and when I could get more I could pull this down and replace it.

By this time I had already decided some siding was better than no siding so I humbled myself and called my buddy to beg for some more scraps. He was slow too and had not done much medal work since he left my place but he said he did have a little in a pile over at his farm that I could have. He also said he would be finished with a building he was working on then in a couple weeks and he said there would be some long sheets left over there that he might be able to let me have also. Right now I'm waiting to hear from him to see what he has that he can part with. Hopefully it will be enough to finish out what I need so I can paint it all one color.

Now after looking at some of the beautiful garage builds here and at other places it pains me to put up this next pic. Let me remind you that it will not always appear this way and someday will be all one color. I was even thinking of putting a nice camouflage pattern on it to keep the tax collector from seeing what's going on.

attachment.php


These are a couple more shots of the pex tube and how I split up the floor in section so that it would be a minimum of places that the pex would exposed to a saw blade when cutting expansion groves.

attachment.php


attachment.php


attachment.php
 

Attachments

  • DSC02423.JPG
    DSC02423.JPG
    135.4 KB · Views: 654
  • slab division north to south.jpg
    slab division north to south.jpg
    115.6 KB · Views: 455
  • saw cut path west to east.JPG
    saw cut path west to east.JPG
    110.6 KB · Views: 456
  • DSC02404.JPG
    DSC02404.JPG
    125 KB · Views: 457
OP
M

mx842

Well-known member
Joined
Feb 24, 2011
Messages
227
Location
Richmond Va
enjoyed reading your build, you sound just like me. I've been building my shop by myself also and find interesting ways to do it, that is just like yours. I don't have pictures to tell the story like yours. I made a see/saw type frame to help me lift tin up when screwing panels to the sides etc. One note: I have expanded my shop three times since I started and still don't have roll up doors on the front yet, because I'm not sure if I'm finished expanding yet. take care and I'll be looking for your updates. I use a winch on a truck and pullies to do all the lifting and tree removal.

Don't feel bad....see my big door in my last post.:D
 
To avoid these ads, REGISTER NOW!
Top Bottom