To avoid these ads, REGISTER NOW!

Building a shed from air freight containers

eyesoreracing

Active member
Joined
Apr 1, 2012
Messages
40
Location
Long Beach, CA
I desperately need a shed to get the stuff that isn't car tools out of my itty bitty garage. Bikes, lawn tools, house tools, all that stuff has to go somewhere else!

At work, we get parts air shipped from Japan all the time, and they come in these clever corrugated steel containers.

shed0.jpg


These things are amazingly lightweight, very strong, break down into flat panels without any tools, and get thrown away all the time. The temptation should be obvious..

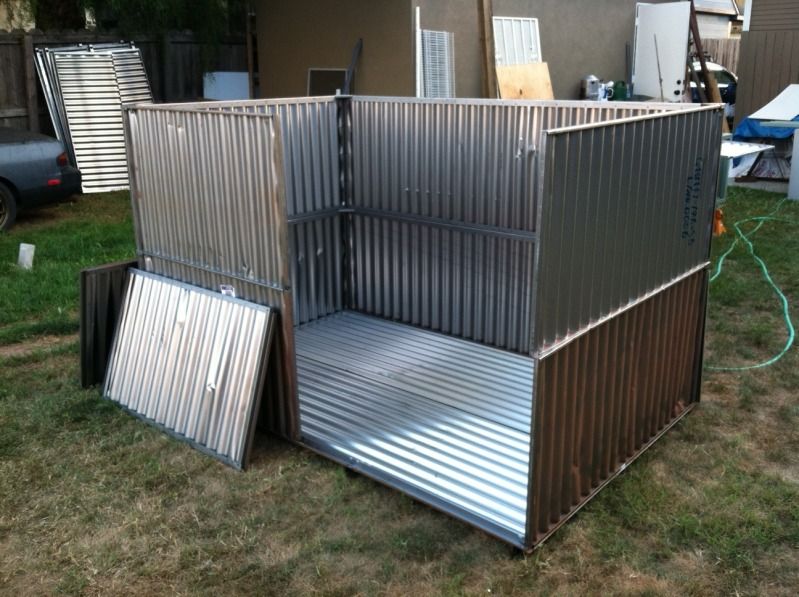
Each panel is very thin corrugated steel spot welded to a simple frame. If you lay the sides down next to the floor and stand them up in just the right way, the bottom of the side panel hooks to the floor with no tools. Two adjacent sides interlock with each other at the corners, and are held together with these little brackets that just slip into slots in each side's steel frame.

shed3.jpg


Over a couple of days, I dragged home four of these containers, in two different sizes, on the roof rack of my Mazda3 (told you they were light...) and finally started assembling them in the backyard this weekend.

Using three sides and a bottom from one of the large containers (roughly 7' by 4'), and one side from a smaller container, I made this handy shape:

shed1.jpg


The second level of steel walls is just held to the lower wall with self-drilling sheet metal screws.

Shed7.jpg


As you can see, this looks like it will make a decent shed with a big door on it.

shed2.jpg


I love the bare metal look, but sadly these are mild steel and start rusting pretty quickly, so I decided to paint the shed to match the house. Since I'm a cheap *******, I only bought one gallon of house-colored paint. That should be enough to paint the parts of the exterior you'll actually see. The rest I painted with a bunch of old nasty leftover paint from parts of the house we don't like. We'll be repainting the mauve bathroom anyway, and the pink trim on the house just has to go. That spare paint goes on the bottom of the shed and the side that faces the neighbor's fence.

Shed4.jpg


So far the shed has cost me about $27 for that gallon of paint. I added another $6 buying 8 cinderblocks. I used my iPhone and a piece of wood (and a friend with a shovel) to make the blocks level.

Shed5.jpg


The shed will sit on a mild slope, that's why the farthest block is sunk so far in the ground. The two staggered ones are dodging a big root.

I was going to take the shed apart, move the floor over to the cinderblocks, and reassemble, but my shovel-wielding friend thought we could just pick it up fully assembled. Turns out he was right. We put two 2x4s under it, lifted with our knees, and easily carried the box to its new "foundation".

Shed6.jpg


You'll notice the third story has some ridiculous looking ears sticking off it. I needed three big containers worth of panels to do this right, but only had two big and two small. The ears are the long sides of the small containers.

A few minutes with a cutoff wheel and some more self-tapping screws and I had the ears trimmed down:

Shed8.jpg


Yes, that is blood. Metal gets sharp...

I'm hoping to have a roof on it tomorrow. I had to spend about $100 on supplies for the roof (some 2x4s and some of that clear corrugated fiberglass junk)

After that, I'm trying to turn the floor of one of the small containers into a sliding door. Not quite sure how that's gonna work yet...
 
Last edited:
To avoid these ads, REGISTER NOW!

88thunder

Well-known member
Joined
Mar 24, 2008
Messages
122
Nice use of "throw-away" material. It's probably as sturdy as my Arrow shed and a whole lot cheaper. Show us the roof and door when you're done.
 

bgarrett

Well-known member
Joined
Feb 11, 2006
Messages
4,393
hmmm, lessee, a concrete floor and some steel framing and those free panels could do some good...
 

bgott

Well-known member
Joined
Oct 31, 2005
Messages
3,512
Location
Houston, TX.
It isn't going to turn out well, too many places to catch water rather than let it run off. You might want to use the channel for the frame work and then screw the corrugated metal to the outside, that way you can layer the sheets for run-off and do away with the sheets running down into the channel.
 
OP
E

eyesoreracing

Active member
Joined
Apr 1, 2012
Messages
40
Location
Long Beach, CA
bgott,

It certainly isn't going to be very water tight! Water will pool at the bottom of each wall panel, and at the channel where the wall meets the floor. It really doesn't rain very much here, though, and I only want to get a few years out of this shed, as the ultimate plan is to build a big enough garage. For the moment, I'm planning to see where the water pools and drill drain holes there.

When you say "use the channel for the frame work" what channel are you talking about? I'm trying to envision your idea.

My original plan was to build a simple wood frame and turn the long side panels 90-degrees (tall and skinny) and screw them between the wood. That was going to require a big stack of only the large panels, which is difficult for me to scrounge. Would have taken months to get all the right materials, and I need this junk out of the garge NOW!
 
OP
E

eyesoreracing

Active member
Joined
Apr 1, 2012
Messages
40
Location
Long Beach, CA
I reckon if you frame out that doorway with some 2x4's it'll make it a whole lot more rigid.

I also scrounged a free 2x10, which I'm going to stand across the top of that door opening. And there will be 2x4s up the sides, so I guess I'm 3/4 framing it. I'm expecting that to significantly improve the structure. The back half of the box is surprisingly strong considering the weight and how few fasteners are currently in it!
 

langss

Well-known member
Joined
Jan 31, 2009
Messages
322
Location
California
Very resourceful. I rented an actual shipping container for the same reason. Unfortunately I could have owned it for what the rent turned out to cost because I had it so long. I wish I had room for it where I live now. :thumbup:
 

WRX/Z28

Well-known member
Joined
Jun 27, 2011
Messages
690
Location
Roebling, NJ
Looks great. I'd add some vent's near the top or it'll be a large pressure cooker, especially in the the summer. Spray foam will be your friend for helping seal things. Make sure to fill in area's where bee's or other pests can build nests.

Wish I had access to raw materials like that for free...
 
OP
E

eyesoreracing

Active member
Joined
Apr 1, 2012
Messages
40
Location
Long Beach, CA
I'm not sure if it will need vents, or if the construction is drafty enough as it is. I know where I'll put them if I need them, so I'm ready...

Isn't most spray foam somewhat porous? I'm afraid if I try to seal the gaps with it it might hold more water against the steel than if I just let it evaporate natrually. I've never used the stuff, though, so I have no idea what I'm talking about...
 
OP
E

eyesoreracing

Active member
Joined
Apr 1, 2012
Messages
40
Location
Long Beach, CA
One extra cost/construction detail I forgot to mention yesterday was the primer. I got some of this metal primer and brushed it on the day before painting it.

shed9.jpg


I was cheap, again, and bought barely enough. Or, actually, not enough... I didn't prime the two oversized top panels because 1: I thought I would swap them out once I found panels the right size, 2: I forgot, and 3: I was out of primer anyway.

Maybe that stuff isn't that important anyway, right?

Or maybe it is...

After one night of dew, can you tell which panel was primed and which wasn't?

shed10.jpg


I'll be interested to see if this spreads. The pained parts are actually showing more rust than the bare metal spots where I scratched the paint during my shortening-and-bleeding exercise. Maybe the water-based paint itself is to blame?
 
OP
E

eyesoreracing

Active member
Joined
Apr 1, 2012
Messages
40
Location
Long Beach, CA
Getting closer!

In addition to discarded air freight containers, I also salvaged an 11' long 2x10 from the same dumpster a few months ago. I've been using it as a walkway as I clean 90 years of dust and debris from my attic, but I just found a better use for it:

shed12.jpg


Just a few screws holding it in place, but suddenly the shed has actual integrity! When the wind kicks up, the whole shed will now blow across the yard as a solid unit, rather than collapsing embarrassingly on itself. What a relief!

The 2x10 sits on the top lip of the metal wall (and will be screwed to it eventually) but I put a few 2x4s along the two floppy walls to both straighten the walls and give something to attach the 2x10 to.

shed11.jpg


With any luck, tomorrow I'll actually find some time to put some fiberglass on the roof.

First, a simple question: how is this little angle normally dealt with?

shed13.jpg


People have been building roofs like this for hundreds of years, so I'm sure this has been figured out already. Do I notch the 2x4? If so, is there a simple way to do it?
 
Last edited:
OP
E

eyesoreracing

Active member
Joined
Apr 1, 2012
Messages
40
Location
Long Beach, CA
it is called a birdsmouth joint
http://en.wikipedia.org/wiki/Birdsmouth_joint

You can get a Swanson's framing square with a small framing book that explains it:
http://www.amazon.com/dp/B000IOJZ5E/?tag=atomicindus08-20

That's perfect!

I can look around at buildings and kinda understand how they're built and mostly why, but I really have very little experience actually building wood structures. Thanks for helping a guy out with what is probably a really basic question. I know what i'm buying tomorrow!
 
To avoid these ads, REGISTER NOW!

Ray-CA

Well-known member
Joined
Jan 6, 2007
Messages
3,451
Location
San Diego CA
Looks good. However, I think that the slope of the roof should be away from the house, not towards it. Whatever bit of run-off you get would be better directed away from your home, not towards it.

Good job with the salvage etc.

Ray
 
OP
E

eyesoreracing

Active member
Joined
Apr 1, 2012
Messages
40
Location
Long Beach, CA
That makes sense, but I'm actually expecting to move the shed in a few years, and with only about 10 inches of rain a year, I'm thinking i can get away with it. If I don't like what the runoff is doing, I can always turn the shed 90 degrees later and have it piss on the termite-eaten fence behind it.
 

58Yeoman

Well-known member
Joined
Oct 1, 2010
Messages
8,999
Location
Central IL
Latex primer isn't a good choice for bare metal; oil base is better. I was also going to say that interior latex isn't good for outside, but you only have 10 inches of rain a year...it might work. I've painted metal with latex primer, then latex paint, and it will rust through the paint.

Good going on recycling the metal, etc.
 
OP
E

eyesoreracing

Active member
Joined
Apr 1, 2012
Messages
40
Location
Long Beach, CA
Any guesses if a layer of that oil base metal primer ON TOP of the already rusty latex paint will be effective? Odds are that's what I'll end up trying, as its getting harder and harder to swap out those two panels.
 

Zeke

Well-known member
Joined
Aug 13, 2009
Messages
17,176
Location
Long Beach CA, the sewer by the sea.
Any guesses if a layer of that oil base metal primer ON TOP of the already rusty latex paint will be effective? Odds are that's what I'll end up trying, as its getting harder and harder to swap out those two panels.

You need to "correct" the rust first. Water based primer can hold out rust, but if any is present, the water borne resin will activate it. Get some Krud Cutter over at Smith Paint on Cherry Ave.
 
OP
E

eyesoreracing

Active member
Joined
Apr 1, 2012
Messages
40
Location
Long Beach, CA
You need to "correct" the rust first. Water based primer can hold out rust, but if any is present, the water borne resin will activate it. Get some Krud Cutter over at Smith Paint on Cherry Ave.

Hah! That's where I got the paint and primer! What is Krud Cutter? Paint stripper or rust killer or what?

I put a second coat of paint over the rust stains on one spot (just cleaning the paint out of the brush after painting part of that 2x10), so I'll be curious to see if the stains crawl up through that second coat.
 

Nowater

Well-known member
Joined
Nov 29, 2011
Messages
744
Location
Southwest Florida
I am thinking that if the panels were turned 90 degrees, and then joined so the seems were vetical that the shed would be more water tight. Especially if the seem is caulked.
 
OP
E

eyesoreracing

Active member
Joined
Apr 1, 2012
Messages
40
Location
Long Beach, CA
How the hell do you make the long cut on that birdmouth? Since my roof is only sloped about 10 degrees, thats a really shallow pain in the **** cut. I'm using a combination of a Japanese razor saw, a chizel, and a dose of indifference. I think I need a jig saw for this, but I need to build this shed before I have room for more tools. Catch 22...
 
Last edited:
OP
E

eyesoreracing

Active member
Joined
Apr 1, 2012
Messages
40
Location
Long Beach, CA
Ok, so I just hacked out the birdsmouths with a razor saw and chisel. Not the prettiest, but it worked well enough for a shed. This is my best one:

IMG_0909.jpg


These are intersecting a horzontal 2x4 that I'm using as a wallplate. Keeping that 2x4 horizontal let me screw it to the flange on the top of the metal box, while still leaving some exposed 2x4 on the inside of the box for me to screw up into the rafters from below.

IMG_0918.jpg


I'm not sure if this is an accepted way to secure rafters, but I'm sure someone will tell me if I've done something silly.

At the top of the roof, I have a little birdmouth cut, but I ended up using these little steel brackets, since I couldn't figure out how to make this connection without them.

IMG_0913.jpg


I made a few mistakes with the paneling for the roof. I was originally going to make the roof 8 feet wide, with is just a few inches wider than the boxes. After several people pointed out the leaking/rusting issues I was likely to have when it rained, I decided some deeper eaves were in order, so I widened it to 10 feet.

In the multiple trips to the BBHSes, I learned that not all corrugated stuff is the same. The wood waffleboard I bought at Lowes matched the fiberglass I bought at Lowes. It also matched the corrugated steel I bought at Home Depot. But the plastic waffleboard stuff I bought at Home Depot didn't match either. I didn't notice this until I started trying to screw them down.

IMG_0917.jpg


The middle strip is the plastic stuff that doesn't even match the corrugated panels sold right next to it.

WRX/Z28 suggested I put some vents near the top to keep it from turning into an oven. I decided that was good thinking, so you'll notice the spreaders between the rafters don't line up with the top plates. That creates a little vent at the top and bottom of the roof so it should ventilate itself pretty well. I'll put some old screens across that gap eventually to keep the larger critters out (though I'm not sure they can climb the steel).
 
OP
E

eyesoreracing

Active member
Joined
Apr 1, 2012
Messages
40
Location
Long Beach, CA
You can see in this shot that I used a mix of Corrugated steel on the ends, and various translucent fiberglass and plastic stuff in the middle for light.

Next up: the door.

I'm using this floor panel from a smaller container as a door. it's the perfect width and has three stiffening rails on it, but its a little short. I'll have to add something to the bottom of it to close the gap. I'll figure that out later...

IMG_0924.jpg


I'm going to attach a steel bar to the 2x10, make some rollers, and have a sliding door. So far I've managed to use salvaged junk for a large percentage of this shed, only buying some 2x4s and corrugated panels for the roof. I'll have to buy the steel rail, but even the lag bolts I'll attach it with were salvaged from wood shipping crates we also get at work. I wanted to keep the freecycling going with the rollers, but it took me a while to figure out how.

I was thinking of taking two dead water pumps, with V-belt pulleys on them, and bolting them to the top of the door. A v-belt pulley will roll on a steel bar quite nicely, and even a dead water pump should still have good enough bearings for rolling a door back and forth a few times a week.

Before I managed to scrounge those, though (I probably have some buried in the garage, but I can't get to them until the shed is done. Catch 22 again...) I stumbled into these damaged and/or defective supercharger drive belt idler pulleys:

IMG_0925.jpg


My friend's shop, MD Automotive, used to be Jackson Racing's prototype shop, back when JR was making lots of Miata and Honda supercharger kits. One of the few remaining legacies of Jackson Racing is scrap metal bins that occasionally feature old pulley parts.

I machined a groove in two of these idler pulleys so they'd ride the rail, then set about figuring out how to attach them the door.

These air freight boxes are often loaded with bulky, loose parts that try their damnedest to bust their way out of the boxes. Since the top of the box only has a flimsy, non-corrugated piece of sheet steel on it, it would be pretty easy to bulge the longer side walls outward except for these steel bars that get snapped across the top of the box to resist spreading.

IMG_0927.jpg


By what can only be total coincidence, these U-channel bars are a tight slip fit into the stiffening rails on the container floor that I'm using as a door.

IMG_0926.jpg


So, after bolting the pulleys to a piece of this bar, I can just slip it into the rail, set the height as needed, and use a bunch of sheet metal screws to hold them in place.

The two outer wheels will ride the top of the rail. The center pulley will be positioned just below the rail to prevent the door from being lifted off the track.
 

Falcon67

Well-known member
Joined
Jun 11, 2009
Messages
18,371
Location
Merkel, TX
Nice work with free materials. I don't know how your winds are out there, but I would anchor that shed with something. It'd have been airborne here already.
 
OP
E

eyesoreracing

Active member
Joined
Apr 1, 2012
Messages
40
Location
Long Beach, CA
Wind here is infrequent (sometimes only once a year) so we tend to ignore the possibility and then get surprised when all our stuff blows away. I have put a hell of a wing on the top of this thing, but luckily it's poorly attached and will just blow into my neighbor's yard when the wind kicks up.

Maybe a couple of those corkscrew anchors are in order. I've seen them before, but don't know what they're supposed to be used for, so I don't know where I should look...
 

mdbeck1

Well-known member
Joined
Mar 7, 2010
Messages
2,297
Location
Norman, OK
You can see in this shot that I used a mix of Corrugated steel on the ends, and various translucent fiberglass and plastic stuff in the middle for light.

Next up: the door.

I'm using this floor panel from a smaller container as a door. it's the perfect width and has three stiffening rails on it, but its a little short. I'll have to add something to the bottom of it to close the gap. I'll figure that out later...

IMG_0924.jpg


.

Cool idea with the pulleys.

My opinion: Drop the door down to the bottom of the opening and cover the upper part of the opening with a piece of plywood (or something). It's a pain to step over something all of the time. Or you could take some leftover steel and make the doors larger.
 

mdbeck1

Well-known member
Joined
Mar 7, 2010
Messages
2,297
Location
Norman, OK
How the hell do you make the long cut on that birdmouth? Since my roof is only sloped about 10 degrees, thats a really shallow pain in the **** cut. I'm using a combination of a Japanese razor saw, a chizel, and a dose of indifference. I think I need a jig saw for this, but I need to build this shed before I have room for more tools. Catch 22...

I use a hand held circular saw then finish it off with either a hand saw or a sawszall.
 

Weekend_warrior

Well-known member
Joined
Feb 4, 2005
Messages
320
Location
Hearland (Forney), Tx
Good use of free materials. I would also, drill some holes in the channels on the outside to allow any water that puddles there to drain top to bottom and make the door longer. With the 10 inches of rain a year you get that should be nice for a while. IF you plan on keeping it for a year or so, you had just better figure on 5. At least that is way it seems for me.

We have a joke in lubbock ... It only rains 11 inches average per year, You should just plan on being in town on that day! We get heavy storms and seem to get our rain all at once. Feast or famine! That wing would not last long around here with our wind though.

Should last you for a couple of years anyway. My old arrow (inherited with the house) has lasted me 10 years. The doors don't work, but I did spray it with house paint to take take care of the rust. It matches the hosue even :rocker: Not much work as we were spraying the house with a spray rig. It finished off the rest of the paint perfectly!
 
To avoid these ads, REGISTER NOW!
Top Bottom