To avoid these ads, REGISTER NOW!

Building my own tool chest

bthucknall

Member
Joined
Apr 23, 2016
Messages
14
So like many other people after looking at all the used tool boxes out there I felt like I could build one myself for less than what I can get even a used one for. I’m a mechanic and have been working out of a stainless steel 4l”x18”x64” box for ten years now. It’s made by knight, i believe it was sold by sam’s or costco’s or someplace but it has never given me any trouble other than some sticky ball bearing slides that I just had to clean. I think it was less than 2 grand new, but I bought it with my first tool set used so I've been happy with it. Here is a link to my current box.
( http://www.garage-toys.com/noname21.html )
The problem is that since i’ve been working for myself it hasn’t been close to big enough for just my hand tools, much less all my diagnostic tools. So i figured I’d biuld a box that was the largest I’d want without it getting difficult to move around the shop, and also have it built pretty modular so that each peice could be lifted by two strong guys while loaded down with tools. I knew I wanted a work surface, and eventually a riser with top locker and side lockers for my tools that are already in cases.
The largest height i could have and the work surface still be usable was about 42 inches. With 6 inch castors i figured that two stacking boxs of 18 inches each was going to make it easy to pick up and move when I wanted to. I wanted all the drawers to be a full 48 inches wide and close to 24 inches deep. After sitting down and making a bunch of drawings, looking at what materials I could get, necessary clearances for the ball bearing slides, I came up with a frame that was exactly 18 inches tall, 24 inches deep and 51 ⅛ wide. Two of these set on top of each other would make my main tool chest. I would put 48 inch wide drawers that were 23 ¾ inch deep in them. Leaving ⅛ separation between drawers, I decided that one box would have an 8”, a 5”, and a 2 ½” tall drawer in it. The top box would have three 2 ¾” drawers, and two 3 ½” drawers. This would give me a box with something close to 1.5 times the volume and area as my current box.
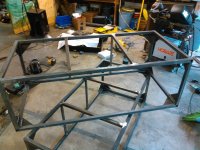
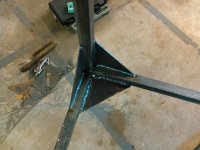
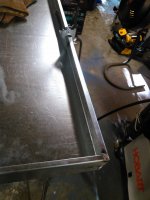
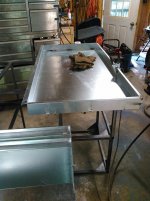
After going to a local metal supply i decided to use 14 ga 1x1 steel tubing for the frame. I built it and then felt I needed gussets so I cut a bunch of gussets out of ⅛” 3 inch wide flat bar and installed them everywhere I could except the top, because I didnt have a plan for a work surface yet and didn’t know how I was going to reinforce it. I ended up putting two more lengths of the same tubing across the top and two ¾” 16 ga tubes in the back to reinforce them. I think im just gonna use hardwood flooring for a work surface, its alot cheaper than paying for a butcher block or having someone make me a stainless top.
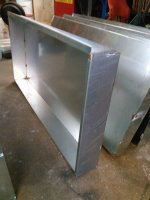
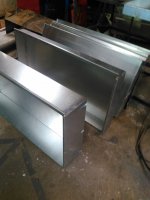
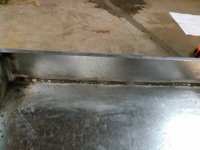
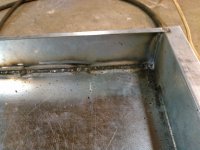
Ive got a local fabrication shop making the drawers out of 16ga galvanized, with a ½ inch lip turned in on all edges except the front, which has a 1 inch lip turned out for a drawer pull. I couldn’t afford a brake so they're gonna brake them and I'll weld them up.
Ive got Accuride C 3832-C24SCP drawer slides for it, which are the heaviest rated slides I could get without breaking my wallet. They’re rated at 100 pound each, and are similar in size to what I found in a snap on box. Accuride at one point was making snap on’s slides, so I figured they were what I wanted to use.
I haven’t decided on how to make framing for attaching the drawer slides(i’m thinking more of that ¾ tube), or what I will skin the frame in(considering ¼ inch oak plywood, putting good marine varnish over stain), and face the drawers with(considering ¼ inch solid oak finished the same way). If anyone has any advice or experience with any part of this i’d really like to hear it, the only other things i’ve welded and fabricated is a trailer enclosure and a welding cart. With everything included it looks like I’ll have less than 1500 into this box, and that it will have more room than a snapon krl 52” roll cab.
 

Attachments

  • KIMG0007.jpg
    KIMG0007.jpg
    144.4 KB · Views: 265
  • KIMG0008.jpg
    KIMG0008.jpg
    146.7 KB · Views: 226
  • KIMG0009.jpg
    KIMG0009.jpg
    144.4 KB · Views: 222
  • KIMG0010.jpg
    KIMG0010.jpg
    147.9 KB · Views: 241
  • KIMG0011.jpg
    KIMG0011.jpg
    143.6 KB · Views: 284
  • KIMG0012.jpg
    KIMG0012.jpg
    146.9 KB · Views: 585
To avoid these ads, REGISTER NOW!

racingtadpole

Well-known member
Joined
Dec 3, 2011
Messages
2,029
Location
The far side of crazy.. but sometimes Australia
You could put another drawer underneath between the wheels if you wanted even more space.
How are you going to hold the top section onto the bottom? I'd either put some dowels on the bottom and mating holes in the top or put a piece of bent flat bar around each corner once its clad.
For the drawer mounts I would have some 16g bent up to the size of the slides with returns as deep as the tube you are mounting to.

Nice work so far.
 
OP
B

bthucknall

Member
Joined
Apr 23, 2016
Messages
14
I think I'm gonna go with something like the dowel approach. Like nots welded to the bottom of the top box and holes in the top of the bottom box. I don't think I'll need much to hold them on top of one another on a smooth shop floor, and if needed the flat bar will be easy enough to add on after it's built.
Ive been trying to picture what you mean with the drawer mounts, but one reason I'm trying to go with plywood on the outside is because I don't want to spend the money or wait for a sheet metal shop to put 4 simple bends into a piece of sheet. At the prices the've been charging i'd imagine it would cost me about two hundred for the skins.
the other thing about the plywood is that I also need drawer faces that will cover the 1/2 inch spacing for the drawer slides. I can easily make my own out of matching wood, and I wouldn't have to wait of pay anyone else.
If I could think of something else to face the drawers with that I could make look professional I might take that option. The drawers and frame have to be painted, so I was wondering if there was a way for me to form sheet metal without a brake, and still have it look good.
 

gahrajmahal

Well-known member
Joined
Dec 12, 2008
Messages
2,527
Location
Cincinnati, Ohio
I have used IKEA kitchen drawers that you can order separately. They come without a face panel. They are steel with heavy duty roller guided built in. A wood bottom comes with it, two sides and a back. All you add is the face. I bought their widest drawer, maybe 36" wide x 18" deep and mounted it underneath my steel shelving unit. I have it full of fasteners. That's about as heavy as you can get and it works great. I think it was around $20.
 

RonRock

Well-known member
Joined
Oct 6, 2007
Messages
1,171
Location
Iowa, USA
I have used IKEA kitchen drawers that you can order separately. They come without a face panel. They are steel with heavy duty roller guided built in. A wood bottom comes with it, two sides and a back. All you add is the face. I bought their widest drawer, maybe 36" wide x 18" deep and mounted it underneath my steel shelving unit. I have it full of fasteners. That's about as heavy as you can get and it works great. I think it was around $20.


You happen to have a link to those drawers? No IKEA in the area that I know of, so I would have to check them out online.
 
OP
B

bthucknall

Member
Joined
Apr 23, 2016
Messages
14
got the drawers from the fabrication shop. I had thought that they were going to build each drawer out of one sheet of metal, but when I picked them up the left and right sides were separate panels tack welded on.
The one I checked at the shop was good enough that I did't check the others, 1/16th out on the diagonal. After getting them back home I realized that several of them are as much as 1/4 inch out of the dimensions I gave them, but its mainly that the person tacking the sides on didn't line it up right. Plus the centers of the long breaks are not as sharp as the ends, so they are actually as much as 3/8 wider in the center than the ends.
I've already paid for them and the shop isn't open till after the weekend, i'm just going to charge ahead and fix them as I weld up the seams, and hope that I can work them to fit the frames like I originally designed.
 

Attachments

  • KIMG0020.jpg
    KIMG0020.jpg
    144.7 KB · Views: 112
  • KIMG0019.jpg
    KIMG0019.jpg
    145.4 KB · Views: 113
  • KIMG0018.jpg
    KIMG0018.jpg
    150.8 KB · Views: 117
  • KIMG0016.jpg
    KIMG0016.jpg
    147 KB · Views: 120
  • KIMG0014.jpg
    KIMG0014.jpg
    143.4 KB · Views: 123
OP
B

bthucknall

Member
Joined
Apr 23, 2016
Messages
14
It took me till the second drawer, but finally learned how to make consistent good welds on the seams. I kept on trying to use tricks like making a thousand separate spot welds, or manually pulsing the trigger to let it cool down. I found out that if I let it build a good puddle while pushing it then it wouldn't burn through if I kept it moving at the right speed. A copper spoon really helped, especially while fixing the burn through.
After getting done I realized that even with me massaging them closer to my planned measurements, I'm still going to need more space in the frames to fit these drawers, and I'm going to have to shim the slides to get them to fit. All the drawers are 1/16th to 1/8th less than 48" wide, which given the clearance I had already planned into the frame, I'll have to shim to make up. Most of the drawers are actually taller by 1/8th to 1/4 inch, and I had planned on 1/8th clearance between drawers. So to make them work I need more room in the frames vertically. I guess I'm gonna try chopping the frame and welding 1/8th inch plate spacers in to get the space I need.
I don't think I'm gonna pay up front for fabrication work anymore. I should have know there would be a problem when the guy had to call me back three times to ask me if the dimensions I gave him were the outer dimensions and if they had to be exact.
 

Attachments

  • KIMG0021.jpg
    KIMG0021.jpg
    149.6 KB · Views: 93
  • KIMG0023.jpg
    KIMG0023.jpg
    146.6 KB · Views: 105
  • KIMG0024.jpg
    KIMG0024.jpg
    147.2 KB · Views: 156

nine4gmc

Well-known member
Joined
Mar 24, 2012
Messages
14,357
Location
Dallas
How much bow and flex is there to the drawer bottoms? You may end up having to make stiffeners to tack in there as well. That ***** about the place making them too tall, out of square.

Sent from my SM-T230NU using Tapatalk
 
To avoid these ads, REGISTER NOW!
OP
B

bthucknall

Member
Joined
Apr 23, 2016
Messages
14
Not much at all. I based my metal gauge off of what snap on uses, and if possible i used heavier gauge. so I had mine made out of 16 ga, where snap on uses 18 ga on most of their boxes, and 20 ga on some.
 

LXCam

ALLIANCE MEMBER
Joined
Apr 23, 2013
Messages
19,105
Location
AZ
Sorry to hear you got screwed on the drawers. But good luck on the rest of the project.
 
OP
B

bthucknall

Member
Joined
Apr 23, 2016
Messages
14
After grinding the tack welds on top flush, I could get all three drawers that were going into the bottom box to fit, but with only 1/8th inch clearance, which I figured I needed at least that much above and below every drawer. Decided I had to weld in another 3/8 inches to the frames.
I really hope I can get these frames back to the perfect square they started as.
 

Attachments

  • KIMG0025.jpg
    KIMG0025.jpg
    146.8 KB · Views: 56
  • KIMG0026.jpg
    KIMG0026.jpg
    146.4 KB · Views: 51

neonnblack

Well-known member
Joined
Jun 7, 2010
Messages
4,913
Location
Reno, NV
The best advice i got about building my own (which like you is coming after you've started) box is always get your drawers made first, then build the frame around the drawers.

I wish i knew that before i started mine.
 
OP
B

bthucknall

Member
Joined
Apr 23, 2016
Messages
14
Yeah, that's definitely the way to go. I wasn't sure I was going to be able to make a square box or be able to weld well enough when I started, so I did the frame first to prove I could learn the skills. If I ever do more boxes that'll be the way I go.
 

Tinner

Well-known member
Joined
Aug 31, 2013
Messages
1,101
Location
N.E. Wisconsin
Part of this mess with the drawers is on you, part on the shop.

If you take work to a fab shop you have to specify the materials, dimensions, tolerance, and method of construction. A simple drawing of the finished part with dimensions and a few notes would have done it in this case.

On the other hand, the shop really took advantage of you. Piss poor workmanship and a minimal effort. There is no reason they couldn't have made those drawers one piece and fully welded the corners. It's no more work, but it does take more skill.

Having them made of galvanized was a poor choice, in my opinion. Nobody wants to weld on that stuff and there's usually an upcharge to do so. In this case, the upcharge was to just tack it together and call it good.

You should have welded the seams vertical down from the outside and ground them smooth, or nearly so. That's the way it's done whenever possible.

I realize my advice is after the fact and please don't think I'm picking on you. Hopefully, yourself and others here can benefit in the future. Good luck with your project, it's not as easy as it looks. :thumbup:
 

Motofixxer

Well-known member
Joined
Oct 10, 2009
Messages
681
If I could think of something else to face the drawers with that I could make look professional I might take that option. The drawers and frame have to be painted, so I was wondering if there was a way for me to form sheet metal without a brake, and still have it look good.

For a unique look you could use colored plexiglass. Flame polished edges frome a torch. Would look really cool actualy.
 

gahrajmahal

Well-known member
Joined
Dec 12, 2008
Messages
2,527
Location
Cincinnati, Ohio
Sorry I did not check back to see your request RonRock Here is the link for the 36" drawers. A bit more expensive than I remember, but still a good value. It looks like $1 per inch of width, so the 15" wide drawer is $15 and the 36" wide drawer is $36. The Line is called "Forvara" and is rated for 55 lb.

http://www.ikea.com/us/en/catalog/products/40262066/

After clicking around on this page I found the model I purchased which is called Maximera

http://www.ikea.com/us/en/catalog/products/70265662/

A little more expensive, but much more stout side rails and roller guides.
 
Last edited:

RonRock

Well-known member
Joined
Oct 6, 2007
Messages
1,171
Location
Iowa, USA
Thanks, I'll check them out. I did my best to find them on their site but it seems they only want to sell complete systems.
 
To avoid these ads, REGISTER NOW!
Top Bottom