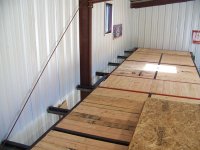
Today Josh was here to help again and we added some extensions to the back of the deck to fill the gap to the wall, then got to work on the OSB floor sheets. Josh had to go before it was all finished, but I managed to get the rest done by myself. I still need to get some more screws to get everything really tight, but tomorrow we should be able to start getting all my shelves and storage cabinets put up there, and start finally putting things away.

You are using an out of date browser. It may not display this or other websites correctly.
You should upgrade or use an alternative browser.
You should upgrade or use an alternative browser.
Building myself a proper shop
- Thread starter StinkBug
- Start date


Krokodil
Well-known member
That is some good progress! Looks good!
Today I finally got to start putting things away! Thank goodness I had a forklift too, cause Josh and I moved literally tons of stuff around today. Got all the cabinets and shelves moved into place, as well as my desk. Obviously the office doesn't have any walls yet, but I've got everything sitting pretty much where it will be. The blue and white cabinets on the right side have their back to what will be the office wall.
Since I got all that stuff off the floor I also got to pull my chassis table out from against the back wall, roll the other frame table with the beetle on it over to the back corner, and set up the big set of pallet racking that will serve as another work bench, and some up high storage for stuff I dont need easy access to. Now the shop is finally getting really close to the way I want it.
Since I got all that stuff off the floor I also got to pull my chassis table out from against the back wall, roll the other frame table with the beetle on it over to the back corner, and set up the big set of pallet racking that will serve as another work bench, and some up high storage for stuff I dont need easy access to. Now the shop is finally getting really close to the way I want it.
Attachments


jktruck150
Well-known member
Cool place!
GOOD NEWS!!! I got my new electrical service all hooked up and inspected today. When the inspector showed up he had to take a step back because of how overkill everything was. He barely even looked at most of it, just asked for the permit card so he could sign it off. For all the stress I've been goin through it makes me happy that we got everything better than expected on the first shot.
Now I just have to dig a big *** trench so that we can run the shop's service.
Now I just have to dig a big *** trench so that we can run the shop's service.
Stang Lover
Member
- Joined
- Dec 3, 2009
- Messages
- 12
Today I finally got to start putting things away! Thank goodness I had a forklift too, cause Josh and I moved literally tons of stuff around today. Got all the cabinets and shelves moved into place, as well as my desk. Obviously the office doesn't have any walls yet, but I've got everything sitting pretty much where it will be. The blue and white cabinets on the right side have their back to what will be the office wall.
Since I got all that stuff off the floor I also got to pull my chassis table out from against the back wall, roll the other frame table with the beetle on it over to the back corner, and set up the big set of pallet racking that will serve as another work bench, and some up high storage for stuff I dont need easy access to. Now the shop is finally getting really close to the way I want it.
The item in pictures 1 & 2 labeled SHARK - is that an Iron worker?
Yes, that's a 50ton Iron worker. It's identical to a Piranha P50. I mainly use it as a press brake, and for pressing dimple dies, but it does have the ability to shear and punch up to 1" thick steel plate, not that I'm brave enough to try it.
e-tek
Well-known member
This is turning into one hell of a building. Great work on the pallet-rack landing! So your palns for the old garage are to make it for show? I'm trying to get my attached cleaned up too - long process!
Yep, the little one will be for showing off the toys, the big one for building them.
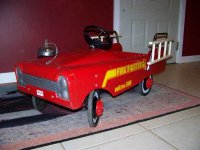
Speaking of, I recently reacquired my very first vehicle. It's long since been retired, but I'm thinking it'll be getting it's own special parking space in the little garage when it's finished.
Speaking of, I recently reacquired my very first vehicle. It's long since been retired, but I'm thinking it'll be getting it's own special parking space in the little garage when it's finished.
Attachments
Rockford514
Well-known member
VERY nice shop,wish I had went as tall
harvey4804
Well-known member
Your shop is looking awesome! Where in SD are you? I'm in Ramona myself.
HOTFR8
Banned
I figured I couldn't spend all this time and money on a new building and not add some kinda personal touch to the foundation. This morning I ran over to the current shop and cut the company logo out of some 3/8" plate on my Torchmate table and had the guys embed the letters in the concrete. It's centered about 12" inside where the main roll up door will be. Tomorrow when they come to sawcut the expansion joints they are also gonna cut the rectangle in to finish things off.

I did something similar here on Gal plate. added the dates the place was built and when the slab of concrete was poored.
Looking good.Somehow I missed this thread. WOW what a great building.