To avoid these ads, REGISTER NOW!

Building window jamb extensions

branimal

Well-known member
Joined
May 31, 2016
Messages
1,943
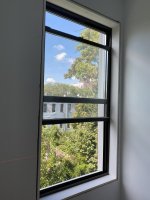
I'm getting ready to build window jamb extensions and I've got some questions.

1. Should I build the jamb extension box on a table and shim it into place? How much smaller should I build the overall height and width? Is 1/8" smaller than the smallest measurement adequate wiggle room?

The alternative is to cut and nail each jamb piece into the framing. If the corners aren't square things are going to get hairy - I think.

2. I've read that putting a 2-3 degree bevel on the jambs provides for a better fit. Sharp side touching the window frame. Is it worth the effort?

3. I'm going to glue and brad nail the frame together. Is that adequate holding power. 6H' x 3'W x 5" deep. 3/4 thickness.

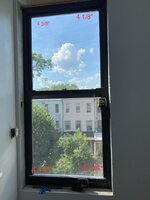
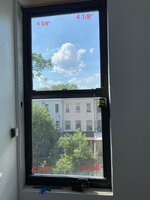
My jambs are not all square. Bottom jamb is 4 1/2" on one side and 4 1/4" on the other. Looks like the sheetrock is plumb up and down but the windows are off a little. I'm going to rip the jambs accordingly with a table saw to the correct angled dimensions.

I know that some guys build the jambs extensions and the window trim all at once and then put the whole box up. I might do that after I get comfortable building the first couple of jamb extension boxes. Baby steps.

Appreciate the advice!!!
 

Attachments

  • IMG_8404.jpg
    IMG_8404.jpg
    68.2 KB · Views: 166
Last edited:
To avoid these ads, REGISTER NOW!

ssdave

Banned
Joined
Apr 11, 2015
Messages
2,913
Location
Eastern Oregon
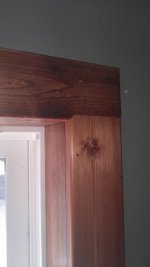
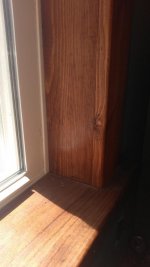
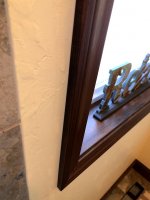
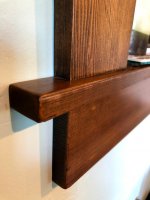
I've built a bunch of these, building some now. I build the back flat, no bevel. A bevel wouldn't hurt, but makes it more complex. I pre-assemble them, put them in place as a unit. Use 6 screws through the jamb extensions into the window to pull them into the window. I assemble with either drywall screws or pocket hole screws. I use pocket hole jointery for the assembly. Brad nailers work, but they'll come loose and gap. Screws stop that problem and make for easier installation without having to be careful to not pull the nails loose. You can move the wood around as needed to install correctly and not worry about gaps developing.

Make the window sill integral to the whole thing. Don't rip the widths different, you're creating a nightmare to trim the window. Make it all flush and the widest width you need. Or, a compromise dimension and shave the drywall a bit where needed to get the trim to fit. The trim will angle out to match the drywall, and you caulk the line behind the trim with alex anyway to hide the mismatch.
 

Attachments

  • 20200821_112742.jpg
    20200821_112742.jpg
    75.2 KB · Views: 163
  • 20200821_112720.jpg
    20200821_112720.jpg
    82.3 KB · Views: 154
  • 20200821_112714.jpg
    20200821_112714.jpg
    80.6 KB · Views: 155
  • 20200821_112700.jpg
    20200821_112700.jpg
    61.9 KB · Views: 152
  • 20200821_112649.jpg
    20200821_112649.jpg
    63.7 KB · Views: 158
  • 20200821_112641.jpg
    20200821_112641.jpg
    93.4 KB · Views: 173
OP
B

branimal

Well-known member
Joined
May 31, 2016
Messages
1,943
ssdave; said:
I've built a bunch of these, building some now. I build the back flat, no bevel. A bevel wouldn't hurt, but makes it more complex. I pre-assemble them, put them in place as a unit. Use 6 screws through the jamb extensions into the window to pull them into the window. I assemble with either drywall screws or pocket hole screws. I use pocket hole jointery for the assembly. Brad nailers work, but they'll come loose and gap. Screws stop that problem and make for easier installation without having to be careful to not pull the nails loose. You can move the wood around as needed to install correctly and not worry about gaps developing.

Make the window sill integral to the whole thing. Don't rip the widths different, you're creating a nightmare to trim the window. Make it all flush and the widest width you need. Or, a compromise dimension and shave the drywall a bit where needed to get the trim to fit. The trim will angle out to match the drywall, and you caulk the line behind the trim with alex anyway to hide the mismatch.

Looks great. I might mess around with the stool and apron for the living room windows once I get the hang of this.

I'll screw the frame together. You're right - gaps will develop once I start moving the frame around if I only brad nail.

How much wiggle room do you give yourself when sizing the frame to the opening?

Good call on the pocket jig. I also have some right angle clamps to get this all squared up.

I cant screw my jamb extension to the window b/c my windows are aluminum.
 

usa#1

Well-known member
Joined
Jul 30, 2008
Messages
392
I'd build as separate pieces. Shim as necessary to make reveal the same on each side of window. Also I would try to move the extension out far enough so the casing wouldn't have to be ripped. May not have room to do this, I can't tell from picture.
 

dfiler2

Well-known member
Joined
Dec 15, 2014
Messages
2,859
Location
NW Minnesota
I would build in one piece and if you can make them 3/4 to 1/2 in smaller than the rough opening, that gives you 1/4 to 3/8 all the way around. If you go too small like the 1/8 you mentioned it gets hard to do any shimming. I also put the casing together on the bench and nail it up in one piece.
 

purplezr2

Well-known member
Joined
Jun 1, 2010
Messages
5,300
Location
Central MN
I build mine as one piece. I used kreg jig for the corners, I also used it to attach the jamb to the window. I build mine a 1/4 inch all round bigger then the sash opening. I also made mine to the largest dimension from the window face to the wall, then if it was off at all, I used my power planer to bring it down to the correct elevation.

Hope that makes sense, I don't have any pictures.
 
OP
B

branimal

Well-known member
Joined
May 31, 2016
Messages
1,943
Here’s a better picture of the window. The distance from sheetrock to window varies in each corner. This is why I believe I need to rip the jambs at angles.


When I screw the jambs into a frame I’ll make sure the trim facing side of the jambs are all flush.

54b810e45f2d3d2689f80e9c869635a0.jpg
 

Attachments

  • 54b810e45f2d3d2689f80e9c869635a0.jpg
    54b810e45f2d3d2689f80e9c869635a0.jpg
    71.2 KB · Views: 31
OP
B

branimal

Well-known member
Joined
May 31, 2016
Messages
1,943
purplezr2; said:
I build mine as one piece. I used kreg jig for the corners, I also used it to attach the jamb to the window. I build mine a 1/4 inch all round bigger then the sash opening. I also made mine to the largest dimension from the window face to the wall, then if it was off at all, I used my power planer to bring it down to the correct elevation.

Hope that makes sense, I don't have any pictures.


Didn’t think about using the power planer. I’ve got a 3 1/4” ryobi that rarely see’s daylight. Might put that to use.
 

The Cobbler

Super Moderator
Staff member
Joined
Oct 24, 2013
Messages
25,991
Location
Niagara Region, Ontario, Canada
you want the jambs equal distances on the window ( the reveal ont he windows equal on all sides. ) cut each jamb to fit tight to the window, flush with the drywall. a bit of a bevel cut away from the finished side at both sides is a good idea. nail it together as a box, shim to position, brad nail it in place. casing trim after .
 

K'ledgeBldr

Well-known member
Joined
Aug 22, 2011
Messages
1,925
Location
Johns Creek, GA
I've done this on several "drywall wrapped" windows over the years. My method keeps the jamb independent of framing. I build the entire unit with casing and sill (this is allowing a 1/4" clearance vertically and horizontally; and assuming the flange mounted window is installed correctly, level, and plumb with the drywall wrap removed)- shim for level under the sill- nail bottom end of casing. Check for plumb of the jamb- nail top end of casing. Add nails to the mid-way points of the casing, sides and top. Then apply apron. Caulk jamb to window frame and casing/apron, ready for paint.

Of course your example window isn't going to take casing on the left side, so kinda defeats the purpose of casing it out. And I see that the wall is constructed of LGS which usually means screws instead of nails, but there are nailers and nails that can be used for LGS.
 

Bert_

Well-known member
Joined
Dec 24, 2016
Messages
9,776
Location
NW Iowa
When I did extensions on the couple vinyl windows a PO installed I assembled then in place. Started with the stool then the sides and top last. Shim as necessary. I put a 5* bevel where the casing sits.

I did stain and varnish each piece before assembly.
 
To avoid these ads, REGISTER NOW!
OP
B

branimal

Well-known member
Joined
May 31, 2016
Messages
1,943
Ok, I think I understand the spacing issue now. I want to make the jamb extension box so that I have an equal reveal all the way around the window using shims to get everything spaced evenly and level.
 

Attachments

  • IMG_8408.jpg
    IMG_8408.jpg
    95.4 KB · Views: 93

Bretny

Well-known member
Joined
Jul 31, 2017
Messages
3,918
Location
Dutchess county NY
Nail them to the stud becid it. Shim to desired reveal. I have done this to every window in my house becids one. That one I bought with a jam extension alreaty in place. It dosnt fit right and looks like complete ****.

No matter how you trim this your going to need to cawlk it even if for air sealing alone. A tiny bit out of square will for sure be hidden with cawlk.
 

Slednut

Well-known member
Joined
Dec 20, 2012
Messages
2,554
Location
Washington state
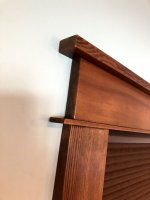
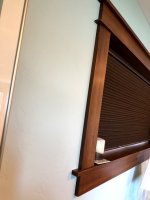
I built these the same way ssdave did his, used pocket screws and had them almost completely built and finished before installing them. I did have to make templates for each end of the stools so they would sit up against the dry wall. I installed the apron after the frame was installed.

If you use wide casings it will hide the depth problem.
 

Attachments

  • Windows.jpg
    Windows.jpg
    97 KB · Views: 88

Bert_

Well-known member
Joined
Dec 24, 2016
Messages
9,776
Location
NW Iowa
No matter how you trim this your going to need to cawlk it even if for air sealing alone. A tiny bit out of square will for sure be hidden with cawlk.

I didn't use any caulk. You can't stain caulk so that was a non starter.

Mine still look bad since the windows are white vinyl. But sometimes you work with what you have. This picture was before I got the backband installed.
 

Attachments

  • KIMG0422.jpg
    KIMG0422.jpg
    118.7 KB · Views: 101

Bert_

Well-known member
Joined
Dec 24, 2016
Messages
9,776
Location
NW Iowa
You guys posting pics of windows from 8ft away arnt showing much becids the wood stayed where you nailed it.

Here.

The unfinished edge will be covered by the backband when I get around to finishing it.
 

Attachments

  • KIMG0621.jpg
    KIMG0621.jpg
    41 KB · Views: 90
  • KIMG0622.jpg
    KIMG0622.jpg
    42.2 KB · Views: 87
  • KIMG0620.jpg
    KIMG0620.jpg
    52.2 KB · Views: 88

Slednut

Well-known member
Joined
Dec 20, 2012
Messages
2,554
Location
Washington state
You guys posting pics of windows from 8ft away arnt showing much becids the wood stayed where you nailed it.

Here's several, one with regular casing.
 

Attachments

  • Window 2.jpg
    Window 2.jpg
    58.3 KB · Views: 71
  • Window 1.jpg
    Window 1.jpg
    64.6 KB · Views: 67
  • Window 6.jpg
    Window 6.jpg
    68 KB · Views: 68
  • Window 3.jpg
    Window 3.jpg
    86.6 KB · Views: 67
  • Window 5.jpg
    Window 5.jpg
    79.5 KB · Views: 72

wrenchguy

Well-known member
Joined
Sep 22, 2011
Messages
4,698
Location
NW Indiana
Assembly your extension jamb frame OD the same measurements as the "outside dimensions" of your window frame. (I use 1/4x1 5/8" staples) Make it as deep as your greatest number, shim to framing using the window frame edge on plane with the extension backside edge. This will give you the same margin/reveal on the side your gonna see. This method makes it easy to keep visual margin the same on all windows, even if different size. Take power planer and machine down extension on plane with drywall. A slight bevel off won't hurt and your trim may lay better. Alot of times old framing like you have is gonna give you different depth numbers around the unit. Careful using planer with the drywall and fingers!
If your mechanically and confident enough you can shim frame in place and scrib the extension, remove it to work table and plane as needed.
You plan on really long screws to fasten extensions to window frame?? U might want to consider fastening it thru shims to framing. Faster with trim gun, less likely mess up.
Good luck with ur project.
 
Last edited:
OP
B

branimal

Well-known member
Joined
May 31, 2016
Messages
1,943
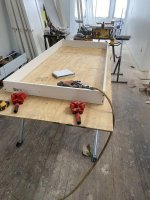
I started building the casings. Got 3 out of 7 done. The first 2, I ripped at an angle with the table saw to get the depths perfect. Measuring and marking was a bit tedious. And I still needed to use the hand planer. So the last one I ripped to the largest depth and then got a good fit with the hand planer. Went much faster.

Glued, brad nailed and screwed up. Ready to be installed.

I'd like to HVLP spray the frames and trim. White oil based paint. I've had better luck in sunny areas with oil based paint than latex.

Got some painting questions:

1. Should I paint them before i install them and touch up the brad nail holes? And run white caulk in the gaps.

OR

2. Install them. Caulk. Fill the nail holes. Mask everything off. Tape along the frame of the aluminum window. Then another layer of tape with plastic to cover the glass. Then use a mask paper gun to cover the sheetrock. Set the HVLP gun to a fairly tight pattern and spray away.

I know I could paint them by hand but I hate painting. And I've gotten pretty good at masking - if that's even a thing.
 

Attachments

  • IMG_8414.jpg
    IMG_8414.jpg
    116.7 KB · Views: 69
  • IMG_8415.jpg
    IMG_8415.jpg
    91.4 KB · Views: 75

eastbaysubaru

Well-known member
Joined
Dec 6, 2009
Messages
340
Location
NorCal
Looks great! I typically use a 5/16" reveal on the window using a pencil and a small square set to that depth. It looks like you're not using a sill per se but when using a sill, I always set that first as it can be difficult to get that level and tight.

As for the painting, I always go with door number 2. It gives a much more uniform finish. So far, so good. Good luck with the rest!

-Brian
 
To avoid these ads, REGISTER NOW!
Top Bottom