To avoid these ads, REGISTER NOW!

Burb's new barn

Burb

Well-known member
Joined
Mar 24, 2014
Messages
96
Location
Hillsdale, Mi
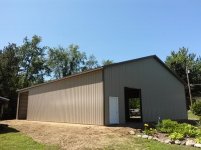
So This have been an on going project for a little while now, but I'm finally going to take the time to post up some build pics.

I currently have a crappy 24'x40' old horse barn w/ dirt floors, oak posts, etc. that's good for semi-dry storage at best, but it would cost more to fix than to replace it. For some time I've wanted a barn/mancave/workshop, and I've been dreaming it in my head for the last 10 years or so. Well over time the barn kept growing in my mind as I acquired more stuff, but life always seems to get in the way and it just kept getting pushed back.

Anyway, finally got in a position to build one this year, and over time I'll post up my on-going results as I sort through all my pictures, and finish completing it.

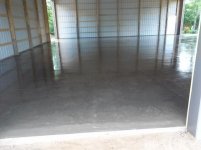
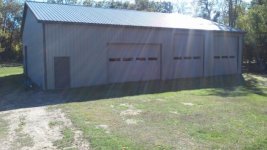
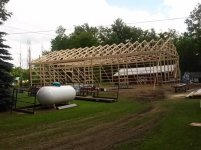
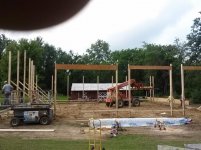
Now I'm normally am too cheap/stubborn to pay anyone to do something that I'm capable off, but the shell/concrete were just too much for me to take on and try to get done in a timely manner, so I hired that part out. Everything else has been done, or will be done by me.

Anyway, sorry for the long post, but now to the good stuff... the pictures!
 
To avoid these ads, REGISTER NOW!
OP
B

Burb

Well-known member
Joined
Mar 24, 2014
Messages
96
Location
Hillsdale, Mi
Site Prep: I had to remove a large swingset, 24'x24' sandbox, an 8'x12' playhouse, and 1/2 of my wife's flower bed to put the barn where I wanted it.
 

Attachments

  • Site Prep 1 (640x480).jpg
    Site Prep 1 (640x480).jpg
    56.6 KB · Views: 115
  • Site Prep 3 (640x480).jpg
    Site Prep 3 (640x480).jpg
    57.6 KB · Views: 97
  • Site Prep 7 (640x480).jpg
    Site Prep 7 (640x480).jpg
    61.4 KB · Views: 95
OP
B

Burb

Well-known member
Joined
Mar 24, 2014
Messages
96
Location
Hillsdale, Mi
Oh, before I forget, The barn is going to be 48'x64'x14'

The crew did an outstanding job in everything they did, only took 4 days to complete their end of it, and barely even tore my yard up in the process of building it.
 

Attachments

  • Day2 4 (640x480).jpg
    Day2 4 (640x480).jpg
    52.8 KB · Views: 123
  • Day2 1 (640x480).jpg
    Day2 1 (640x480).jpg
    65.1 KB · Views: 100
  • Poles 2 (640x480).jpg
    Poles 2 (640x480).jpg
    57.5 KB · Views: 100
  • Poles 1 (640x480).jpg
    Poles 1 (640x480).jpg
    55.6 KB · Views: 114
OP
B

Burb

Well-known member
Joined
Mar 24, 2014
Messages
96
Location
Hillsdale, Mi
This is from day 3 with a 3 guy crew. It would have took me forever just to dig all the holes, and they're almost done.
 

Attachments

  • Day3 1 (640x480).jpg
    Day3 1 (640x480).jpg
    50.1 KB · Views: 102
  • Day3 2 (640x480).jpg
    Day3 2 (640x480).jpg
    46.5 KB · Views: 98
  • Day3 3 (640x480).jpg
    Day3 3 (640x480).jpg
    50.7 KB · Views: 95
OP
B

Burb

Well-known member
Joined
Mar 24, 2014
Messages
96
Location
Hillsdale, Mi
Day 4, the contractor's completed their end of it and left the site almost spotless. They picked up every little scrap piece every day, which really impressed me. These guys were top notch, and I'll definitely recommend them to anyone.
 

Attachments

  • Day4 1 (640x480).jpg
    Day4 1 (640x480).jpg
    49.2 KB · Views: 82
  • Day4 2 (640x480).jpg
    Day4 2 (640x480).jpg
    50.5 KB · Views: 76
  • Day4 3 (640x480).jpg
    Day4 3 (640x480).jpg
    49 KB · Views: 92
Last edited:
OP
B

Burb

Well-known member
Joined
Mar 24, 2014
Messages
96
Location
Hillsdale, Mi
More details please. Floorplan?

Keep the pictures coming!

A lot of it is a work in progress, I kinda make it up as I go:D 
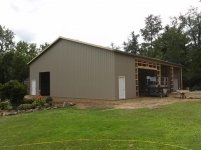
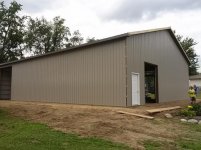
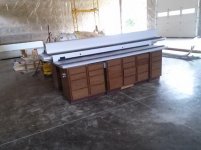
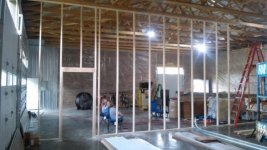
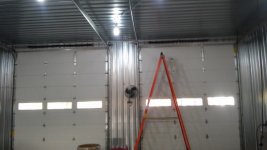
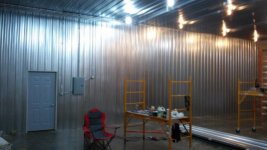
I've already built a wall dividing the LH & RH sides in half, with future plans of dividing the LH 1/2 again. I want to basically have 3 separate areas. The large(32x48) half will eventually have a hoist, plus a drive thru bay for my current camper with room to grow into a motorhome, or whatever down the road. The LH side will be a general garage for parking extra vehicles in the front, and the back room for that half will be storage for all the misc. stuff(lawn mower, Kubota, quads, etc.

Somewhere I've got scans of my hand drawn floor plan, but not on this computer.

There will be plenty more pics when time allows, most of them I have on my work computer, so finding time to screw off at work is sometimes hard to do.
 
OP
B

Burb

Well-known member
Joined
Mar 24, 2014
Messages
96
Location
Hillsdale, Mi
Floor poured and all done. These guys also did top notch work, and kept the jobsite impeccably clean. I had originally wanted to epoxy the entire floor, but getting that done cost more than the 50+ yards of concrete/labor, so I just went with a cure n' seal after the pour.
 
OP
B

Burb

Well-known member
Joined
Mar 24, 2014
Messages
96
Location
Hillsdale, Mi
Oops, forgot to attach the concrete pics.
 

Attachments

  • Concrete 2 (640x480).jpg
    Concrete 2 (640x480).jpg
    144.5 KB · Views: 94
  • Concrete 3 (640x480).jpg
    Concrete 3 (640x480).jpg
    29.4 KB · Views: 90
  • Concrete 4 (640x480).jpg
    Concrete 4 (640x480).jpg
    32.9 KB · Views: 87
  • Concrete 5 (640x480).jpg
    Concrete 5 (640x480).jpg
    32.1 KB · Views: 78
OP
B

Burb

Well-known member
Joined
Mar 24, 2014
Messages
96
Location
Hillsdale, Mi
Got some grading done(mid July) around the doors. I will eventually have an asphalt driveway done for it(as money allows), but until then I wanted to be able to get in and out of the barn with a vehicle, and I also wanted to seed all the dirt in to cut down on the mud. I moved a lot of dirt out of my woods with just a 3pt. scoop on my old Kubota!
 

Attachments

  • Leveling 2 (640x480).jpg
    Leveling 2 (640x480).jpg
    39.5 KB · Views: 75
  • Leveling 1 (640x480).jpg
    Leveling 1 (640x480).jpg
    39.1 KB · Views: 83
OP
B

Burb

Well-known member
Joined
Mar 24, 2014
Messages
96
Location
Hillsdale, Mi
Inner 2x4 girts and hanging the wall insulation. Went w/ 24" rolls of R19 for the walls.
 

Attachments

  • Inside Framing 3 (640x480).jpg
    Inside Framing 3 (640x480).jpg
    35.9 KB · Views: 84
  • Insulation 3 (640x480).jpg
    Insulation 3 (640x480).jpg
    33.7 KB · Views: 101
  • Insulation 6 (640x480).jpg
    Insulation 6 (640x480).jpg
    35 KB · Views: 97
OP
B

Burb

Well-known member
Joined
Mar 24, 2014
Messages
96
Location
Hillsdale, Mi
After a big run around with Wayne Dalton on the doors I finally got them all installed. They ended up cutting the doors crooked, not enough to cause an issue with the function, but visually from the inside the ends of the panels would not line up. They ended up sending me 5 new doors, and I got to keep all the old panels. $6000 worth of insulated extra panels for free is ok by me!

I went with (3) 12w x 13t, (1) 16w x 10t, and (1) 8w x 10t. The 13t are low clearance track, and the 10' are height clearance track.
 

Attachments

  • Doors 10 (640x360).jpg
    Doors 10 (640x360).jpg
    39.1 KB · Views: 57
OP
B

Burb

Well-known member
Joined
Mar 24, 2014
Messages
96
Location
Hillsdale, Mi
I got my three entry doors painted. We ended up having exterior latex color matched to the barn trim, but I did not want to have to brush or roll the doors(I hate painting) In the past I've had decent results thinning latex down with distilled water so I could spray them, but I figured I'd search the internet and see what other tricks were out there. I stumbled upon a youtube video where the guy actually used windshield washer fluid to the thin paint, and I figured I'd give it a try.

It worked amazing! I sprayed all 3 doors with my cheapo HVLP gun, and I couldn't be more pleased with the results.
 

Attachments

  • Entry Door 2 (360x640).jpg
    Entry Door 2 (360x640).jpg
    31.5 KB · Views: 30
  • Entry Door 1 (640x360).jpg
    Entry Door 1 (640x360).jpg
    118.6 KB · Views: 36
OP
B

Burb

Well-known member
Joined
Mar 24, 2014
Messages
96
Location
Hillsdale, Mi
Scored some cheap cabinets & countertop off of craigslist. (14) 15"w cabinets plus (1) 8' countertop, (2) 11' counter tops, and (2) 12' countertops all with powerstrips built into the rear splash guard for $140!
 

Attachments

  • Cabinets 1 (640x480).jpg
    Cabinets 1 (640x480).jpg
    36.9 KB · Views: 54
  • Cabinets 3 (640x360).jpg
    Cabinets 3 (640x360).jpg
    32.2 KB · Views: 64
To avoid these ads, REGISTER NOW!
OP
B

Burb

Well-known member
Joined
Mar 24, 2014
Messages
96
Location
Hillsdale, Mi
Building and insulating the center wall that splits the barn in 1/2. MY 11yo helper in the scissor lift :)
 

Attachments

  • Wall 2 (640x360).jpg
    Wall 2 (640x360).jpg
    40.4 KB · Views: 62
  • Wall 3 (640x360).jpg
    Wall 3 (640x360).jpg
    41.6 KB · Views: 64
  • Wall 6 (640x360).jpg
    Wall 6 (640x360).jpg
    37.4 KB · Views: 80
OP
B

Burb

Well-known member
Joined
Mar 24, 2014
Messages
96
Location
Hillsdale, Mi
Scored an air compressor for Free! I even tried to buy it, but the guy refused any money. He will be receiving several cases of Budlight(his beer of choice, not mine) for his generousity.

It's a few year old IR, 7.5hp, 80gal. two stage that doesn't currently work, but I've already got a motor lined up if that's what's wrong, but haven't had time to trouble shoot it yet.

This should be more than enough air for my needs.
 

Attachments

  • Compressor 2 (480x640).jpg
    Compressor 2 (480x640).jpg
    37.8 KB · Views: 51
  • Compressor 1 (480x640).jpg
    Compressor 1 (480x640).jpg
    51.1 KB · Views: 38
OP
B

Burb

Well-known member
Joined
Mar 24, 2014
Messages
96
Location
Hillsdale, Mi
Kinda going out of order here, but I finally got the inside steel and enough electrical completed to move this in. The second most important part of any garage (only slightly behind a welder outlet) is a beer fridge! I actually picked this up months before the barn was even started, but it's finally found it's permanent home. I plan on doing some sort of custom painting on the front, but don't know what yet.
 

Attachments

  • Beer (360x640).jpg
    Beer (360x640).jpg
    113.6 KB · Views: 74

sean Buick 76

Well-known member
Joined
May 7, 2013
Messages
3,221
Location
Edmonton Alberta
Great work!!! I am super jealous of your barn it looks great! Awesome scores in the cabinets and compressor! I liek the way you think about re-using and fixing stuff up, Ia m the same way!

The only suggestion I have is that your should consider using photobucket to post your pics full sized... It make it much more enjoyable to see all the pics full sized without clicking on each one...

http://s1383.photobucket.com/
 
OP
B

Burb

Well-known member
Joined
Mar 24, 2014
Messages
96
Location
Hillsdale, Mi
Quick update: Got my Beacon-Morris 75k heater installed and working(pics to follow at some point), but more importantly I revamped the front of my beer machine. Now the wife can't ***** about me not having any Christmas spirit, I mean hell, I've got a Christmas Tree in my shop!
 

Attachments

  • Beer2 (360x640).jpg
    Beer2 (360x640).jpg
    132 KB · Views: 56
OP
B

Burb

Well-known member
Joined
Mar 24, 2014
Messages
96
Location
Hillsdale, Mi
Great build thread! I just changed my mind on size and door placement thanks lol

Thanks!

Here's a few more pics(in no particular order) of the Galv. walls/ceiling, lighting, heater/exhaust, and my tire rack.
 

Attachments

  • Tire Rack 2 (640x360).jpg
    Tire Rack 2 (640x360).jpg
    133.6 KB · Views: 45
  • Exhaust 2 (640x360).jpg
    Exhaust 2 (640x360).jpg
    112.6 KB · Views: 39
  • Heater 2 (640x360).jpg
    Heater 2 (640x360).jpg
    29.4 KB · Views: 41
  • Heater 1 (640x360).jpg
    Heater 1 (640x360).jpg
    31.6 KB · Views: 37
  • Wall Steel 8.jpg
    Wall Steel 8.jpg
    132.1 KB · Views: 40
  • Wall Steel 5 (640x360).jpg
    Wall Steel 5 (640x360).jpg
    31.3 KB · Views: 39
  • Lights 7 (640x360).jpg
    Lights 7 (640x360).jpg
    37.3 KB · Views: 47
OP
B

Burb

Well-known member
Joined
Mar 24, 2014
Messages
96
Location
Hillsdale, Mi
After having 16 days off for the Holidays I've got a little bit more accomplished in the barn.Got my Cabinets all built/painted and I'm quite happy with the end results.

I built 16' lower cabinets out of 3/4" ply, and ended up going with 3/4" solid oak flooring on top of 3/4" mdf for the counter top. I also recessed a 20gal. parts washer in the counter top.

For the upper cabinets they are also built out of 3/4" ply, 12' total length, but I didn't want to have to hang them off the walls, so I built a frame work out of 2x2 sq. tubing that bolts to the lower counter top and they hang from that.

After getting them all painted black there was just too much black, so I hand painted the flames(4 coats, sometimes I'm my own worst enemy.)

I have more pics of the actual building of the cabinets if anyone is interested, but didn't feel like posting them all.
 

Attachments

  • Parts Washer 2 (640x360).jpg
    Parts Washer 2 (640x360).jpg
    110.3 KB · Views: 32
  • Parts Washer 1 (640x360).jpg
    Parts Washer 1 (640x360).jpg
    99.5 KB · Views: 41
  • Completed Cabinets 3 (640x360).jpg
    Completed Cabinets 3 (640x360).jpg
    107.2 KB · Views: 42
  • Cabinet Support 4 (640x360).jpg
    Cabinet Support 4 (640x360).jpg
    108.4 KB · Views: 38
Last edited:

Catadj78

Well-known member
Joined
Aug 11, 2014
Messages
1,009
Location
Alabama
I really like how you did the parts washer. I think I will copy this.

Good score on the cabinets and the compressor
 
OP
B

Burb

Well-known member
Joined
Mar 24, 2014
Messages
96
Location
Hillsdale, Mi
Thank you. It's just a $89 TSC parts washer without the legs. I did have to modify the power switch for it which normally mounts on the outside of the tub. I just extended the wires underneath and ran it to a normal light switch in conduit on the end of the cabinet. Also the normal switch box holds the "pump box"(for lack of a better term) so I made a sheet metal panel to sandwich it to the tub.

It's not shown in the pictures, but I also plumbed in a ball valve drain that exits through the side of the cabinet. It should make it a lot easier to drain that way.
 
OP
B

Burb

Well-known member
Joined
Mar 24, 2014
Messages
96
Location
Hillsdale, Mi
Finally got my Home Theater projector in, so I figured I'd give you an update.

Over Christmas I picked up some 1x4's and blackout cloth to make my own projector screen. I had originally wanted to just hang it on the wall in my barn, but with my camper parked in that bay it would have meant pulling the camper out every time I wanted to use the projector. Then a light bulb came on... I'll use the wall to store the screen, and for viewing when the camper isn't stored inside, but with a few coat hooks on the back of the screen I was able to hang it from the hinges of my overhead door!

I couldn't be happier with the results, and now that my projector finally came in I had to try it out. Attached are progress pics, and the end result. Keep in mind that this is a 12'w x 9't screen, and the pics are from my phone, but in person the picture quality looks a lot better, especially considering it's a cheapo Hong Kong projector.

It will mainly be used to watch live supercross on, with the occasional family movie night thrown in, but for around $120 into the screen, and $250 into the projector I'm very pleased.

Now to try and convince the wife that **** on a 168" screen is normal:FIREdevil
 

Attachments

  • Screen Frame 1.jpg
    Screen Frame 1.jpg
    139.4 KB · Views: 23
  • Screen 1.jpg
    Screen 1.jpg
    113.7 KB · Views: 25
  • Projector 1.jpg
    Projector 1.jpg
    111.2 KB · Views: 30
To avoid these ads, REGISTER NOW!
Top Bottom