To avoid these ads, REGISTER NOW!

butcher block assembly table design help

rieferman

Well-known member
Joined
May 18, 2009
Messages
2,586
Location
Collegeville PA (30 min west of Philly)
Hello,
I also posted this in my build thread but wasn't getting any traction over there, so I'm trying again in here.

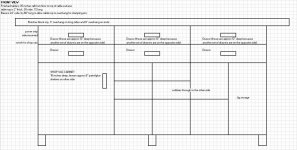
I'm looking for some design opionions as I look to rebuild my existing assembly table.

I have this great maple butcher block top that serves as my workbench top. This is mainly my assembly table for woodworking projects, but also used for general purpose workshoppy stuff. Underneath, I currently have a single shelf and the metal legs that came with this when I picked it up from an old manufacturing plant that was closing down.

Because I need more storage, and would also like some practice building some cabinets and drawers, I thought a fun project would be to replace the base with something shop built.

Besides building some new skills, my goals of the storage are:
- Must be able to clamp things to table top (need a lip all the way around)
- Would like to be able to install a woodworking vice on one end
- Power tool storage, allowing for "quick grab" access
- Frequently used glue and paint/stain/poly storage
- shop vac garage (while I have a dust collector for my stationary tools, some tasks benefit from a shop vac connection)
- lots of shallow drawers for things like squares, paper, calculators, sand paper, knives, tape measures, planes, chisels etc.)


Now, before I go ahead and do a sketchup of this (which is often nearly as time consuming as building it... but is a nice way to "make mistakes virtually" without wasting real material) I wanted to get everyone's opinions on this first rough draft.

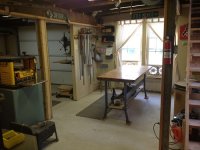
I've also included a "today" picture so you can see the location and envision it.

THANKS!


edit: btw, on the drawings, each square is 1 inch and the drawing is done to proper scale

edit 2: this cabinet will be entirely built from 3/4" plywood
 

Attachments

  • new work bench take 2 front.jpg
    new work bench take 2 front.jpg
    116.3 KB · Views: 67
  • assembly area.JPG
    assembly area.JPG
    72.8 KB · Views: 107
To avoid these ads, REGISTER NOW!

ez-duzit

Well-known member
Joined
Jun 24, 2013
Messages
5,101
Location
Marina del Rey
You're going to miss that big open shelf. And you'll need to provide more overhang for a large woodworking vise (buy that before starting the bench).

One of my benches is 48"x96", with 2 roll-away base cabinets on one side (with wheels removed), and one large open shelf on the other, with room to slide milk crates under the shelf.
 

nutjob

Well-known member
Joined
May 8, 2008
Messages
808
Location
NE, PA
Looks like you want to be able to access drawers and cubbies from both sides?

Not sure how that will work out for you. If on one side and the drawer with a certain needed tool is on the other side, will you be walking around in circles alot?

I understand being able to work all around the project but I would have a "front" and "back" Deeper drawers and storage and having a back fixed panel will add alot of stiffness from racking to the unit.

What type of vise are you looking to add?

Google Woodworking benches images, lots of ideas for vise types, placement and drawers, storage.

Kevin
 
To avoid these ads, REGISTER NOW!
OP
R

rieferman

Well-known member
Joined
May 18, 2009
Messages
2,586
Location
Collegeville PA (30 min west of Philly)
ez wrote:
You're going to miss that big open shelf.


I have other open shelving around the shop, but have found that this open shelf has lots of items that are less than 6" in height, and then a whole bunch of wasted space above that and below that. Although, I do suppose I could do a trial run and add a section of cubbies to what's in place already to test whether I miss the space.


and:
And you'll need to provide more overhang for a large woodworking vise (buy that before starting the bench).

I was planning the wood vice on the end where I have the "jig storage" noted. So I can notch as needed to allow installation of the vice. But good call and thanks for the head's up!


Nut job wrote:
Looks like you want to be able to access drawers and cubbies from both sides?

Not sure how that will work out for you. If on one side and the drawer with a certain needed tool is on the other side, will you be walking around in circles alot?


I thought the same thing initially, and then started thinking through what I'd keep in the drawers. I tend to have planning, building and then finishing as the three major task phases or a project... so as long as all items for a given task phase were located on the same side of the bench, shouldn't be an issue. But the fact that you had the same concern that I had makes me want to think it through even more carefully to be sure I'm on the right track.

edit: and good point about racking force.. I do need to think about how the design will account for that... perhaps a partition separating the cubbies down the middle lengthwise.
 
Last edited:

gm54210

Well-known member
Joined
Jan 21, 2010
Messages
422
Location
Penna Dutch Country
First, consider this the first workbench you are going to build - there are always improvements you will want to make. With that in mind, a few thoughts:

Consider building three cabinet carcasses so you can handle them easily during the build and give you flexibility for future revisions. This uses a bit more material initially, but will negate major rework in the future (like adding a new or different vise etc.) by allowing you to pull just what needs rework versus pulling apart the whole bench.

The typical placement for a woodworking vise is on the right side of the view you provided (for a right hander). There are practical reasons for this placement, but it isn’t a hard or fast rule. Installation here will block both drawers. Consider a center stack of drawers, or at least a cubbie in this area to accommodate the vise

As for the cubbies, in my shop they collect more dust and junk than anything. Plus they always seem to be the wrong size for the tool I want to store there. A thought would be to use pull out trays on drawer slides for the power tools and then put doors on.

Since your drawing shows the cabinet with small feet, consider enclosing this with a toe kick, or raising the height of the feet. You know that little screw will find its way to the middle of the bench when you drop it.

If you are going with full overlay doors, if you haven’t looked into Blum (euro style) hinges, do so. They provide larger opening angles which allow easier access inside the cabinet. They are adjustable after installation, so if you are like me, a half bubble off plumb, they allow some measure of correction after the fact. Plus they are self closing which will prevent shin and knee injuries.
Oh, and for the drawers just below the top, full extension slides, or better, overtravel slides so you can access the back of the drawer. (Remember the 3” overhang.) There are also two-way slides, but they tend to get a bit salty pricewise.

Just food for thought. Looks like a fun project. Great shop space BTW!

The other Wes
 
To avoid these ads, REGISTER NOW!
Top Bottom