To avoid these ads, REGISTER NOW!

Cabinets with wet floor

travisn1

Well-known member
Joined
Oct 22, 2012
Messages
152
Location
Waterloo NY
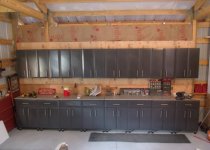
I'm looking to make some base cabinets along the side of my garage. 12" deep at the bottom, 16 or so at the top due to the wall being on top of cement bricks.

My problem is snow melt from sitting on the floor (no drains possible), so there will be standing water for a while till it evaporates.

Will have the garage furnace finished tomorrow so that'll speed up the drying process :rocker:

I'm thinking make a PT 2x4 base then set the plywood cabinet on top of that? It would essentially be my toe kick area so basically wasted space regardless. I'm worried about water that gets under the cabinet not coming back out (due to the ****** floor surface). Perhaps the concrete will **** the water out as it evaporates from the center of the floor? Maybe drill some holes in the boards parallel to the wall or even rip those boards to be a 1/4" shorter to leave a gap along the floor and just have the perpendicular members touch the floor?

I've typically made 2x4 benches but I want practice making cabinets so I figure this would be a good start.

off topic to the main reason for this thread, but I'm wondering how far along in the cabinet build I can get before I need to decide doors vs drawers. Or if I can somehow make a universal box then pick a direction or change once I start using the space more.
 
Last edited:
To avoid these ads, REGISTER NOW!
OP
T

travisn1

Well-known member
Joined
Oct 22, 2012
Messages
152
Location
Waterloo NY
Photos are fun.

Cabinets will become an extension of sorts to the shelf the furnace is on going to the right. Welder cart should fit under the furnace. (I haven't built it yet, the filing cabinet under the window is the beginnings, just need to add casters and a frame to hold the bottle)
 

Attachments

  • IMG_20171228_193223.jpg
    IMG_20171228_193223.jpg
    128.8 KB · Views: 122
Last edited:

MushCreek

Well-known member
Joined
Jan 14, 2015
Messages
9,760
Location
Upstate South Carolina
I would leave them open underneath, with a removable toekick, maybe made of PVC trim so the water doesn't hurt it. This piece could snap into place, and be removed for drying during flood season. Set the boxes on PT 2x4's to get them off of the floor. If it's going to get really wet, for an extended period, water may wick up the PT, though. I would use a good water proof finish all over the cabinets, even the parts that don't show.

I built my kitchen cabinets from scratch, using 3/4" cabinet plywood. They could be used either with doors or drawers, although the only doors I used were under the sink. Drawers are much better for storage, in general. We have 32 drawers in our kitchen! I assembled my cabinets and drawers using Kreg fasteners and glue. I bought iron-on veneer to cap the plywood edges, but that would be overkill in a garage (or would it?) Drawers are a lot of work, but once you get everything set up, they go pretty fast.
 

Shootinok

Well-known member
Joined
Aug 16, 2016
Messages
710
Location
Oklahoma USA
Another option could be to wall hang your cabinets and leave the toe kick area open. You'd get alot of strength from that ledge at the back and you'd have the opportunity to keep the underside swept or blown out clean. And storage for things like floor jacks.
A few feet at the front if needed could be made from steel or pipe.
 

RWorth

Well-known member
Joined
Aug 29, 2016
Messages
592
Location
Cape Cod , Mass.
I make everything that touches concrete PT, and air is your friend. If I was going to make wood cabinets I would just set them on PT 4x4 legs, tall enough to run my push broom under. I have a small push broom that works great under stuff. That will give you your kick and air circulation.
 

matt01073

Well-known member
Joined
Feb 1, 2013
Messages
134
Location
western mass
I dont really have a moisture issue in my shop , but I do have a bench made of lista cabinets and a row of taller vidmar cabinets . I didnt want to take a chance on rust so i sat all of them on rubber roofing material as a barrier you might consider something like that under any base you make . the stuff I used came in a six or eight foot wide roll and was pretty heavy duty , any commercial roofer should have some scraps you can get for cheap or free.
 

lakeroadster

Well-known member
Joined
Jan 19, 2015
Messages
5,166
Location
Central Colorado
My cabinets are wall mounted and have feet in the front. That would address your moisture issues.

You really don't want the cabinets sitting on the floor, even with PT bases, if the floor is wet. You'll have mildew / mold / musty smell issues.
 

Attachments

  • Cabinet Wall Day 4.jpg
    Cabinet Wall Day 4.jpg
    66.5 KB · Views: 124

Voi

Well-known member
Joined
Oct 10, 2010
Messages
5,140
Location
Western South Dakota
I would do a ledger board on the back and those adjustable cabinet feet in the front. There are clips that can then attach an easily removable toe board to the adjustable feet but I think I'd just skip the toe board altogether. Or at least I'd leave it off during wet times. Let things air out and make it easier to put a squeegee or shop vac under the cabinets.
 

ford33

Well-known member
Joined
Feb 26, 2011
Messages
2,118
Location
Chicago, IL. USA
Keep the area under the floor cabinets open to allow you to clean under them with a broom and allows water to evaporate.

I built a series of new base cabinets from 3/4" plywood but without the toe kick area. Essentially they are a kitchen base cabinet design without the toe kick area

Then I built a separate large horizontal frame of regular pine 2x4's that spanned the width of all the cabinets I planned to place on the floor. I elevated the frame above the garage floor the height of a push broom so I could clean under the frame and cabinet assembly. The frame has wood feet made of 2"x4"'s PT located every place a cabinet needs support. The frame is leveled by cutting the feet to the needed height which is about 5 inches. I placed the frame on the floor and then screwed my new base cabinets to the frame and wall.

Prior to building these new cabinets I used a set of old kitchen base cabinets. Upon their removal, I discovered a mouse nest. The mice constructed a nest under the cabinets in the toe kick area. I never knew it was there. The new design prevents critters from hiding under the cabinets and allows you to clean under the cabinets with a broom or water hose.
 

M35A2

Well-known member
Joined
Jun 4, 2014
Messages
833
Location
Coos Bay, Oregon
Been building garage cabinets for years for my customers and I always use Hafele brand leg levelers. They are adjustable and have 3 different lengths of legs so you can account for garage floor slope. They have clips availabe that fasten on the toekicks and clip onto the legs. These levelers will hold a lot of weight and bases come in a press-on (10mm holes) or screw on.
 

Attachments

  • hafele-637_79_301-1.jpg
    hafele-637_79_301-1.jpg
    108.3 KB · Views: 18
To avoid these ads, REGISTER NOW!

CGT80

Well-known member
Joined
Aug 29, 2014
Messages
863
Location
IE, SoCal, USA
Aluminum or stainless are also other good options for hardware, depending on your abilities. If you want it to look finished like it has a toe kick, you could use aluminum perforated sheet as a toe kick. With small enough holes, it will keep even small hardware from rolling under, but it will allow air to circulate. If you installed it with magnets or a clip, like what holds cabinet doors closed, you could easily remove it to clean or dry under. Leave it raw or paint it.

I would not do pressure treated, either if it is expected to be wet quite often. It has been a while since I built cabinets, but some styles would work with either drawers or doors while others may be geared towards one. It will depend on the type of hardware you use and possibly whether the doors are set in flush or set outside of the face frame. Heck, some cabinets don't use face frames. For a garage, the overlapping doors and drawer fronts should do a better job keeping the inside clean.

I would do a google search for images of cabinets and consider what style will work best for you and go from there. You can even find images of the cabinet construction with the right key words. That can be much faster than searching text and forums for ideas.
 

Muckin_Slusher

Well-known member
Joined
Apr 1, 2017
Messages
465
Location
Abitibi
I reused the bottom pieces from hardware stove aisle shelving to keep this filing cabinet off the floor. I really like those plastic levelling feet in the previous post though.

RIMG4437.jpg
 

brownbagg

Well-known member
Joined
Mar 20, 2006
Messages
5,208
i never did do it, but i wish i had a concrete pad under my tool boxes and stuff so I could hose down the slab without the dirty water and trash going under the tool boxes
 
OP
T

travisn1

Well-known member
Joined
Oct 22, 2012
Messages
152
Location
Waterloo NY
Thanks for all the responses, keep em coming

The floor isn't permanently wet, just whatever melts off of the car during the winter. Those feet are a good idea since the floor slopes down away from the house anyways.
 

drewski

Well-known member
Joined
Apr 13, 2008
Messages
419
Location
Mid-Tn
I buy my titus legs and sockets from Woodworker Express. They average less than $2 each and they ship fast. You'll find a wide range of prices on these at some of the other outlets like Rockler and Woodcraft.
 

Joe Reed

Well-known member
Joined
Aug 31, 2005
Messages
916
Location
Cordova TN
Another option could be to wall hang your cabinets and leave the toe kick area open. You'd get alot of strength from that ledge at the back and you'd have the opportunity to keep the underside swept or blown out clean. And storage for things like floor jacks.
A few feet at the front if needed could be made from steel or pipe.

That's what I did, but without any feet on the front.

My garage had a strip of 1x4 wood trim covering the joint between the concrete ledge and the drywall. I sat these boxes on that 1x4 and screwed them to the joists. That put the bottom of the cabinets about 8.5" above the floor....plenty of room to sweep under, but not too high to waste space.

Inside the boxes are (for the most part) plastic drawer units from WalMart ...lightweight and cheap. Some have shelves instad. I made the boxes 18" deep so the drawer units would fit behind the doors. I didn't want to go wider and leave less room for parking...and I wasn't going to use the top for a workbench anyway.

I used sliding doors on these bottom cabinets so I could easily access the stuff inside without banging doors against the car (upper cabinets have normal doors). I left a gap between these so the passenger door on the MG could be opened with no problem - even if I park close to that side (which I normally do so the grandkids don't open the doors on the other car into the side of the MG). I've since partially filled that gap with some narrow shelves to hold more stuff.

Underneath this cabinet I made a little cart to hold scrap lumber. That's also a prefect spot to store stuff like those little harbor freight furniture dollies. It only takes a second to roll that stuff out when I want to sweep under there or blow/hose out the garage.
 

Attachments

  • IMG_6707.jpg
    IMG_6707.jpg
    131.8 KB · Views: 21

kbs2244

Well-known member
Joined
Nov 11, 2006
Messages
14,065
I would go with your original plan.
A toe kick back wall will keep stuff from going under the cabinets.
Winter slush is salt water and will not rot PT wood.
If you are still worried about it, they make rubber base board molding you can put on the face.
 

CraigStu

Well-known member
Joined
May 22, 2014
Messages
4,018
Location
Blacksburg, Va
How tall is that block wall? In my previous garage mine was about 4-5inches off the floor. I used cheap kitchen base cabinets, set them on the block, and screwed them into the wall studs. That got my work bench height just right for me. I made a custom height block at the front corner of each cabinet from a left over piece of 4x4 to help support them and reduce the chance they might rack. That left enough space to get the shop vac under the cabinets to keep the area clean.
 

toolmiser

Well-known member
Joined
Sep 1, 2009
Messages
1,655
Location
La Crosse, WI
How about putting some round screened "vents" in the toekick? You will find them at your home center, you can get a couple sizes of round ones that you cut in with a hole saw, it will keep the "critters" out. With those installed you could caulk around your toe kick to keep the water out, the vents will allow it to evaporate if the water still gets in.
 
OP
T

travisn1

Well-known member
Joined
Oct 22, 2012
Messages
152
Location
Waterloo NY
I would go with your original plan.
A toe kick back wall will keep stuff from going under the cabinets.
Winter slush is salt water and will not rot PT wood.
If you are still worried about it, they make rubber base board molding you can put on the face.

Yea, it's not normally wet, just in one spot where the slush collects. I'm going to get a squegee to get most of it outside, but it will still be wet.

How tall is that block wall? In my previous garage mine was about 4-5inches off the floor. I used cheap kitchen base cabinets, set them on the block, and screwed them into the wall studs. That got my work bench height just right for me. I made a custom height block at the front corner of each cabinet from a left over piece of 4x4 to help support them and reduce the chance they might rack. That left enough space to get the shop vac under the cabinets to keep the area clean.

You can see it in the picture I posted, 2 courses plus a little.

How about putting some round screened "vents" in the toekick? You will find them at your home center, you can get a couple sizes of round ones that you cut in with a hole saw, it will keep the "critters" out. With those installed you could caulk around your toe kick to keep the water out, the vents will allow it to evaporate if the water still gets in.

those vents are a good idea.
 
To avoid these ads, REGISTER NOW!
Top Bottom