To avoid these ads, REGISTER NOW!

Carpentry puzzle

paredown

Well-known member
Joined
Jan 12, 2012
Messages
545
Location
Pomona, NY
Seems a simple thing, but new to me...

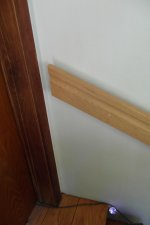
How do I calculate the angles to make a cut on the end of this railing, to have it level with the landing. (Plan is to biscuit join the two pieces together.)

I should be able to figure this out, but I keep walking by this, and have had no good ideas. (Things like this make me miss working with real finish carpenters!)

Points given for a clear procedural description, and tools used to measure!:beer:
 

Attachments

  • SAM_1121.jpg
    SAM_1121.jpg
    40 KB · Views: 283
To avoid these ads, REGISTER NOW!

TTMotorsports

Well-known member
Joined
Jan 8, 2019
Messages
1,107
Location
Lucerne Valley, CA
Use level on the top and angle finder to get the total angle. Divide by 2 and cut end of railing and the piece you are installing to that angle. If you just cut the top piece to total angle the piece will be taller or shorter than the railing.
 

Evilunclegrimace

Well-known member
Joined
Sep 24, 2015
Messages
868
Location
Erie Pa
If you are talking about butting into the wall near the door jamb at the top of the landing strike a plumb line from the joint at the first floor board at the top of the stairs on to the hand rail and cut it . Cut the matching angle on to the horizontal hand rail piece that will **** to the wall. Biscuit them together and you have a finished hand rail
 

wrenchguy

Well-known member
Joined
Sep 22, 2011
Messages
4,698
Location
NW Indiana
The so called landing in the photo? Are u wanting a mitered return at that end? Level or parallel to so called landing? Is that plumb cut plumb? That cut is ur mistake... it should be 45 and the mitered return is 45 with its bottom edge (seat cut) being 90 degrees to the plumb cut shown. Experiment with drops.
 

Moosefire

Well-known member
Joined
Oct 26, 2018
Messages
754
Location
Detroit
Something like this? 27280c064f76b4e6d4edbf009064b45c.jpg

Sent from my SM-N960U using Tapatalk
 

Attachments

  • 27280c064f76b4e6d4edbf009064b45c.jpg
    27280c064f76b4e6d4edbf009064b45c.jpg
    43.4 KB · Views: 1
OP
P

paredown

Well-known member
Joined
Jan 12, 2012
Messages
545
Location
Pomona, NY
Thanks all!

I used to own an adjustable square--it may be stored in a "special" place--now if I can just find it.

To clarify--no return, just a flat section ending about where it ends now. (I thought I could stand looking at it as a single piece--did it in a hurry because MIL was coming, and she need something to hang on to for those two steps.)

I think I am clear about the procedure--thanks for the reminder to split the angle on the two pieces so that the lengths match.
 

manwithtools

ALLIANCE MEMBER
Joined
Aug 24, 2015
Messages
13,968
Location
Lebanon, TN
I strongly recommend one of these vintage Stanley No. 18's - easily found on eBay for less than $25.

4452921_fullsize.jpg
 
To avoid these ads, REGISTER NOW!

WunTon

Well-known member
Joined
Jun 22, 2018
Messages
339
Location
My house in Purcellville VA

johnnyradiant

Well-known member
Joined
Mar 27, 2017
Messages
833
Location
Vancouver, BC
OR you go 6X more for the Starrett CP505A-12 ProSite Combination Protractor. I sometimes feel like I'm going cross eyed trying to read the degrees but I love mine if I have it well lit and by the end of the day with my phone's camera to use as a glorified magnifying glass.
 

Firstram

Well-known member
Joined
May 16, 2017
Messages
1,391
Take 2 rips of wood that are the same width, say 4". Place one on the landing with one end just hanging over the top tread and the other running down the steps resting on the nosings. Pinch them together where they cross, trace the top and bottom of the stair angle onto the landing board. Connect the 2 lines at the top and bottom edges and there's your miter cut.

I trimmed houses for years and lots of cool ways to measure angles but, this is fast, accurate and foolproof.
 

BigSteve63

Well-known member
Joined
Mar 19, 2010
Messages
404
Location
SW Missouri
Level or bevel gauges as mentioned, but it looks like your railing is offset from the wall a bit - would probably use a piece of squared stiff cardboard or thin plywood. **** to the wall and let it run behind the rail; strike a line and you have your cut mark/angle.

Steve
 

HenryAZ

MEMBER EMERITUS
Joined
Sep 18, 2012
Messages
1,054
Location
South Congress AZ
Level or bevel gauges as mentioned, but it looks like your railing is offset from the wall a bit - would probably use a piece of squared stiff cardboard or thin plywood. **** to the wall and let it run behind the rail; strike a line and you have your cut mark/angle.
Or just **** it up to the vertical part, at the angle you want it to be, and then just place a straight edge along the vertical and mark the line on the piece you are cutting.
 

LS6 Tommy

Well-known member
Joined
Dec 27, 2013
Messages
26,162
Location
Northern NJ
Something like this? 27280c064f76b4e6d4edbf009064b45c.jpg

Sent from my SM-N960U using Tapatalk

I have the Tacklife version of that. It's identical except the label. Someone makes them for everybody and sells them with different branding. I got mine on Amazon on a "Daily Deal" for about $7.99. Do a search and just get the least expensive one that looks the same.

Tommy
 

Attachments

  • 27280c064f76b4e6d4edbf009064b45c.jpg
    27280c064f76b4e6d4edbf009064b45c.jpg
    39.1 KB · Views: 1
To avoid these ads, REGISTER NOW!
Top Bottom