To avoid these ads, REGISTER NOW!

Chamfer a hole in wood

Bessy

Well-known member
Joined
Dec 18, 2012
Messages
995
Location
Ontario, Canada
Full disclosure, I'm what I would call a "novice woodworker with 15+ years of experience". I have a fairly well equipped shop, but I apologize in advance if there is a painfully obvious solution to what I am trying to do here. I am working on a few Christmas gifts in the shop and I'm running up against a perplexing issue: How to cleanly chamfer/break the edge of a shallow hole?

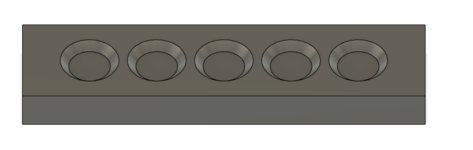
In a piece of pine, I would like to drill five holes in a row, approximately 1-1/2" diameter by 1/4" deep in pine, but with a 1/4" 45-degree chamfer around the edge. I have a router bit that would do the job, were the hole deep enough to account for the bearing at the bottom, however, I am hellbent on not drilling all the way through the wood, or going deeper than the width of the chamfer.

Short of building a circle jig that I would have to set and reset five times, ensuring I'm centered on each hole, is there a simple solution, be it a technique or a tool, that I'm missing here?

Thanks in advance!

B.
 

Attachments

  • Chamfer Sketch.png
    Chamfer Sketch.png
    41.8 KB · Views: 23
To avoid these ads, REGISTER NOW!

Pen & Wrench

Well-known member
Joined
Jan 12, 2015
Messages
660
Location
Huron, SD
If they are inch and a half round holes, I'd set another piece of wood on top of the work piece you want to end up with, fasten them together, by either making the pieces bigger and screw them together, and then cut the finished piece down to the exact size after the chamfering operation, or possibly double face tape them together, then use a v-groove router bit, with a router guide bushing of the correct configuration to make the chamfer. There are other ways, but that would be a pretty easy way to do it. The guide bushing fits in the center of the base plate of the router, and you have to pick the one that matches the relative position the cut needs to be in relation to the circle you drill in the wood guide and the finished piece you want to make. I'm sure others will chime in and expound on this but you can find all sorts of info on youtube for this sort of thing.
Here is a link for one such video:

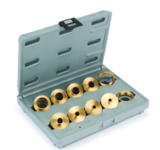
I made myself an overhead pin router for things like that a number of years ago, and it will do what you are wanting to do, or you can buy a Daisy Pin Router" set up and do the same thing with something like that. If you are only doing it once, then I'd go with the second piece of wood as a guide and use a router guide bushing with a v-groove bit.

If you don't want to cut through the piece, then maybe a forestner bit will make a pretty flat bottom without drilling through, or else you might want to make it from 2 pieces, and chamfer a piece all the way through, then glue a thin piece on the bottom to act as the bottom you don't drill through. Again, if you did this, you could oversize it just a bit and trim it to exact proportions after you do the work and glue it up, then trim it on a table saw to the exact dimensions.


V-Groove-Bit.pngGuide-Bushing-Set.png
 

wssix99

Well-known member
Joined
Mar 2, 2011
Messages
5,162
Location
Chicago, IL
Use a "router template guides". See minute 4:09 in this video for the technique you need for your project. (Just use your 45 degree bit.)
 

Boogerman

Well-known member
Joined
Jan 28, 2021
Messages
833
Location
aspen cove hill
Top bearing on a 45 degree grooving router bit, using a hole drilled in a board or a metal plate on top as a template:

20221103-214706.jpg
 

mhejl

Well-known member
Joined
Aug 7, 2015
Messages
328
Location
DFW Texas
Can you use something denser than pine like white oak? Pine is the killer - it'll tear out very easily, especially with the holes that close together.

A single-flute or "single ended" (with a hole drilled diagonally) from Keo or M.A. Ford are the cleanest but I'd suspect they'll tear out in pine. Multi-flute will be a disaster. Expensive for the 1.5" or larger.

Otherwise, search for "mini piloted chamfer bit", but roundovers are more common:


Maybe even a 1/8 shank dremel size?
 

LeonardY

Well-known member
Joined
Apr 16, 2011
Messages
5,083
Location
Southern California
How to cleanly chamfer/break the edge of a shallow hole?
What you're trying to do is a round pocket with a beveled edge. If you want a true flat bottom, then you need to make a template and route the pocket out. If you don't care that there is a center point, a forstner bit would be the way to go. That should be done on a drill press.
You could use a spade bit but the likelihood of tear out goes way up. Also the center hole is deep.
The chamfer or beveled edge is problematic. Pilot and bearing bits are the typical way to do this. But since your pocket is so shallow there is nothing for the bit to ride against.
There are bowl and tray bits. That you could use.
The spacing appears to be too close for a ganged template. The solution is to make a template that has pins and that can be registered to holes.

I don't know if you have the tools to accomplish this but it sounds that you might.

If I was doing it with basic woodworking tools.
I would re-saw the pine to the thickness I wanted for the depth.
Make a template with 1.5" holes.
Attach pine with double stick tape.
Drill a hole to fit the router bit
Route the holes with the chamfer pilot bit.
Glue the pine pieces back together.

Hope this helps.
 
Last edited:

Renegade1LI

Well-known member
Joined
Mar 11, 2018
Messages
4,984
Location
long island ny
If you have a lathe or drill press you could turn the profile on a block of poplar and glue some 80 grit to it. I would mount in drill press and sand out the chamfer. Should be easy enough to do in pine.
 

CraigStu

Well-known member
Joined
May 22, 2014
Messages
4,044
Location
Blacksburg, Va
If you have a lathe or drill press you could turn the profile on a block of poplar and glue some 80 grit to it. I would mount in drill press and sand out the chamfer. Should be easy enough to do in pine.
Thanks Renegade, that is what I was thinking but hadn't typed.
 
To avoid these ads, REGISTER NOW!
OP
B

Bessy

Well-known member
Joined
Dec 18, 2012
Messages
995
Location
Ontario, Canada
Update,

I grabbed a set of larger forstner bits and just gave up on the chamfer in the interests of getting sh*t done. Bottom line is that it came down to "is it a detail that is $60+ worth of "noticeable"?" And I figured the answer is no.
 

fartymarty

Well-known member
Joined
Nov 9, 2012
Messages
1,348
Location
Fort Worth
I like the foam cone sanding idea for cheap and effective. Before reading that, the first thing that popped into my head was using a large (obviously larger than 1.5") step drill and just lightly touch the edge with whatever the next step over 1.5" is on the drill...probably 1.625".
But yes, doubtful that the detail is worth $60.
 

Innovate1

Well-known member
Joined
Jul 28, 2014
Messages
4,291
Location
Illinois near St. Louis, Missouri
Pine is going to be difficult to get a good surface, at least that's my experience. I tried to do some rosette blocks with pine and ended up going to maple. It was a more complex shape done on a CNC with 15k RPM spindle. Higher speed would probably help.
 
OP
B

Bessy

Well-known member
Joined
Dec 18, 2012
Messages
995
Location
Ontario, Canada
Semi finishes product: still need to stain, but I wanted my sister to choose the stain color. Hope to finish up this week, if I can find the top of my workbench! 16733856970977738252547761853477.jpg
 
OP
B

Bessy

Well-known member
Joined
Dec 18, 2012
Messages
995
Location
Ontario, Canada
This is GJ...

The proper answer is that I'd make the design in CAD and then use my CNC to cut and chamfer the holes.
Wanna send me that CNC machine?! Just kidding, I'm up to my eyeballs in wood right now. I need to get it all up on the walls before I buy more tools that take up floor space!
 

PassnThru

Well-known member
Joined
Jan 5, 2010
Messages
6,512
Location
Bowling Green KY
I know it's done - but looking at the picture I probably would have done it in stages. Take a 1 by and drill the holes all the way through. Use a router to chamfer the holes - easily done since you have room for the bearing - then run it through the table saw to the thickness you want for the hole depth. Then run another piece through for the combined thickness and then glue them together - cut to final size and ease the edges.
 
To avoid these ads, REGISTER NOW!
Top Bottom