To avoid these ads, REGISTER NOW!

Cheapest/easiest storage flooing for Shelterlogic

wannabridin

Well-known member
Joined
May 17, 2011
Messages
140
Hello all,

I recently acquired a free 6x10 Shelterlogic garage-in-a-box shed that I'm going to use to store 2-3 project motorcycles. Since I got it for free, I'll also be incorporating a billboard vinyl cover to go over the stock tarp, mostly to keep the UV from degrading it at all.

The thing I'm struggling with the most, is what should I do for the floor?? My minimums will include a vapor barrier, tamping/compaction and leveling.

The options are limitless though: tilled in cement w/ the dirt, plywood, wood frame w/ ply, gravel, straight dirt, all pavers, pavers here and there for the tires/kickstands, etc etc!

I was hoping for some insight on a good/cheap way to get a usable flooring to store bikes on w/o tipping over. We will more than likely be out of the house in 2 years or less, so I really don't want to spend a lot on this, and I'll be taking it with me when we move. Thank you!!!
 
To avoid these ads, REGISTER NOW!

Justind97

Well-known member
Joined
Oct 6, 2014
Messages
691
Location
Ottawa, Canada
2 methods.

Vapour barrier, then Plywood.

Or large patio stones. If it stays fairly dry in the area it’s in, I wouldn’t worry about the vapour with the patio stones
 
OP
W

wannabridin

Well-known member
Joined
May 17, 2011
Messages
140
do you have access to free pallets?

Some of my co-workers JUST (not 2 minutes ago) recommended pallets unanimously. I believe I could scrounged up some from work here!

They said, level it, vapor barrier, then pallets right on top. Plywood for a base, screwed onto top of pallets. Boom, quick and easy floor.

Promotes airflow, cheap, easy and doesn't impact vertical height much at all...
 

Buckgnarly

Well-known member
Joined
Oct 8, 2010
Messages
7,654
Location
VT
I just threw plywood over the gravel that was there. Also have vents kits, never had a moisture problem.
 

Stuart in MN

Well-known member
Joined
Sep 8, 2005
Messages
23,152
Location
Minneapolis
Some of my co-workers JUST (not 2 minutes ago) recommended pallets unanimously. I believe I could scrounged up some from work here!

They said, level it, vapor barrier, then pallets right on top. Plywood for a base, screwed onto top of pallets. Boom, quick and easy floor.

Promotes airflow, cheap, easy and doesn't impact vertical height much at all...


I like this idea, since it will keep the plywood up off the ground. The airflow should help keep the interior of the shelter dry as well. On the other hand, the space underneath the plywood may be a nice home for mice or other critters...
 

kelpaso1

MEMBER EMERITUS
Joined
Sep 28, 2009
Messages
3,962
Location
New Brunswick
I have a 12X20 in my yard. I put landscape fabric over the grass and then 1" of crushed rock. Then along the sides and back end I put pallets. In the center I have room for the ride on mower, push mower, and snow blower. Never had a problem with moisture or rust and it's pretty humid here.
 
To avoid these ads, REGISTER NOW!
OP
W

wannabridin

Well-known member
Joined
May 17, 2011
Messages
140
Excellent idea! We do have an issue with weather extremes (right in the middle of DFW, TX), so I think the fabric/vapor barrier is a must, as I want minimum moisture inside.

I have a pile of pressure/heat treated pallets (for international shipments) at work that nobody will miss, so I'll likely just drag 3-4 of those home!


I don't think the critters will be too big of a problem. I've a 8-10" gap under my wooden shed on the side of my house (supported w/ cinder blocks), without any chicken-wire or similar around the perimeter and my only problem is leaf buildup, which isn't a big deal.

Pallets it is guys, thanks!!!! I knew I would get the right answer here!!


Now the next question is: what ventilation is recommended for you shelterlogic owners?? I've seen their "automatic" vents, but they're pricey and have mixed reviews. I figured if I could get a normal side vent, I should be fine??? Just glue/rivet it into the tarp and call it a day???
 

kelpaso1

MEMBER EMERITUS
Joined
Sep 28, 2009
Messages
3,962
Location
New Brunswick
In the spring, summer, and fall I just leave the front flap open and only close it if there is a rain storm coming through.
 
OP
W

wannabridin

Well-known member
Joined
May 17, 2011
Messages
140
That's a good idea, now if I could only be cognizant of the weather to remember to do that...
 
OP
W

wannabridin

Well-known member
Joined
May 17, 2011
Messages
140
So I'm too forgetful to go do that, so I'd like a more idiot-proof solution. I'm thinking that a simple louvered vent at the eves front and back would suffice, especially with some kind of mesh in between. Use some silicone (or similar) sealant on each side w/ pop rivets, folding back the flaps used to cut it out and call it day!
 
OP
W

wannabridin

Well-known member
Joined
May 17, 2011
Messages
140
Finished "grinding" the tree stumps (ended up using my chainsaw to get them below ground level) that were in the way, so next up is to clean up the area and start leveling the ground to prepare for the subgrade prep (gravel, vapor barrier, etc.) and then throw some pavers under the frame mounts to make sure it's sturdy and won't sink.

Well, going to use gravel/rock under some pallets. Throw some ply on top (treated with something, dunno yet) to lock it all together and call it a day. I picked up some "side vents" intended for a trailer or RV and will be using those at the eves on each end for ventilation. They're 8" square, so I figure I'll simply cut the hole, fold it back, then rivet/bolt it to the canvas with some sealant around the flange.
 

Clirry

Member
Joined
Mar 31, 2014
Messages
20
I was thinking about going this route with my shelterlogic as well and any updates and pictures?

Cheers
 
OP
W

wannabridin

Well-known member
Joined
May 17, 2011
Messages
140
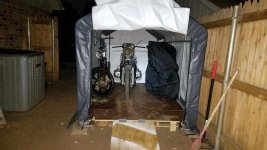
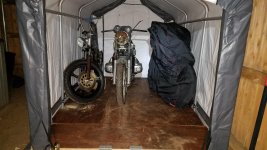
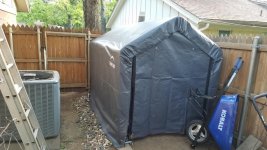
I ended up using pallets from work and some 5/8 plywood. I learned something important with this shed: when building a Shelterlogic and using a floor, build said floor first, put in place, then build shed around the floor.

Trying to line up and square the shed was a bit difficult, especially pole to pole. It's certainly perfectly functional, but my craftsmanship on the entire thing is right on the edge of acceptable for me.

I do not have the rocks pictured on the side, and I've also added a billboard vinyl tarp as a cover to help prevent UV and debris damage.

I still have to cut into the "doors" and add the passive vents I have, in hopes of minimizing/eliminating condensation and moisture in there.
 

Attachments

  • 20180417_075955.jpg
    20180417_075955.jpg
    152.1 KB · Views: 41
  • 20180428_103302.jpg
    20180428_103302.jpg
    96.3 KB · Views: 44
  • 20180429_213023.jpg
    20180429_213023.jpg
    149.1 KB · Views: 42
  • 20180429_213031.jpg
    20180429_213031.jpg
    150.3 KB · Views: 40
To avoid these ads, REGISTER NOW!
Top Bottom