To avoid these ads, REGISTER NOW!

Chevy 3100 Build Thread

yaidunno

Well-known member
Joined
Feb 10, 2011
Messages
1,336
Location
WI
Day 1: Went and picked up the new project. This is my first shot at a full restoration, or resto mod rather, so please bare with me.


It didn't take too long to get things apart.


A naked frame went to the sand blasters.


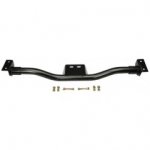
Time to start the fab work on the frame. Cross member goes in.


Frame gets fully boxed for added rigidity.


New rear arches were made and welded in, fish plates inside the rails.


Some goodies came in the mail.


I made up a Ford 9" housing. Its being straightened here.


Triangulated 4 link completes the rear.


Engine tear down. 6.0L LQ9.


T-56 disassembled and cleaned. Might paint it, not sure yet.


Gas tank bought and fitted.


Engine goes back together with a bump in compression and hotter cam. Choose paint color for the truck and fancy up the engine.


Block motor mounts.


Chassis motor mounts.


Transmission cross member.


Some axles and rear brakes go on.


It now rolls again!


Hung some sheet metal to get an idea of how its going to sit.


And thats where im at now. Any comments or criticism is welcome!
 
To avoid these ads, REGISTER NOW!

stinkity stoink

Well-known member
Joined
Apr 8, 2007
Messages
729
Location
New Jersey
It looks great! I love these trucks and have one also that's a daily driver.
Looking at you're work I am sure I just don't see it ,but it looks like the ****** cross member does not come out. If so how is the ****** removed if you have to get it out.
Nice truck and work!!
 
OP
Y

yaidunno

Well-known member
Joined
Feb 10, 2011
Messages
1,336
Location
WI
It looks great! I love these trucks and have one also that's a daily driver.
Looking at you're work I am sure I just don't see it ,but it looks like the ****** cross member does not come out. If so how is the ****** removed if you have to get it out.
Nice truck and work!!

Thanks much. The ****** mount is permanent. If the trans needs to come out, it'll be an all day project. Engine would need to shuffle forward 5-6 inches and then it'd go out the bottom. The way i see it, the ****** problems would likely be expensive, there fore it would be out of commission for a while. The extra day and slight head ache really doesn't bother me. (I say that now, but hopefully the day never comes :eyecrazy: )
 

Imwalkin

Well-known member
Joined
Apr 3, 2006
Messages
135
Looks good. What the deal with the red dodge? Build tread? Looks interesting.
 

garboui

Well-known member
Joined
Jun 30, 2011
Messages
999
Location
Southern Ontario
Sweet man.

Not to hijack or get OT but in the pic where you are straightening the rear end how are you measuring for straightness. Not nit picking or criticizing, just genuinely curious and would like the knowledge.
 
OP
Y

yaidunno

Well-known member
Joined
Feb 10, 2011
Messages
1,336
Location
WI
Imwalkin, the red car is actually a 53 Plymouth. Its my fathers, so i don't have many photos of it, sorry.

garboui, inside the axle housing is a piece of 4141 solid rod about 1 1/2" that is supported by the carrier bearings (actually bushings for this operation). The outter bearing flanges have bearings in them and the tubes are straightened until the flanges fit into the tubes. The jack is moved left or right to get the bending force in the desired location. If memory serves me correctly, the tubes were within 1/8"-3/16" off so straightening them was fairly easy. After the flanges are welded, i re checked it by making sure the rod went through all 4 bearings/bushings. Thanks for asking!
 

G-force

Well-known member
Joined
Jul 2, 2006
Messages
739
Location
Oregon
steller work! Are you going to refinish the sheet metal or leave as is?

While the frame is bare, if it were me I would go ahead and make that trans member removable. It will never be easier than right now. You never know why you might have to drop a trans...or where.
 

NHBandit

Well-known member
Joined
Jan 11, 2012
Messages
2,757
Location
East Tennessee
Cool project. I'm doing a 56 3200 series myself. I do agree with making the trans crossmember removable though. There is no logical reason not to and at some point you'll need to change the clutch at the very least. In my 56 truck I'm using a tubular crossmember from CPP and I think it was only around $50 including shipping.
 

Attachments

  • cpp-tubular-trans-crossmember.jpg
    cpp-tubular-trans-crossmember.jpg
    5 KB · Views: 44
OP
Y

yaidunno

Well-known member
Joined
Feb 10, 2011
Messages
1,336
Location
WI
NHBandit, you bring up a valid point with the clutch service. I will cut up some flanges and make the center section drop out of the cross member.

G-force, the sheet metal will be getting fully refinished. The floor and firewall on the cab will be the biggest projects as far as that's concerned.

Robert, thanks much for the compliment. Means a lot coming from an accomplished metalworker such as yourself!
 

zkling

Well-known member
Joined
Jan 23, 2007
Messages
16,939
Well it ain't no Ferrari, but it will do. ;) What color did you decide on? I like your little hydraulic press. That looks handy. Great work as usual. :beer:
 

Lhorn

Well-known member
Joined
Sep 17, 2008
Messages
1,487
Wow, that looks fanstastic. Motors is real pretty and that finished chassis looks like it came from Art Morrison compared with what you started with.
 
OP
Y

yaidunno

Well-known member
Joined
Feb 10, 2011
Messages
1,336
Location
WI
Thanks much guys!

zkling, the color for the truck will be the same as what i painted the engine.

Purdue, thats a great looking project you've got going there! Love the white walls!
 

theknurl

Banned
Joined
Dec 18, 2010
Messages
921
Location
SoCal
yaidunno;
do it like NHBandit said, its $50 and a few holes....
making a dropout center weakens the mount....having a 1 piece bolted to the rails is strong.....

:beer:
 
OP
Y

yaidunno

Well-known member
Joined
Feb 10, 2011
Messages
1,336
Location
WI
yaidunno;
do it like NHBandit said, its $50 and a few holes....
making a dropout center weakens the mount....having a 1 piece bolted to the rails is strong.....

:beer:

Call me stubborn, but i think i'm going to pursue the flange design. I plan on using 6 socket head cap screws to secure each set of flanges. 1-3/4" holes are already through the inner and outer frame rails and its welded and gusseted in place. The bolt on units are simply to hold up the weight of the transmission. My application requires the cross member to be a structural piece in the frame. I would be willing to bet that even with the flanges, the 1-3/4" by 3/16" wall DOM i've used will be more rigid then the bolt on piece.

I do appreciate the comment though :beer:
 
To avoid these ads, REGISTER NOW!

theknurl

Banned
Joined
Dec 18, 2010
Messages
921
Location
SoCal
yaidunno;
the transmission mount deals with torque......thats why the rubber tears......its not just supporting weight

a 1 piece bolt in gives you a longer torque arm than the engine mounts do....bet your engine mounts don't last as long;)
 

RivennHewn

Well-known member
Joined
Jun 4, 2011
Messages
10,356
Location
PNW
I have a '51 Chevy PU.

Most days I look at it and think my purpose in life is to store it until someone like you comes along and buys it.

Don't know when I'll ever get the time/space/money to do it right, but it was my grandad's and I ain't letting go.
 

DEEDDUDE

Well-known member
Joined
Jan 9, 2012
Messages
161
Location
Beach City, Texas
The truck looks perfect. I've been looking for one of these for a while. :rocker:

I'm doing something similar with a 54 Bel Air; installing a LS-1, 4L60E, MII and ford 9". Got it running and driving, but torn down now for body work.

Keep up the good work.
 
OP
Y

yaidunno

Well-known member
Joined
Feb 10, 2011
Messages
1,336
Location
WI
yaidunno;
the transmission mount deals with torque......thats why the rubber tears......its not just supporting weight

a 1 piece bolt in gives you a longer torque arm than the engine mounts do....bet your engine mounts don't last as long;)

The "arm" to resist twist would be measured from the axis of rotation to the frame rail. I dont see why you think the bolt on unit would be any longer then the tube i've made? My apologies for not recognizing the trans mount also dealing with torque, as it certainly does encounter a percentage of the delivered torque.

Rivenn, its never to late to get started!

KCarGuy, thanks much.

Deeddude, that sounds like a nice ride! Hopefully its back on the road soon.
 
OP
Y

yaidunno

Well-known member
Joined
Feb 10, 2011
Messages
1,336
Location
WI
No progress to speak of. I bought a place on 9 acres out in the country late this summer, so im using all the remaining fair weather days to get things done outside and around the house. The truck really isnt in the budget at this point either.
 

BuickFarmer

Well-known member
Joined
Apr 5, 2006
Messages
1,415
Location
Athens, Georgia
Awesome work you're doing !!! Hope you can get back on it soon! I have three 54 Buicks torn down at the time though so can relate
 
Last edited:

Scott r c

Well-known member
Joined
May 28, 2013
Messages
1,056
No progress to speak of. I bought a place on 9 acres out in the country late this summer, so im using all the remaining fair weather days to get things done outside and around the house. The truck really isnt in the budget at this point either.

How much power do you expect out of the lq9? 450-500?
 

BBChevro

Well-known member
Joined
Jan 24, 2014
Messages
2,235
Location
Brisbane, Qld., Australia
Very nice work, I've got projects that I started 10 years ago and haven't returned to. :lol:
(Life has a habit of getting in the way of projects sometimes).

I've subscribed so I don't miss any updates - I love these old trucks. :thumbup:
 
OP
Y

yaidunno

Well-known member
Joined
Feb 10, 2011
Messages
1,336
Location
WI
Thanks for the kind words guys.

Scott r c: Yep, thats what im shooting for at the crank. Should be enough to get it down the road.
 

sqznby

Well-known member
Joined
Oct 26, 2013
Messages
980
Location
Coastal NC
Truck looks awesome.
With that motor and trans combo, that sure is going to a fun truck to boot around in.
Great job, lookin forward to your updates and conrgats on your new house
 

Man Cave

Well-known member
Joined
Oct 29, 2009
Messages
94
Location
southern Indiana
Awesome project. I doing basically the same thing to a '41 International. Going with the standard 350/350 combo but one of these days I would like to build an LS series engine. Thanks for the pics.
 

SSleeper

New member
Joined
Mar 14, 2011
Messages
3
what are the details on the valve covers/adapters? any more pics of those? I've been thinking of doing some type of coil cover or sbc cover on mine. thanks!
 

HMCFab9

Well-known member
Joined
Jan 22, 2013
Messages
1,317
Location
Fox valley area, Wisconsin
Cool truck! I'm looking forward to seeing it when it's done. Nice color choice too.
I think I've seen the red car at a couple shows nearby. That's the one with Dakota parts under it, right?
 
OP
Y

yaidunno

Well-known member
Joined
Feb 10, 2011
Messages
1,336
Location
WI
what are the details on the valve covers/adapters? any more pics of those? I've been thinking of doing some type of coil cover or sbc cover on mine. thanks!

Unfortunately I don't have much in the way for photos. I simply took a piece of 3/4 x 1/8 bar stock and ran it across the LS valve cover in line with the holes on the '50s covers. Holes were drilled and tapped into the LS covers and then the fasteners were sealed.

Cool truck! I'm looking forward to seeing it when it's done. Nice color choice too.
I think I've seen the red car at a couple shows nearby. That's the one with Dakota parts under it, right?

Good to see a local on here. Yep, the red car is my dads. And you are correct with the Dakota parts.
 
To avoid these ads, REGISTER NOW!
Top Bottom