To avoid these ads, REGISTER NOW!

Chimney install for a vintage Malm fireplace

kyrbz

Well-known member
Joined
Jan 30, 2012
Messages
1,376
Location
midwest US
Awhile back I was thrilled to find a vintage Malm fireplace in a thrift store for $79. You can still buy them new for $3,700. It's in good shape, no dents with the screen. I need to clean it up and give it a repaint, but it should look great after a little TLC. It's the perfect fireplace for a mid century modern/brutalist renovation I'm working on.
malm.jpg


When I was framing the roof of where this fireplace is going, I hadn't really decided on the exact placement of the fireplace, but figured I would be able to go between the joist with the chimney. Around the time when the metal roof was getting ready to be done, I needed to make a decision of the chimney/fireplace placement. Naturally where it needed to be was right dead center on a roof joist.
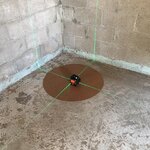
laser1.JPG

laser2.JPG

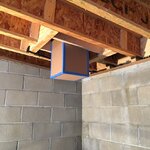
Time to do a little surgery on the roof joist. I extracted the section of joist mostly with a multi tool and a straight edge jig I made to get a clean straight cut. While I was removing and boxing in the chimney area I used a 2x with clamps to support the joist I was working on.
cut.JPG

box.jpg

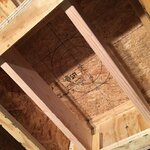
Next I took 2x6's and attached plywood flanges on each end. They rest on the flange of the I-joist and are what will support the chimney box. They give me the ability to adjust from the left to right.
support.JPG

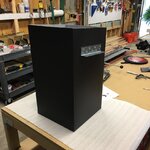
A cardboard mock-up of the outer chimney box. The 2x's on the side of the cardboard mock-up represent the angle bracket that are attached to the sides of the real chimney box. The angle brackets attached to the chimney box sit on top of the 2x6's and allow adjustment forward and back. The flanged 2x6's and the angle brackets combined allow me full adjustment last and right, forward and back. Maybe not real evident in pic, but the top of the SS chimney box was cut to match the angle of the roof pitch.
box1.JPG

box2.JPG

box3.JPG

More coming...........
 
To avoid these ads, REGISTER NOW!

MadeByMiller

Well-known member
Joined
Dec 29, 2018
Messages
1,230
Location
Rapid City, SD
Fantastic, very well done and great score on the OG Malm! I really enjoy all of your posts. I encourage you to make a shop thread in the Garage Gallery sub forum if you would be comfortable with that. I think our interests and tastes have quite a bit of overlap.
 
OP
K

kyrbz

Well-known member
Joined
Jan 30, 2012
Messages
1,376
Location
midwest US
Fantastic, very well done and great score on the OG Malm! I really enjoy all of your posts. I encourage you to make a shop thread in the Garage Gallery sub forum if you would be comfortable with that. I think our interests and tastes have quite a bit of overlap.
I keep thinking I'll start a thread about the property I'm renovating, but I always feel like I want to be a little further along with the project before I start it.
 
OP
K

kyrbz

Well-known member
Joined
Jan 30, 2012
Messages
1,376
Location
midwest US
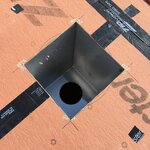
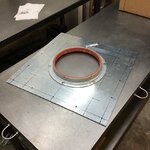
The next step was dropping the double wall SS pipe in the ceiling support box. The place I bought the chimney parts from sells a ring with cables to stabilize the chimney pipe on the exterior of the roof but I really didn't like that system. I bought a galvanized flange and some hi temp silicone tape from McMaster Carr. I riveted the silicone to the inside of the flange and attached the flange to a square piece of sheet metal. Once the chimney pipe was positioned correctly, I screwed this contraption to the roof resulting in a very rigid chimney. After this was done, the roofer was able to finish doing his thing.

flange.JPG

flange2.JPG

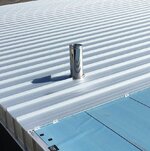
This pic doesn't show there was one more silicone flashing that slid over the chimney pipe and fastened down to the metal roof and then the storm collar over it which is shown in the next pic.
flange3.JPG

chimney.JPG

chimin.jpeg

The chimney is ready for the Malm fireplace, unfortunately there's still tons of work to do on other things before the fireplace is installed. I'll post a pic in the future when the fireplace install goes down.
 
Last edited:

PCustoms

Well-known member
Joined
Jul 23, 2011
Messages
23,684
Location
VT
Looks good, but dumb question.

Why did you just jog the flue over or move the fireplace to avoid all the joist work?
 
OP
K

kyrbz

Well-known member
Joined
Jan 30, 2012
Messages
1,376
Location
midwest US
Looks good, but dumb question.

Why did you just jog the flue over or move the fireplace to avoid all the joist work?
I wanted the fireplace in a specific location. It's in a corner and I wanted it equal distance from each wall. My OCDness doesn't allow for a jog in the chimney pipe. That would drive me crazy. The joist work really wasn't a big deal, maybe 1/2 a day to cut out that section and box it in.
 
To avoid these ads, REGISTER NOW!

MadeByMiller

Well-known member
Joined
Dec 29, 2018
Messages
1,230
Location
Rapid City, SD
I keep thinking I'll start a thread about the property I'm renovating, but I always feel like I want to be a little further along with the project before I start it.
There's no time like the present! I really enjoy updating my thread over there. I've said it before, but it's like a digital diary for me. A place that captures a moment in time that I can refer back to. I'm sure you have a large backlog of post worthy items that we would all love to see!

On topic: great execution with the flange and chimney.
 

tarbellb

Well-known member
Joined
Apr 17, 2011
Messages
5,831
Location
Oregon
Why did you decide to transition from round pipe to square, then back? Ease of mount or something else?
 
OP
K

kyrbz

Well-known member
Joined
Jan 30, 2012
Messages
1,376
Location
midwest US
Why did you decide to transition from round pipe to square, then back? Ease of mount or something else?
It's a system that meets code for passing a chimney through a combustable (wood) roof. Inside the house exiting the stove you usually have single wall stove pipe but before it goes through the roof it has to transition to a double wall stainless steel stove pipe. The double wall stainless pipe additionally has to be protected from anything coming in contact with it. The square black stainless box has two functions, it supports the double wall stainless pipe and it also protects anything from coming in contact with it in the roof cavity.
 

pancho400cid

Well-known member
Joined
Sep 26, 2014
Messages
4,550
Location
Austin, TX
Looks great! Any updates? I'm kinda interested in a Malm fireplace for our mid-century house. Googled it and of course wound up back at GJ.
 
OP
K

kyrbz

Well-known member
Joined
Jan 30, 2012
Messages
1,376
Location
midwest US
Looks great! Any updates? I'm kinda interested in a Malm fireplace for our mid-century house. Googled it and of course wound up back at GJ.
Unfortunately no. I’m currently in permit hell with the city on that project. I had some family issues that pulled me away from the project for a bit. When I resumed, I found out my permit had expired and trying to get it reactivated has been a nightmare. The city recently adopted new much stricter building codes and would not reactivate my original permit. I’ve had to resubmit new drawings conforming to the new building codes, hire a mechanical engineer which I got by without first time, have a new survey done, and am probably going to be fined for some work that was done while the permit was expired. I’m almost a year into trying to get the permit renewed. The adoption of the latest building codes has been a fiasco in my city. I personally know of several people/businesses that it’s taken over a year to get permits and others who simply gave up because of all the expenses and obstacles the city throws at you. On the positive side, after spending 15k re-hiring an architect, structural engineer, mechanical engineer, and survey company, I think my new permit should be issued any day now as I just received a bill from the city for the permit. Oh I forgot to mention that the city told me that I couldn’t do any work that requires a permit myself on a commercial property and that only a licensed GC registered with the city could perform permitted work on a commercial property. Since I’m doing a lot of the work myself I took the commercial GC test and got registered and insured with the city so I can work on my own property.
 
Last edited:
OP
K

kyrbz

Well-known member
Joined
Jan 30, 2012
Messages
1,376
Location
midwest US
Most of the new building codes are related to energy efficiency. I originally had 4" of closed cell foam sprayed on the ceiling which met the original permit codes. With the new codes, I'm having to add an additional 8" of mineral wool to get me to the required R-value. In these pics I've just done a small area around the flue box to demonstrate to the building inspector how I'll be adding the insulation. I need to wait on the new permit and the building inspector giving me the thumbs up to proceed.

IMG_7434.jpeg

IMG_7432.jpeg
 
Last edited:

Beerhippie

Well-known member
Joined
Oct 13, 2023
Messages
10,686
Location
Far NE Oregon
chimney-jpg.1994648


Every roof penetration I've installed on standing-seam has hit right on one of the seams just like that. I guess it's better than falling right between the seams where it would form a dam.
 

zak77

Well-known member
Joined
Sep 18, 2014
Messages
1,363
Location
Monson, MA
You may want to think about venting that metal box that sits between the rafters since it will get HOT in there. I'm assuming the chimney system you're using is a class A with 2" clearance to combustibles? Although your good per code, i'd prefer to vent the box. My woodstove sits in the basement and goes through the first floor, then attic and out. I built a chase in a closet for the flue boxed in with drywall then built another chase in the attic. Both chases got pretty hot unvented so i put vents in both. The chase on the first floor helps pull some heat out and into the living area and the chase in the attic is vented low with other vents built into the storm collar so that warm air gets vented to the exterior.
 
To avoid these ads, REGISTER NOW!
Top Bottom