To avoid these ads, REGISTER NOW!

chimney repair

05wrangler

Well-known member
Joined
Dec 21, 2011
Messages
117
Location
West of Indianapolis
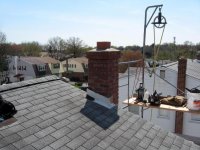
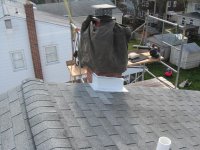
sense my garage is attached to my house I figured this would apply to the forum:beer:. So the chimney on my house has a bad cement cap on it. has a few cracks and bad spots. So I am going to chip it off and form and poor a new one. but I have a few questions.

-what material do I use and what mix ratio? (someone told me pure Portland cement and another said Portland, masonry type N and sand? not sure of the amounts)

-where can I get and what kind of foam should I to used to isolate the chimney liners from direct contact with the cement cap?

I will post picture of the cap once I get up there. Thanks for any input!!
 
To avoid these ads, REGISTER NOW!

Hilltopmasonry

Well-known member
Joined
Oct 12, 2015
Messages
2,167
A pic would help but you have 2 choices, you could fit a prefab cap on if it would fit or you can make a form and mix concrete and pour a custom fit cap.

I would only use concrete not mortar. Get a couple bags of premix just add water type.

I am actually doing one tomorrow and will try to have my guys take some pictures. They are forming it and pouring concrete
 

NUTTSGT

Super Moderator
Staff member
Joined
Sep 14, 2009
Messages
50,891
Location
Northern Central Ohio
I bought a prefab like Hilltop mentions for my chimney. It was worth the money as to not having to forming up on top of the roof/chimney. Luckily, all I needed was a small cap to sit on top of the 16x16 chimney block.

I suggest you make a stop by your local masonry supply or brick supply house.
 

Git

Well-known member
Joined
May 18, 2008
Messages
6,894
Location
S Cal

Attachments

  • Kerney chimney 052a.jpg
    Kerney chimney 052a.jpg
    146.2 KB · Views: 105
  • Kerney chimney 046a.jpg
    Kerney chimney 046a.jpg
    147 KB · Views: 99
  • Kerney chimney 073a.jpg
    Kerney chimney 073a.jpg
    147.5 KB · Views: 99
Last edited:
OP
0

05wrangler

Well-known member
Joined
Dec 21, 2011
Messages
117
Location
West of Indianapolis
Thanks for the feedback go far guys! My phone is not letting me upload the pictures right now. But I think I'm going to pour new one over getting a custom cap. My current one goes from about 2 inches and tapers to nothing just shy of the edge of the stone. I think it should be a little thicker on the edge than what they had done.

So if I get some Portland cement, sand, and type N masonry cement would that be an appropriate mix?

And about the foam, I was told to use a thin foam wrap to isolate direct contact with the clay flu? I don't see how that works.

Will try again tomorrow for the pics
 
Last edited:

The Wart

Member
Joined
May 18, 2015
Messages
13
Location
Maryland
Google "How to construct a chimney crown" by Carolyn Schierhorn. Excellent article with accurate information.
 

Ironhorse74

MEMBER EMERITUS
Joined
Nov 10, 2014
Messages
998
Location
The Pacific North Wet
What you are talking about is the crown. The crown has two jobs. To keep moisture out of the chase and to keep rain from running down the brick. That is why the crown in Nuttsgt's picture has an overhang. Back when I was doing a lot of crown replacements, I would chisel off a half brick width of the old crown. Wrap cardboard around the flu tile. Form my overhang with two bys. Mix small gravel, portland cement and fiber reinforcement. Carry it up in 5 gallon buckets. When I formed it, I would make a high spot in the middle so that I got good water run off. Wait a couple of days for curing. Pull the forms off and the cardboard out. I would then run a good high quality silicone sealer in the gap tje cardboard left.

Brad
 

Finky198

Well-known member
Joined
Feb 25, 2014
Messages
2,120
Location
North East
Basically what HE said ^^^ my partner is a semi retired mason

I would say the biggest issue we see is bad prep, followed be wrong materials (ie.. Mortar mix) and then improper homeowner Repairs ....:lol_hitti


Just a few tips to add to the above directions

I'd start by dealing with any visible Cracks. The Best solution is to open them wider with a grinder and masonry blade. Then blowing out the dust and debris, and later sealing them with professional grade Caulking ( Sika is very good Stuff)

2zz3j95.png


Then remove the cap and make some shallow cuts with a grinder on the mating surface to help with adhesion, a bonding agent will also aid in a longer lasting repair. Do this before building your forms. good prep and Clean Surfaces are the KEY to the whole process.

Then Build your forms...and yes and overhang is a must but not to much is needed 1"+. I'd like to add that i'd go no thinner then 2" at the edge with a slight pitch up to the Flu aprox 1"-2" this will give you the proper pitch to keep water from pooling...
6pm8md.png


8vzymv.png


(I would just by premade Concrete mix 5000 psi in bags) it willl be one less headache or thing to go wrong :confused: just add water. but not to much...:drool:


zk1ief.png

2uzpjex.png

Finally caulking and paint should be the last steps You'll need to caulk the seam between the new cap and chimney and well as the flu...

after all of this has dried, I would highly recommend Painting the entire chimney. ( not sure of the brand), but is simialr to the Drylock paint you waterproof basements with, Just a lot nice looking with color... this will prolong and Water ingress and seal out the weather...

2mdpcuv.png


Ill Try to find some pictures :thumbup: best of luck
 
Last edited:
To avoid these ads, REGISTER NOW!
OP
0

05wrangler

Well-known member
Joined
Dec 21, 2011
Messages
117
Location
West of Indianapolis
You guys rock! I know I promised pics today but I still can't get it to do it. I'll upload them tomorrow to photo bucket. Thanks for the advice so far!
 

Crfdell

Well-known member
Joined
Dec 22, 2012
Messages
103
Location
Cambridge Ontario Canada
Cut in a drip edge about 1- 1.5" from ghe brick on the under side of the new cap to prevent water from running into the interface and down the brick. Chimney will last much longer. Good luck post some pics when done.
 

joes169

Well-known member
Joined
Sep 19, 2011
Messages
663
Location
WI
What you are talking about is the crown. The crown has two jobs. To keep moisture out of the chase and to keep rain from running down the brick. That is why the crown in Nuttsgt's picture has an overhang. Back when I was doing a lot of crown replacements, I would chisel off a half brick width of the old crown. Wrap cardboard around the flu tile. Form my overhang with two bys. Mix small gravel, portland cement and fiber reinforcement. Carry it up in 5 gallon buckets. When I formed it, I would make a high spot in the middle so that I got good water run off. Wait a couple of days for curing. Pull the forms off and the cardboard out. I would then run a good high quality silicone sealer in the gap tje cardboard left.

Brad

I'm a masonry contractor, and agree that this is good info.

We actually just poured a huge 40" by 13'0" cap with 4 active flues last Friday.

We use sill sealer around the flue(s) as a bond break, for thermal expansion, and to relieve stresses that tend to lead to cracking in the cap. Knife a little out when it's hard and use a good sealant between the flue & cap.

The more overhang, the better. I like at least 2" so you have more room to get a drip edge ground in later. You can also use foam weatherstripping nailed to the bottom of the form to cast it in right away. The one we poured the other day had a 4.5" overhang, as it got thin stone veneer afterwards, leaving a 3"+ final overhang. More cap = bigger overhang IMPO.

I wouldn't skimp too much on concrete thickness, I like 2.5" to 3" thick at a minimum. Spend the extra money to buy the 5000 psi bags, or buy a bag of Portland and richen up each bag with it.

Don't forget to oil the forms, regular veggie oil works great.
 

NUTTSGT

Super Moderator
Staff member
Joined
Sep 14, 2009
Messages
50,891
Location
Northern Central Ohio
after all of this has dried, I would highly recommend Painting the entire chimney. ( not sure of the brand), but is simialr to the Drylock paint you waterproof basements with, Just a lot nice looking with color... this will prolong and Water ingress and seal out the weather...

2mdpcuv.png


Ill Try to find some pictures :thumbup: best of luck


Do you have any other pics of this chimney after it was painted ?
 

strutaeng

Well-known member
Joined
Dec 12, 2011
Messages
2,261
Location
Dallas, TX

Hilltopmasonry

Well-known member
Joined
Oct 12, 2015
Messages
2,167
Here you go, there is 2x4s on the bottom surrounded by 1x8 on the outside to give it a cap. We silicone the voids between the facebrick and the 2x4 to keep the concrete from oozing down between and staining the brick
 

Attachments

  • image.jpg
    image.jpg
    14.3 KB · Views: 20

Finky198

Well-known member
Joined
Feb 25, 2014
Messages
2,120
Location
North East
241qyaa.png


Here's a better close up shot. I'll get a completed pic in the next day or 2

The paint is called "thorolastic acrylic" I'd look for a commercial supply place the stuff is expensive but top quality and super durable... Think truck bed liner but for concrete.
 
Last edited:
OP
0

05wrangler

Well-known member
Joined
Dec 21, 2011
Messages
117
Location
West of Indianapolis
I'm going to try and find something I can use as a bond break, would like to find something I can wrap around the flu like ceramic wool or something like that. I don't know if the box store will have that or not
 

joes169

Well-known member
Joined
Sep 19, 2011
Messages
663
Location
WI
What is the flue servicing? A natural wood fireplace vs. a water heater are a huge difference in temperature and expansion. Also, the height of the chimney means alot.
 
OP
0

05wrangler

Well-known member
Joined
Dec 21, 2011
Messages
117
Location
West of Indianapolis
It used to be a wood burning fire place, how it is a propane insert. But one day I would like to convert back to wood ( so I have back up heat, my house is heated on a boiler system, which has a separate chimney in a different location)
 
To avoid these ads, REGISTER NOW!
Top Bottom