To avoid these ads, REGISTER NOW!

classic Makita BO4510 sander--Repair or Replace?

mslim

Well-known member
Joined
Mar 25, 2015
Messages
293
Location
Fayetteville, AR
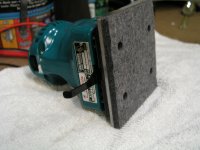
Last time I used my Makita BO4510 sander I had a real problem with the sandpaper moving on the felt pad. I bought the sander in late '70's or early 80's and it has served me well on many projects. I have a dining room table in my RV that I need to refinish soon, so I disassembled the sander last night with an eye toward refurbing it.

The felt pad on the bottom plate has no doubt become compressed and that could be a contributing factor toward the lack of retention of the sandpaper. The lower most bearing felt glitchy no doubt to the age and the fact that it's closest to the sanding dust. The next bearing up the armature shaft was so-so. It's a tight fit and since I don't have a bearing puller, I'd probably just leave it as is. The topmost bearing felt fine. The brushes are about 1/2 their original length so I'd replace them while I had it apart.

Once before in the sander's lifetime, I had replaced the springy metal sandpaper holders and that seemed to help. So if I kept the sander, I would replace these as well.

The dilemma is repair or replace? It's about $42 worth of parts. The price is basically not an issue for me. I play a Hammond organ and ride an old BMW airhead so I like objects that were made to last. This sander was made in Japan and it's a little jewel of a device. I'm a bit skeptical of the current Makita offerings that are made in China, although my LXT drill and impact seem to be well made.

However maybe there's better schemes now on newer sanders for retaining and changing the sandpaper? Any thoughts or suggestions are appreciated.
 
To avoid these ads, REGISTER NOW!

RTM

Well-known member
Joined
May 13, 2019
Messages
13,248
Location
SF Bay Area
Those old dinosaurs are hard to let go. You can get a replacement on eBay for $65 of questionable quality, or rebuild yours and get another 40 years out of it.

I have a newer Makita ROS, and have already replaced the pad as it separated after about 10 years.
 

The Cobbler

Super Moderator
Staff member
Joined
Oct 24, 2013
Messages
25,970
Location
Niagara Region, Ontario, Canada
I just refurbed my mid 80's made in Japan Makita belt sander . all new bearings, a new graphite pad set. I debated on the brushes but they're easily changed & currently are better than 50% remaining.
I spent $30 to $40 on it . It's as good as new now. probably better than new current model
if it were me, I would refurb your sander, but while you're into it, do the bearings too. they don't cost much, are easily replaced usually and make a world of difference as far as smooth operation.
 
OP
M

mslim

Well-known member
Joined
Mar 25, 2015
Messages
293
Location
Fayetteville, AR
I took your suggestions to rebuild the old Makita. FWIW about $13 for two bearings from local suppliers and $35 inc tax and shipping from online parts place for two sandpaper clamps, brushes and a new felt pad, so about $50 all in.

One of the bearing guys set the armature in his vise and took a front end balljoint pickle fork and pried the bad bearing off the shaft. (This shop works mainly with big a$$ motors) This alarmed me but it was too late to do anything. There's faint jaw marks on two of the stack teeth from the vise but I emeryed most of out it on my drill press.

Since I can't heat these bearings due to the plastic seals, I wondered if I could freeze the armature and then slip the room temp bearing on??
 
OP
M

mslim

Well-known member
Joined
Mar 25, 2015
Messages
293
Location
Fayetteville, AR
Still waiting for my parts so I cleaned the old felt pad off bottom plate with Goo Gone and Acetone. A bit of a job but it was a rainy day so there was nothing else productive to do.

I am puzzled by one thing. Look at this parts diagram and notice item 8. It is a "rubber pin 4, 5007MG part# 2630029. I don't have a clue where it goes. Item 10 is another rubber pin but it does not exist on my sander. The bottom plate has been redesigned to make it unnecessary.

I looked at item 10, the fan part, but I couldn't see any place for it to go there. We all know parts diagrams aren't infallible but I could use some help on this one. Apparently the rubber pin is also used in a variety of other Makita power tools of this era. If anyone has encountered this, and could offer a little guidance, I would be very grateful.

bo4510.gif
 
Last edited:

Reese

Well-known member
Joined
Nov 8, 2013
Messages
149
The rubber pin is installed in the outer diameter of the bearing bore, I assume to keep the bearing tight in the bore. I remember seeing them on most Makita tools when I repaired tools in the 80's.
 
To avoid these ads, REGISTER NOW!
OP
M

mslim

Well-known member
Joined
Mar 25, 2015
Messages
293
Location
Fayetteville, AR
Thanks for the help. I see a hole for rubber pin 15 in the bottom pad plate 14 (my sander pad plate is different and does not have that hole) but I'm still foggy on where rubber pin 8 might go. Bearing 7 is a pretty tight press fit.

The field coil assembly 6 has two holes in the frame but the pin is too large to fit in either one. I have watched several videos on this and still haven't seen where the pin goes.
 
Last edited:
OP
M

mslim

Well-known member
Joined
Mar 25, 2015
Messages
293
Location
Fayetteville, AR
A little update.

Talked to Makita tech support today and, although the guy made a good effort he really couldn't enlighten me on the proper place for the upper rubber pin. Basically he seemed to be a parts guy and not familiar with actual tool repair.
 
OP
M

mslim

Well-known member
Joined
Mar 25, 2015
Messages
293
Location
Fayetteville, AR
I cleaned and reassembled the BO4510 today with all the new parts. It looks respectable and runs smoothly. I guess I never learn. I should have a taken a picture when I first opened it. The routing of the internal wires was tricky. The power cable was connected internally with this little white connector block (#20). Try as I might, I never found sufficient room for it. I resorted to closed end pigtail connectors the same as the factory used on a couple of the other wires.

I never figured out where the rubber pin went.

P1010121.JPGP1010122.JPGP1010123.JPG
 
Last edited:

exmaxima1

Well-known member
Joined
Jun 25, 2011
Messages
6,343
Location
Midwest
The sander in the pics looks slightly different from the exploded view of the parts sheet. Your sander is just like my old Makita, and has the old style bent metal clamps for retaining the sandpaper. The exploded view model looks to have wire clamps. On my Makita I also needed tape on the swing out levers as they buzzed and drove me crazy. All the newer sanders with wire clamps never make noise like that
 
OP
M

mslim

Well-known member
Joined
Mar 25, 2015
Messages
293
Location
Fayetteville, AR
Yes my sander is slightly different from the parts sheet. As I noted, there is no cavity for rubber pin #15 in the bottom plate.

I bought this sander so long ago, I really can't remember if it originally had the wire clamps or not. It looks like the wire clamps are NLA from parts suppliers. When I initially sent it to Makita USA in the 80's because the sandpaper was slipping, it came back with the lever clamps.

I believe that the felt pad was so compressed it contributed to the sandpaper slipping again. Also maybe the metal spring clamps had lost tension as well.

Since I was so deep into the refurb, I ordered new clamps as well as the felt pad. The brushes were half gone. It looks like there is a little scribe line on them so that may be the go/no-go point and they were very close to it. Lower motor bearing got replaced and the bearing on the orbital bottom plate was replaced as well. The levers on the new sandpaper clamps were so stiff I could hardly swing them out initially. I put a little triflon and 3-in-1 and exercised them and they loosened up to a suitable operational level. Haven't had a chance to use it yet but it feels strong and powerful now.

BTW If you know exactly where the middle rubber pin (#8) goes, I'd appreciate hearing from you.
 
To avoid these ads, REGISTER NOW!
Top Bottom