To avoid these ads, REGISTER NOW!

Above 1200 Sq/FT Cleaning Up My Shop

Wokspaces above 1200 squarefeet.
OP
O

oldironfarmer

Well-known member
Joined
Jun 25, 2016
Messages
6,664
Location
Terlton, Oklahoma
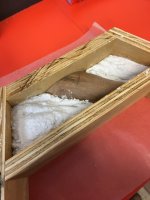
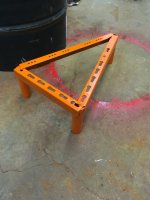
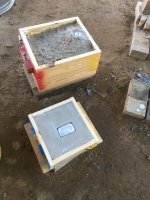
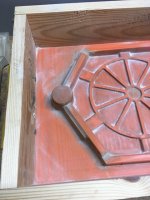
Well I couldn't wait so I pounded sand in the new match plate mold. Ran out of sand because I had another mold set up. No matter

attachment.php


Wind was 30 to 40 mph and I was unsure whether my furnace would heat the charge. No problem!! It is exciting to open the mold!

attachment.php


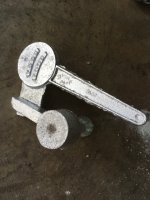
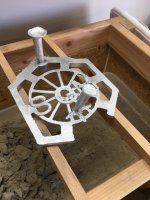
It didn't fill completely. Have to work on that. I've got some help on a casting forum. My wife's initials are SGM.

attachment.php


Hopefully it is clear how the drag pattern makes the wheel and the initials on the top of the match plate set right on the wheel when the match plate is removed for casting.

attachment.php


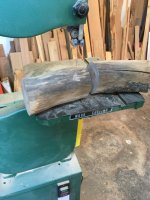
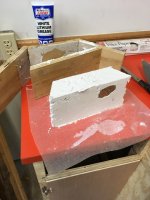
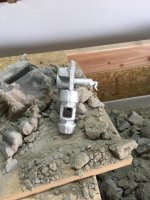
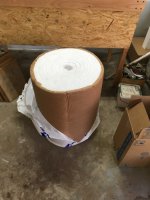
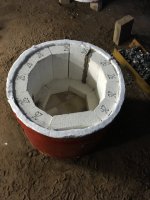
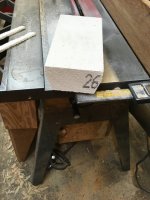
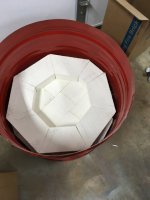
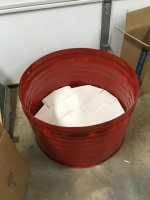
Out of the blue I decided to start on a new brick furnace. ID of a 55 gallon drum is about 22". I have some 1" ceramic fiber blanker, so I thought an inch of it would cushion the brick well, so I laid out for a 20" OD ring of brick. 13.85 degree cut 5/8" shy of the full brick to make a 13 brick ring with 20" OD.

attachment.php


I chickened out and left about a 1" flat, afraid the blade would wobble and it would be too small. Circle is about 20-1/4". That will compress the blanket a bit, I think it will work.

attachment.php


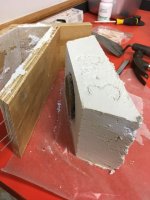
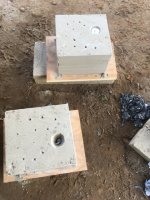
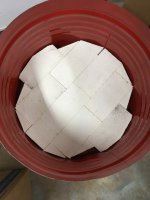
Crucible is 8" and needs a plinth, and brick is 9" so the brick will need a raised foundation.

attachment.php


Fancy arch is next! :scared:

Thanks for looking in!!
 

Attachments

  • IMG_3122.JPG
    IMG_3122.JPG
    142.4 KB · Views: 676
  • IMG_3133.JPG
    IMG_3133.JPG
    105.9 KB · Views: 673
  • IMG_3130.JPG
    IMG_3130.JPG
    99.2 KB · Views: 676
  • IMG_3129.JPG
    IMG_3129.JPG
    116.1 KB · Views: 673
  • IMG_3127.JPG
    IMG_3127.JPG
    146.1 KB · Views: 678
  • IMG_3124.JPG
    IMG_3124.JPG
    125.1 KB · Views: 673
  • IMG_3123.jpg
    IMG_3123.jpg
    56.9 KB · Views: 668
To avoid these ads, REGISTER NOW!

TwoBytes

Well-known member
Joined
Mar 14, 2014
Messages
790
Location
Canberra, 'Stralia
A guy like Archer, who just wants to be a builder, is a joy to all us old guys whose children don't care too much about what we like to do. Glad the budding engineer put the brace right to use. Not much danger there unless he drops it on his foot.

Was he able to make any holes with it yet? As simple as they are, they do take some practice. Sorry I didn't have any metric bits...

The hammer is intended to be for both of you. You can tap on the threaded end of a bolt with it and not damage the threads. Hope you can put it to good use.

Andy, he can make holes with it if I hold the top and apply some pressure. He can do the turning if I hold it steady, and we've made a few good holes together. He can apply pressure... or hold it steady... or turn it... but not all three at once yet.

:bounce:

He'll get it with a bit of practice though.

I understand that the hammer is for both of us... he thinks all my tools are his already anyway! He will definitely get to use the hammer, I just didn't want him running around the garage with it. I was worried he'd try it out on the car, or my motorbike, or the wall!

:willy_nil

I think you're right that it will be hard for him to hurt himself with the brace and bit. However, his first attempt at using it was interesting to say the least. He ran straight out to the garage to give it a go, and by the time I'd caught up, and suggested clamping the bit of wood down, he'd come up with his own method...

View media item 81467
And I don't think he's too fussed about not having metric bits, he measured that bit of timber on the ground to be two feet...

:lol:

VERY WELL DONE on shipping those tools to TB and his SUPERVISOR. looks like they are already being put to good use. i tried to see how much shipping was, but it looked like $450 or maybe TB did his fancy blurring process to it like he did with the address which is awesome BTW. TB if you want to teach an old guy how to do that please email me and i'll try to ship you some old tools too for your Supervisor (if it doesn't cost $450 to ship a package down under).

Drives, I use an image editing program called GIMP, it's just like Photoshop but free and open source.

It's just a matter of selecting the area you wanted pixelated and applying a filter. I found this video that demonstrates it pretty well...

Trust me, $450 was a small price to pay to see a smile on Archer's face.

It's incredibly easy to ship, you just get the address, put it on the package, and take it to the post office. They will help you fill out the customs forms and take your $450.

The way I figure it, at the current exchange rate, $450 postage, plus the value of the brace, bits, and hand crafted hammer comes to approximately priceless!

Andy, what can I say :dunno: other than I am truly humbled to receive a package from Oklahoma:bowdown:

It contained a "Genuine Andy Martin Hammer ".:rocker:

Number 6 off the production line..:rocker:

View media item 81368
I am just so stoked at the wonderful thought. Andy, thank you yet again...:thumbup::thumbup::thumbup::thumbup::thumbup:

Steve, we are part of a very exclusive club. Mine is number 7...

View media item 81464
I'm guessing that takes the membership of the Australian branch of the OIF Hammer Owners Club to 2?

Andy: I can't tell if you are pulling my leg or if the shipping costs to get Archer that good old drill were really that high?:dunno:

funny as I see Archer (AKA the SUPERVISOR) and TwoBytes using that drill a YouTube video of a HOW'S IT MADE Tv show pops up over on the Woodworking 101 thread that might be as fun for you to watch as it was me if you have a few minutes. of course it could show you that you might be missing a few more tools so BEE CAREFUL.


enjoy your SATUR(day) and hope you find another one or two new calves.

Great video, thanks Drives. I have no doubt that Andy could make his own auger bit if he wanted to.

$450 AUS, that's like $3 here. :willy_nil

No, not really. It was something like $45 postage. A bit much but well worth it to give Archer a little something.

See, I've really started cleaning out my shop. Giving away tools :) I only have maybe six braces left.

Haha, yeah, if you could've paid the postage in Aussie money you would've saved a fortune!

The postage stamp on the parcel says $52.75. I assume that was real US dollars, not Australian Pesos.

:headscrat

Really appreciated at this end, let me tell you! And glad I could do my small part in cleaning out your shop.

:bowdown:
 
Last edited:
OP
O

oldironfarmer

Well-known member
Joined
Jun 25, 2016
Messages
6,664
Location
Terlton, Oklahoma
Pepsi trucks only, please! :evil:

Man, so that's what happens when the tell Andy to go pound sand... :lol_hitti

I'm confused here. What should I do when somebody says "go pound sand in your flask?"

I've been told that so many times over the years I finally learned they were encouraging me to do foundry work. Better friends than I thought, it's actually a lot of fun!

Andy, he can make holes with it if I hold the top and apply some pressure. He can do the turning if I hold it steady, and we've made a few good holes together. He can apply pressure... or hold it steady... or turn it... but not all three at once yet.

:bounce:

He'll get it with a bit of practice though.

I understand that the hammer is for both of us... he thinks all my tools are his already anyway! He will definitely get to use the hammer, I just didn't want him running around the garage with it. I was worried he'd try it out on the car, or my motorbike, or the wall!

:willy_nil

I think you're right that it will be hard for him to hurt himself with the brace and bit. However, his first attempt at using it was interesting to say the least. He ran straight out to the garage to give it a go, and by the time I'd caught up, and suggested clamping the bit of wood down, he'd come up with his own method...

View media item 81467
And I don't think he's too fussed about not having metric bits, he measured that bit of timber on the ground to be two feet...

:lol:


Drives, I use an image editing program called GIMP, it's just like Photoshop but free and open source.

It's just a matter of selecting the area you wanted pixelated and applying a filter. I found this video that demonstrates it pretty well...


The way I figure it, at the current exchange rate, $450 postage, plus the value of the brace, bits, and hand crafted hammer comes to approximately priceless!


Steve, we are part of a very exclusive club. Mine is number 7...

View media item 81464
I'm guessing that takes the membership of the Australian branch of the OIF Hammer Owners Club to 2?


Great video, thanks Drives. I have no doubt that Andy could make his own auger bit if he wanted to.


Haha, yeah, if you could've paid the postage in Aussie money you would've saved a fortune!

The postage stamp on the parcel says $52.75. I assume that was real US dollars, not Australian Pesos.

:headscrat

Really appreciated at this end, let me tell you! And glad I could do my small part in cleaning out your shop.

:bowdown:

My son's tools are for the both of us too.:)

And at this age, it won't be long he'll have exclusive use of them.:bounce:

:headscrat

Thanks for the update on Archer and the two foot board.:lol_hitti

I agree, the experience is priceless.

I'd have never dreamt the hammers would be appreciated. I'm very honored.:bowdown::bowdown:

I offered them to anyone who wanted one and got no takers, so I thought I'd send a few out rather than remelt them.

We had 40 to 50 mph wind all day yesterday and today is supposed to be calm. What a great day!!
 

Bob Heine

ALLIANCE MEMBER
Joined
Oct 24, 2009
Messages
10,706
Location
Boca Raton, Florida
I'd have never dreamt the hammers would be appreciated. I'm very honored.:bowdown::bowdown:

I offered them to anyone who wanted one and got no takers, so I thought I'd send a few out rather than remelt them.
Andy, I would be honored to save one of those hammers from the crucible. I just happen to have a spot on the wall over the workbench....

attachment.php
 

Attachments

  • Wall of Fame.jpg
    Wall of Fame.jpg
    40.6 KB · Views: 619

Growlertdi

Well-known member
Joined
May 17, 2016
Messages
410
Location
Millersport, Ohio
My wife still rolls her eyes at the Broom I ordered for the shop, I also would be honored to have an OIF hammer for the garage.

if you offered them up before I certainly missed it.
 

drivesitfar

Well-known member
Joined
Oct 23, 2013
Messages
36,022
Location
Pacific Northwest
Andy: hopefully you'll get a few new calves this week or maybe today.

I didn't see the #'s stamped on your hammers and what a great idea. nice to see they are making their way around the world too. do you also stamp #'s in your brooms or just autograph them?

enjoy your SATUR(day)

TB: that picture of your SUPERVISOR holding the 2x4 with his feet so he could drill a hole is PRICELESS and looks like he could use a good vise. i wish i knew somebody heading Down Under and i'd give them one to put in a suitcase or golf bag to give you cause i'm afraid i'd have to rob a bank to pay to ship you and the Supervisor one.

in your travels if you might happen to see a DAWN offset vise for a reasonable price you might want to buy it cause I hear they are very handy and the older the better if in good shape.
 

Attachments

  • Dawnvices_0205.jpg
    Dawnvices_0205.jpg
    101 KB · Views: 64

Lyndon

Well-known member
Joined
Aug 11, 2014
Messages
2,535
Location
Sydney, Australia
Andy, I would be honored to save one of those hammers from the crucible. I just happen to have a spot on the wall over the workbench....

attachment.php

Andy

I too have a spot......

Sorry I missed the original post, I've been so busy I'm a bit behind. I haven't had anything to contribute to my thread for ages as I've been dealing with a daughters engagement party, a 29th anniversary, hot weather, a Jag club run and busy work..... (That's my excuse and I'm sticking to it :beer:).

But I was a bit staggered to read how much the postage was :shocking:

PM me and I'll contribute to make it 3 Down Under.

Lyndon
Catching up
 
OP
O

oldironfarmer

Well-known member
Joined
Jun 25, 2016
Messages
6,664
Location
Terlton, Oklahoma
Andy, I would be honored to save one of those hammers from the crucible. I just happen to have a spot on the wall over the workbench....

attachment.php

Well, Bob, I'm happy to put you on the list. But the hammers are intended to be used not hung up on the wall. It won't damage a steel shaft, and it will stand a lot of abuse.

My wife still rolls her eyes at the Broom I ordered for the shop, I also would be honored to have an OIF hammer for the garage.

if you offered them up before I certainly missed it.

I'd be honored to send you one. It won't be quick...

Andy: hopefully you'll get a few new calves this week or maybe today.

I didn't see the #'s stamped on your hammers and what a great idea. nice to see they are making their way around the world too. do you also stamp #'s in your brooms or just autograph them?

enjoy your SATUR(day)

TB: that picture of your SUPERVISOR holding the 2x4 with his feet so he could drill a hole is PRICELESS and looks like he could use a good vise. i wish i knew somebody heading Down Under and i'd give them one to put in a suitcase or golf bag to give you cause i'm afraid i'd have to rob a bank to pay to ship you and the Supervisor one.

in your travels if you might happen to see a DAWN offset vise for a reasonable price you might want to buy it cause I hear they are very handy and the older the better if in good shape.

No new calves. :(

I don't put serial numbers on brooms, but I like doing it on the hammers. :bounce:

Andy

I too have a spot......

Sorry I missed the original post, I've been so busy I'm a bit behind. I haven't had anything to contribute to my thread for ages as I've been dealing with a daughters engagement party, a 29th anniversary, hot weather, a Jag club run and busy work..... (That's my excuse and I'm sticking to it :beer:).

But I was a bit staggered to read how much the postage was :shocking:

PM me and I'll contribute to make it 3 Down Under.

Lyndon
Catching up

Your excuses earn you a hammer :lol_hitti

Postage is not too bad. Archer's brace and bit are a bit heavy, but the hammer doesn't weigh much.

I will need you to PM me your address. Please. And, there's no schedule.:eyecrazy:

Thanks for the interest guys!
 
OP
O

oldironfarmer

Well-known member
Joined
Jun 25, 2016
Messages
6,664
Location
Terlton, Oklahoma
Had a good long day today. I modified the trivet pattern based on some suggestions from a casting forum. Made the inlet runners a bit larger. And made a smaller sprue with a built in pouring basin. This was turned out of a walnut branch I've been using off of for several years.

attachment.php


It has it's drawbacks. But I can fill this for a pattern.

attachment.php


The thickened runners are on the left.

attachment.php


Also put in a vent riser opposite the sprue. No metal rose in it.

attachment.php


But I changed to wheel alloy. I may have poured it too cool the first time, and the wheel alloy was supposed to be less viscous. Results are not spectacular.

attachment.php


New casting is on the right. You're supposed to learn from your mistakes. So I have a learning opportunity.
 

Attachments

  • IMG_3143.JPG
    IMG_3143.JPG
    136.7 KB · Views: 550
  • IMG_3142.JPG
    IMG_3142.JPG
    107 KB · Views: 548
  • IMG_3141.JPG
    IMG_3141.JPG
    106.5 KB · Views: 548
  • IMG_3135.JPG
    IMG_3135.JPG
    131.4 KB · Views: 551
  • IMG_3134.JPG
    IMG_3134.JPG
    135.1 KB · Views: 553

Bob Heine

ALLIANCE MEMBER
Joined
Oct 24, 2009
Messages
10,706
Location
Boca Raton, Florida
Well, Bob, I'm happy to put you on the list. But the hammers are intended to be used not hung up on the wall. It won't damage a steel shaft, and it will stand a lot of abuse.
Andy, I don't own any "display only" tools. I use the saw when I need to cut a piece of wood in the garage and the knife opens my UPS and Fedex boxes all the time. I think you saw the photo of the rabbet plane in use last week. I will treat the hammer with the respect it deserves but it will be used.

I bought one of those Harbor Freight brass hammers but it's heavy and a lot of times I use a tiny steel hammer to tap small stuff. An aluminum hammer would fill a void in my life (and my tool collection).

No pressure, I can wait. :tantrum2::willy_nil:tantrum2::willy_nil:tantrum2:
 

1/2 Cup

Member Emeritus
Joined
Apr 28, 2012
Messages
19,283
Location
Shepparton. Victoria. Australia


The way I figure it, at the current exchange rate, $450 postage, plus the value of the brace, bits, and hand crafted hammer comes to approximately priceless!


Steve, we are part of a very exclusive club. Mine is number 7...

View media item 81464
I'm guessing that takes the membership of the Australian branch of the OIF Hammer Owners Club to 2?

Really appreciated at this end, let me tell you! And glad I could do my small part in cleaning out your shop.

:bowdown:


Mat, we almost need a social group in the forum..:thumbup:
 
OP
O

oldironfarmer

Well-known member
Joined
Jun 25, 2016
Messages
6,664
Location
Terlton, Oklahoma
Also today I did a little more on my new brick furnace. I decided the refractory shell I had spent so much time on had too much mass and would take too long to heat up each time. It might be OK if I was going to heat it and do several melts but I'm not there. Yesterday I cut brick for a circle to fit inside a 55 gallon drum. At nine inches, the brick are just 1 inch taller than the crucible I plan to use for brass, copper, bronze, and aluminum bronze. All those melt too hot for my stainless steel pipe crucible. Today I cut a ring of brick to make the wall 2-1/2" higher.

Flat laid brick need a miter cut, rather than a bevel like on the last brick. The old Craftsman saw has a plastic insert called Exact-I-Cut. The purpose is to make a pencil mark to line up with the blade so you can adjust the work to the line. I've never used it until today. Worked well to cut the brick accurately.

attachment.php


attachment.php


A word about cutting brick. A wood cutting blade cuts soft brick easily but makes lots of dust. I changed out my good 10" carbide blade to an old 9" steel blade. And my dust collection system draws the dust in very well, but I still wear a respirator and my glasses get coated in fine dust. So it is hazardous and I don't do it lightly.

After three brick I made a test layout on the bottom of the drum. So good so far. The bottom of the drum is bent so I have to go by the outside. I plan to use the top of the drum.

attachment.php


Cut the rest and then cut a finish brick.

attachment.php


Then cut the end off the drum and cleaned and painted it inside out. If it doesn't get too hot it should last. So far the outside of the brick furnace has stayed cool and this furnace will have the same brick plus an inch of ceramic fiber.

attachment.php


Here's an old picture of the drum I finally used.

attachment.php


It spent the last two years on tires next to the shipping container.

Yes, I was standing in the paint booth to take that picture, and the door leads to the planer room. Things have changed.:lol_hitti

Dental appointment tomorrow!:rocker:
 

Attachments

  • IMG_3140.JPG
    IMG_3140.JPG
    101.6 KB · Views: 540
  • IMG_3139.JPG
    IMG_3139.JPG
    92.5 KB · Views: 540
  • IMG_3138.JPG
    IMG_3138.JPG
    94.3 KB · Views: 543
  • IMG_3137.JPG
    IMG_3137.JPG
    120.2 KB · Views: 543
  • IMG_3136.JPG
    IMG_3136.JPG
    114.5 KB · Views: 542
  • IMG_1434.jpg
    IMG_1434.jpg
    46.1 KB · Views: 533

brg404

Member
Joined
Nov 20, 2010
Messages
5
Andy, you might try a larger diameter sprue to get a better volume/pressure from the pour. The sprue neck looks too restrictive... Maybe a second Sprue instead of a vent across from the first.

Good Luck next pour, dont give up!
 

drivesitfar

Well-known member
Joined
Oct 23, 2013
Messages
36,022
Location
Pacific Northwest
Andy: you know what they say we learn more from our MISTAKES than we ever did from our successes or victories. keep trying and i'm sure Sharon's trivet will be golden and a keepsake once you get it right.

thanks for the tip on using an old table saw to cut bricks. also sharing you need to wear a mask and probably full face shield too.

hope you have a new calf today and hope the dentist is as nice to you as your Zumba teacher is.

cheers
 

tym

Well-known member
Joined
Mar 5, 2016
Messages
2,435
Location
MA
I'm liking the progress on the trivets! You're getting there. Heck, they'll now be 10% more awesome!
 
Last edited:
OP
O

oldironfarmer

Well-known member
Joined
Jun 25, 2016
Messages
6,664
Location
Terlton, Oklahoma
Andy, I don't own any "display only" tools. I use the saw when I need to cut a piece of wood in the garage and the knife opens my UPS and Fedex boxes all the time. I think you saw the photo of the rabbet plane in use last week. I will treat the hammer with the respect it deserves but it will be used.

I bought one of those Harbor Freight brass hammers but it's heavy and a lot of times I use a tiny steel hammer to tap small stuff. An aluminum hammer would fill a void in my life (and my tool collection).

No pressure, I can wait. :tantrum2::willy_nil:tantrum2::willy_nil:tantrum2:


Filling a void in your life is my goal. Admiring your rack has lost it's luster.

Mat, we almost need a social group in the forum..:thumbup:

:willy_nil And Lyndon will make three. I'll try to ship his upside down so it will arrive right.

Andy, it is all part of the learning curve..:thumbup:

You will get there.:thumbup:

Thank you sir! I have the confidence of getting there, but, you know the old saying, it's always dark when there is no light.

Andy, you might try a larger diameter sprue to get a better volume/pressure from the pour. The sprue neck looks too restrictive... Maybe a second Sprue instead of a vent across from the first.

Good Luck next pour, dont give up!

The sprue is intended too be an orifice. But I went back to the 5/8". A second sprue is tricky business. Unless you pour simultaneously, and maybe even then, you're likely to get a cold shut with two entrance points.

Thanks for the well wishes. And I'm generally not smart enough to give up, even when I'm ahead.

Andy: you know what they say we learn more from our MISTAKES than we ever did from our successes or victories. keep trying and i'm sure Sharon's trivet will be golden and a keepsake once you get it right.

thanks for the tip on using an old table saw to cut bricks. also sharing you need to wear a mask and probably full face shield too.

hope you have a new calf today and hope the dentist is as nice to you as your Zumba teacher is.

cheers

Success is so much the sweeter if she turned you down the first few times.

An important point I forgot to say, these are soft insulating brick. Not hard firebrick. Hard firebrick like you use in a fireplace will smooth off a blade before getting cut themselves. This brick is about the consistency of chalk. Drop one and you can just sweep it up. Face shield too!:thumbup:

I'm looking the progress on the trivets! You're getting there. Heck, they'll now be 10% more awesome!

Thank you!

I'm guessing demand for scrap iron will go down and so will the price. Scrap aluminium too, glad mine is all free. And I have about ten years' supply. Still looking for more, JB :willy_nil
 
OP
O

oldironfarmer

Well-known member
Joined
Jun 25, 2016
Messages
6,664
Location
Terlton, Oklahoma
Today I got out early and made a pour on a trivet.

First I reamed out the sprue hole to take the old 5/8" sprue again. Then used a 1/2" sprue made for hammer casting as a riser. Scratched out some sand to make a vent to two spokes and the rim farthest from the sprue.

attachment.php


Sweet success!:rocker::rocker:

attachment.php


I poured just under 1,400F and saw the liquid pop up to the top of the riser. Pouring too cool was my entire problem, I think. Last pour was at 1,250F.

Laid out the floor for the new brick furnace. They have to come back out, some of them are a little tight. A little tight means breakage during warm up.

attachment.php


The small pieces were drops from the wall foundation.

A better perspective.

attachment.php


Then put in the wall foundation.

attachment.php


And the wall brick.

attachment.php


One inch of ceramic fiber blanket goes between the brick and the can. I still have to make a burner opening. I may cast one but I'm ready to fire it right now.:willy_nil So I may try to make one out of brick.

I should get some shop time tomorrow, so here's hoping!:thumbup:
 

Attachments

  • IMG_3149.JPG
    IMG_3149.JPG
    91.3 KB · Views: 446
  • IMG_3148.JPG
    IMG_3148.JPG
    86.3 KB · Views: 442
  • IMG_3147.JPG
    IMG_3147.JPG
    80.3 KB · Views: 443
  • IMG_3146.JPG
    IMG_3146.JPG
    86.3 KB · Views: 450
  • IMG_3145.JPG
    IMG_3145.JPG
    117.5 KB · Views: 449
  • IMG_3144.JPG
    IMG_3144.JPG
    106.9 KB · Views: 451
To avoid these ads, REGISTER NOW!

drivesitfar

Well-known member
Joined
Oct 23, 2013
Messages
36,022
Location
Pacific Northwest
Andy: looks like 3rd time was the charm on the Trivet!! WELL DONE!!

I seem to recall seeing a hole already in the part of the old barrel you are using or are you talking about making a hole in the new brick you are laying inside it?

looks like you are having fun so keep it up.

cheers
 
OP
O

oldironfarmer

Well-known member
Joined
Jun 25, 2016
Messages
6,664
Location
Terlton, Oklahoma
Andy, now that's a great improvement, well done..:rocker:

:3gears: Thank you sir! Things are so hard when they won't work and so easy when they do.:lol:

Andy: looks like 3rd time was the charm on the Trivet!! WELL DONE!!

I seem to recall seeing a hole already in the part of the old barrel you are using or are you talking about making a hole in the new brick you are laying inside it?

looks like you are having fun so keep it up.

cheers

Was it only three times?:bounce:

Yes, since I'm using the top of the drum it has two bung holes. However it would be inconvenient to use the larger of those, although it is about the right size. The burner would have to be below the furnace, making the furnace potentially higher off the ground even with a new burner design. Furnace needs to be low to lift the crucible out safely. If the burner were to shoot straight up it would be subject to getting debris in it. And molten metal in case of a cracked or dropped crucible.

Conventional design is to have the burner fire into the firebox tangentially so as to swirl around the crucible before exiting the top. Directly impinging on the crucible will shorten it's life. shooting straight up would give the flame a more direct shot at the hole in the arch where the gasses exit (and where you drop additional charge and alloying agents or flux into the crucible during firing). While I don't mind deviating from convention if I see a reason, for the most part you get better results staying with what works for other people.

I also want to build a waste oil burner. This will burn motor oil, cooking oil, etc., a practically free source of fuel (collection costs to get cooking oil from restaurants) which also has a higher heat input than propane. Fiddling with a burner design is also more convenient going in the side or top of something.

Well, you did ask...

:bounce:

Thanks for the visits guys!!
 

tym

Well-known member
Joined
Mar 5, 2016
Messages
2,435
Location
MA
Congrats on the successful trivet!
Please also show us when it's all cleaned up!
I also want to build a waste oil burner. This will burn motor oil, cooking oil, etc., a practically free source of fuel (collection costs to get cooking oil from restaurants) which also has a higher heat input than propane. Fiddling with a burner design is also more convenient going in the side or top of something.
I've been toying with the idea of something like this too for the folks' garage. I'll be following with interest!

Hey, it's almost Saturday!
 

jbmatth

Well-known member
Joined
Jun 3, 2013
Messages
5,685
Location
Northern Ok.
I'm guessing demand for scrap iron will go down and so will the price. Scrap aluminium too, glad mine is all free. And I have about ten years' supply. Still looking for more, JB :willy_nil

I might just have a box full for you, but have more to put in before I ship it out. Good news is it is in an old USPS crate. They make great boxes by the way, you should get a few.
 
OP
O

oldironfarmer

Well-known member
Joined
Jun 25, 2016
Messages
6,664
Location
Terlton, Oklahoma
Congrats on the successful trivet!
Please also show us when it's all cleaned up!
I've been toying with the idea of something like this too for the folks' garage. I'll be following with interest!

Hey, it's almost Saturday!

I will definitely have a show and tell on a finished trivet. But we have a ways to go.

The waste oil burner I'm looking at building is pretty crude with no controls. There are very well designed waste oil heaters for heating a room. A foundry burner is much different.

Thanks for the visit.

I might just have a box full for you, but have more to put in before I ship it out. Good news is it is in an old USPS crate. They make great boxes by the way, you should get a few.

The white boxes? They are heavy duty.

Nice job on the trivet. Got one question. Isn't any hot dish placed on it going to rock on the raised letters?

Glen

I hope not. The plan is to put words around the rim, I think I mentioned that, but may not have mentioned one reason for the words on the rim is to raise the rim to match the initials.

Glad you're watching!

Good luck on your waste oil burner. I hope smelling French fries while casting does not make you too hungry. :eyecrazy:

Hmmm, maybe the smell of French fries will make the muffins go down easier.

Thanks for the visits!
 
OP
O

oldironfarmer

Well-known member
Joined
Jun 25, 2016
Messages
6,664
Location
Terlton, Oklahoma
Work on the new brick furnace today. Decided the burner inlet would be too large to penetrate one brick without breaking a lot of brick trying to get a good hole drilled and ground out to a cone. Decided to cast a horizontal tile to match a brick size. First made a form 4-1/2x9x2-1/2 thick to match the taper of two vertical bricks.

attachment.php


Then had to turn a cone for the burner opening. Looked around and saw an old piece of wood, I think it's oak, but the bark did not look familiar. In any event it will do. Tried to make parallel cuts with the band saw freehand.

attachment.php


Chucked it up and started turning. It has a few big splits but I think they'll turn out.

attachment.php


Finished up pretty clean.

attachment.php


Trimmed the ends at an angle on the bandsaw and got a pretty good fit. No picture :( Mixed up some refractory and started filling the mold, stuck the cone in per my marks.

attachment.php
 

Attachments

  • IMG_3154.JPG
    IMG_3154.JPG
    92 KB · Views: 633
  • IMG_3153.jpg
    IMG_3153.jpg
    57.5 KB · Views: 631
  • IMG_3152.JPG
    IMG_3152.JPG
    144.1 KB · Views: 638
  • IMG_3151.JPG
    IMG_3151.JPG
    127.2 KB · Views: 637
  • IMG_3150.JPG
    IMG_3150.JPG
    93.1 KB · Views: 639
OP
O

oldironfarmer

Well-known member
Joined
Jun 25, 2016
Messages
6,664
Location
Terlton, Oklahoma
Finished filling the refractory just in time to go to the Sister-In-Law's for supper. When we got back I went out to try to catch the mud before it was too hard so I could drive the cone out. Got the form off and the mud is still a little soft.

attachment.php


There's a hairline shrinkage crack right above the cone. If it stays to one crack that should not be detrimental to the burner tile. I'm apprehensive about trying to drive the cone out, the casting may just break in two. Might still be able to use it, but so much better as one piece. The angle was too sharp for a punch to dig in so I used a center punch with a good sharp lick. The cone came loose.:rocker:

attachment.php


Then it pushed out easily.

attachment.php


The tile is intact so now it needs to cure several days before I start a heat cure. Not as much honeycombing as I expected. The refractory is a stiff mix.

Also made a three legged stand to set the furnace on. After making it I'm considering using four to six hard firebrick instead. Oh well, got nothing but time. :willy_nil

attachment.php


Thanks for stopping by the design-as-you-go-workshop.:willy_nil
 

Attachments

  • IMG_3155.JPG
    IMG_3155.JPG
    102.9 KB · Views: 633
  • IMG_3156.JPG
    IMG_3156.JPG
    102.2 KB · Views: 632
  • IMG_3157.JPG
    IMG_3157.JPG
    93.5 KB · Views: 633
  • IMG_3158.JPG
    IMG_3158.JPG
    88.9 KB · Views: 635

drivesitfar

Well-known member
Joined
Oct 23, 2013
Messages
36,022
Location
Pacific Northwest
Andy: it must be nice to have the material almost at the ready, machines and tools to work it, the brains to think it through and always keep moving forward and of course the time to do it.

thanks for the short explanation about your burner's HOLE and I'm watching and learning how you are planning on making it. looks like you are making progress even with all your social activities.

hope you have a fun SATURDAY cause it's finally rest day for us tomorrow.

new calves? the ones already running around are going to be practically older kin or teenagers by the time the next batch shows up.

cheers
 

Rex_A_Lott

Well-known member
Joined
Jul 27, 2011
Messages
167
Location
Upstate South Carolina
Just in case you get bored,:lol: I found this guy's channel:
I think he may be your brother by another mother. You have some similar interests, the same work ethic and maybe some of the same beliefs.
Now he has his own you tube channel, so you may find yourself watching other videos. I would recommend watching the one about the 80 year old blacksmith, Cy. I liked a few of the others, also, but you may find them boring. I will warn you some of the videos jump around a lot, but I'm no cameraman either, so its not really fair to criticize.
Hope you enjoy the shop tour.
Enjoy your Sunday.
 
OP
O

oldironfarmer

Well-known member
Joined
Jun 25, 2016
Messages
6,664
Location
Terlton, Oklahoma
Andy: it must be nice to have the material almost at the ready, machines and tools to work it, the brains to think it through and always keep moving forward and of course the time to do it.

thanks for the short explanation about your burner's HOLE and I'm watching and learning how you are planning on making it. looks like you are making progress even with all your social activities.

hope you have a fun SATURDAY cause it's finally rest day for us tomorrow.

new calves? the ones already running around are going to be practically older kin or teenagers by the time the next batch shows up.

cheers

Thanks for driving by, Drives.

It is nice to have the tools to do what I want, and a reasonable (or unreasonable, depending on your perspective) supply of material on hand. I live 45 minutes from the big city, which equates to three hours wasted if I have to go get something. However I also get a kick out of being able to make something without leaving the farm.

I don't know what the deal is, several cows are about ready to pop.

Just in case you get bored,:lol: I found this guy's channel:
I think he may be your brother by another mother. You have some similar interests, the same work ethic and maybe some of the same beliefs.
Now he has his own you tube channel, so you may find yourself watching other videos. I would recommend watching the one about the 80 year old blacksmith, Cy. I liked a few of the others, also, but you may find them boring. I will warn you some of the videos jump around a lot, but I'm no cameraman either, so its not really fair to criticize.
Hope you enjoy the shop tour.
Enjoy your Sunday.

Boy oh boy that guys has a lot of nice junk. I feel shamed.:sad:

And it looks well organized and clean, too. I like that crane.
 
OP
O

oldironfarmer

Well-known member
Joined
Jun 25, 2016
Messages
6,664
Location
Terlton, Oklahoma
Worked a little more on the furnace, took the brick back out and cut the hole for the burner. Pictures later.:wtf:

Pounded a little sand on a wrench pattern and a hammer. It finally happened. I ran out of hot metal. Not enough to pour the hammer mold full.

attachment.php


But I can see some metal, so it may be OK.

I looks good. This is a hammer with the eye core from the new core box recently completed. It may be a little large. I cracked the core putting it in. It held up but is a little crooked. That just means I have to grind the handle to match.

attachment.php


Wrench pattern needs some work, sand is hanging up around the name. It will probably get used, however.

attachment.php


On the reverse of the hammer I cast two "Food" patterns, one is normal font, one is bold. It is hard to tell the difference, but I like the bold better. The CAD work on these takes some time so I needed a sample casting before putting the time into several words. These are for the rim of the trivet pattern.

attachment.php


Seems like I did more than that today.:eyecrazy:

Thanks for the visits.
 

Attachments

  • IMG_3162.JPG
    IMG_3162.JPG
    115.2 KB · Views: 538
  • IMG_3161.JPG
    IMG_3161.JPG
    127.4 KB · Views: 538
  • IMG_3160.JPG
    IMG_3160.JPG
    123.7 KB · Views: 542
  • IMG_3159.JPG
    IMG_3159.JPG
    141.6 KB · Views: 542

Guster

Well-known member
Joined
Mar 11, 2012
Messages
1,543
Location
Auckland, New Zealand
Gone for a week and already you’ve started on a new furnace! Was worried you might be getting bored but you seem to have made great progress. Trivet came out well.
:thumbup:

What is your plan for the lid and which casting forum do you frequent?
 
OP
O

oldironfarmer

Well-known member
Joined
Jun 25, 2016
Messages
6,664
Location
Terlton, Oklahoma
Andy, well done..:thumbup:

Thank you very much! :bowdown:

Gone for a week and already you’ve started on a new furnace! Was worried you might be getting bored but you seem to have made great progress. Trivet came out well.
:thumbup:

What is your plan for the lid and which casting forum do you frequent?

Yeah, my second new furnace. The solid refractory shell I made will take too much heat to warm it up so I'm putting it on the back burner until I have a used oil burner (cheap fuel).

My initial plan for the arch was radial brick wedges on a 10 degree angle so they could rise as they expanded and be self supporting since they are on the angle. I may yet do that, but I'm considering a ceramic fiber arch, with ITC-100 hardner. I'm concerned the soft brick may grind itself away with heating and cooling. I'm also wary of the dangers of fired ceramic fiber.

I've been reading on Alloy Avenue.

Had a few minutes today and started assembling the new furnace. disassembled my stacked brick furnace :)willy_nil I have no way to melt aluminum!) because that's where the new furnace needs to sit. Decided four brick will hold it and support the end of the drum best.

attachment.php


Put the floor back in, but used some of the old brick from the stacked brick furnace.

attachment.php


Drug out my roll of ceramic fiber.

attachment.php


It's great stuff and I don't like it. It can release hazardous tiny fibers into the air after it's fired and fried. It is safer in the raw state but still not without respiratory hazard. So I wore gloves and a respirator and washed good after handling it.

attachment.php


It cuts pretty easily with a sharp knife, but soon the knife is not sharp. Lined the drum with it.

attachment.php


Then put the brick back in

attachment.php


I got lucky, pressing the brick against the fiber I wound up with 1" gap between brick (about the 8:00 position in the picture) so one layer of fiber made it a tight fit. That should hold the brick in place through heating a cooling cycles.

Cut a hole in the fiber to match the burner tile to allow access for the burner. I hadn't done too well, I had to trim out the hole in the drum a bit. But now it fits.

attachment.php
 

Attachments

  • IMG_3170.JPG
    IMG_3170.JPG
    85.8 KB · Views: 465
  • IMG_3169.JPG
    IMG_3169.JPG
    106.2 KB · Views: 464
  • IMG_3168.JPG
    IMG_3168.JPG
    116.8 KB · Views: 464
  • IMG_3167.JPG
    IMG_3167.JPG
    116.5 KB · Views: 464
  • IMG_3166.JPG
    IMG_3166.JPG
    104.3 KB · Views: 465
  • IMG_3165.JPG
    IMG_3165.JPG
    140.2 KB · Views: 463
  • IMG_3164.jpg
    IMG_3164.jpg
    57.6 KB · Views: 463
OP
O

oldironfarmer

Well-known member
Joined
Jun 25, 2016
Messages
6,664
Location
Terlton, Oklahoma
Then coated the exposed fiber with ITC-100, which forms a hard surface upon firing and seals in the fibers. It's dark chocolate now.

attachment.php


I don't want to get the furnace wet so I looked around and found an aluminum cover somebody made. I really can't remember where I got it. Got lucky again, it fit the drum with maybe 1/4" gap.

attachment.php


I can rebuild my stacked brick furnace but am hoping to get this one up and running soon.

Thanks for stopping by!
 

Attachments

  • IMG_3171.JPG
    IMG_3171.JPG
    104.2 KB · Views: 460
  • IMG_3172.JPG
    IMG_3172.JPG
    97.3 KB · Views: 461
To avoid these ads, REGISTER NOW!
Top Bottom