Farmall450
Well-known member
Sadly I don't get it. Never saw the show, but I fear there is a pun here somewhere. Don't you hate it when you overshoot your audience?
I was going out on a limb.
They're based in Pawnee, Indiana.


Sadly I don't get it. Never saw the show, but I fear there is a pun here somewhere. Don't you hate it when you overshoot your audience?
I was going out on a limb.
They're based in Pawnee, Indiana.
 Nice couple
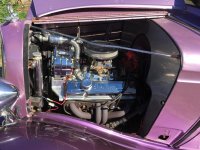
Nice work on the car, that small block and trans looks good together.
")
I started reading this thread back near the beginning, and have revisited it a time or two. Early on I wondered if Andy was the same Andy I knew from a project south of Houston about 5 years ago. The pictures a few pages back prove that yes you are the Andy Martin I knew.
I prefer to remain internet anonymous, but you may remember me as the guy on the fractionator who was restoring an old Martini Henry rifle. You gave me a couple of springs you made as I needed to replace a flat spring.
It is good to see that you are doing well and having a good time on your farm.

Much nicer.
I started reading this thread back near the beginning, and have revisited it a time or two. Early on I wondered if Andy was the same Andy I knew from a project south of Houston about 5 years ago. The pictures a few pages back prove that yes you are the Andy Martin I knew.
I prefer to remain internet anonymous, but you may remember me as the guy on the fractionator who was restoring an old Martini Henry rifle. You gave me a couple of springs you made as I needed to replace a flat spring.
It is good to see that you are doing well and having a good time on your farm.
 Kindof. I guess. Maybe not too much. I don't hide my tag numbers... By June of 2016 I had to start posting, and when I decided to add on to my shop to relieve congestion I started this thread. Now I don't know how to stop it.
It's a small world we live in.
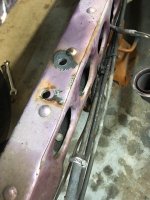
Andy your repair is way better.
Andy I spent some time early this morning and hopefully tonight I can get caught up on your thread that moves at the speed of light. A Purplish Hot Rod?
Bret

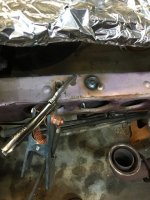
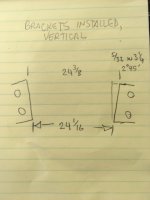
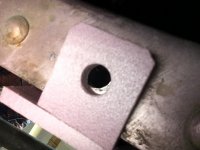
Andy the mount is in a very awkward position plus the fact that it is not parallel, you have done pretty well.
Nice looking weld, Andy. It's going to be nice when you finish.
Looking good Andy.
Jim, it's not nice to spy on people! I only gave the can a quick whiff to be sure there was still active thinner. Spent the afternoon planting evergreens. It was only 89 in the shade and 120 where I was passed out in the garden. Liane enjoys the heat and likes watching me melt.WARNING!
Andy, don't listen to Bob. He has been melting foam peanuts all morning and the fumes have finally unhinged the sanity that was only loosely coupled to begin with. He will be much better when he wakes up from his afternoon heat stroke.

Now that would be a cool idea!Could car club plates or plaques be cast the same way you cast the hammers?
The thickness or thinness may be and issue.
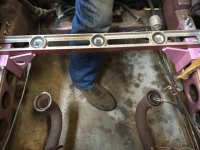
Andy, nice work on the engine mounts.
When I lose something like that hay bale spike, I always find it long after I stop looking. If I'm lucky, I trip over it. More likely it will destroy a piece of equipment or puncture a tire.
OK, now I have Transfer Punch Set on my Harbor Freight shopping list. I have never owned a set but that explains all the bound-up bolts on my projects. If I were younger I might spend more than $10.99 on the set but it is highly likely I will forget they are in my collection soon after I bring them home. Thanks for adding to my list. Now I just have to remember to bring the list and coupons (hey, $2.20 is nothing to laugh at).
EDIT1: I just saw your last post. If it were me, I'd just make the mount out of foam. How strong does it have to be?
EDIT2: I think the foam mounts will be fine as long as you don't spill lacquer thinner on them.
WARNING!
Andy, don't listen to Bob. He has been melting foam peanuts all morning and the fumes have finally unhinged the sanity that was only loosely coupled to begin with. He will be much better when he wakes up from his afternoon heat stroke.
Jim, it's not nice to spy on people! I only gave the can a quick whiff to be sure there was still active thinner. Spent the afternoon planting evergreens. It was only 89 in the shade and 120 where I was passed out in the garden. Liane enjoys the heat and likes watching me melt.
Andy: great engineering figuring out how to make room for the new motor mount. I bet your son will be very happy whether you return his purple car next week or after Christmas.
hope you had a great weekend
Just an FYI for the folks not familiar with the transfer punches, they'll last much longer if you dont FRAM on them, only hit 'em hard enough to make a mark you can see. Go back with the regular center punch and make the real mark.
Thanks Andy for showing us all how to re-engineer the mounts, looking much better.
Could car club plates or plaques be cast the same way you cast the hammers?
The thickness or thinness may be and issue.
Casting your own motor mounts is a really cool project. Can't wait to see the results.
Vince
Now that would be a cool idea!
I've never crazy or forged anything, but picked up a few items at a local colonial fair with a blacksmithing demo. Lots of Revolutionaty War reenactors too.
Plaques, badges and decals is one of the main reasons to get into casting. Followed by handles, knobs, pulleys and many other fittings. Ultimately restoring or rebuilding any cast part. For fine, sharp detail you'd likely want to die or investment cast depending on the size. But sand cast works well enough for most things. Detail can be quite good using a finer sand in the mold area.
Purple car is coming along very nicely Andy! A cast motor mount bracket opens a lot of options and a good excuse to use the good muffins. While you are at it you can cast and cure or vulcanise your own urethane or rubber elastomers too.
Just remember to spill some fluids back into the engine when you put it back together again.

Now that's a thought! Actually with the holidays around the corner.Seems like we could come up with a design people on GJ would want.
Ok I'm here. Now what ??If you're not interested in the process of making motor mounts for an old hot rod, just skip forward a few posts. This may be boring.
) forms micro cracks instead of bending; I'd think that steel would be a better material for this application.Wow, quite the ordeal.
It'll be interesting to see them in action. I wonder if one could 3D print them, although I suppose that would probably take longer than your method.
I bet in the near future rapid modeling would be very possible.
Looks Good!
Andy you have truly excelled
BTW we have not a bad metric system of measurement you could potentially use, it would be so much easier. Those fractions just do my head in now a days, it has been many a year since this black duck has had to use them.
Now that's a thought! Actually with the holidays around the corner.
Ok I'm here. Now what ??
J/K I am very much going to bookmark this page because building stuff out of foam like that is an amazing idea !!
Handy: your new motor mounts look like great engineering and fabrication at it's best. I (we) all hope it works like you hope it should.
good luck!!
Andy, when you get time (ha!) maybe you could tell us the benefits of cast aluminum engine mounts instead of welded steel engine mounts.
The way things started, you were welding steel, and then suddenly you recreated them in foam. I must've missed something.
Not knowing the answer to this, what is the load on the engine mounts? Obviously there's weight, and rotational forces, both as the engine winds up and as it slows down. There's also longitudinal forces from acceleration and deceleration. Aluminum (Aluminium for Rian
Of course I'm just throwing popcorn from the cheap seats, and I don't have a clue.