To avoid these ads, REGISTER NOW!

Above 1200 Sq/FT Cody's 33'x62' Garage

Wokspaces above 1200 squarefeet.
OP
M

madison069

Well-known member
Joined
Nov 5, 2010
Messages
4,147
Location
Monroeville, PA
I also decided to install a hitch on the Subaru along with the trailer wiring harness. Figured the Subaru can pull light stuff along with put the mother in law's wheel chair lift on the back when we take her on some trips. The scooter will ride outside and the Mother in law will ride inside. But I did install a ratchet ******** the lift incase she wants to ride back there.....

IMG_5025.jpeg

I also installed these window vents to enjoy the rain scents and get rid of chili night gas.

IMG_5027.jpeg

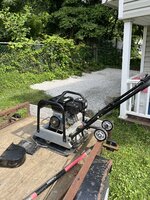
Then somehow I started getting lawnmowers from trash days again, seems I just can't help myself and I start picking them up. Along with the scrap man is selling me the lawnmowers he picks up for $5 each since he don't make any money off them at the scrap yard.

IMG_5048.jpeg

Got to have some fun, so back in November I got 2 tickets to the Buckeye country festival which had several artist playing there. Little Big Town, Chris Stapelton, and the main attraction George Strait. I wanted to see ol' George again before he stops touring again. Seen his show 3 times since 2005 and I have to say this one was the best. The seats sucked cause they were bleacher seats and after 6 hours there, they were very uncomfortable.
IMG_5129.jpeg

Along with a little fishing at the end of May, which got me 2 large mouth bass after fishing 3 hours that day. Haven't been back since that day.

IMG_5144.jpeg

That's most of May, atleast the big stuff anyway.
 
Last edited:
To avoid these ads, REGISTER NOW!
OP
M

madison069

Well-known member
Joined
Nov 5, 2010
Messages
4,147
Location
Monroeville, PA
More lawnmowers....

IMG_5214.jpeg

Took the youngest and her friend to Erie, PA for the Splash Lagoon indoor water park but didn't get any pictures as I was riding the slides myself! But I did get them at the Erie Lake beach.


IMG_5225.jpeg

This mower was an easy fix but not alot of folks know this can happen. When the engine stops quickly for what ever reason, the key on the flywheel can sheer off. Resulting in the mower backfiring and snatching the pull cord out of your hand. This is what it looks like sometime when the key is sheered.

IMG_5244.jpeg

Those two groves are supposed to be aligned with each other. So a simple 20 cents key and reassembling resulted in a nice running lawnmower!
IMG_5247.jpeg

Then i got another mower and a simple maintenance job done on it before it sold the same day.
IMG_5292.jpeg

Went to a car show and meet this fella who just bought this 1979 camaro. Has a Turbo'ed LSmotor in it with a th400. Young kid who bought it just as it is. Told him to let me know when he goes to the drag strip.

IMG_5307.jpeg

Oh and now I'm down to these 3 mowers to sell, just need a new air filter for the gold one.

IMG_5353.jpeg

And these two Toro mowers has major issues. the left one runs but burns oil, the right one doesn't spin 360 as it has something keeping it stuck in a certain spot of the rotation of the engine. I'm gonna have my middle child out there to work on these two cause they are going to give both of us a little learning experience.

IMG_5352.jpeg

Oh and then there's this old mower that was recently picked up. I still need to pressure wash it and see what's going on. So far I found a lot of oil around the muffler, but the oil dipstick was bent badly and the oil level was a little over full. So I'm wondering if the bent oil dipstick is giving me a false reading and the oil is just over filled which can explain the oil around the muffler.

IMG_5354.jpeg

So that brings us up to date. Only thing I'm missing is all of the boxes of camaro interior parts I've bought but since I haven't gotten to them yet I didn't get any pictures. I've just been stacking the boxes up as they come cause I'm busy as it is.

Oh wait, I got one more thing going on too. I'll post that on the next post.
 
Last edited:
OP
M

madison069

Well-known member
Joined
Nov 5, 2010
Messages
4,147
Location
Monroeville, PA
You've been busy!

That's A LOT of push mowers!


I added it up recently and apparently I've sold 58 lawnmowers since beginning of Covid. Started doing it with the middle child and then just kept going since she got back into school activity and working at a local grocery store.

Seems folks rather throw them away instead of taking them somewhere to repair them. Honestly it takes me on average an hour a mower to do maintenance and repair them. Some simple as carb cleaning and maintenance to fixing self-propeller and more complicated failures with the motors. I've worked on mowers ever since I started turning wrenches as a 13 year old. As a 13 year old I had 9 lawn mowers fixed up in my back yard and my dad showed me how to advertise in the paper to sell them.

Now adays with the internet it's gotten easier to sell stuff so I just do this to support the camaro hobby along with anything else I like doing.
 

Bob Heine

ALLIANCE MEMBER
Joined
Oct 24, 2009
Messages
10,703
Location
Boca Raton, Florida
Cody, when I lived in New York I never bought a lawnmower. As you discovered a long time ago, a lot of them have a sheared woodruff key. I found two identical mowers at the curb on town cleanup night, brought them home and both were good as new with two new woodruff keys. All my friends and neighbors had mowers I rescued from those town cleanup nights.
 
OP
M

madison069

Well-known member
Joined
Nov 5, 2010
Messages
4,147
Location
Monroeville, PA
Woodruff key! That's the terminology I was looking for.

It does seem to be a common issue and because of that I bought a 20 pack of woodruff keys off ebay to keep in the cabinet. Last I checked I had around 8 keys left so in 3 years I've used 12 of them.

Something i discovered yesterday was the new Briggs and Stratton EXI motors has a polymer camshaft. They make the shaft core out of metal but press on the polymer lobes and gears. It seems that's a common failure among the EXI motors. You would have thought they learned their lesson from the nylon teeth on timing chains that the old chevy had but I guess not.
 
OP
M

madison069

Well-known member
Joined
Nov 5, 2010
Messages
4,147
Location
Monroeville, PA
So as mentioned, I have another big project going on. I'm currently digging along this cement slab and this corner of the house to install a french drain. It seems the water was pooling up along this wall and the column that holds a corner of the back deck was trapping it. This resulted in water getting in the basement corner and some mold was growing in this corner. So, I dug this trench and had to stop when I hit concrete beside the brick. I'm now of the opinion that it was over pour and I'm going to chisel some of it away so I can get that trench another 3 feet deeper so it's below the basement floor some. Or I will be moving over a foot from the brick wall and continue the digging to get it down some more. But with the rain I've had to stop the progress. Hopefully I'll be able to start back next weekend once I'm back in the country. The previous owner was a contractor and he was so generous with putting junk bricks and glass back in this area for fill material. So, I got a nice pile of junk bricks to get rid of somehow. The dirt is going over by the playhouse to level that area out. The spot beside the playhouse is where I park the car trailer and because the are is a slight slope downward, it can be difficult to get the trailer out when it's wet in that spot. So, as you can see, the french drain project turned into 3 different "While I'm doing this, I might as well do these" projects.

I did check it yesterday after a rain and even though it hadn't rained in the past 3 hours, there was still a stream of water traveling down the trench. So, this was a much-needed project to be done even though my wife doesn't see it.

IMG_5272.jpeg
IMG_5273.jpegIMG_5275.jpegIMG_5279.jpeg

Oh and since the side of the concrete slab is exposed i decided now is the time to repair this slab. So I had moved all of my grilling stuff and put it on the other side of the deck for now in the yard. I recently pressure washed the slab and chiseled all of the loose stuff. I was going to seal the cracks up before I put down some concrete in the deep areas but the rain came and hinder that progress. Once I get the slab semi level, I'll be using a retopper material to make the concrete surface more uniform and then seal the concrete to prevent water from seeping in the new concrete top. Hopefully this will prevent this slab from getting worse over time.

IMG_5280.jpeg
 
Last edited:

Bob Heine

ALLIANCE MEMBER
Joined
Oct 24, 2009
Messages
10,703
Location
Boca Raton, Florida
Cody, I'm going to need some sympathy back pain medication just from looking at that project. Sometimes the "out of sight, out of mind" view changes the day something collapses.
 
OP
M

madison069

Well-known member
Joined
Nov 5, 2010
Messages
4,147
Location
Monroeville, PA
So, June 16th was mine and the wife's 10th anniversary, so with all of the points from flying to Texas and the spending I did during that time I was able to get us flight tickets to Punta Cana along with pay for the all-inclusive resort we stayed at. We reserved a private pool room with ocean view and it didn't disappoint! I walked to the bar from my pool which was only 20 feet away one morning, and ever since the waitress saw where I went, she started keeping my glass full. So, i didn't have to get out of my pool except for the restroom. Called for room service and they brought the food to the pool for me! We did spend alot of time at the beach too. I kind of wish I knew how many jack Daniel bottles I emptied during that 5 day stay, but I am kind of glad I don't know....

IMG_5412.jpeg

Then back home I got started back on the lawnmowers and was able to piece this one together with spare parts.
IMG_5560.jpeg

I disassembled the two Toro, one had bad rings so I ordered the rings and head gasket for it. The other one shows severe damage to the connecting rod and crankshaft. Not sure how that could of happened on a 4 year old mower. Maybe they didn't keep the oil level up since it's one of those stow away mower and I know they are prone to loosing oil when in the stored position. Check out the plastic timing gear and cam shaft.

IMG_5615.jpeg
The bad connector rod.

IMG_5630.jpeg

IMG_5631.jpeg

IMG_5637.jpeg

Waiting on rings and head gasket for the left one. The right one just might go in the spare part area since the rod and crankshaft alone is $160 in parts. Not including gaskets and seals.

I also bought a plate compactor for the projects I got going on. This Thing can beat you down if you're not careful! Any slope will cause it to take off downhill and get away from you if you're not careful and not strong enough to wrangle it back in place.

IMG_5613.jpeg


I used the plate compactor to compact the dirt down where I'm leveling the yard out where the car trailer is parked, so that's where I'm hauling the dirt to from the french drain project. I need to add acouple of more rows of retaining wall blocks at the trailer parking area to get one side level with the high side. But with the rain coming on and off it's started to hinder my progress on this project. Hopefully during this week, I can get the rest of the dirt dug out from the french drain trench, add the row of blocks to the parking area, and then this weekend go get some gravel for the parking area and french drain from the landscaping supply store. Crossing my finger for a decent weather this week but it's looking like rain each day this week.
 
Last edited:
OP
M

madison069

Well-known member
Joined
Nov 5, 2010
Messages
4,147
Location
Monroeville, PA
SO alittle progress on the french drain project. Seems the more I dug around, the more I've found that the concrete is actually 10 inches thick and it seems to continue under the deck. Makes me wonder if there was a complete concrete pad under this deck. Wouldn't surprise me since previous owner seems to enjoy dumping his job's fill materials around the yard, so why not store some under the deck.

Either way I got a water issue so lets see if I can divert it.
IMG_5702.jpeg

So, i took the concrete saw and saw cut some groves to create a channel in the surface of the concrete to help divert the water to the trench that is gonna be filled with a french drain pipe and 2B Gravel that goes to the retaining wall which has a french drain behind it filled with 2B gravel. Hopefully, this will slow the water down some and get it away from the house. IMG_5705.jpegIMG_5707.jpegIMG_5709.jpeg

I[ll go to the landscaping supply shop and get a truck bed of 2B gravel to fill this trench back up minus the 4 inches from the top. I'm starting to think maybe I should dig out the rest of that fill to see just how big the slab is under the deck. Who knows, might be a nice pad there and I can make it a nicer storage spot for the kid's power wheels.


the recent weekend I picked up a rusted out lawnmower that had a really pour shape deck. I mean holes all over the deck from the rust. So i tested the motor out and there was nothing major wrong with the motor. So I striped the good parts off the deck and also got the motor off. Being it was a briggs and stratton motor which was the same motor on the Toro but just different model, I figured it might be a direct swap. Low and behold it was a direct swap with no modifications needed. Only thing that stands out is the sticker on the cover says Craftsman instead of Toro.


The motor,

IMG_5711.jpeg

The Toro deck,
IMG_5712.jpeg

Mated together like they were made for each other.

IMG_5721.jpeg

I also picked up a transmission jack for an upcoming project involving the camaro. As much as I wish it was a new 4L80E transmission, I decided to just swap out the torque converter to make it work with the cam shaft that's in it. So, soon I'll be installing a 2500 RPM Stall converter in the TH400.

IMG_5681.jpeg
 
Last edited:
OP
M

madison069

Well-known member
Joined
Nov 5, 2010
Messages
4,147
Location
Monroeville, PA
While filling in the trench, a nice heavy rain fall came by and dropped a good bit of water on the ground. So of course I had to investigate my concrete trench. Seems like it’s working. There’s a nice steady stream flowing toward the gravel drain trench and taking most of the water away from the brick wall.

IMG_5750.jpeg
IMG_5751.jpeg

And the trench is mostly in place with the block border. Just need to clean the fill up and pack it along the block to keep them in their places. 1 ton of 2b limestone gravel went in that trench…

IMG_5752.jpeg

IMG_5753.jpeg

Stopping for the day with that project as I’ve been working on other stuff too. Being hot and muggy now I like to go in the garage to tinker.
 
OP
M

madison069

Well-known member
Joined
Nov 5, 2010
Messages
4,147
Location
Monroeville, PA
Happy Forth of July!

In-laws are coming over today for dinner. Only thing I’m in charge of is two desserts and cook the meat which is putter butter beef( it’s what my wife and mother in law keeps calling it) and I’m just to finish the ribs when it arrives, not sure what the mother in law has in mind regarding I finish it off.

With the rain coming and going all weekend, I wasn’t able to do the concrete pad repair so it just sits for now til the weather clears up a few days straight.

Since we will be going camping soon, I pulled the camper in the garage to go over it. So far it shows to be in good shape except one corner is soft, and the big storage compartment lid is trashed. Nothing major since I’ve already fixed one corner due to the same issue. The storage lid was supposed to be temporary until I had a diamond plate lid made. Guess it’s time to do it. I also neglected it and so I didn’t put any damp rid in there. Seems the condensation got to the ceiling.
IMG_5740.jpeg
IMG_5742.jpegIMG_5743.jpeg

I left it up after cleaning it, while it dried out some more before I popped it down to go over all of the sealed joints.

Then I started working on the mower with the bad piston rings. Overall it wasn’t a bad job to do. Smaller then a typical v8 and easier to maneuver.
IMG_5800.jpeg

Here we are with the piston and crankshaft back in with the new rings. I ran the honer tool to deglaze the cylinder wall already and had all of the parts cleaned. IMG_5820.jpeg

Then I assembled everything back on it minus the cover to get it ready to reassemble to the deck.
IMG_5823.jpeg

And here we are back on the deck and running. After running for 5 mins it’s been smoke free! IMG_5824.jpeg

I’ll let it cool off and check the head bolts and the valve gaps again before cutting the grass with it.

Other then cleaning the house, that’s been pretty much the past couple of days for me.
 
OP
M

madison069

Well-known member
Joined
Nov 5, 2010
Messages
4,147
Location
Monroeville, PA
So let’s bounce to another project that’s going on.

So I took the fill from under the back porch and placed it by the playhouse where I park the car hauler. Once I got the ground mostly leveled I went and got 3 tons of 2B limestone gravel. The truck can haul one ton at a time so that means I had to make three trips to the landscape supply store.

Here is the first ton and the landscape fabric I placed down under the gravel.
IMG_5853.jpeg

Got to put the truck to work but at least I can protect it with tarps.

IMG_5859.jpeg

While compacting the gravel I saw a bolt and washer laying on the gravel. Strange I thought, as theee was no bolt in the gravel and it sure did look new.

So I popped the belt cover off my plate compactor and low and behold I found the origin of the shiny bolt. It was the bolt that held the clutch assembly on the plate compactor.
IMG_5860.jpeg


Once I put it back together I ran that plate compactor for awhile to get a nice level solid area for the trailer.

IMG_5861.jpeg

Then I took the plate compactor back to the garage to tighten the clutch bolt some more and put the belt cover back on. I used my 3 ft long extension to do the job…
IMG_5864.jpeg

Now to back the trailer in its spot and check it out.

IMG_5867.jpeg

IMG_5868.jpeg
IMG_5869.jpeg

So apparently I still need to come up more on the playhouse side of the parking area, along with more gravel in the rear. I didn’t anticipate the axles going that far back. But while backing the trailer back it was going so easily and in the past it used to shift toward the playhouse, so I never had it this far back. So I’ll work on the blocks to extend the wall some more and bring another ton of gravel to level out the area some more in the near future.
 

Attachments

  • IMG_5863.jpeg
    IMG_5863.jpeg
    1.4 MB · Views: 10
OP
M

madison069

Well-known member
Joined
Nov 5, 2010
Messages
4,147
Location
Monroeville, PA
Between trimming bushes and cutting the yard, I worked on the concrete slab some. I had two bags of sand topping in my stash of bag mix, so I figured I’d try them in a isolated spot. Working under the stairs was alittle difficult getting close to the steps like I was, but I think it came out ok. I need more practice but since this area will be covered back up with wood for the grill, I figured it’s the perfect place to practice.

Brushed bonding adhesive down and here it is dried. It was like a shiner sheen going on like I clear coated the concrete slab.


IMG_5871.jpeg


Here it is with the two bags of sand topping. Alittle crooked on my edge so next time I’ll bust out the 6 foot level to use as a guide. Also I needed to wait some more before I brushed the top. Oh well, this part is serving it’s purpose and it should be solid.
IMG_5873.jpeg

I might break this up in several sections if I’m going to do this all by myself….
 
OP
M

madison069

Well-known member
Joined
Nov 5, 2010
Messages
4,147
Location
Monroeville, PA
Ever took a step forward in your list of things to do and just get taken back 2 steps? Well apparently when I was weed eating along the wall on Saturday I must of damaged the coaxial cable that goes to the living room tv. The cable was on the ground and just laying against the house. I figured I’d clean up this wall while I was at it along with run the cable up high to keep it safe from now on. Well here is the results of removing all of the unused cables on one side of the house. I also took down the old Verizon box since they installed a new smaller box when I moved here.

IMG_5880.jpeg

This leaves me with two sides of the house left to remove the junk cables that was left from previous cable techs. I just need to bust out the 40ft ladder to get the last two walls. This will be the same time I run the new Ethernet cable to the garage when I do this job.

While at Lowe’s getting the RG6 stuff, I saw that there was a sale on the dewalt fans. I’ve been thinking of getting one for the boat and varies projects around the house while I work. So for $149 I got the fan, one 5ah battery, and a charger. Heck the battery cost that much so I I figured why not.

IMG_5879.jpeg
IMG_5881.jpeg

It moves some air and I can see it being a pleasure to use in the future.

That’s been my Sunday, was gonna relax and piddle on small project but this cable project seems to be a priority in my house.
 
OP
M

madison069

Well-known member
Joined
Nov 5, 2010
Messages
4,147
Location
Monroeville, PA
A friend of my wife has a landscaping business. He reached out to me to ask if I could work on his mowers for him and so I told him I'll give it a shot.

He brought this walk behind mower to the house and on the cutting deck attachment there was a crack in the mounting plate. So i jacked the mower in a position to get the crack closer together. Once satisfied I grinded the paint off as much as I could to prepare it for welding.
IMG_5910.jpeg

IMG_5911.jpeg

IMG_5912.jpeg

Ideally I would have like to remove the cutting deck and weld this on both side but several bolts was giving me alot of fits when i tried to remove them so I left the deck on the mower. Either way I got it welded with the Mig welder and lets say, the weld looks like ****. I got good penetration but boy did it look rough. Considering this was the third time I've ever used the mid welder I figured I should be thankful that it even held together lol.
IMG_5913.jpeg

SInce I didn't fully trust my weld I decided to put a plate on it to help reinforce that joint some more. So, I pulled a 1/4" steel plate out of my stash and cut this L shape plate out with the cutting torch. I need to get a metal table for cutting and welding made up for the shop, doing this outside on an old garbage truck drum brake hub was interesting. But one thing nice about the hub was it allowed me to use vice grips to hold the metal plate while I cut and grind. I didn't get a picture of this setup cause I was in a rush.

Got the plate cleaned up some and cut holes in the plate for the bolts. Then I drilled a new hole for an extra bolt on the bottom and assembled it all together.
IMG_5914.jpeg

Then I painted it with a coat of paint to slow down the rusting of the plate.

IMG_5915.jpeg

When I sent the photos of the repair, the guy seems to be happy with it, hopefully it holds up for him. Maybe when the season is over, I can get him to bring it back over so we can take the deck off and go through the rest of the deck and also redo this mounting point.

In the mean time I'll practice my welding on my 1/4" plate to learn the machine better and also improve my welding skills.
 

Attachments

  • IMG_5916.jpeg
    IMG_5916.jpeg
    761.6 KB · Views: 9
Last edited:
OP
M

madison069

Well-known member
Joined
Nov 5, 2010
Messages
4,147
Location
Monroeville, PA
So one morning I got up to find the house fan wasn’t working. Since I was getting up for work I just put it off til later. Came home at lunch time and armed with a socket set, small crescent, a new fan belt I had bought a couple of years ago and a headlight I got up in the attic. I crawled around and found the fan belt was broke as suspected. Pulled the old cracked up belt and installed a new one. Remind me to get back in the attic during the winter so I can add a couple of small plywood pieces to the attic floor to make it easier to get to this fan. Attic is very shallow height wise so it’s never fun to be up there.
IMG_5965.jpeg
IMG_5962.jpeg

Buddy of mine called me and said he saw a show the night before and there was a rig with Big Dog Drilling on it. I said yea that’s “Black Gold” rig work is real but floorhand drama was mostly fake. But, season one and the last episode there was a short part where my Dad made an appearance on the show. He was the Drilling Superintendent at the time and was watching over 6 rigs when the season 1 was recorded.
IMG_6029.png
IMG_6035.pngI miss that man.

Anyway, the youngest kid wanted to make a few bucks so I had her wipe the outside of the toolbox down for me. I think she did a great job!
IMG_6052.jpeg
IMG_6061.jpeg

She previously cleaned the bathroom in the garage and it still looks good. Slowly I’ll have her clean the whole garage!

A little mower repair involved some welding. Still looks rough but the heat mark on the other side tells me I got good penetration so I’m ok with it. A little grinding and some red paint makes it pretty.
IMG_6068.jpeg

This batch of mower makes it 16 total for the year. 2 of them will go to another landscaper as they were his and he wanted me to repair them for him. The green one will go back to the rental property, the toro with the black cover will probably go into my landscaping tools and I’ll sell the other push mower once I confirm there’s no issues with the black toro motor. Oh and the pressure washer I picked up 2 months ago was fixed with a simple carburetor cleaning. No issues with the pump on this one!

IMG_6090.jpeg

Well, that’s it for updates for now, I’m still working on the concrete pad but I’m doing it in small patches since I’m doing it by myself. The side of the pad is proving to be challenging on recapping it!
 

Attachments

  • IMG_6061.jpeg
    IMG_6061.jpeg
    823.3 KB · Views: 9
To avoid these ads, REGISTER NOW!
OP
M

madison069

Well-known member
Joined
Nov 5, 2010
Messages
4,147
Location
Monroeville, PA
Not much to add other then just cleaning. I've been purging the garage more this weekend and organizing the stuff that I do want to keep. Been thinking of what I want to do to clean up the place more and make it more efficient. I'm starting to think about replacing the craftsman tool boxes with a 72" wide toolbox top and bottom setup. WIth the train of thought that I would also eliminate the card catalog filing cabinet since this cabinet holds some random tools. Also, maybe get a single 60 gallon air compressor and sell the two 30 gallon air compressors. But none the less I just want to get rid of **** that i've been holding onto and haven't used in years so that way I will need it in the near future when it's gone.

Before
IMG_6090.jpeg

After
IMG_6241.jpeg
IMG_6242.jpeg
IMG_6243.jpeg
I don't have a before photo, but this is the after math of removing the junk off this shelves and organizing the kept items.

IMG_6259.jpeg
 
Last edited:
OP
M

madison069

Well-known member
Joined
Nov 5, 2010
Messages
4,147
Location
Monroeville, PA
These photos are just what I'm still working on.

The pile of card board boxes are all camaro related parts that I need to start installing on the camaro. There's a torque converter, exhaust system, and interior pieces in that pile.

Think I'll start to clean up around the camaro next so I can make more room while working on the camaro. This way I can work on getting rid of the pile of card board boxes.

IMG_6245.jpeg

IMG_6246.jpeg

IMG_6247.jpeg
IMG_6250.jpeg
 
Last edited:
OP
M

madison069

Well-known member
Joined
Nov 5, 2010
Messages
4,147
Location
Monroeville, PA
So I’m still cleaning up around the garage. Started working around my work table since it’s where I’m holding camaro parts as I install them. Now I can actually walk around the table without tripping and I also put a dry erase board up to start writing the list of things to do on the camaro. I need some markers…..
IMG_6296.jpeg

IMG_6297.jpegIMG_6298.jpeg

I need to either shift through the buckets of bolts I have on the table, or just toss them. Of course they are full of bolts related to the camaro and I’m sure other cars/trucks I’ve worked on in my life. Maybe that might be a good job for my youngest?

Going through everything and getting rid of stuff I don’t need gas cause some other containers to become empty. Figured I’d put them here for now, but they might get tossed soon. Oh and I’m sure my refuse guys did not like all of the **** I took to the street to be picked up. It was roughly 3 truck loads. Metal man was happy though!
IMG_6300.jpeg

I took all of my cooking related stuff and put them in this tote for now. The plans are to put a small outdoor storage area by the grilling pad. So this will go outside soon.
IMG_6295.jpeg

As for the grilling pad, I’m just gonna say concrete isn’t my strong suit. But I did learn some valuable lessons doing this pad. Basically a 18” hand trowel is not big enough for this job. Sand topping mix don’t stick to existing concrete sides like stucco did in my younger days. Also a 4” hand edger is not the right tool to make straight lines.

IMG_6183.jpeg

But hey it’s level and not riddled with craters and bad dips in the surface! So I’ll call that a win. Plus it should now keep water from dripping in the cellar since all of the preexisting cracks are sealed up. I’m gonna spray a sealer on this top coat to keep the moisture at bay. In the mean time I might talk to some concrete friends and ask them what it would cost me to have a preformed slab installed here if it really drives me nuts. Even though most of the area is gonna get covered with split wood, bbq grills, smoker, propane burner stands, and grilling related stuff, it still might bug me.

Oh well, I’ll deal with it.
 
OP
M

madison069

Well-known member
Joined
Nov 5, 2010
Messages
4,147
Location
Monroeville, PA
Found some markers so I started writing the list.

IMG_6320.jpeg

The van’s muffler rusted apart, so I ordered a new one and installed it. I thought about welding but the metal was just too rusty.
IMG_6323.jpeg
IMG_6324.jpeg

Then I cleaned the bench off and cleaned under it.
Need to increase the size of the battery tool self to have a spot for the fan.
IMG_6331.jpeg

Probably next section is to go through the toolbox and organize it more. I think I’m gonna put the Wright tools that were my dads in the tool chest and start using them.
 
OP
M

madison069

Well-known member
Joined
Nov 5, 2010
Messages
4,147
Location
Monroeville, PA
Well got another lawnmower recently, so I went through it. Nothing major except the pull cord was janky so I replaced it, new air filter, fresh gas, new oil, and sharpened the blade. Went through to and cleaned it some and removed some of the **** that was on it.
IMG_6429.jpeg

So I got 50 led bulbs to replace the 40 4’ fluorescent bulbs in the garage. Since two of the fixtures had blown ballasters I went ahead and did these twos. This is the first one, on the left.
IMG_6430.jpeg

This one has been out basically since I got the place.
IMG_6431.jpeg

I cut the wires and wired it for the led but left the ballast in the fixtures since they ain’t causing any issues. IMG_6432.jpeg

Let there be lights!
IMG_6433.jpeg

That leaves 6 more fixtures to do and then these four on the other side of the garage. As you can tell wasn’t much lighting going on in the other side.
IMG_6435.jpeg
IMG_6436.jpeg

That was pretty much todays progress.
 
OP
M

madison069

Well-known member
Joined
Nov 5, 2010
Messages
4,147
Location
Monroeville, PA
So for giggles I did the math for how much watts was being used before and after the LED bulb swap on the big side of the garage.

I took out 20 of the old T5 bulbs with a 34W rating , which is a total of 680W.

I installed 32 LED with a 14W rating, which is a total of 448W.

So I got more light and I am using 232W less when the lights turn on.

I have to double check but internet search says it’s 9 cents per kW for my power company and guessing 3hrs a day of usage for an average in the year the calculator says I save $22 a year in electricity. So I have to get 12 years out of these bulbs before I see the return on the initial purchase of these bulbs. I fear I won’t be in the house long enough to see the return on my purchase but I can see better in the garage now!

Oh and I forgot to add, the last 6 light fixtures that I converted to LED got their ballasts removed. So, there's 2 light fixtures that still has the ballasts in them and 6 that are empty. I'm sure it drove some folks nuts when i said I left the ballasts in place for the first two.....:giggle:
 
Last edited:
OP
M

madison069

Well-known member
Joined
Nov 5, 2010
Messages
4,147
Location
Monroeville, PA
I went back through my thread and I found that I had put 4 of those light fixtures back on the ceiling on March 4th 2018. I said back then I would change them to LED as budget allowed. Well fast forward over 5 years later and they are all done now. That one light fixture did work but I remember it went out shortly after being installed.

So I got the other side completed during lunch,

IMG_6457.jpeg

Nice and bright in that part of the garage now!

And for proof here is a photo of the old ballast in the trash can.
IMG_6456.jpeg

Now I can write off something on the board.
 
OP
M

madison069

Well-known member
Joined
Nov 5, 2010
Messages
4,147
Location
Monroeville, PA
I needed a place to put my dewalt fan so I can get it out of the toolbox. So I made a bigger shelf and also placed a 4ft led light fixture under the shelf. It’s one of those harbor freight deal for $18.

Before
IMG_6331.jpeg

After
IMG_6464.jpeg


I know it seems to be a pattern there with the light. I’ve been wearing my headlights due to poor lighting so I made it a priority to get this resolved.
 

OutlawDrifter

Well-known member
Joined
Jan 20, 2015
Messages
3,872
Location
KS
Cody, I've been considering a light above my workbench...it would need all the Camaro exhaust stuff cleaned off first if I were to use it for something other than storage 🤷‍♂️

Upgrades are looking good 🤙
 
OP
M

madison069

Well-known member
Joined
Nov 5, 2010
Messages
4,147
Location
Monroeville, PA
Cody, I've been considering a light above my workbench...it would need all the Camaro exhaust stuff cleaned off first if I were to use it for something other than storage 🤷‍♂️

Upgrades are looking good 🤙
I haven’t worked at the bench yet, but the light seems to be bright! I was concerned with how close the light was to the wall. Didn’t know if that would cast an odd shadow. But it seems to be well placed as there no shadow from my head being over the bench if it was directly above me.

Currently the light fixture is just sitting on the shelf bracket and being held in place with the angled piece of the bracket. I might try to mount it more solid if this location turns out to be ideal.

Like you I need to also deal with my camaro exhaust. But first I need to install the new torque converter and then I can install the exhaust. Maybe that will be this weekend project or at least get it started.
 
OP
M

madison069

Well-known member
Joined
Nov 5, 2010
Messages
4,147
Location
Monroeville, PA
Got to start somewhere right?

After helping a buddy remove the climate controls out of his Subaru, I decided to look at the camaro.

I got the driveshaft pulled out, but while I was removing it I started to wonder if I had proper travel distance for the driveshaft. I’ll have to do some measuring when I get ready to reinstall the driveshaft.
IMG_6484.jpeg

Then I removed the shifter from the camaro. This is a competition style shifter so it’s alittle complicated to shift. Specially if it’s just gonna be a ride around town car.
IMG_6485.jpeg

Then I had to clean up for dinner so I stopped there for the night.

Think I should drain the fluid somehow, but other then dropping the pan it’s currently my only option. Maybe it’s time to buy a fluid extractor?
 

Bob Heine

ALLIANCE MEMBER
Joined
Oct 24, 2009
Messages
10,703
Location
Boca Raton, Florida
Think I should drain the fluid somehow, but other then dropping the pan it’s currently my only option.
Cody, the first time I do the transmission fluid and filter change on one of my cars I order a pan with a drain. If it isn't outrageous, I get an aluminum one with extra capacity. I could only find a steel one for the PT Cruiser.
 
OP
M

madison069

Well-known member
Joined
Nov 5, 2010
Messages
4,147
Location
Monroeville, PA
Cody, the first time I do the transmission fluid and filter change on one of my cars I order a pan with a drain. If it isn't outrageous, I get an aluminum one with extra capacity. I could only find a steel one for the PT Cruiser.
I've been thinking about one of those fluid extractors from harbor freight to get this job done without a big mess. But I did order a new pan with a drain plug so I can swap the old one out. It's supposed to be in by Tuesday so that gives me time to get the transmission out.
 
OP
M

madison069

Well-known member
Joined
Nov 5, 2010
Messages
4,147
Location
Monroeville, PA
LubeLocker gasket, LubeLocker gasket, LubeLocker gasket...catch my drift? :LOL:

Hmmm, something about gasket.......


$32 for this gasket I see, alright I got one on order for the th400 pan. Never heard of them but honestly that's not surprising. It used to be the fel-pro blue gasket was the best on the market but it's been awhile.
 
OP
M

madison069

Well-known member
Joined
Nov 5, 2010
Messages
4,147
Location
Monroeville, PA
So let’s start the transmission removal process.

First let’s remove as much fluid as we can with the fluid extractor. We will reuse this fluid!
IMG_6494.jpeg

The connection was letting air in so I placed some clamps on it. Now it’s tight!
IMG_6495.jpeg

Roughly 1.5 to 2 gallons was removed.
IMG_6497.jpeg

Let’s separate the transmission from the engine, this transmission jack from harbor freight is making this job really easy! I’ve always hated pulling transmission on regular jacks.
IMG_6507.jpeg


I had to test for the new converter on the flywheel and while test fitting I’ve determined the bolts for the torque converter is too short. I got new bolts on order that’s half an inch longer. But to use 7/16” diameter bolts I had to drill the holes on the converter to accept the bolts. Follow the instructions for the converter to allow bigger bolts to fit in the ears of the converter.

IMG_6509.jpeg

I got the transmission connected back to the engine but have to wait for the new bolts for the torque converter. Then I cleaned up and get the transmission cross member reinstalled. I still got some more work to do under the car so I can keep busy while I wait for parts to come in.
IMG_6513.jpeg

The old transmission pan.
IMG_6512.jpeg
 

Attachments

  • IMG_6511.jpeg
    IMG_6511.jpeg
    628.8 KB · Views: 3
OP
M

madison069

Well-known member
Joined
Nov 5, 2010
Messages
4,147
Location
Monroeville, PA
Went to a concert last night, sevendust and Alterbridge. I enjoyed Alterbridge performance as I do like their music!
IMG_6525.jpegIMG_6540.jpeg

Today after work I grabbed a few things for the camaro like washers, paint, and the packages that has came in for the camaro.

Then I assembled the new tiller I got from the Hot Deal. $150 for the tiller isn’t a bad deal. But you do get what you paid for and this tiller has some plastic gears and pulleys. We will see how long that last. But compare to my old one, you can tell the times were worn out and the new one is bigger.
IMG_6551.jpeg
IMG_6552.jpeg
IMG_6549.jpeg

Then I removed the fishing lines off some old reels I picked up from a garage sale. Planning to clean afew of them up and put them back to work. Will see how this goes.
IMG_6557.jpeg

That’s been it for the day.
 
OP
M

madison069

Well-known member
Joined
Nov 5, 2010
Messages
4,147
Location
Monroeville, PA
Some progress on the camaro. I got the right bolts and some grade 8 washers. Why the washers? Well, there is a good gap going on between the converter and flex plate.
IMG_6580.jpeg

Per the standards, you only want 1/8-3/16” gap for the ballooning of the converter while in use. This was over 1/4” and if I just pushed the converter to the flex plate I would end up disengaging from the transmission pump. Now they do sell fancy shim kits for this reason but simple grade 8 washers will do the job of filling in the gap. But first let’s get some red loctite on the nut threads.
IMG_6581.jpeg

There, properly gapped and torqued down to one click in the elbow. Eventually it will be two click when the arthritis sets in my elbow. But for now it’s one click.
IMG_6582.jpeg

Then it was time to get the dust shield on the converter. Had to do a little trimming to the cover to clear the starter since this was an aftermarket cover.
IMG_6585.jpeg

This is why it’s hard to let go of these buckets of bolts. I needed 4 bolts for the cover and low and behold some old timing cover bolts did the trick. I even cleaned them up with the wire wheel and painted them.
IMG_6589.jpeg
IMG_6588.jpeg
IMG_6590.jpeg


Then I admired the new transmission gasket from lube locker. We will see how this goes as I’ve never used these gasket.
IMG_6579.jpeg
 
To avoid these ads, REGISTER NOW!
Top Bottom