To avoid these ads, REGISTER NOW!

Above 1200 Sq/FT Cody's 33'x62' Garage

Wokspaces above 1200 squarefeet.
OP
M

madison069

Well-known member
Joined
Nov 5, 2010
Messages
4,148
Location
Monroeville, PA
I don't envy any of that. I let a little secret out I didn't guide coat anything on my truck. Did I miss a few low spots? Sure did!

Bret
I talk to myself while sanding and I keep telling myself why not just paint it as is, it’s a driver! Then I just keep sanding and I tell myself how it’s worth finding these spots now instead of being annoyed that I didn’t try to reduce some of them…..

Next project is going be a rat rod…….
 
To avoid these ads, REGISTER NOW!
OP
M

madison069

Well-known member
Joined
Nov 5, 2010
Messages
4,148
Location
Monroeville, PA
Tonight’s progress was completing the door and front fender top half, and then getting half of the hood done. So many different curves and trying to get it all sanded in a uniform way is challenging. But I’ve found a few low spots on the hood that would of bugged me and also on top of the front fenders. Hopefully I’ll get the other half of the hood done and I’ll go back and prep the low spots for filler and address some high spots too.

EFD5F2FE-35CD-43FD-A9A6-1B7D730A13A8.jpeg
DAB50F5D-F4B6-4A3B-AB96-2BC41B86DF11.jpeg
22C08EEA-DCD7-4A2B-AAF4-33E8EC1725AA.jpeg
 
OP
M

madison069

Well-known member
Joined
Nov 5, 2010
Messages
4,148
Location
Monroeville, PA
Using Evercoat rage gold filler, but I do have some glazing putty on hand. The plan was to skim coat the low spots and then block sand again before applying high build again.
Some of these spots are 1/8” deep when you place a straight edge on it so filler should be good.
 
OP
M

madison069

Well-known member
Joined
Nov 5, 2010
Messages
4,148
Location
Monroeville, PA
If it's truly a driver, perhaps vinyl wrap it instead of wet paint. Just a thought.
It has crossed my mind. But luckily I have a buddy that runs a body shop who’s willing to paint it for me. The body work wasn’t possible due to he is a one man shop right now and doing insurance claim the most. But he can do the paint for me and at cost of material.
 
OP
M

madison069

Well-known member
Joined
Nov 5, 2010
Messages
4,148
Location
Monroeville, PA
The glazing putty I’ll be using when needed. Tonight I hope to finish the other half of the hood and then I’ll go around and sand the low spots out for filler.
6AC39432-1BA0-4CCF-B966-06C49E8B81E5.jpeg
 

bj383ss

Well-known member
Joined
Sep 29, 2011
Messages
3,166
Location
TX
That's the same stuff I used except mine was in a metal can. It worked pretty well. I actually used quite a bit on the inside of the bed panels. Tons of little dings and dents. I didn't get all of them but the majority. I still haven't decided if the inside of my bed will be body color or Rhino line. it.

Bret
 
OP
M

madison069

Well-known member
Joined
Nov 5, 2010
Messages
4,148
Location
Monroeville, PA
I was able to get the rest of the hood blocked sanded. Then I went around and sanded all of the low spots with 150 grit sandpaper, so the filler has something to bite into since it had high build primer in the low spots. Then I went around with some wax and grease remover to clean all the area that was going to get filler. Got filler spread out and just sat in a chair while the filler cured. I was beat last night so I just called it quit after the filler was applied.

My filler game is weak, luckily my sanding game is strong. I tried to skim it better, but it just didn't look right. first it was too much, then it was too little, and then it was never perfect. Oh well, I can sand it off.
D10526B9-57AA-405C-8C35-64F34DBFFCA0.jpeg170B463B-BFC8-48C2-902B-630FDEAE8373.jpeg

Oh, and I found a great use for the koozie with magnets in it while I was applying filler. I won't be doing it throughout the project but just thought it was cool.
A0CB9114-5B32-4CC7-ADCB-FD3C55B95418.jpeg
 
Last edited:
OP
M

madison069

Well-known member
Joined
Nov 5, 2010
Messages
4,148
Location
Monroeville, PA
So Saturday (10-29) I worked on the camaro for 7 hours, just a sanding. You would think as much filler as I put on the car, I wouldn’t have any low spot. Well I’m telling ya I had several low spots in the filler! I went back with glazing putty due to being so shallow of a low spot and was able to get them all level. I know this is boring updates, but it’s all I got to update with these days.
44F832EB-55E9-41F6-A962-3A18BEF605F7.jpegE0303C06-0309-44FD-9A95-2319AC65C382.jpeg9823E9F1-746F-45BA-A141-783C8EADE903.jpeg6BCDFA1A-A9B7-44DD-92D7-0EDB5EA08487.jpeg61A15710-87AD-4120-817D-E191DB10CAB7.jpeg4B4B0294-0E97-49B7-B886-C194C9A911A1.jpeg3754553B-F800-428B-B8A3-8E517A5424DD.jpeg
I went ahead and got it lifted up so I can work on the bottom half of the car without having to lay down to do it. While it was up I had a little fun with it and took the factory tires from my truck and got a photo of the camaro jacked up!

7A070562-24D9-41DA-B2AF-2D9B365C9948.jpeg

I think it looks good! 😂🤣
Buddies back in Texas thought otherwise.
 

Attachments

  • BBF3A85C-14D7-437E-9427-1FB65F2F2643.jpeg
    BBF3A85C-14D7-437E-9427-1FB65F2F2643.jpeg
    741.2 KB · Views: 9

bj383ss

Well-known member
Joined
Sep 29, 2011
Messages
3,166
Location
TX
I don't think its boring at all. These parts of the projects is what makes them awesome at the end. All the little details that people like to skip over because they are boring and tedious. I remember doing all that and I don't want to do it again but it is nice to see someone else going through it. :)

Bret
 

Bob Heine

ALLIANCE MEMBER
Joined
Oct 24, 2009
Messages
10,705
Location
Boca Raton, Florida
Cody, I'm with Bret. Those who have slapped a couple of coats of finish paint and skipped the hours of prep have no idea why it doesn't look so great.
 
OP
M

madison069

Well-known member
Joined
Nov 5, 2010
Messages
4,148
Location
Monroeville, PA
I don't think its boring at all. These parts of the projects is what makes them awesome at the end. All the little details that people like to skip over because they are boring and tedious. I remember doing all that and I don't want to do it again but it is nice to see someone else going through it. :)

Bret

Cody, I'm with Bret. Those who have slapped a couple of coats of finish paint and skipped the hours of prep have no idea why it doesn't look so great.

Bret, Bob - Like ya'll say, it should be worth it in the end. I'm not trying to win best of show with this car but as long as it's looks good from 10 feet away, I'll be happy! lol

Well, nothing much to report yesterday. Just cleaning around the garage, house, and yard. repaired a utility sink drain cause the old one rusted out. Was an easy fix, but the cheap plastic drainpipe had a lot to be desired. Also, it seems none of the big box stores had the double sink drain setup like the original, so I had to use one of those double sink drainpipes where the drain is under one sink while the other side has to be routed to the sink beside it instead of having the main drainpipe in between the sinks if that makes sense. I found the original setup online but comparing the $65 with shipping time to the cheap plastic $30 option that I can do now, it just made sense to go that route.

Tonight, is trick or treat so no working on the camaro. But tomorrow is looking good after work, along with the rest of the week. Maybe I'll get the sanding all done and I'll be able to shoot a new coat of high build primer over the whole car this weekend. Then I'll block sand it again and hope nothing extreme pops up and I can move on to the bumper covers and the other little stuff that's being painted the same color.
 

Bob Heine

ALLIANCE MEMBER
Joined
Oct 24, 2009
Messages
10,705
Location
Boca Raton, Florida
Also, it seems none of the big box stores had the double sink drain setup like the original, so I had to use one of those double sink drainpipes where the drain is under one sink while the other side has to be routed to the sink beside it instead of having the main drainpipe in between the sinks if that makes sense.
Cody, makes perfect sense. Lowe's shows both styles available in my local store but I bet one or the other isn't really in stock.
Double Sink Drain - Center.jpg Double Sink Drain - Side.jpg
P.S. I earned a Homer Simpson award when I thought it would be a good idea to have two traps under the sinks, including one on the garbage disposal. The fourth time I had to clear both traps I put the setup on the right under there with a baffle tee. The baffle tee reduced the ceiling cleaning events to near zero.
 
Last edited:
OP
M

madison069

Well-known member
Joined
Nov 5, 2010
Messages
4,148
Location
Monroeville, PA
Bob, the one on the right is what I used. The one on the left was available, but due to sink drains were so close together (5" from center to center), I wasn't able to use the left one. The center T was too bulky and wide. They make a setup that works with the close together drain opening, but like I said it was $65 and I just couldn't stomach that much for a room that was not finished and needs an update anyway.
 
OP
M

madison069

Well-known member
Joined
Nov 5, 2010
Messages
4,148
Location
Monroeville, PA
Got most of the filler blocked last night. A few spot needed some glazing putty. Just need to sand the driver side door. Then go over the whole car with a fine tooth comb to fix any small things I’ve missed. Gonna start sweeping the floor up and vacuuming everything as much as I can. Try to get the area ready for the high build primer that is to go on the camaro next.

58623435-7DA4-44E6-883C-0C2861E13079.jpegCCAB7862-8BE0-488F-8D92-EA16034E59D1.jpeg

Something I’ve been wrestling with is when do I stop with the smoothing of the body? It seems every time I look, I find some small spot that’s not perfect so I mark it to come back later. Eventually it’s gonna come down to nitpicking nothing and I’m gonna end up sanding the car away! Lol

Either way, I’m getting close to seeing a light at the end of the tunnel.
 

bj383ss

Well-known member
Joined
Sep 29, 2011
Messages
3,166
Location
TX
That is the million dollar question. I struggled with this on the roof of my truck. Probably about 10 sessions total. It came out pretty good. The hood however I got impatient and missed several low spots. I can see them when I drive it. So I guess the hood should be perfect and maybe the driver door? Those are the two things you will see every time you drive it. This is why paint and bodywork cost so much in labor. People don't realize how much time and effort goes into making it look good.

Bret
 
OP
M

madison069

Well-known member
Joined
Nov 5, 2010
Messages
4,148
Location
Monroeville, PA
That is the million dollar question. I struggled with this on the roof of my truck. Probably about 10 sessions total. It came out pretty good. The hood however I got impatient and missed several low spots. I can see them when I drive it. So I guess the hood should be perfect and maybe the driver door? Those are the two things you will see every time you drive it. This is why paint and bodywork cost so much in labor. People don't realize how much time and effort goes into making it look good.

Bret
Yea I’m thinking the same thing, I just hope I don’t miss something major over all. Minor misses I can probably live with, but if it’s big then it will probably drive me nuts.

So I went over the car and finish sanding the last of filler and glaze putty. Then took my time with a maroon scotch pad and went over the edges and surface to find any minor issues. Once I got it all the spots I found corrected, I started vacuuming and cleaning the surface to prep for tape off. I’ll go back over the whole car with wax and grease remover again before painting but I’m sure the air is holding a lot of dust particles despite the box fans with filters running.

Was able to get the passenger side taped off mostly. Still need the under skirt taped off to keep overspray from getting to the underside. Maybe I’ll get the driver side done and the skirt. Then I’ll vacuum the floor and wipe the surface again today.
7FF3757F-84FF-4733-B3A3-725987E4A001.jpegE7A82B8B-5C7C-478F-B200-60F78A08EC50.jpeg2A7403B4-9185-4C6A-90DA-B9C3F10C5B4D.jpegD431DFAB-D971-459F-9F6B-B25D6824026D.jpeg
 
To avoid these ads, REGISTER NOW!
OP
M

madison069

Well-known member
Joined
Nov 5, 2010
Messages
4,148
Location
Monroeville, PA
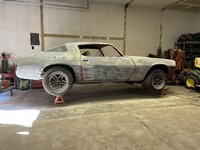
So after a long weekend traveling and wheeling and dealing I was able to finish taping off the camaro and shot some primer on the camaro this morning. Overall it looks good, just a bunch of small imperfections that I’ve found. The high build primer was giving me a lot of trouble with shooting out of my HVLP purple gun from harbor freight, it had the 1.8 tip and I’ve had no issues in the past so I’m not sure why the trouble. It just didn’t want to shoot out the material well so I had to go slow with my sweep. I’ve tried every adjustment I could think of but nothing would improve material transfer. Maybe it’s just too thick for a 1.8 tip and I should source a 2.0 tip gun?

Either way, here’s pictures of the camaro!
(All I see is all of the surface to block sand again…..)
93505FA2-F77A-4D57-AD12-4BE4A209DD2C.jpegB5832350-3702-4A43-9B70-615CCED8B4F4.jpeg

Then as I said, I was wheeling and dealing also and was able to pick up this snowblower for $350 and not running, so I took a gamble. The guy said he bought it from an auction 2 years ago and never got the safety key for it and so he didn’t use it or got it running. So for $10 for a set of universal keys at lowes, drained the old gas, and freshen up the carb since it was stale and gummy in the carb, I got the snowblower running like a brand new one! I suspect it was used for one season since there was some rust on the heat shield and the gas was in the tank too.
B435434A-7BCE-4138-857D-A502A8B9E28D.jpeg

Tomorrow is Election Day so I’m off due to the building being used for voting area. I’ll spend some time sanding the other parts like bumper covers, trims, and spoiler along with cleaning the shop some. I’m gonna let the primer cure a few days if not a whole week before I block sand.
 

Bob Heine

ALLIANCE MEMBER
Joined
Oct 24, 2009
Messages
10,705
Location
Boca Raton, Florida
Maybe it’s just too thick for a 1.8 tip and I should source a 2.0 tip gun?
Cody, I don't think you would see much difference with a 2.0 mm tip gun. That primer is like un-thinned latex so I use my green Vaper 2.3 mm gun. I bought it from Northern tool back in February 2013 when it was $39.99. It has gone up $20 since then. It's one of my gravity guns (there's an embarrassingly large collection of suction feed guns as well as a number of airbrushes).
Spray Gun Collection.jpg
 
OP
M

madison069

Well-known member
Joined
Nov 5, 2010
Messages
4,148
Location
Monroeville, PA
Cody, I don't think you would see much difference with a 2.0 mm tip gun. That primer is like un-thinned latex so I use my green Vaper 2.3 mm gun. I bought it from Northern tool back in February 2013 when it was $39.99. It has gone up $20 since then. It's one of my gravity guns (there's an embarrassingly large collection of suction feed guns as well as a number of airbrushes).
Spray Gun Collection.jpg
Well I should get the Vaper 2.3 tip gun this weekend, I’ll need to do some more spraying so it’s worth the purchase.

Oh and I also have siphon guns in my drawer too. I should bring them out and see what tips are on those guns. Didn’t think about them since they were in a different drawer then the gravity fed guns.
 

bj383ss

Well-known member
Joined
Sep 29, 2011
Messages
3,166
Location
TX
Well I should get the Vaper 2.3 tip gun this weekend, I’ll need to do some more spraying so it’s worth the purchase.

Oh and I also have siphon guns in my drawer too. I should bring them out and see what tips are on those guns. Didn’t think about them since they were in a different drawer then the gravity fed guns.
I always use the siphon gun for primer. Mine is set perfect. I don't mess with it.

Bret
 
OP
M

madison069

Well-known member
Joined
Nov 5, 2010
Messages
4,148
Location
Monroeville, PA
So today I worked on the spoiler and bumper covers. Seems I had sanded the ends of the spoiler thin back in the days. So I used duraglass and filler to fix this issue. I think it came out good.

80F48AB2-4EDF-4323-9DAB-8EC20097E5C8.jpegAA4DC500-4751-44CE-B14B-AA25ABEFEA90.jpeg


I talked to my buddy who does auto body work and told him my issues with the spray gun not spraying. He asked me if I used reducer, well you would think an engineer would of thought of that but the 4:1 on the high build primer sheets kept making me think it was only primer and hardener was to be mixed. When it was actually 4:1:1 that was to be mixed for the primer! So after mixing it right this time, the gun laid the material out a lot better and I was able to get good coverage and fast!

C8E69597-FFCE-49AA-95AD-70703C44A229.jpeg1A02106B-0D72-40EC-81FA-A610F2DA3C0E.jpeg

After spraying

50BA5BD2-D468-4FB0-A08C-0C88B9CA1FA0.jpegB8185E79-4766-46D8-BB7B-2F5FCE35656F.jpeg


After cleaning up the gun and everything else, I decided to call it a night. Oh and I went ahead and sprayed a guide coat on the car. I’ll do an initial blocking just to find the issues on the car so I can work on them while the rest of the primer cures still.
 
OP
M

madison069

Well-known member
Joined
Nov 5, 2010
Messages
4,148
Location
Monroeville, PA
Found the siphon guns. A devilbiss jga 502 and a Speedaire. I looked up what devilbiss are going for these days new, I don’t think I’ll be buying a new one anytime soon.
2A86EF04-10F7-465E-BFE5-D4210FC4168F.jpeg
 

bj383ss

Well-known member
Joined
Sep 29, 2011
Messages
3,166
Location
TX
Mine's not a name brand but it looks just like the Devilbiss. My dad gave it to me he bought it in the 80's at a used tool store. He first used it to paint my Caprice and then later he painted his El Camino. Only thing I have ever done besides clean it is replace the little hose that connects from the pot to the gun.

Bret
 

Bob Heine

ALLIANCE MEMBER
Joined
Oct 24, 2009
Messages
10,705
Location
Boca Raton, Florida
Cody, a Craftsman siphon gun was my first and I used it to paint our house with slightly thinned latex. Turns out a quart of latex doesn't go very far so there were a lot of trips up and down the ladder to re-fill it. Also discovered that reaching out from the extension ladder made that thing feel a lot heavier. By the end of the day I was keeping the gun as close to me as possible. Ladder safety was not a thing back in 1966.
First House Painting.jpg
I bought a conversion kit to allow the Craftsman gun to work with a remote pressure pot. Harbor Freight sold 2.5 gallon pressure pots years ago but they never went on sale and I refused to pay $100 for it. Then I found their Central Pneumatic 1/2 gallon remote pressure pot setup. I should have weighed the HF gun because it alone is as heavy as the Craftsman gun with a full quart of paint.
Pressure and Siphon Guns.jpg
 
OP
M

madison069

Well-known member
Joined
Nov 5, 2010
Messages
4,148
Location
Monroeville, PA
I remember me and my dad painting my 1978 chevy crew cab truck with a siphon gun. It was painted safety Red due to the paint was free from the drilling rig. It did the job and considering the prep job we did on the truck, it came out crappy but good enough for a high school kid. Atleast it wasn't rusty, faded, and multi color! But the cloud of paint that it produced then and no less we did it in a single car garage with the garage door open. I think there was some words mentioned about how red paint got on the white fence since this was my pawpaw's garage we were using. None the less i ended up painting that white fence white again.

I wish i had pictures of that day, but we didn't buy alot of stuff like camera films due to the cost and we were just doing by with what we had. We actually borrowed the air compressor and paint gun to do the job from my scout master.

I'm currently at home with the youngest due to she's sick. doc thinks it's the flu cause she's had a fever since Saturday. Today the fever doesn't seem to be an issue but the coughing does cause concerns.

I was going to work on the camaro since i had to stay home but I got sidetracked with paperwork since I had a doctor bill that the insurance didn't initially cover but after talking to them, they area having the hospital reissue the claim with a different code so we will see.

Then I started organizing the papers and decided I'd scan some documents so I can get ride of the paper copies and make room in the filing cabinet. Well my HP printer wasn't working with my laptop and so I got fed up and bought a Epson ET-3850. Currently setting it up right now so I'll report back later on how it goes......
 

Bob Heine

ALLIANCE MEMBER
Joined
Oct 24, 2009
Messages
10,705
Location
Boca Raton, Florida
Well my HP printer wasn't working with my laptop and so I got fed up and bought a Epson ET-3850.
Cody, I bought an Epson ET7700 in August 2021 and I really like it. Every previous inkjet printer failed to print in color when the cartridge got to about a year old. Because these are EcoTank models, they only require ink, not cartridges. I filled the tanks with ink in August 2015 and this is how much has been used:
Epson ET7700 Ink - 15 months.jpg
No clogs, no misprints and its only drawback is that two-sided printing is slower than my HP laser printer because the Epson pauses between sides to allow the ink to dry. No drying time with the laser but I don't have a color laser printer.
 
OP
M

madison069

Well-known member
Joined
Nov 5, 2010
Messages
4,148
Location
Monroeville, PA
Bob, that's one of the reason I bought the Epson eco tank printer was to reduce the cartridge hassle I had with the HP. But I also liked the auto document feeder option on the HP. I will say the Epson print lacks in the ADF department compared to the HP, but at least the Epson does scan. It seems the Epson ADF is very picky and if there's one tiny little crease in the paper, it will go on strike and say paper jam, fix it.

Otherwise, I'm happy with the printer so I need to decide if that's a breaking point or not for this printer.

On to the typical news, I was able to block sand the whole car body this weekend. I found several issues and marked them with blue tape. some range to pinhole, all the way to it's still shallow. But for some reason those doors are being problematic. It seems I forget how to skim coat when I did the doors, both sides. Passenger side was bad enough that I didn't even tape the bad spots. The driver side door is better but still need more attention. The rest of the body seems to be ok overall but I'll have to either skim some spots or shoot a little more high-build in the not bad, but not perfect enough to continue through due to some very shallow spots.

C80D9FCC-97CB-4F18-B1E6-F4482C625198.jpegCCD1BC24-5435-41A2-BA8B-40617BB3943C.jpegEB446DAF-4CC1-41AF-9BCF-2B65D7DD8011.jpegEB2A2DB5-212A-49B5-8D40-B43CA536C778.jpegF03837F6-09D8-44C5-BFC4-338DA94F8060.jpeg
 
Last edited:
OP
M

madison069

Well-known member
Joined
Nov 5, 2010
Messages
4,148
Location
Monroeville, PA
Mine's not a name brand but it looks just like the Devilbiss. My dad gave it to me he bought it in the 80's at a used tool store. He first used it to paint my Caprice and then later he painted his El Camino. Only thing I have ever done besides clean it is replace the little hose that connects from the pot to the gun.

Bret
My dad was familiar with the suction paint gun due to all of the painting he had to do on the drilling rigs when he was a rougneck. They had to use needle guns to descale the rigs and tanks, which I'm surprise he didn't go deaf from that needle gun and just the general noise of the rig cause ear protection wasn't a thing back then. Then they would clean the surface up with cleaner and then spray the paint. So naturally he shot the paint on the truck.
 
OP
M

madison069

Well-known member
Joined
Nov 5, 2010
Messages
4,148
Location
Monroeville, PA
Got to spend a little time in the garage and was able to block the rear bumper cover and the spoiler end pieces. Maybe tonight I’ll get the front cover and the center spoiler piece blocked. Then I can go around and fix the small imperfections.

599D5E04-905D-4B64-8D2B-2C0BB391573F.jpegD0FB1687-9254-44BD-BBD6-C0BBD37BD599.jpeg
 
OP
M

madison069

Well-known member
Joined
Nov 5, 2010
Messages
4,148
Location
Monroeville, PA
Are you using any flexible agents for those parts?

Bret
No additional agent, but it’s the same stuff my buddy uses in his collision shop for plastic parts and all. I buy my stuff from him since he know what I should use and he’s gonna be painting it soon.
 
OP
M

madison069

Well-known member
Joined
Nov 5, 2010
Messages
4,148
Location
Monroeville, PA
Are you using any flexible agents for those parts?

Bret
So I called the rep for Upol and he explained the system 20 primer doesn’t need flex additive like the older paint lines did. The primer is chemically made for all surfaces to reduce the additional steps that the older systems had in the past.

At this point I just gonna have to trust the rep and my buddy on this one with their experience with this product. Plus my buddy used the same product on my wife’s bumper cover for the van and it’s been 2 years now. I know for a fact that the cover wasn’t treated gently as my wife snagged a trailer with the cover and pulled the cover off the van. Luckily the cover was able to be snapped back on and only showed a scratch where the trailer was hung on it.

With my recent mistake of forgetting the reducer, I started questioning if I missed something again as I do recall the older stuff needed flex additives. All I could think of was I’m gonna have to sand this primer all off if I made a mistake!
 

bj383ss

Well-known member
Joined
Sep 29, 2011
Messages
3,166
Location
TX
**** my bad! I didn't mean to cause worry. I only asked because every time I walk into the garage I see the 4 bumper corners on the Caprice and the paint is all cracked because I just painted them with no flex agent. No worries on the reducer. On the hood of the 64' I used the wrong reducer for the epoxy sealer primer. That's why it orange peeled. I get to look at that everyday. At some point it will get sanded and reshot. But my excuse right now is I don't have anymore Blue paint.

Bret
 
OP
M

madison069

Well-known member
Joined
Nov 5, 2010
Messages
4,148
Location
Monroeville, PA
**** my bad! I didn't mean to cause worry. I only asked because every time I walk into the garage I see the 4 bumper corners on the Caprice and the paint is all cracked because I just painted them with no flex agent. No worries on the reducer. On the hood of the 64' I used the wrong reducer for the epoxy sealer primer. That's why it orange peeled. I get to look at that everyday. At some point it will get sanded and reshot. But my excuse right now is I don't have anymore Blue paint.

Bret

No I understand, the previous owner of the camaro must of used no flex in his paint cause like your caprice it was all cracked up on the bumper cover too. So I had to sand all of the old stuff off and it took forever! Whatever he used was hard! But then again I didn’t acquire the camaro until 1999 and I don’t know when he repainted the car. Just due to the age of the paint could of made it hard.

As for forgetting the reducer, that was a brutal job of correcting. So much orange peel!!! Sanding it out with 400 grit took a long time but this coat is suppose to be the last whole body coat of primer. I just need to spot coat some primer where I still have correction to do.

Hopefully tonight I get to finish the front bumper cover, I started last night and was able to get about 4/10 of the way done. So many curves on the top of that cover has slowed the progress down.
 
To avoid these ads, REGISTER NOW!
Top Bottom