
You are using an out of date browser. It may not display this or other websites correctly.
You should upgrade or use an alternative browser.
You should upgrade or use an alternative browser.
Above 1200 Sq/FT Cody's 33'x62' Garage
- Thread starter madison069
- Start date
Wokspaces above 1200 squarefeet.
OP
madison069
Well-known member
I got a few friends in Plum, how long ago was it when you were living in Plum?
OP
madison069
Well-known member
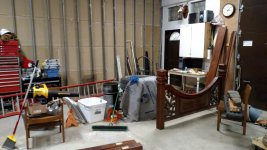
Today's progress in the garage. Been slowly unpacking the boxes and organizing it all into category so I can better organized it all. I feel like I made a dent in it all but I still got a lot to go.
Attachments


OP
madison069
Well-known member
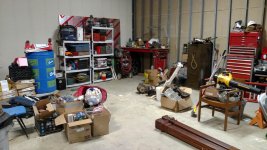
Just a few updates, I got tired of tripping on the jack stands and also having to hunt them down when I need to use them so I built a few shelves by the garage door and going to store them in this spot. We will see how great it works and maybe update the shelves if they turn out to be in a good location.
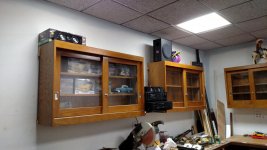
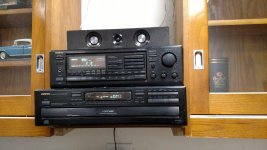
I also got some tunes in the wood shop thanks to some old surround speakers I had and my $20 sound system I got at a estate sale. It works so I'm happy. I can actually hear it throughout the garage even though it's in the very back room!
Other then continue cleaning the place up, organizing some more it's been just completing maintenance of the fleet and house!
Attachments

Last edited:
OP
madison069
Well-known member
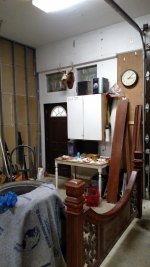
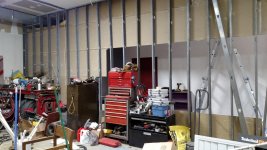
So awhile back I got a chance to work on taking the big wall down, it's a lot nicer to walk from the light switch to the auto side now instead of going outside from man door to man door!!
Hopefully this weekend I can get some of the stuff moved and I can keep taking the wall down to where the filing cabinet is currently located.
Hopefully this weekend I can get some of the stuff moved and I can keep taking the wall down to where the filing cabinet is currently located.
Attachments

OP
madison069
Well-known member
Nothing much happened except short sessions to go through the boxes I still have and started sorting them out by types. So one tote is electrical stuffs, another is plumbing stuff, another is extra hand tools, another is air compressors tools related items and so on.
Been so cold that I can only spend short burst of times in the garage, plus spending time with the family during the weekend.
Been so cold that I can only spend short burst of times in the garage, plus spending time with the family during the weekend.
OP
madison069
Well-known member
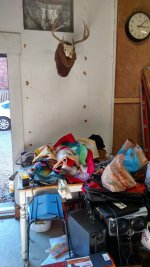
So continue with the garage cleanup and projects around the garage. While cleaning out the boxes I found my double light switch cover with some deer on it that I picked up from a estate sale and I decided the uncovered light switches in the wood room was the perfect place for it!
Then I found my burnt drill that I was planning to harvest the chord for another drill with a frayed chord, so I took it apart and in order to get it apart I had to hit it with a hammer to break the bond that had occured when the motor got hot enough to melt the plastic. Thought it was pretty cool that it could get that hot so here is a picture of that interesting drill (I'm amuse with items that burn as I think of the Thermodynamic of it all happening!)
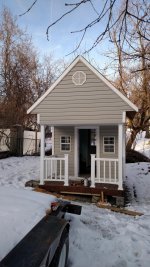
When I moved to this new house I had to move the playhouse to the new place, in order to avoid ripping wires down I had to remove the roof to make it low enough to drive it on the street while it was loaded on my car trailer. Since the weather warmed up Saturday< even with snow still on the ground, I took the time to put the siding back on and make a list of what I needed to finish the other gable end and the soffit. When the weather gets clear of snow I'll start putting the shingles back on the roof also, but for now the siding needs to go up so it don't look like a mess in this corner of the yard.
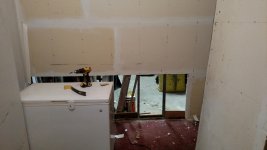
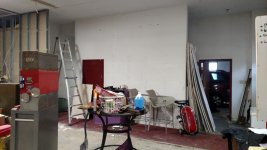
Then I worked on the garage Sunday and was able to finish removing the rest of the wall and general cleaning of the wall/ceiling of unnecessary items. Also I took the time to route the single outlet through the wall instead of hanging down from the ceiling and put a coulpe of more outlets since this is where the bench will go and I'll have the battery charger and lights to plug in to them. In order to brace the outlets up I put **** wood behind the stud to give the screws something to bite into. I'm debating on if I should put wood between the studs to help the studs out so they won't flex when pulling power cords out of the outlets.
Then I found my burnt drill that I was planning to harvest the chord for another drill with a frayed chord, so I took it apart and in order to get it apart I had to hit it with a hammer to break the bond that had occured when the motor got hot enough to melt the plastic. Thought it was pretty cool that it could get that hot so here is a picture of that interesting drill (I'm amuse with items that burn as I think of the Thermodynamic of it all happening!)
When I moved to this new house I had to move the playhouse to the new place, in order to avoid ripping wires down I had to remove the roof to make it low enough to drive it on the street while it was loaded on my car trailer. Since the weather warmed up Saturday< even with snow still on the ground, I took the time to put the siding back on and make a list of what I needed to finish the other gable end and the soffit. When the weather gets clear of snow I'll start putting the shingles back on the roof also, but for now the siding needs to go up so it don't look like a mess in this corner of the yard.
Then I worked on the garage Sunday and was able to finish removing the rest of the wall and general cleaning of the wall/ceiling of unnecessary items. Also I took the time to route the single outlet through the wall instead of hanging down from the ceiling and put a coulpe of more outlets since this is where the bench will go and I'll have the battery charger and lights to plug in to them. In order to brace the outlets up I put **** wood behind the stud to give the screws something to bite into. I'm debating on if I should put wood between the studs to help the studs out so they won't flex when pulling power cords out of the outlets.
Attachments
-
 IMG_20180111_121436063.jpg140.7 KB · Views: 247
 -
 IMG_20180111_190226652.jpg152 KB · Views: 297
 -
 IMG_20180120_161824037.jpg154.1 KB · Views: 277
 -
 IMG_20180119_125335887.jpg147.5 KB · Views: 266
 -
 IMG_20180121_093844505.jpg142.8 KB · Views: 252
 -
 IMG_20180121_094400360.jpg142.8 KB · Views: 251
 -
 IMG_20180121_181336735.jpg144.9 KB · Views: 255
Last edited:
OP
madison069
Well-known member
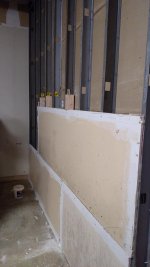
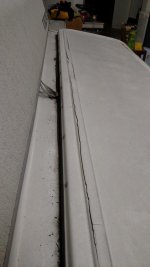
As part of my keeping cost down, I took the drywall sheets from the wall removal and reusing then on this side of the wall. I wanted to see if the drywall stiffens up the studs enough for me to not brace it with wood scrap. But I need to install some more screws as this is where I called it a night and went in the house.
Hopefully I'll get to pick at it some more throughout the week!
Hopefully I'll get to pick at it some more throughout the week!
Attachments
Last edited:
OP
madison069
Well-known member
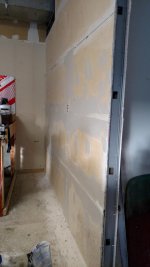
Got the rest of the wall sheeted, and started mudding the joints with some tap. Looks like I'll have to put another coat of mud on top of the tape since it looks exposed still. Didn't look that exposed but I guess after drying some it appears like it now.
Hopefully it set and if it does I'll do the rest of the joints on top when the weather warms up some more again.
Hopefully it set and if it does I'll do the rest of the joints on top when the weather warms up some more again.
Attachments
Last edited:
OP
madison069
Well-known member
So during my lunch hour I decided to work on my wife's Valentine's present, I started with a piece of wood with a live edge and knocked the bark off. Sanded one side down and drew the heart and names on it. Used s angle grinder to make the heart and then a router to do the names. I wanted that burnt look so I picked a dull bit to do the job.
Then I coated it with a coat of poly before heading back to work. I'll set a heat lamp up when I get home to help it cure some more.
Then I coated it with a coat of poly before heading back to work. I'll set a heat lamp up when I get home to help it cure some more.
Attachments


OP
madison069
Well-known member
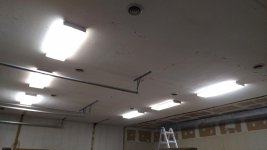
One of the things I noticed was the previous owner took down some of the lights. I'm not sure why she or he did that but they did leave them behind so I went ahead and put two of them back up in place. I still got two more to go and I'll have to lights out of my way and have more lights! I will eventually replace the bulbs with led versions when they start to go out.
Attachments

OP
madison069
Well-known member
Today's lunch break work consist of putting the last two lights back up. Now I do not have any wires hanging down that came from old light fixtures. As the budget allows I'll swap them all for LED, but for now that's going to have to do.
With snow on the ground the weather hasn't been allowing me to finish mudding the joints on the drywall. So I just look at the unfinished wall wishing I could finish it up and push my bench back against that wall!
My next project will have to be something I can do in the cold and I'm leaning toward either building a lumber rack or continue organizing my stuff and listing parts/supplies on Craigslist and eBay. Nothing to really post about when it comes to selling stuff, so maybe I'll start drawing my lumber rack setup and show what I'm thinking.
Attachments

OP
madison069
Well-known member
So decided to get the pop up camper ready for camping. Found some floor damage in the front storage compartment. So I removed the water damaged floor and will replace it with new wood along with sealing it and spray truck rubber material on the underside to protect it. Also I'll start calling some fabrication shops to see about making a aluminum diamond plate lid to replace my cracked plastic lid that allowed the water to get in. It was nice to work in the garage while it rained outside!
Attachments


Last edited:
OP
madison069
Well-known member
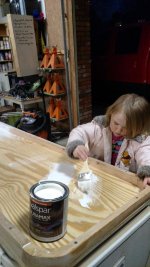
So I got the floor patched, simple osb 1/2" thick just like the factory stuff. Used liquid nail to seal it in place and glued in the grooves it slides into. Also I sprayed the underside with flex seal since that was the only rubber spray that Lowes had and I didn't feel like running to the parts store for one can of undercoating. I also made a lid out of wood to replace the cracked lid. Hoping this all works out cause so far it's not costing me much since I had all of the supplies in the garage. If things go south I'll just have a metal lid made in the future. I also employed my youngest for some painting in exchange for some gummy fruits. Now I'm just waiting for the coat of paint to dry and I'll flip it and give it a couple of coats on the top side.
Attachments


OP
madison069
Well-known member
So we got the storage lid finished up and now I just need to find something to seal the lid to the camper, but other wise I'm happy with how it turned out. Now to see how it holds up over time.
We then poped the camper up to let it air out while in the garage away from the environment. My little one was testing the seats out and talking about which bed is hers and where everyone will be sleeping at during the camping trip!
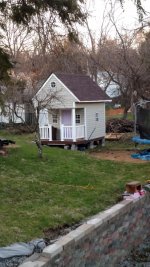
Then Sunday I had the FIL over to help me with the shingles while I reshingled the playhouse from when I moved the play house last fall. I'm not happy with the way it's leveled right now but I need to get some more blocks of different size and then I can properly level trhe playhouse and place a few more supports under it. Then I'll run a simple underskirt on it to make it more presentable before I build the back steps.
Also my above ground pool area next to the playhouse needs attention soon as the pool will be coming out in 2 months! Summer is almost upon us here in PA!
We then poped the camper up to let it air out while in the garage away from the environment. My little one was testing the seats out and talking about which bed is hers and where everyone will be sleeping at during the camping trip!
Then Sunday I had the FIL over to help me with the shingles while I reshingled the playhouse from when I moved the play house last fall. I'm not happy with the way it's leveled right now but I need to get some more blocks of different size and then I can properly level trhe playhouse and place a few more supports under it. Then I'll run a simple underskirt on it to make it more presentable before I build the back steps.
Also my above ground pool area next to the playhouse needs attention soon as the pool will be coming out in 2 months! Summer is almost upon us here in PA!
Attachments


Last edited:
OP
madison069
Well-known member
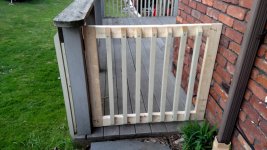
So over the past week I've been doing little projects around the house and working outside. One of the things I needed to work on was building gates for the deck so the wife can let the dogs out on the porch. I got it built along with built the other gate. They match the railing of the deck but I'm going to paint it all white with exterior paint today or tomorrow after I fix a few things on them.
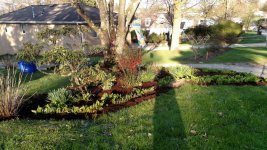
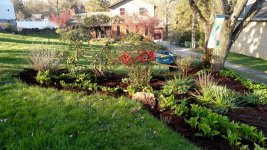
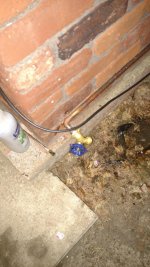
Also we got the front flower bed cleaned and mulched yesterday so it looks nice when coming into the driveway. I also replaced the water spigot since it bursted over winter cause I didn't turn the water off to it, Duh.
First soldering I've done in a long time, I need some practice but it seems to be hold at this moment.
Attachments


Last edited:
OP
madison069
Well-known member
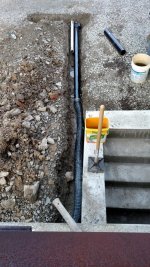
So one of the trouble area of the home is this cellar, it is always filling up with water from rain storms and so on. Part of the issue is the door for the cellar was a horizontal door that did nothing for holding water out and it resulted in the stairway turning into a funnel to catch water. Also water was coming from the wall of the stairs so I need to fix all of that.
So to start it off I established a flat surface to have a starting point for building the new slanted door that will go in this place. I also dug behind the wall and waterproofed the surface to prevent more water coming in through the wall. I also tried out the cement surface bonding on the inside of the wall to get a feel for it before I put that on the exposed walls. While I was at it I started digging the trench for the french drain from the retaining wall and around the cellar and stairs. Digging in this compacted gravel driveway has been a challenge. No trencher in town can cut through it, so I'm doing it with a demolition hammer and a shovel. Hopefully I get the main branch completed tomorrow with the help of the FIL doing cleanout duty while I bust up the ground with the demolition hammer!
So to start it off I established a flat surface to have a starting point for building the new slanted door that will go in this place. I also dug behind the wall and waterproofed the surface to prevent more water coming in through the wall. I also tried out the cement surface bonding on the inside of the wall to get a feel for it before I put that on the exposed walls. While I was at it I started digging the trench for the french drain from the retaining wall and around the cellar and stairs. Digging in this compacted gravel driveway has been a challenge. No trencher in town can cut through it, so I'm doing it with a demolition hammer and a shovel. Hopefully I get the main branch completed tomorrow with the help of the FIL doing cleanout duty while I bust up the ground with the demolition hammer!
Attachments


Last edited:
sean Buick 76
Well-known member
Good progres it looks great!!
OP
madison069
Well-known member
Thanks Sean!
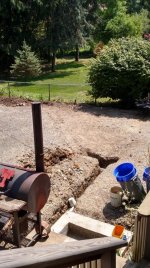
As for the trench across the driveway, it was a challenging task when doing it by hand. I was able to complete the trench across the driveway but after digging that trench it was determined the next few trenches will be done by either rental equipments of some kind or hire it out. Busting that hard compacted ground was a chore!!
None the less I got it done with the help of the FIL and the son of my daughter's babysitter on cleanup while I busted the ground up. I also got the trench across the driveway buried to open the driveway back up for everyone to park in the back again. I'll deal with the area around the cellar another day, but it was brutally hot here in PA for the past weekend.
Attachments

Last edited:
OP
madison069
Well-known member
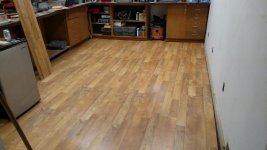
So the other day, I was driving home when I saw a pile of engineer flooring sitting out by the curb for trash day. I stopped to take a look and thought this would look good in my wood room! So I gathered all the pieces and finally laid it all down today. I thought it made a difference in the room! Just need to trim it out and I'll be done.
Attachments


OP
madison069
Well-known member
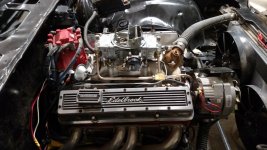
So I started working on the camaro to bring it back to life. Started with disassembling it since there was issues with the fuel system and cooling system from sitting for 10 years. Inspected everything I could see without pulling the head since it has already fired up and ran pretty well. I'll run a compression test on it soon just to be sure the rings are still good. But wanted to give the rings time to soak in oil and cycle it some to help loosen anything.
While I waited for more parts for the camaro I started picking at this piece of wood to see what it will look like when it's poly'ed. I'm thinking a live edge end table will be it's future.
While I waited for more parts for the camaro I started picking at this piece of wood to see what it will look like when it's poly'ed. I'm thinking a live edge end table will be it's future.
Attachments


Last edited:
PLOWJEEP
Well-known member
I found your thread from Andy's noticed that you aren't too far from me. I live in Youngsville , PA in Warren County. Looks like you are going to have a great space when you get it set up like you want. I am happy for you,and look forward to seeing more progress .
Good luck, and welcome to Pennsylvania.
Brian
Good luck, and welcome to Pennsylvania.
Brian
OP
madison069
Well-known member
Hey there Brian!
Thanks for chiming in! I've been slowing just getting rid of stuff in the garage and keeping it somewhat cleaned up. I'm hoping to hit it some more in the warmer days this year since I really want to just stay around the house instead of going all over the world this year.
As for where you are located, yea you're not too far up north! I generally go to Erie every year with the kids to go swimming at the beach and camp somewhere close by. I haven't made it west to Youngsville but it looks like a nice little town that's not too far away from Erie when you just want to go visit for a day!
Only thing to report from the garage front is like I said, just cleaning out the stuff and selling off what I don't want anymore. Yesterday I was working through my original nintendo systems since I don't plan to keep it all. Plus I keep picking them up at estate sales for cheap so I figured it's time to unload them on ebay to finance future projects.
I also got a few coats of poly on the corner table I got going on and purchased some hairpin legs for the table. Maybe I can sell it to someone as it's a nice little table that I think would look good in someone's livingroom with a plant on top.
Either way, today it's a lovely white slushy environment in my driveway so I'm staying indoor during the cold periods and keep listing stuff on ebay!
OP
madison069
Well-known member
Just a small project on the Camaro I completed over the weekend. I made a simple bracket to hold the electric fans on the Camaro. It looks a lot better then what I previously had on the fans.
Other then that just still sorting, selling, and cleaning.
Other then that just still sorting, selling, and cleaning.
Attachments

OP
madison069
Well-known member
So Ive started on a project that means a lot to me. A little background story.
My grandpa built me a toy box when I was 2-3 yrs old. I've spent a lot of time playing in the toy box, pretending I was racing cars and flying in a space shuttle. I've kept it in my room up til I was 18 and I moved off to college. My mother kept it since it was her father that built it for me. She painted it purple for a little cousin of mine to use until she was too old for a toy box. Afterward it sat in a shed until I came back to Texas with a uhaul truck to load up all of the other stuff i left along with my Camaro and the toy box.
My daughter is 4 years old now and I decided to paint it I her color so she can play with it. Her choice of color was a bright pink color. I did leave the red on the back of the toy box as that's the original color when I was playing with it. So after it's second coat it's now drying as my daughter keeps asking is it ready!?! But I still have one more thing to do and that's put my grandpa's name on the back of it and date it with the date he built it. He passed away when I was 17 and that's now 19 years ago. So soon my daughter will get to play in her new toy box that her great grandpa built for us to play in.
Attachments


Last edited:
jblnut
ALLIANCE MEMBER
Toy box looks great !!!
Putting Grandpa's name on the back of it is a really neat touch.
Putting Grandpa's name on the back of it is a really neat touch.
OP
madison069
Well-known member
Thanks Mike!
I got the toy box in the house yesterday at lunch time but I don't think she saw it yet. I've been out of the house all day yesterday and didn't get home til 10pm since I was attending a graduation party. My daughter slept over at a friend's house so today I know she will see it in her room.
So a few days ago I received a package from jblnut and when I got it opened i was surprised by a bonafide plow disc! Also included was some stickers that will be put on my toolbox soon once it's cleaned up!
So this plow disc project will kick another project in gear and that's the refurbish of the Craftsman stick welder. I bought this welder almost two years ago and it just sat I the corner of the garage. I wanted to take it apart and go through it since I never seen it work and the dial is very stiff. Along with I haven't installed a 220v plug in the garage yet. So now we will start work on this unit to see if I can get it in good condition for some welding!
So if you have any insight on how this Craftsman welder is built and tips to clean the dials and contacts, I'm all ears!
Attachments


OP
madison069
Well-known member
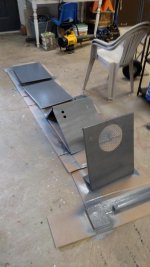
So thanks to jblnut for send me a plow disc, it has pushed me to work on the Craftsman stick welder I picked up awhile back. So during lunch I broke it down and took lots of pictures to help me put it back together. I'll sand the outside down and shoot some paint on it soon. But in the mean time I need to see what's the best way to clean the transformer. Anyone got some suggestions?
Edit*** base on my knowledge of transformer and some reading, I'm just going to use a brush and vacuum to clean the surface of dust and loose stuff and let the transformer be. Just focus on cleaning contacts and outside of the unit. ***
Edit*** base on my knowledge of transformer and some reading, I'm just going to use a brush and vacuum to clean the surface of dust and loose stuff and let the transformer be. Just focus on cleaning contacts and outside of the unit. ***
Attachments
Last edited:
jblnut
ALLIANCE MEMBER
Sure glad it made it to you intact. I wasn't all that worried as I was pretty sure the box was stout enough to take the beating the disk blade would put on it.
Those stickers are going to raise questions about just what exactly you do to cows when people see them
I purchased an old welder circa 1930 at an auction and it fired right up when I plugged it in. It's a bit finicky but once you get used to it it is a treat to use. I'd clean up/paint that old Craftsman unit and put it back together.
rixtrix1
Well-known member
Nice toybox! Love the old welder. It will look great with a new paint job!
I have a GE 180 amp buzzbox welder that I learned to arc weld with while in high school. I have no idea how long the school owned it before I came along, but I graduated in 1970. A friend bought it a a school surplus sale in 1973 and sold it to me in 1975. It's extremely noisy, but a dream to lay a bead with. Can't remember exactly when I used it last but it keeps the dust off of about 3 sq ft of my garage floor very well. It weighs about 160# and I have a 1966 Chevy 327 bare block on the bottom of the cart to keep it from tipping over. Good luck with the disc; should make a super Wok!
I have a GE 180 amp buzzbox welder that I learned to arc weld with while in high school. I have no idea how long the school owned it before I came along, but I graduated in 1970. A friend bought it a a school surplus sale in 1973 and sold it to me in 1975. It's extremely noisy, but a dream to lay a bead with. Can't remember exactly when I used it last but it keeps the dust off of about 3 sq ft of my garage floor very well. It weighs about 160# and I have a 1966 Chevy 327 bare block on the bottom of the cart to keep it from tipping over. Good luck with the disc; should make a super Wok!
Unruh
Well-known member
Took me awhile to find this thread, but I’m glad I did. You have a lot of fun projects going on! Keep posting!
OP
madison069
Well-known member
So after I got the welder case painted, i figured I'd go watch Godzilla:King of the Monsters! I must say it was a good movie but I'm a sucker for Godzilla fights! I prefer the bigger Godzilla over the skinny one they had awhile back though.
Anyway I came back home to the paint dry enough to put the machine back together. Took my time ensuring the connections was cleaned and tight. That fan was nasty! So I took my time cleaning it up too and dropped a couple of drops of oil on the shaft. Then I put some hooks on the side of the case to hang the leads on the side instead of just hanging around or on top of the machine. Just need a new ground clamp, rods, and a welding helmet. I also need to wire up a 240v outlet so I think me and the daughter will be making a trip to home Depot to get the supplies. I'm not going to go crazy with running a wire all the way through the garage, just staight down from the breaker panel so it's a short run. Then I'll flip the machine on with a wooden dry stick and stand back!
Anyway I came back home to the paint dry enough to put the machine back together. Took my time ensuring the connections was cleaned and tight. That fan was nasty! So I took my time cleaning it up too and dropped a couple of drops of oil on the shaft. Then I put some hooks on the side of the case to hang the leads on the side instead of just hanging around or on top of the machine. Just need a new ground clamp, rods, and a welding helmet. I also need to wire up a 240v outlet so I think me and the daughter will be making a trip to home Depot to get the supplies. I'm not going to go crazy with running a wire all the way through the garage, just staight down from the breaker panel so it's a short run. Then I'll flip the machine on with a wooden dry stick and stand back!
Attachments


OP
madison069
Well-known member
Sure glad it made it to you intact. I wasn't all that worried as I was pretty sure the box was stout enough to take the beating the disk blade would put on it.
Those stickers are going to raise questions about just what exactly you do to cows when people see them
I purchased an old welder circa 1930 at an auction and it fired right up when I plugged it in. It's a bit finicky but once you get used to it it is a treat to use. I'd clean up/paint that old Craftsman unit and put it back together.
Speaking of the box the plow came in, it turned into a temporary table.
Folks already questions alot of things I do so what I do to a cow won't worry anyone.

Nice toybox! Love the old welder. It will look great with a new paint job!
I have a GE 180 amp buzzbox welder that I learned to arc weld with while in high school. I have no idea how long the school owned it before I came along, but I graduated in 1970. A friend bought it a a school surplus sale in 1973 and sold it to me in 1975. It's extremely noisy, but a dream to lay a bead with. Can't remember exactly when I used it last but it keeps the dust off of about 3 sq ft of my garage floor very well. It weighs about 160# and I have a 1966 Chevy 327 bare block on the bottom of the cart to keep it from tipping over. Good luck with the disc; should make a super Wok!
This unit is dated 1968 as per the tag on it, so we will see how good of a machine it is!
Took me awhile to find this thread, but I’m glad I did. You have a lot of fun projects going on! Keep posting!
Glad you like my projects, I think I got 15 in the fire right now. At least I'm busy!! I'll start posting more as I go and hopefully I'll be showing some more Camaro projects soon!
Hellpig
Well-known member
LOL, Sears Color-Matic?
Have one out in the shop, vice grips on shaft to turn.
Was like that when I got it!
Have one out in the shop, vice grips on shaft to turn.
Was like that when I got it!
OP
madison069
Well-known member
LOL, Sears Color-Matic?
Have one out in the shop, vice grips on shaft to turn.
Was like that when I got it!
Yep! For $30 i figured it was worth the gamble. One of the reasons I wanted to take it apart was the dial was hard to turn and it felt like I was going to break it. So I found it hard a little rust in the shaft of the dial so I cleaned it and applied a thin coat of silicone. Now it turns easily and when locked it stays put! The welder also came with a separate set of leads but it wasn't for this welder and I ended up selling them for $100 so this welder owes me nothing.
jblnut
ALLIANCE MEMBER
Did you get the welder running ??
OP
madison069
Well-known member
Did you get the welder running ??
Not yet. I went to Lowes yesterday and got the outlet for the welder, wires to run from the outlet to the breaker panel and when I went to look for a breaker they didn't have one.
 As per the website they had 5 of them in stock but we couldn't find one anywhere.
So I'm short a breaker right now. Then I need to get a welding helmet and some rods before I can test it.
But in the meantime, I had to repair a leaky bathroom faucet which turned out to be a simple rubber washer replacement.
Spent a little time staining/sealing the deck, with all of the rain it's hard to do it all in a weekend. So I spend an hour here and a hour there after work. Hopefully my wife will work on it now that school is out and she's home, she's a better painter then I am.
I'm also working on a spot for the firewood to be placed instead of just on the ground and out in the opening. I got the ground level enough and now need to dig the holes for the poles so i can build a little roof for it based on where the poles end up going. Then I'll place some extra retaining wall blocks I have stashed on the ground to keep the wood out of the dirt! Since I have some low spots and holes around the yard from pulling plants out of the ground I take my time to shift the dirt out so I can use it to fill the spots with. Apparently the previous owner used construction site leftover dirt cause the ground is full of metal bits, wire, and other trash so I want to remove all of that stuff before I dump the dirt in the holes.
But with the rain coming this afternoon I'll probably put my truck in the garage and do the oil change and get some stuff inside the garage done. Oh and order a breaker online for the welder so I will be sure to have one soon!
Attachments


Last edited:
OP
madison069
Well-known member
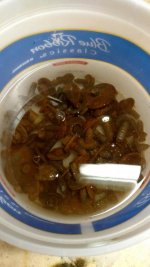
So with the progress of the camaro going, I decided I needed to start cleaning more bolts and since they're rusty I figured why not experiment. So today at lunch time I took a bunch of the bolts and dump them in the bucket, then covered them with straight white vinegar. Lets see how they do after sitting in the solution!
Attachments


Last edited: