To avoid these ads, REGISTER NOW!

Columbian 10" Woodworking Vise Restore

b.well

Well-known member
Joined
May 13, 2020
Messages
391
Location
NY
Hello

I need some advice.

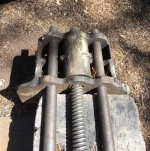
I posted this vise first as a find on the Garage Sale thread. I also posted some of these issues I ran into along the way with the restore. I will re post the important information from the Garage Sale here as this was recommended for a place people could more easily find if they have the same vise or questions/issues. I am not out of the woods yet and I do appreciate all the help I get along the way. Thank you!

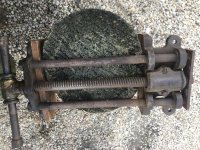
Bought for $45; local pickup.
attachment.php

attachment.php


The Metal separator plate and Static Jaw slid right off after I removed the cotter bin in the back.

Had to go a little crazy to get the bolt off the slide rod. This was after it was sprayed with PB blaster, sat overnight and sprayed again.
attachment.php


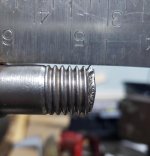
Sadly, I realized I damaged the thread. I thought the Nut was tight from rust. However, now I know, the end of the bolt threads had been hammered so the bolt would never come off. I broke the outside thread taking the bolt off. This picture taken after I cleaned up the slide rod with a wire wheel.
attachment.php


Another finding. The outside slide rod thread is more proud (taller) than the rest of the threads. Was this the result from mushrooming the end? Not sure.
attachment.php


I decided NOT to remove the other slide rod. I can see it is hammered as well. I wire wheeled it, the main screw, and the handle all attached. Heavy and hard. Harbor Freight drill wheels were really scratching up the surface of the slide rods. Dewalt(bench grinder) and Forney(drill) wire wheels removed rust and did not leave scratches.

I have NOT been able to get the Nut back on the slide rod. The threads look pretty good(no cross threading) on both the nut and bolt but no go. I put the slide rod in the soft pole jaws on my vise and it spins in the vise before the nut will move. Nut move about 1/2 turn then stops. I filed down the "proud thread" some and I think that did help but still getting stuck. I do not think i filed it level with the other threads yet. Not sure how important it is to file the top only vs the sides too.

I went to Home Depot today and bought a 3/4 Coarse Nut and Bolt. The vise nut gets stuck on the HD bolt. The vise slide rod gets stuck on the HD Nut. Ugh. Was expecting only one to have an issue, not both.

If you have any advice how to resolve my current issue as I go through this process please let me know. Thank you!

Questions:
1. What grit sandpaper will I need to go up to so I do not see scratches on the metal any bigger than the factory finish? Max I have now is 220. I have 400 on order.
2. How would you fix my thread issue? I have been advised just to crank it on. Now that I have a 3/4 coarse bolt I can clamp that and crank the nut on it. That might fix the nut.
3. How would you hold the slide rod without damaging it? I gashed it up with the pipe wrench I used to loosen the slide rod bolt. Thus the reason for question 1....

I'll keep updating this thread during the process of restore and workbench mount. I have to add a couple 2x4s under the bench to mount this.

Lessons Learned:
1. This Vise is NOT meant to come apart. If you are not a machinist I advise leaving it together. Another example: the pin on the front of the dynamic jaw that holds the handle is mushroomed on both sides; so no getting it off without doing some damage.
 

Attachments

  • s-l1600.jpg
    s-l1600.jpg
    153.8 KB · Views: 397
  • s-l1600 (3).jpg
    s-l1600 (3).jpg
    166.4 KB · Views: 400
  • 20200819_122338.jpg
    20200819_122338.jpg
    155.3 KB · Views: 387
  • 20200819_125935.jpg
    20200819_125935.jpg
    68.7 KB · Views: 395
  • 20200819_190235.jpg
    20200819_190235.jpg
    80.8 KB · Views: 388
Last edited:
To avoid these ads, REGISTER NOW!
OP
B

b.well

Well-known member
Joined
May 13, 2020
Messages
391
Location
NY
Originally Posted by Provincial (on the garage sale thread)
I have had success with repairing a damaged thread like that using a three-corner file, carefully working the oversize area down to the same pitch diameter (technical term) so the threads are uniform in diameter with the undamaged threads.

If you can find something with the same thread (pitch and diameter) to try the nut on, you can determine if the internal threads of the nut are damaged. If they are OK, or if you have the appropriate thread restorer, the nut can be your test gauge for your work on the male threads. Go slowly and check often. You can use Prussian Blue or a Sharpie to find the high spots.
 

Provincial

Well-known member
Joined
Sep 21, 2011
Messages
6,874
Location
Near Salem, OR
If you can get access to a thread pitch gauge, check the pitch of the threads and compare it to the HD bolt and nut. The vise may not have standard threads!

If the threads are standard, try to find someone with the proper thread restorer male and female tools.
 

ClappedOutBport

Well-known member
Joined
Mar 30, 2016
Messages
998
That peened thread is still too big. You need to remove it, until the crest is no longer proud. You might be able to get away with just grinding the crest off, but I'd grind it all the way down, and keeping going until it cleans up.
 

Shiftless

Well-known member
Joined
Mar 9, 2014
Messages
14,606
Location
East Bay SFO
That peened thread is still too big. You need to remove it, until the crest is no longer proud. You might be able to get away with just grinding the crest off, but I'd grind it all the way down, and keeping going until it cleans up.

That’s the way it looks from here too. :+1: to that ^^^^^^^^^^^^^

Hopefully you know someone who has a tap and a die of that size to help clean up those threads.
They’d be pretty expensive to buy new, especially for a likely one time use.

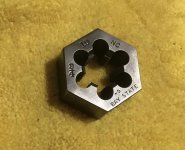
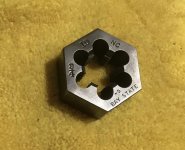
The die you need to clean up the threads on that rod will look something like this one of mine. You don’t need a specialized handle...just use an 1 1/2 inch wrench or if you don’t have one of those, a big adjustable “crescent” wrench will do.

But like C.O.B. said, you’ll probably be in good enough shape if you just grind that buggered thread down slightly below the level of the other threads. It looks like the rest of the threads are clean and the nut will have enough to grab.
How would you lock the nut back on though? No more extra metal to peen over. Maybe blue locktite would be good enough. Red locktite will definitely hold it.
If your nut is buggered up too, that will need a tap.
 

Attachments

  • 5F4E868C-B4A6-435C-98C4-E379D8BB4790.jpg
    5F4E868C-B4A6-435C-98C4-E379D8BB4790.jpg
    121.8 KB · Views: 19
Last edited:
OP
B

b.well

Well-known member
Joined
May 13, 2020
Messages
391
Location
NY
If you can get access to a thread pitch gauge, check the pitch of the threads and compare it to the HD bolt and nut. The vise may not have standard threads!

If the threads are standard, try to find someone with the proper thread restorer male and female tools.

I have a metric file that I would call a thread restorer. It has thread pitches from 1.0-3.0. 4 sided; top and bottom half are different pitches. The vise bolt matched good with 2.5mm.

My neighbor is a mechanic. I'll ask him if he has a 3/4 tap/die. My tap/die goes up to 1/2". My thread restorer goes up to 3/4 but is fine threads.

That peened thread is still too big. You need to remove it, until the crest is no longer proud. You might be able to get away with just grinding the crest off, but I'd grind it all the way down, and keeping going until it cleans up.

My picture above was from before I filed things down. I do think it's still proud. Would I still file it down before using the die? (assuming I can find one). I just don't think i'm comfortable enough with the grinder in this small tolerance. The proud thread just needs to come down a little. The gap looks alot bigger on the computer than it did on the phone or in person....lol.

That’s the way it looks from here too. :+1: to that ^^^^^^^^^^^^^

Hopefully you know someone who has a tap and a die of that size to help clean up those threads.
They’d be pretty expensive to buy new, especially for a likely one time use.

The die you need to clean up the threads on that rod will look something like this one of mine. You don’t need a specialized handle...just use an 1 1/2 inch wrench or if you don’t have one of those, a big adjustable “crescent” wrench will do.

But like C.O.B. said, you’ll probably be in good enough shape if you just grind that buggered thread down slightly below the level of the other threads. It looks like the rest of the threads are clean and the nut will have enough to grab.
How would you lock the nut back on though? No more extra metal to peen over. Maybe blue locktite would be good enough. Red locktite will definitely hold it.
If your nut is buggered up too, that will need a tap.

I'll get some pics of the nut. I think it looks ok. Noting major but I do think a tap would help it. Does the Nut really need to be locked down? I have locktite, both colors. These rods support the vise sliding in and out but are not part of the clamping force.

Sounds like I need more time on my grinder!!!

Thanks for all your input. Hopefully I can get this worked out in the next couple days.

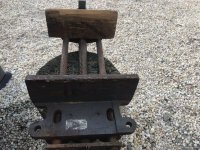
New question.... how many screws would you use on the bottom of the static jaw to mount this baby? I originally thought two. But now I am thinking 4. The clearance may be an issue but if not for bolts what are the two oval holes above the slide rods for?
 

Attachments

  • s-l1600 (2).jpg
    s-l1600 (2).jpg
    163.1 KB · Views: 20

ClappedOutBport

Well-known member
Joined
Mar 30, 2016
Messages
998
You're overthinking this. It's the outside thread, you've got plenty holding it. Just make it go away. Sitting on the grinder rest just slowly roll it along the thread. Like I said, no harm in taking it all the way to the root diameter. That's what I'd do. Won't look as pretty, but it's too late for that now.


Just grab a new nut if the old one is trashed. They just used a standard, off the shelf nut, no reason to worry about a 100% restoration.


Yes, they need to be tight. That's what keeps the jaw from rocking back and forth and damaging the shaft. That's why they peened it, so the nut would never back off and stay tight.
 
OP
B

b.well

Well-known member
Joined
May 13, 2020
Messages
391
Location
NY
I've definitely put alot of thought in. I was going for the 100% restore so a bummer when I found out the bolts were hammered and some machining would be required to get it all apart and back together.

For some reason last night I was just thinking hand grinder and that's what my comments were about. I agree bench grinder makes ALOT more sense.

I already picked up a new nut and it gets stuck too. But after i bring that outside thread down both old and new nuts might be fine. We shall see!

What would you take out the proud marks I left in the sliding rod with(from the pipe wrench)? Will working up to 400 grit get back to the factory look on the slide?
 

ClappedOutBport

Well-known member
Joined
Mar 30, 2016
Messages
998
Nope. Sandpaper isn't very judicious in it's removal of metal. As much as it takes off the highs, it will take off the lows. A file works excellent. With some technique you can remove the burrs without touching the base metal. Afterwords if it needs a little polishing then use some sandpaper, but sparingly.
 
OP
B

b.well

Well-known member
Joined
May 13, 2020
Messages
391
Location
NY
Nope. Sandpaper isn't very judicious in it's removal of metal. As much as it takes off the highs, it will take off the lows. A file works excellent. With some technique you can remove the burrs without touching the base metal. Afterwords if it needs a little polishing then use some sandpaper, but sparingly.

Good point about the sandpaper. I've seen people use sandpaper in different ways for vise restores but not to remove highs like I am doing. I have a small mil ******* file I think will work good. Thanks.
 

Shiftless

Well-known member
Joined
Mar 9, 2014
Messages
14,606
Location
East Bay SFO
Nope. Sandpaper isn't very judicious in it's removal of metal. As much as it takes off the highs, it will take off the lows. A file works excellent. With some technique you can remove the burrs without touching the base metal. Afterwords if it needs a little polishing then use some sandpaper, but sparingly.

More good advice from C.O.B. :beer:

Like he said, I’d start by filing and then if you want to achieve a super smooth and nice brushed steel finish, keeping the rod perfectly round you can try this technique. Soak wet or dry sandpaper with WD40 or ATF or other light oil, and use some spark plug wire or vacuum hose and work it back and forth.
Realize that those parts will not be visible when the vise is actually installed.
Here is a picture I found online.
 

Attachments

  • 2D488DF5-3706-4DEC-B87E-22D1CC73EC1A.jpg
    2D488DF5-3706-4DEC-B87E-22D1CC73EC1A.jpg
    80.7 KB · Views: 45
Last edited:
OP
B

b.well

Well-known member
Joined
May 13, 2020
Messages
391
Location
NY
More good advice from C.O.B. :beer:

Like he said, I’d start by filing and then if you want to achieve a nice brushed steel finish and keep the rod perfectly round you can try this technique. Soak wet or dry sandpaper with WD40 or ATF or other light oil, and use some spark plug wire or vacuum hose and work it back and forth.
Here is a picture I found online.

Nice pic. Good advice. I will get rid of the highs but not go down into the lows. What grit sandpaper? I see/hear sandpaper alot but not the grit.
 

Shiftless

Well-known member
Joined
Mar 9, 2014
Messages
14,606
Location
East Bay SFO
Nice pic. Good advice. I will get rid of the highs but not go down into the lows. What grit sandpaper? I see/hear sandpaper alot but not the grit.

I think you could start with something like 320 or 400.
If you want to experiment with polishing just for the experience, you could then move to 600 and then to 1000 grit.

Don’t be tempted to go cheap with garnet paper. Use wet/dry or even emery cloth if you want the most durable.

For polishing parts of vise handles etc., I cut strips of 600 grit and use this shoe shine technique.
 

Attachments

  • D3924FEA-4CDC-40E3-A298-240C740869A1.jpeg
    D3924FEA-4CDC-40E3-A298-240C740869A1.jpeg
    38.7 KB · Views: 19
Last edited:

ClappedOutBport

Well-known member
Joined
Mar 30, 2016
Messages
998
Scotchbrite (maroon then grey) also does an excellent job at leaving a scratch-free luster. Shiftless is right, cheap emery doesn't pay.
 
OP
B

b.well

Well-known member
Joined
May 13, 2020
Messages
391
Location
NY
Just a little update. I took off most of the outer thread on the bench grinder with one quarter turn. I was going to try and keep more of the thread but it went quick. I also lined up the HD bolt with the Vise threads and they line up perfect. Still neither the HD nut nor the Vise nut go on. I am still going to followup with my mechanic friend about the 3/4 tap/die. The nut at least needs it since it won't go on the clean HD bolt.

I also found a video of a guy restoring the "non qr" version of this same vise. It's got a flat handle, not a rod like mine, but the core of the vise is the same. Removing the slide rods and handle are the same. He said the front threads were "damaged" and grinded them down(around the edge thread) to get the bolts off, hit the nuts some but not too bad. To keep the slide rods from twisting he drilled holes in the back of them so he could stick a rod down in them to hold them still; I agree a better solution than the damage I did with the pipe wrench.

He has two of these in his shop. One mounted to his bench previously restored. He did not mention having any issue with that one. Also his mounted vise has the pin holding the handle mount peened on both sides(like mine). The vise he is restoring someone put in a nut and bolt.

It's at least a 4 part video. The steps above are in part 2. Jump to 3:30.

So if I wanted to move forward taking it apart those are viable solutions.
 

Shiftless

Well-known member
Joined
Mar 9, 2014
Messages
14,606
Location
East Bay SFO
If you take it apart, it is certainly easier to use a wire wheel on those rods like good ol’ Shane did in his 4 part video. The one he bought for $10 needed LOTS of work.

Someday, I will restore my old 10 inch Abernathy QR woodworking vise. It is not frozen up or cracked like his was. To clean the rods, I plan to use a wire wheel and some sandpaper and scotchbrite so I don’t need to disassemble. They slide OK now, so I doubt that I will have to spend much time on that part of the job.
The wooden handle which I presume is original, is pretty cool in that one of the ends is screwed on. That will make disassembly and refinishing of the handle assembly super easy.
 

Attachments

  • AD861F33-5316-40CA-B37F-B08D77907151.jpg
    AD861F33-5316-40CA-B37F-B08D77907151.jpg
    155.1 KB · Views: 16
  • 9BC2FE21-6A86-4E5C-887C-154510C92D33.jpg
    9BC2FE21-6A86-4E5C-887C-154510C92D33.jpg
    151.7 KB · Views: 19
Last edited:
OP
B

b.well

Well-known member
Joined
May 13, 2020
Messages
391
Location
NY
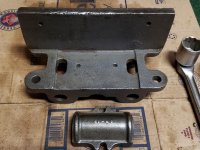
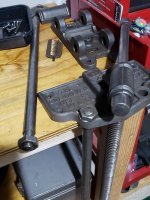
As I promised this to be a restore thread here are some pictures of the vise now. I have more parts wire wheeled. I need to go back and get a smaller wheel in the nooks and crannies. So far everything is wheeled on a 6" bench, OR 2" cup and 3" round 1/4" shank wheels on either my drill or drill press.

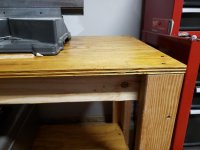
I also posted the corner of my 4ft mitre saw table where I plan to mount the vise. I need to add a ~10" long 2x4 to the front and back of the current frame. This will give me a ~10" long x 4.5" area for mounting. There is a catch. The mount holes for the vise line up between two of the 2x4s. The 2x4s will be glued and screwed together.

Does anyone see an issue or has anyone ever put a lag bolt up between two attached 2x4s? Or at any other joint I guess. Will this hold solid?

I know ideally this mighty vise would mount to a much larger dedicated bench. My workshop is 6ft at the end of a 1 bay garage; so working with what I have. I won't get much dog use out of it. I do plan to put in some dog holes. The table is also on wheels which adds alot of flexibility.

My mechanic friend thinks he has a 3/4 tap/die at work in his shop. He will bring home today if he does :)
 

Attachments

  • 20200824_145330.jpg
    20200824_145330.jpg
    107.6 KB · Views: 20
  • 20200824_145740.jpg
    20200824_145740.jpg
    152.6 KB · Views: 25
  • 20200824_145759.jpg
    20200824_145759.jpg
    154 KB · Views: 22
  • 20200824_145824.jpg
    20200824_145824.jpg
    157.2 KB · Views: 27

Shiftless

Well-known member
Joined
Mar 9, 2014
Messages
14,606
Location
East Bay SFO
Looks like you’re making good progress. Nice and clean. :beer:
I wouldn’t worry about a long lag screw up between two 2x4s. They are tight up against each other, right? You could screw them together every foot or so for extra insurance if you wanted to feel more secure. Drill the proper sized pilot hole and use 3 or 3 1/2 inch long lag screws up into those pieces. There is not a whole lot of stress there anyway.

Make sure to specify 3/4 : 10 to your buddy. Three quarter inch threads come in fine and coarse. You need coarse.
 
OP
B

b.well

Well-known member
Joined
May 13, 2020
Messages
391
Location
NY
I've learned different wire wheels take of different amount of material. I noted before the HF wheels were leaving scratches so too stiff for this work. Forney(3 different ones on drill) and Dewalt(on bench grinder) did not leave scratches. However, my Forney 3" round is taking the vise to bear metal. What is left on the images I posted above? Pics above are after using the Forney 2" cup and the Dewalt 6" grinder. I was happy with the above look. Then I used the 3" round to get in some of the corners and it took more off. The extra that came off was thicker I think than what came off before.

Definitely rust came off first. Is the last layer paint, more rust, grease/grime?

I think I have to hit it all now with the Forney 3" round so it's not mismatched....
 
To avoid these ads, REGISTER NOW!

Shiftless

Well-known member
Joined
Mar 9, 2014
Messages
14,606
Location
East Bay SFO
It’s my experience that the nice clean shiny surfaces like you have created will oxidize to become more uniform.
A coating is necessary to keep the lighter color. Many of us use paste wax. I use paste wax and more often Fluid Film.


.
 
Last edited:
OP
B

b.well

Well-known member
Joined
May 13, 2020
Messages
391
Location
NY
My plan was to "paint" the vise with linseed oil. Then bake it. However that would be for the jaws(main body), not the handle, main screw and slide rods. Right now the main screw and one slide rod are still attached. I guess it's ok for it all to bake at 400 degrees for 4hrs. Agree?

Yes, paste wax for the shiny parts (slides).
And grease for the main screw.

I'll look at fluid film too; haven't seen that one.
 

Shiftless

Well-known member
Joined
Mar 9, 2014
Messages
14,606
Location
East Bay SFO
I’ve used a lot of BLO but never baked it. Some fellows who have say it smells pretty bad and highly recommended NOT using your kitchen oven.

How about just leaving it out in the August sun?

If you want to have some fun with solar energy, put it into an open top shallow cardboard box and cover with glass. Should be good for about 150+ degrees in bright sun.


.
 
Last edited:
OP
B

b.well

Well-known member
Joined
May 13, 2020
Messages
391
Location
NY
I’ve used a lot of BLO but never baked it. Some fellows who have say it smells pretty bad and highly recommended NOT using your kitchen oven.

How about just leaving it out in the August sun?

If you want to have some fun with solar energy, put it into an open top shallow cardboard box and cover with glass. Should be good for about 150+ degrees in bright sun.


.

Nice solar energy idea :)

I haven't researched using BLO on metal. I saw a restore video where baking is how the guy used it. Grill recommended because of the smell.

I have used BLO on wooden tool handles with great success.

Do you think BLO gets just as hard and strong when drying naturally? as opposed to the baking? What process worked for you? Paint with BLO and let dry 24-48 hrs?
 

Shiftless

Well-known member
Joined
Mar 9, 2014
Messages
14,606
Location
East Bay SFO
Nice solar energy idea :)

I haven't researched using BLO on metal. I saw a restore video where baking is how the guy used it. Grill recommended because of the smell.

I have used BLO on wooden tool handles with great success.

Do you think BLO gets just as hard and strong when drying naturally? as opposed to the baking? What process worked for you? Paint with BLO and let dry 24-48 hrs?

The drying time depends on weather. I have used it when it is cold and damp and it took weeks to harden.
If it’s sunny and warm where you are, I would apply a thin coat with a crappy old small paint brush or a rag. Then wipe off the excess after a few minutes. That should dry and harden in a day or two. If you want to apply more later on, go ahead.
Another technique is to thin the BLO with turpentine or mineral spirits. Then apply multiple coats. Since my vises go up on a shelf, it doesn’t really matter to me how long it takes for the BLO to harden.
Be very careful with rags soaked in BLO. They will spontaneously combust if you just wad them up and put them away.
Lay them out flat outdoors and let them harden up and then toss in the trash.
 
OP
B

b.well

Well-known member
Joined
May 13, 2020
Messages
391
Location
NY
The drying time depends on weather. I have used it when it is cold and damp and it took weeks to harden.
If it’s sunny and warm where you are, I would apply a thin coat with a crappy old small paint brush or a rag. Then wipe off the excess after a few minutes. That should dry and harden in a day or two. If you want to apply more later on, go ahead.
Another technique is to thin the BLO with turpentine or mineral spirits. Then apply multiple coats. Since my vises go up on a shelf, it doesn’t really matter to me how long it takes for the BLO to harden.
Be very careful with rags soaked in BLO. They will spontaneously combust if you just wad them up and put them away.
Lay them out flat outdoors and let them harden up and then toss in the trash.

I just watched a couple BLO on metal videos. Both did with heat. The blacksmith heated the metal first. The DIY guy heated with a torch after applying the BLO to "harden" it. I am still curious if heat makes BLO stronger than air drying.

I've been burning the paper towel I use to wipe off the excess BLO in the driveway :)
 

Shiftless

Well-known member
Joined
Mar 9, 2014
Messages
14,606
Location
East Bay SFO
Will a 3/4" tap and die fit in 1/2" tap and die wrenches?

Here is a picture of my 3/4 : 10 thread cutting die.
You don’t need a handle for this style. Just use a big wrench.
If your mechanic friend has the style that is round, like a big hockey puck, ask to borrow his handle.
Same for the tap. You aren’t cutting new threads, just cleaning them up. The tap has a square on the top you can grab with a wrench.
 

Attachments

  • F390591F-3F22-40FF-AA20-72BAF405E9E3.jpg
    F390591F-3F22-40FF-AA20-72BAF405E9E3.jpg
    121.8 KB · Views: 6
Last edited:
OP
B

b.well

Well-known member
Joined
May 13, 2020
Messages
391
Location
NY
Thanks Shiftless. Depending how much force I need to apply I think I will be back into the same situation I was in getting the nut off in the first place. The slide rod will just turn and turn. No way to hold it still. Clamped in soft pipe jaws in my 4" vise it doesn't take much force for the pipe to turn. I may need to just drill holes near the back of the slide rods (like the guy did in the video I posted) so I have something to keep the pipe from moving. I might need the holes anyway to tighten things back up. And If I am drilling holes in the slide rods I can take the other one off too.

My friend's tap die set is an old one, passed down, in a wooden box. Surely round dies. He forgot to bring it home again....said he will have it today for sure....lol Fingers Crossed!!!

I have a wrench up to 1 1/8. And two sockets up to 1 1/4. Those are my maxes :)
 

Shiftless

Well-known member
Joined
Mar 9, 2014
Messages
14,606
Location
East Bay SFO
My die has flats 1 1/2 inches across. You might need a bigger wrench!

Do you have a big adjustable that you’re forgetting about? You could use a pipe wrench if you had to.

Sounds like you’ll have to drill holes in the back ends of those rods.
 
OP
B

b.well

Well-known member
Joined
May 13, 2020
Messages
391
Location
NY
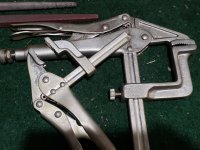
I have two 12" adjustable wrenches that should be fine. Haven't measured their max opening. And if you saw my garage sale post I have recently acquired these :)

attachment.php
 

Attachments

  • 20200823_104114.jpg
    20200823_104114.jpg
    155 KB · Views: 136
OP
B

b.well

Well-known member
Joined
May 13, 2020
Messages
391
Location
NY
My die has flats 1 1/2 inches across. You might need a bigger wrench!

Do you have a big adjustable that you’re forgetting about? You could use a pipe wrench if you had to.

Sounds like you’ll have to drill holes in the back ends of those rods.

Doh. 12" adjustable just opens to 1 1/4". But channel locks open to 1 1/2" with jaws in parallel. And of course those DEEP vise grips :)
 

Shiftless

Well-known member
Joined
Mar 9, 2014
Messages
14,606
Location
East Bay SFO
Your channel lock pliers should be fine. You don’t need a ton of torque. Those vise grip clamps are made for squeezing not for serious twisting.

Stay on the lookout at garage sales for a bigger adjustable wrench. The next size up is 15 inch. If you ever need to put major muscle on a stuck fastener, it’s good to have at least a 15. I acquired a 24 in a tool trade deal. I’ve never needed it but it’s a good conversation piece hanging on the wall in my garage.
 
OP
B

b.well

Well-known member
Joined
May 13, 2020
Messages
391
Location
NY
Your channel lock pliers should be fine. You don’t need a ton of torque. Those vise grip clamps are made for squeezing not for serious twisting.

Stay on the lookout at garage sales for a bigger adjustable wrench. The next size up is 15 inch. If you ever need to put major muscle on a stuck fastener, it’s good to have at least a 15. I acquired a 24 in a tool trade deal. I’ve never needed it but it’s a good conversation piece hanging on the wall in my garage.

Happy to report my neighbor came through and after a quick tap and die session my bolt issues are history. Isn't a perfect fit so sweet!!!

I'll still keep an eye out for a 3/4" tap set to have on hand. I had a deal made for one on FB Market then the seller sold to someone else. Argh. There is a nice old greenfield set for sell a couple hours away. Is it worth the drive? I asked the seller if they'll ship. Haven't heard back yet :)

I unexpectedly found some new rust today. Flash rust? Not sure. Maybe most people don't go a few days between cleaning and protecting. The one that rusted was in my backpack. More humid in there? I dunno. I am just happy I can put this thing back together now!

I did get to some new parts today and did some more wire wheeling. I'll try to get some updated pics up tomorrow.
 

Shiftless

Well-known member
Joined
Mar 9, 2014
Messages
14,606
Location
East Bay SFO
Good progress!

Flash rust is quick. That’s how it got its name “Flash”

I have seen it happen in minutes.

I’m definitely NOT going to be pulling out the guide bars on any woodworking vises. Your difficulties taught me a valuable lesson.

Here is a thought... instead of drilling holes in the end of that guide rail, how about grinding down a flat spot or even 2 flat spots on the end so that you could grip it with a wrench or a bench vise and not have it spin? I like that better than the YouTube guy who drilled holes and held the guide bars tight with a punch.

Kind of like this motor shaft.
 

Attachments

  • 950D2500-36B0-4143-A1BE-D8CD50983525.jpeg
    950D2500-36B0-4143-A1BE-D8CD50983525.jpeg
    41.4 KB · Views: 6
Last edited:
OP
B

b.well

Well-known member
Joined
May 13, 2020
Messages
391
Location
NY
Good progress!

Flash rust is quick. That’s how it got its name “Flash”

I have seen it happen in minutes.

I’m definitely NOT going to be pulling out the guide bars on any woodworking vises. Your difficulties taught me a valuable lesson.

Here is a thought... instead of drilling holes in the end of that guide rail, how about grinding down a flat spot or even 2 flat spots on the end so that you could grip it with a wrench or a bench vise and not have it spin? I like that better than the YouTube guy who drilled holes and held the guide bars tight with a punch.

Kind of like this motor shaft.

That is an interesting idea too. I'll keep that in mind.
 
OP
B

b.well

Well-known member
Joined
May 13, 2020
Messages
391
Location
NY
I hit a few sales on Friday and today was mostly family day; both great joys. I did manage to get some updated pictures of my Columbian Vise. I don't think any new work since I last reported but definitely clean parts that haven't been seen :)

Note:
What holds the dog piece in place is a pressure fit, not a threaded screw.

Take Notice! The Nut is on the Slide Rod easily by hand!!!

Next Steps.....
1. Fix my pipe wrench peaks (file)
2. Final wire wheel where needed(flash rust) and get paste wax on the shiny parts quick.
3. Complete any "unsure parts" below
4. Paint with Boiled Linseed Oil and either bake dry or let dry naturally. Does BLO dry harder if heat is applied? Not sure...... Is it OK for the still attached slide rod and main screw to bake at 400 degrees for 4 hours? Not sure....

Unsure parts....
1. The easiest part to remove next would be the handle and main screw. I would grind the peened end and tap out the pin holding it together.
2. If I want to remove the other rod I would grind the outer thread, then should not have thread issues. But would also need to solution the current rod turning issue. Options are: Drill a hole at the end(use punch/screwdriver to hold). Grind flat top and bottom at the end(use wrench to hold). Use pipe wrench at the end.
 

Attachments

  • 20200829_195616.jpg
    20200829_195616.jpg
    127.1 KB · Views: 21
  • 20200829_195724.jpg
    20200829_195724.jpg
    108.2 KB · Views: 20
  • 20200829_195755.jpg
    20200829_195755.jpg
    94.3 KB · Views: 20
Last edited:

Shiftless

Well-known member
Joined
Mar 9, 2014
Messages
14,606
Location
East Bay SFO
Next Steps.....
1. Fix my pipe wrench peaks (file)
Right..file first them smooth with sandpaper strips

2. Final wire wheel where needed(flash rust) and get paste wax on the shiny parts quick.
Yes, paste wax is good. I also use Fluid Film for that kind of thing. It’s a lanolin based rust barrier that is also a good lubricant. But realize that if you’re using that vise, that oil attracts sawdust and wax doesn’t.

3. Complete any "unsure parts" below
4. Paint with Boiled Linseed Oil and either bake dry or let dry naturally. Does BLO dry harder if heat is applied?
I’ve never baked BLO so I can’t say. Don’t paint it on heavily without rubbing off the excess with a rag or paper towel. Multiple thin coats are way better than one thick coat.

Not sure...... Is it OK for the still attached slide rod and main screw to bake at 400 degrees for 4 hours? Not sure....
I can’t imagine how that would damage steel. Just don’t do something crazy like quench hot cast iron with cold water.
 
OP
B

b.well

Well-known member
Joined
May 13, 2020
Messages
391
Location
NY
Next Steps.....
1. Fix my pipe wrench peaks (file)
Right..file first them smooth with sandpaper strips
a. YES

2. Final wire wheel where needed(flash rust) and get paste wax on the shiny parts quick.
Yes, paste wax is good. I also use Fluid Film for that kind of thing. It’s a lanolin based rust barrier that is also a good lubricant. But realize that if you’re using that vise, that oil attracts sawdust and wax doesn’t.
a. Didn't realize that about Fludi Film. Thanks for this tip. This will be next to my mitre saw so I'll go with the wax.

3. Complete any "unsure parts" below
4. Paint with Boiled Linseed Oil and either bake dry or let dry naturally. Does BLO dry harder if heat is applied?
I’ve never baked BLO so I can’t say. Don’t paint it on heavily without rubbing off the excess with a rag or paper towel. Multiple thin coats are way better than one thick coat.
a. I'll have to find the video again where the guy baked it. I use BLO on wood handles and do exactly what you said. Multiple thin coats wiping off the access. Have not thought of it the same way for metal. It won't soak in like wood. Still I get that multiple thin coats are better, same with most paint I think. How long would I wait between coats? Overnight? Or just a few hours?

Not sure...... Is it OK for the still attached slide rod and main screw to bake at 400 degrees for 4 hours? Not sure....
I can’t imagine how that would damage steel. Just don’t do something crazy like quench hot cast iron with cold water.[/QUOTE]
a. Thanks for the confirmation!
 

Shiftless

Well-known member
Joined
Mar 9, 2014
Messages
14,606
Location
East Bay SFO
Re: time between coats

I would wait until it’s hard. If you put BLO on top of BLO that is still soft, I bet it would just dissolve off the first coat and you wouldn’t get the build that you’re looking for.
Time to harden depends on conditions of course.

Are you going to use the oven in your kitchen?
 
To avoid these ads, REGISTER NOW!
Top Bottom