

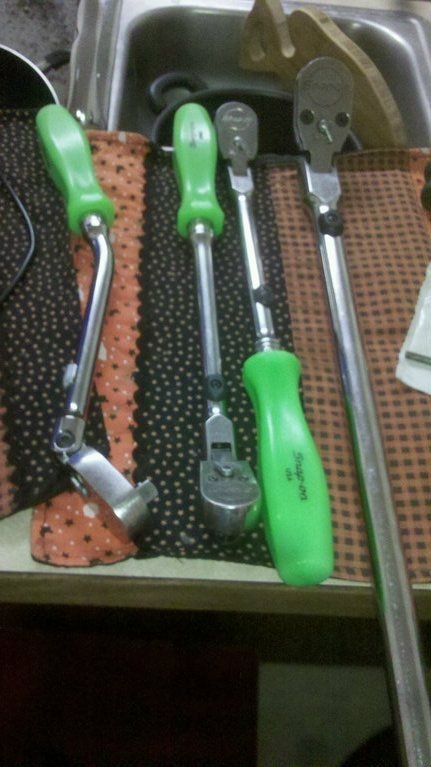
So I had a thread asking a few questions on adding a hard handle to an SLX80A long flex 1/2 drive snap on ratchet. Finally, got into the machine shop a few hours Friday, knocked the handle down to just over 1/2 in. Didn't get much else done till today when we re-opened. Knocked the extra meat off three more steel handles, and made 4 lime green hard handled ratchets. They turned out incredible. I'm pretty damn excited to test these out when I return to work next week!
From left to right I have an FHBF80, FX80, F841, and SLX80A:


Believe it or not, two wraps of this yellow painters type tape (more like non-sticky duct tape) was enough to protect the handles from the 4 jaw chuck. The first SDD8 handle fell victim to the chuck. Another SDD6 got very hot from drilling :-(

I machined all my handles to a .004 to .007 press fit, boiled the plastic handles, and pushed them on by hand, and a bit of tapping on the floor.

A final side project in all of these, as you can see, I have an offset flex head that is now a locking head. I bought an original FHBF80, because I couldn't put the offset handled ratchet in a lathe. I lopped off the extra 1/2 of steel on the end, and smoothed out the wings for the green handle. The hard parts was adding the locking mechanism. I threw the ratchet handle itself into the tool holder of the lathe, and used the appropriate drill bit in the jaws of the lathe to sort of work backwards, and drill two centered, stepped holes into the ratchet at the appropriate depths. The smaller hole I used a drill bit, but the larger hole required an end mill bit for a seat for the spring. That's still the easy part. Lastly, the little "L" hole for the lock button is 3/16ths, so I grabbed the right 4 flute carbide bit and put it into the mill, got the handle into the vise on the mill, and proceeded to plunge cut the holes I shadowed from my other locking ratchet. It was somewhat nerve racking, but after a few worried stops to check, I hit my other hole spot on and made the "L" for the lock. All the rest is just reassembly with new parts!
It works quite well, I'm really really happy with it. I need to take it back to the mill though, one last time, as the leg which you use to hold the lock out of the way to make it a free head was cut at too aggressive of an angle and you can't get it over all the way. This means its way too easy to pop out of place when you want it to stay over. That, and my larger secondary hole could be a tish deeper to take some tension of the spring. Either that or I could snip a coil from the spring as well to make it easier to use. Can't complain about 100% working on my first try, though. I'm really happy with it!
Here is a video of the facility I was able to use:
http://smg.photobucket.com/albums/v...w¤t=photobucket-23164-1345513038333.mp4
Note, this mill has a placard on it relating to WW2 most likely:

On the mill


Thanks for the inspiration, Part numbers, and machining tips to the Garage journal and its members. And to snap on for the parts ;-)
From left to right I have an FHBF80, FX80, F841, and SLX80A:
Believe it or not, two wraps of this yellow painters type tape (more like non-sticky duct tape) was enough to protect the handles from the 4 jaw chuck. The first SDD8 handle fell victim to the chuck. Another SDD6 got very hot from drilling :-(
I machined all my handles to a .004 to .007 press fit, boiled the plastic handles, and pushed them on by hand, and a bit of tapping on the floor.
A final side project in all of these, as you can see, I have an offset flex head that is now a locking head. I bought an original FHBF80, because I couldn't put the offset handled ratchet in a lathe. I lopped off the extra 1/2 of steel on the end, and smoothed out the wings for the green handle. The hard parts was adding the locking mechanism. I threw the ratchet handle itself into the tool holder of the lathe, and used the appropriate drill bit in the jaws of the lathe to sort of work backwards, and drill two centered, stepped holes into the ratchet at the appropriate depths. The smaller hole I used a drill bit, but the larger hole required an end mill bit for a seat for the spring. That's still the easy part. Lastly, the little "L" hole for the lock button is 3/16ths, so I grabbed the right 4 flute carbide bit and put it into the mill, got the handle into the vise on the mill, and proceeded to plunge cut the holes I shadowed from my other locking ratchet. It was somewhat nerve racking, but after a few worried stops to check, I hit my other hole spot on and made the "L" for the lock. All the rest is just reassembly with new parts!
It works quite well, I'm really really happy with it. I need to take it back to the mill though, one last time, as the leg which you use to hold the lock out of the way to make it a free head was cut at too aggressive of an angle and you can't get it over all the way. This means its way too easy to pop out of place when you want it to stay over. That, and my larger secondary hole could be a tish deeper to take some tension of the spring. Either that or I could snip a coil from the spring as well to make it easier to use. Can't complain about 100% working on my first try, though. I'm really happy with it!
Here is a video of the facility I was able to use:
http://smg.photobucket.com/albums/v...w¤t=photobucket-23164-1345513038333.mp4
Note, this mill has a placard on it relating to WW2 most likely:
On the mill
Thanks for the inspiration, Part numbers, and machining tips to the Garage journal and its members. And to snap on for the parts ;-)
Last edited:
 I'm going to drop by my home town snappy guy and show him the FHBF I bought from him on Thursday, I'm sure he'll be impressed. No more oil-absorbing handle