To avoid these ads, REGISTER NOW!

Compound Shop Remodel Thread

jbailey927

Well-known member
Joined
Feb 21, 2024
Messages
50
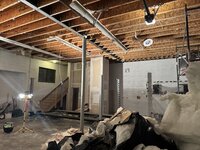
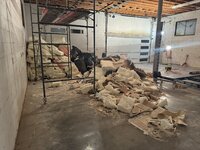
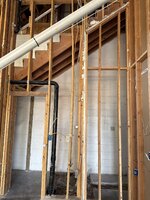
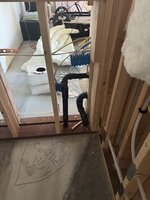
I have been very lucky and ended up with my father in laws shop after his passing in 2007. This shop is 40'x40' shop with 14' cealings a 16' x 8' and a 10' x 12' door. It has a framed bathroom with pluming with only a toilet under the back corner stairs. He was a mason by trade and ran his business out of the shop and therefore had a very spefic use for the shop. I have a full time office job but am a tinker and DIYer that enjoys building and dabbling, but I also need a space that can host people as we host several big parties a year as well. I finaly have the bandwith, finances and ability to redo the shop and am kicking off work this year.

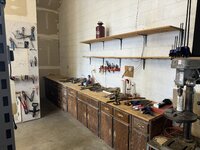
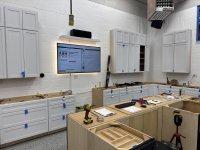
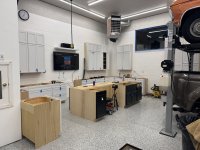
I also was able to acquire a full kitchen of brand new (but installed once) kitchen cabinets from a client of my wifes company. It was a large custom house and its was a full kitchen and butlers pantry. I plan to install all the cabinets in the back corner of the shop and elevate the base cabinets 3 1/2 inches off the ground. I am going to keep the island cabinets as an island on a rolling steel subframe so I can move it around easily if I need a large clear workspace or a large level worspace outside. I am still designing the subframe but will post later on that.

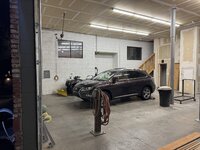
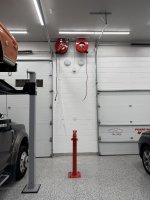
I have already upgraded the garage doors to insulated doors with smart openers that have windows and they made a HUGE difference, highly reccomend the Overhead Door people , they did great work. I also upgraded the old balast based Florecent lights with double the amount of LED 4' tubes, but the lighting is still underwhelming. The single car lift is new as well.

Current Plans for the Shop:

Bathroom: New Toilet, Urinal, Shower, with raised area and hand washer (dog washing, bike washing etc..) all within the shower - thinkng a dutch style shower door
Outside of Bathroom: Stainles steel comercial style sink with large integrated sloped drying rack/area
Plumed Air: I have a US General large air tank i want to baffel and run a RapidAir type system with multiple drops
Power Reals: Front and Back Power Reels
Car Wash Station: Powerwashing station mounted to wall between garage doors - likely Krenzel system from Obsessed Garage
Windows: Upgrading to triple pain non-operable windows for better insulation and security
Lighting: All new LED Lighting - This a weak area for me, I know i will need work lighting vs area lighting and i will have dark zones under the car lift....
Plumed Vacum: I already have a central vacume for the apparment above the shop, will add some drops for the shop as well (NOT for sawdust, but for general cleaning)


Outstanding Questions:
I toured a firestation once and saw the guys hosing Ice and Snow off the Chief's truck (staying clear of the glass of course) and was thinking of running hot and cold to the frunt of the interiof with a hot/cold mixer hose bib so i could do the same.
If I ever upgrade the lift to Bendback I need compressed Air drops to power the lift locks.
I have a MIG setup and an Oxy Excetaline torch and a cheap metal table - i will keep this for now and think about a dedicated metal working station down the road.
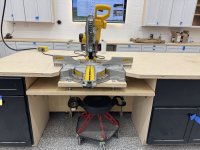
I want to integrate the table and miter saw into the base cabinets of the island.

The big question is what am I missing?

Here are As Built and Millwork Layout desings.


Shop As Built Plan.png

Shop Mill Work Plan.png
 
To avoid these ads, REGISTER NOW!
OP
J

jbailey927

Well-known member
Joined
Feb 21, 2024
Messages
50
Here are some pictures of the shop before I started cleaning it out. IMG_0603.JPGIMG_0600.JPGIMG_0601.JPG
img_0580-jpg.2268162
IMG_0214.JPGIMG_0215.JPG
 

Attachments

  • IMG_0580.JPG
    IMG_0580.JPG
    929.7 KB · Views: 939

thammel

Well-known member
Joined
Oct 3, 2005
Messages
2,237
Location
Maryland
Gonna be really nice! I would add a mini -split for AC. Another thing that will really brighten it up and make is so much nice is paint. White ceiling paint and perhaps an off white or white for the walls. Wonder what happened over the heater that the drywall was replaced?
 
OP
J

jbailey927

Well-known member
Joined
Feb 21, 2024
Messages
50
@thammel It never gets above 80 in the space, so I had not really considered the expense for a mini-split, might be worth to run a 10ga circuit to the back wall where I plan on doing most of the work so if I ever want to add one I can. We added a dumbwaiter about 10 years ago running up to an apparment above the shop where my wife's mom lives and that was a proposes spot, we ended up running it on the other side of the shop but opened up the cealing in both places for the engineer.
 
OP
J

jbailey927

Well-known member
Joined
Feb 21, 2024
Messages
50
Progress over the weekend.
- Removal of stuff
- Donation and give away of unwanted wood, construction materials, etc....
- Removal of drywall in expanded bathroom area.
- Finally started F250, discovered Gas Leak in the Carberator, removed carb for garage to rebuild.
 

Attachments

  • IMG_2152.jpg
    IMG_2152.jpg
    722.7 KB · Views: 95
  • IMG_2080.jpg
    IMG_2080.jpg
    597.8 KB · Views: 85
  • IMG_2097.jpg
    IMG_2097.jpg
    761.5 KB · Views: 83
  • IMG_2095.jpg
    IMG_2095.jpg
    645.7 KB · Views: 84
  • IMG_2089.jpg
    IMG_2089.jpg
    751.6 KB · Views: 88
  • IMG_2088.jpg
    IMG_2088.jpg
    814.4 KB · Views: 112

jollygreengiant

Well-known member
Joined
Nov 10, 2013
Messages
2,354
Location
Ontario, Canada
Looks like a nice space, I'll be looking forward to see what you do with it.

As for suggestions:
Low voltage needs. Do you have internet in the building? Will you want security cameras at any point? Answering yes to either of those questions will probably mean running some cat 5/6 wires.
Do you have enough electrical outlets? It looks like you have enough over the old workbench but on some other walls they look more scarce, will that be enough for you?
Don't forget a space for a shop fridge, especially if you are planning to host events out there.
 
OP
J

jbailey927

Well-known member
Joined
Feb 21, 2024
Messages
50
@jollygreengiant :

Good Point, Yes there is hardwired router in the building and I will be running cat6 in the cealing when it comes down next week.

POE Cameras - thats something I had not considered, thanks for that insight.

Electical - There are 3 sets of circuits run through the block walls with outlets every 8 feet. I am running dedicated drops for the table saw, miter, Air Compressor, Fridge, Ice Maker, auidio equipment. Basically anything big enough to need its own circuit or be big enought to impact other stuff on a circuit.

I have attached the Cabinet plan that shows the Fridge and Ice Maker in the Shop, so drinks and coolers should be under control. I already have a single 4 post lift and will be getting a double 4 post lift for the double door side of the garage, so while those will be working areas, they wont be workbench areas.

Thanks for your thoughts!Cabinets.png
 

Attachments

  • Bailey Shop - ID Model (1).pdf
    30.5 KB · Views: 7
OP
J

jbailey927

Well-known member
Joined
Feb 21, 2024
Messages
50
Went backwards to go forward, removed drywall and insulation to run new electrical, closed foam cell and batt combination and low volatage in the ceiling. Cut conrete for the shower and ice maker drains. Pulled the Panel cover off to dive into the creatively done sub panel.
 

Attachments

  • IMG_2224 (1).JPG
    IMG_2224 (1).JPG
    815.9 KB · Views: 106
  • IMG_2221.JPG
    IMG_2221.JPG
    706.5 KB · Views: 103
  • IMG_2220.jpg
    IMG_2220.jpg
    845.8 KB · Views: 89
  • IMG_2216.jpg
    IMG_2216.jpg
    924.5 KB · Views: 86
  • IMG_2210.jpg
    IMG_2210.jpg
    863.9 KB · Views: 82
  • IMG_2234.jpg
    IMG_2234.jpg
    949 KB · Views: 81
OP
J

jbailey927

Well-known member
Joined
Feb 21, 2024
Messages
50
Its been a while since I checked in, has been a very busy spring with some progress made in the shop.

Demo Completed
Plumbing Drains run for Icemaker, Shower
New Pluming run for Sink, pressure washer
All Electrical circuits run and landed on panel
All low voltage run (Cat 6, Coax for Eth over COAX, Dumbwaiter Controls)
New Walls Framed
Insulation installed (2/3 Inches of foam + Fiberglass remaining)

IMG_2945.jpgIMG_2946.jpgIMG_3109.jpgIMG_3110.jpg
 
OP
J

jbailey927

Well-known member
Joined
Feb 21, 2024
Messages
50
Plumbing for the bathroom, sink, Icemaker and fridge is all done and I finally recieved the interior windows, getting close to be able to do drywall. Installing windows is a new thing for me. I have no doubt I will post on here if I run into Trouble.
 

Attachments

  • IMG_3258.jpg
    IMG_3258.jpg
    755.2 KB · Views: 55
  • IMG_3267.jpg
    IMG_3267.jpg
    397.9 KB · Views: 53
  • IMG_3268.jpg
    IMG_3268.jpg
    586.9 KB · Views: 47
  • IMG_3271.jpg
    IMG_3271.jpg
    700.9 KB · Views: 47
  • IMG_3274.jpg
    IMG_3274.jpg
    573.6 KB · Views: 45
  • IMG_3256.jpg
    IMG_3256.jpg
    734.5 KB · Views: 58
OP
J

jbailey927

Well-known member
Joined
Feb 21, 2024
Messages
50
Mounted the windows last weekend and the first sheets of drywall went in today.
 

Attachments

  • IMG_3386.jpg
    IMG_3386.jpg
    666.1 KB · Views: 43
  • IMG_3360.jpg
    IMG_3360.jpg
    838.8 KB · Views: 41
  • IMG_3358.jpg
    IMG_3358.jpg
    732.8 KB · Views: 45
  • IMG_3369.jpg
    IMG_3369.jpg
    713.1 KB · Views: 50
OP
J

jbailey927

Well-known member
Joined
Feb 21, 2024
Messages
50
I think we have settled on these light fixture as they are extreamly versatile. I can dim them, set them for differen output leves, different Kelvin levels (35K, 40K and 50K).


1753998592966.png

Will post back here an updated final price and update once they go in.
 
OP
J

jbailey927

Well-known member
Joined
Feb 21, 2024
Messages
50
The floor guys got here on Monday and holy **** the level of equipment they have for grinding the floor down before laying down the epoxy is incredible. It really makes me doubt the Acid Etch or chemical preperation products can equal mechanical grinding.

IMG_3458.jpg
 
To avoid these ads, REGISTER NOW!
OP
J

jbailey927

Well-known member
Joined
Feb 21, 2024
Messages
50
Well August and September got away from me. I spend some time out on Black Rock Desert and now its October apparently. But I have been painting with the help of the wife and daughter and I got all the lights and electrical on the ceiling buttoned up this weekend. Also got the new dumbwaiter and bathroom doors installed. For some reason doors do not agree with me. I plumbed and istalled the large door fine, but the smaller door gave me the hardest time and even though the frame is plumb and everything is level is still rubbing on the bottom jamb. It seems like the door is sagging a little and therefore rubbing on the sill even thought the jamb is 100% plumb, but I dont know. My plan is to sand down the bottom of the door when I take it off to paint it.

The paint needs touch up and cut in so looks a little rough, but the broad strokes are there....
 

Attachments

  • IMG_3771.JPG
    IMG_3771.JPG
    951.3 KB · Views: 92
  • IMG_3770.JPG
    IMG_3770.JPG
    797.8 KB · Views: 93

DennisK59

Well-known member
Joined
May 21, 2021
Messages
205
Try shimming the bottom hinge from index card material, if two on the bottom and one in the middle.
 
OP
J

jbailey927

Well-known member
Joined
Feb 21, 2024
Messages
50
@DennisK59 :

Thanks for the advice, shim the hinge plate and the door or the hinge plate and the jamb? I would assume the Jamb side otherwise when you open the door you lose the adjustment, right?
 
OP
J

jbailey927

Well-known member
Joined
Feb 21, 2024
Messages
50
I installed the Viper Turbo Floor Fan 24" last night up on the wall and learned the hard way that they have a "safety" feature that does not allow them to be switched on and off from a power on setting, you have to dial them back to 0 then ramp them up to whatever speed you want every single time. After drilling holes in the wall I am going to have to pull this down off the wall and find something else. Lesson learned for the next time, test first drill second.

Other than that they are a super cool fan. This fan is quiet, moves a ton of air, comes with a portable leg setup and a wall mount, really is a great unit.


IMG_3820.jpg

IMG_3819.jpg
 
OP
J

jbailey927

Well-known member
Joined
Feb 21, 2024
Messages
50
After another couple of month break I have made some more progress in the shop. WIth my projects I have come to realize that progress comes in big spurts, apparently I can't keep my focus, or I have work, a family and a household to run, or something....

Since Mid October:
Reels Mounted (Power reels hooked up, still working on Air system)
Car Lift back in the garage
Base Cabinets installed (wife convinced me not go to 3.5 high, but due to the slope of the floor basically entire cabinet is off of floor and supported by back mounting to wall and supports between cabinet frame and floor)
Uppers installed
New Windows Installed
Sink Installed
Finished painting cealing and walls
TV installed
 

Attachments

  • IMG_4119.JPG
    IMG_4119.JPG
    820.9 KB · Views: 75
  • IMG_4124.jpg
    IMG_4124.jpg
    691 KB · Views: 76
  • IMG_4102.jpg
    IMG_4102.jpg
    663.3 KB · Views: 76
  • IMG_4101.jpg
    IMG_4101.jpg
    975.5 KB · Views: 80
  • IMG_4100.jpg
    IMG_4100.jpg
    971.7 KB · Views: 79
  • IMG_4071.jpg
    IMG_4071.jpg
    962.9 KB · Views: 94
OP
J

jbailey927

Well-known member
Joined
Feb 21, 2024
Messages
50
I worked on the Shop the last couple of weekends and the Island this weekend. The counters are all done and are 3/4 rough ply and then 3/4 unfishished birch. The birch is screwed up though the unfished in a couple of places so its easy to swap out after it takes a beating after a couple of years.

For the I Island I got all the cabinets tied together and on casters, I used the 4" red ones from Rockler.. I took 3/4 ply and mounted the casters to that the size of the "floorplate" of the cabinet and just set the cabinet on that. Each cabinet has its own little caster tray it sits on. One side has a fixed staight rolling caster on each outside corner, otherwise I dont see a way of controlling the thing. Its actually pretty easy to move around. Took a number of ideas from different utubers for the miter saw, its not pretty or finished, but it is functional.
 

Attachments

  • IMG_4210.JPG
    IMG_4210.JPG
    723.5 KB · Views: 60
  • IMG_4209.JPG
    IMG_4209.JPG
    1.1 MB · Views: 64
  • IMG_4207.JPG
    IMG_4207.JPG
    701.6 KB · Views: 63
  • IMG_4206.JPG
    IMG_4206.JPG
    1.1 MB · Views: 64
  • IMG_4205.JPG
    IMG_4205.JPG
    1.1 MB · Views: 65
OP
J

jbailey927

Well-known member
Joined
Feb 21, 2024
Messages
50
@Tynee : I would love to take credit but cannot, if you search youtube for adjustable miter station or ultimate miter station, you will find a number of people doing the same thing.

@larry4406 : Its a 24' tall shaft that goes from the ground up to the upper floor appartment. Has a 30" x 30' box (I think). Its from a company out of California, I think they were Powerlift Dumbwaiters. I stuck a LED strip light in the well and as long as the box is in the upper staition it acts as a night light in the garage and then lights the box when its in the lower station.
 

Attachments

  • IMG_4006.jpg
    IMG_4006.jpg
    273.2 KB · Views: 58
  • IMG_4007.jpg
    IMG_4007.jpg
    703.5 KB · Views: 48
  • IMG_4101.jpg
    IMG_4101.jpg
    975.5 KB · Views: 45
OP
J

jbailey927

Well-known member
Joined
Feb 21, 2024
Messages
50
Tackled the stairs this weekend. I used a product from Intralink called Nora. What I would call your hospital floor type product. Vinyl sheet good type stuff. You must prep the base make sure its real smooth and there are no large gaps. Then you lay down essentially a tape then place the product on top of that and cut to fit. You precut every tread and riser before you start instillation because they overlap at every stair. Once you peal the paper and apply the product you use a heavy roller to make sure there is adhesion between the product, tape, and floor.
 

Attachments

  • IMG_4429.jpg
    IMG_4429.jpg
    1.3 MB · Views: 23
  • IMG_4436.jpg
    IMG_4436.jpg
    754.8 KB · Views: 22
  • IMG_4437.jpg
    IMG_4437.jpg
    888.9 KB · Views: 22
  • IMG_4439.jpg
    IMG_4439.jpg
    1.2 MB · Views: 23
  • IMG_4440.jpg
    IMG_4440.jpg
    914.8 KB · Views: 20
  • IMG_4441.jpg
    IMG_4441.jpg
    762.8 KB · Views: 19
OP
J

jbailey927

Well-known member
Joined
Feb 21, 2024
Messages
50
@rzims : Thank you, sorry I missed your comment.
@RalphJeepGuy : Right now, its car storage and working area, I am working on a bathroom area in the back and do all kinds of general projects and stuff in there. Im not a real mechanic by any means so haven’t gotten to the point where I have an entire engine taken apart and spread all over the place. The stairs lead up to an apartment where my MIL lives.
 

Smilodon

Well-known member
Joined
Oct 27, 2009
Messages
1,182
Location
Titusville, FL
Nice place and nice plans/work. I wish I could empty out my Dad's old shop I inherited as quickly. It is in another location so I only work on it seasonally. Lots of sorting and 2 20 yard dumpsters (so far) and it is starting to look usable again.

Anyhow, I was wondering what the recessed space in the left wall was for? Or do you even know? Seems like a good spot to put some pallet racks or something for bigger stuff that would be out of the way.
 
OP
J

jbailey927

Well-known member
Joined
Feb 21, 2024
Messages
50
@Smilodon : If this is what you are talking about, its a niche for a pellet stove and flue that goes up through the upper story as a chimney and closet. I am going to put some more storage that matches the existing cabinets I got for free and build a false front for in front of the vacume and air compressor and baffle it to reduce the noise while running. Hopefully the front will be of the same cabinet doors that the cabinetry is made out of to match. I put a radio station or record studio style On Air sign in the ceiling that turns on whenever the air compressor is on, so I dont forget about it and leave it on. Something like this picture is how I wasnt the cabinet side to look.
 

Attachments

  • Nitch Plan.jpg
    Nitch Plan.jpg
    653 KB · Views: 14
  • Air On.jpg
    Air On.jpg
    572 KB · Views: 15
  • Nitch Plan Final.jpg
    Nitch Plan Final.jpg
    619.9 KB · Views: 6
  • IMG_4446.jpg
    IMG_4446.jpg
    660 KB · Views: 7
To avoid these ads, REGISTER NOW!
Top Bottom