To avoid these ads, REGISTER NOW!

Compression - Show Off Your Compressor

A_Pmech

Well-known member
Joined
May 8, 2007
Messages
8,002
Location
IL
A_Pmech, those are beautiful what's the going price?

I'll send you a PM. :thumbup:

cnc-me said:
Bet it's time to hook up the big phase converter.

Yep!

W-Cummins said:
You might like it but if your running them on a single phase non-commercial service your neighbors and the power co are not going to be happy.

Good point, in most cases that would be true! However, those issues were worked out with the power co-op a long time ago. I live in a very rural area and it is common to run large motor loads on heavy single-phase services here. Many grain elevators, machine shops and water treatment plants out here run large three-phase motors through phase converters on single-phase services with the power company's blessing.

I think Mitch is planning a different approach, he's been discussing driving his unit directly from the PTO of his 40HP tractor. That would slow the pump down into the 500-600 RPM range which should still be good for 50 CFM or so just loping along.

I might take you up on the filter offer, I'll have to see how the installation progresses when I get around to it. :thumbup:
 
To avoid these ads, REGISTER NOW!

1984Datsun

Well-known member
Joined
Jul 25, 2011
Messages
139
Location
Michigan
1984Datsun:

it sounds to me like why your tank is dropping so low it because you don't close the ball valve? but after you are done using your air compressor you should switch it to the "OFF"

This is with the ball valve shut... closing off the air hose and stuff.

I think it's the crappy pipe pieces with the crappy threads... they probably don't seal as well as real pipes do like some here mentioned. They are made in China, so that probably explains it.

What I might just do is clean the threads that go into the tank, lots of teflon tape, and then before reinstalling the pipe, I would grind the gal. coating off of the ares around the pipe fittings and pipe, and weld them around. That would probably take care of that. Otherwise, if anyone knows where to find real US made pipes, with good sealing threads and proper fit, holler. I'd rather do that as it would be faster and probably look better.

The compressor is shut off whenever I am done with it. I usually let it drop a bit before I open the drain fitting on the bottom of the tank to blow the water out... am I supposed to do that after it's maxed out at 135 psi?
 

Bob Heine

ALLIANCE MEMBER
Joined
Oct 24, 2009
Messages
10,703
Location
Boca Raton, Florida
This is with the ball valve shut... closing off the air hose and stuff.

I think it's the crappy pipe pieces with the crappy threads... they probably don't seal as well as real pipes do like some here mentioned. They are made in China, so that probably explains it.

What I might just do is clean the threads that go into the tank, lots of teflon tape, and then before reinstalling the pipe, I would grind the gal. coating off of the ares around the pipe fittings and pipe, and weld them around. That would probably take care of that. Otherwise, if anyone knows where to find real US made pipes, with good sealing threads and proper fit, holler. I'd rather do that as it would be faster and probably look better.

The compressor is shut off whenever I am done with it. I usually let it drop a bit before I open the drain fitting on the bottom of the tank to blow the water out... am I supposed to do that after it's maxed out at 135 psi?
It's hard to tell but looks like there's no tape on the vertical side of the 90-degree elbow coming out of the tank.
attachment.php


I'm no pro but I worked for a plumber as a teenager back in the early 60s. We cut and threaded the galvanized pipe on site and used pipe joint compound on the threads. If the threads are rough, like most of the Chinese pipe, they tear the Teflon tape to shreds. Today's pipe joint compound has Teflon as well as oil, clay and calcium carbonate. It's messier than tape but with galvanized pipe I've had better luck with pipe joint compound. Save the tape for threaded copper or brass fittings.

You should be able to just crack the drain valve, regardless of the pressure, and drain the water from the tank.
 

1984Datsun

Well-known member
Joined
Jul 25, 2011
Messages
139
Location
Michigan
It's hard to tell but looks like there's no tape on the vertical side of the 90-degree elbow coming out of the tank.
attachment.php


I'm no pro but I worked for a plumber as a teenager back in the early 60s. We cut and threaded the galvanized pipe on site and used pipe joint compound on the threads. If the threads are rough, like most of the Chinese pipe, they tear the Teflon tape to shreds. Today's pipe joint compound has Teflon as well as oil, clay and calcium carbonate. It's messier than tape but with galvanized pipe I've had better luck with pipe joint compound. Save the tape for threaded copper or brass fittings.

You should be able to just crack the drain valve, regardless of the pressure, and drain the water from the tank.

I was wondering about pipe compound... and no tape was present on that second joint you speak of... that was actually a piece of elbow and such pipe that I got out of the scrap pile... it was so tight that I couldn't get it apart... should've put it in the vise. Yes, it is rust free on the inside too.

Thanks for pitching in with an idea of what the problem most likely is... the connections...

Will have to find that pipe thread compound... I've got some around here somewhere. This time the pipe will be taken apart in the vise and put back together in the vise so I can make a nice and tight.

Thinking back, I did see a couple of bubbles form outside the pipe connections... it was only in the part below the regulator. Gotta be them connections then... that's something I can do on a rainy day like today, tomorrow, and supposedly Friday.
 

balane

Well-known member
Joined
May 4, 2011
Messages
2,996
Location
Pacific Northwest
I can tell you that I had a slow leak with the white tape but I couldn't find it. So I went through and replaced all the tape with rectorseal #5 compound (probably spelling that wrong.) on clean fittings. And now my gauge stays planted on wherever I leave it.
 

mdbeck1

Well-known member
Joined
Mar 7, 2010
Messages
2,297
Location
Norman, OK
I can tell you that I had a slow leak with the white tape but I couldn't find it. So I went through and replaced all the tape with rectorseal #5 compound (probably spelling that wrong.) on clean fittings. And now my gauge stays planted on wherever I leave it.

I put mine together a short while back and put a reducing T in with a plug in one end (future growth). I could NOT get the plug to seal. I tried tape and then went to the compound. Still leaked. I finally just replaced the plug with an air chuck (it was handy). It sealed right up. Aparently the plug was the problem. Now the compressor pumps up to 155 and sits there for a week unless someone turns the ball valve for the air hose.

BTW: I decided to leave the air chuck. I might eventually decide to run a sandblaster and it would probably be faster if I just plugged that hose direct to the 155 side instead of the 90psi I've got the rest of the system regulated to.


Oh, and I remembered a trick from Dad... Get a little bit of soapy water and spray it on the connectors. If you see bubbles you've found your leak.
 

1984Datsun

Well-known member
Joined
Jul 25, 2011
Messages
139
Location
Michigan
I can tell you that I had a slow leak with the white tape but I couldn't find it. So I went through and replaced all the tape with rectorseal #5 compound (probably spelling that wrong.) on clean fittings. And now my gauge stays planted on wherever I leave it.

Will do that.

Did you wire brush the threads or something to make them "clean" as you say?
 

Jim Johnstone

Well-known member
Joined
Apr 11, 2011
Messages
1,841
Location
Brantford, Ontario
My shop compressor is nothing fancy, just a 5hp 60 gallon that I assembled from parts from Princess Auto. Uses an offshore made single stage 3 piston pump that spins high RPM, makes a **** load of noise and heat. I'm just waiting for the pump to give up the ghost and I will replace it with a 2 stage pump from the likes of Devilbiss/Quincy/Saylor Beal etc.

Now the photo I have attached is going to be my winter project. :bounce: It's a 4 stage 4 piston pump made in England by Bristol Pneumatics. It came from the factory with a 20hp or 15hp option. Mine is 15hp, but I will be swapping it to a 10hp single phase motor as soon as I find one, and reducing the RPM accordingly. With the 20hp motor, it produced 24 CFM at 5000 psi. Should be right around 11 or 12 cfm at 5000 when I'm done with the 10hp motor swap.

SDC12087.jpg
 

chrommagman

Well-known member
Joined
Jul 15, 2011
Messages
346
Location
Mesa, Arizona
Will do that.

Did you wire brush the threads or something to make them "clean" as you say?

You can do that! here is a tip that I found out. Put the teflon tape on then put some disk brake quite on the fittings, wait till it's tacky (almost set) then put the fittings together. It works very well because that disk brake quite forms a silicone seal.

With this leak have you tried soapy water in a spray bottle??
 

GeorgiaHybrid

Well-known member
Joined
Sep 9, 2008
Messages
3,763
Location
Extreme NW Georgia
my shop compressor is nothing fancy, just a 5hp 60 gallon that i assembled from parts from princess auto. Uses an offshore made single stage 3 piston pump that spins high rpm, makes a **** load of noise and heat. I'm just waiting for the pump to give up the ghost and i will replace it with a 2 stage pump from the likes of devilbiss/quincy/saylor beal etc.

Now the photo i have attached is going to be my winter project. :bounce: It's a 4 stage 4 piston pump made in england by bristol pneumatics. It came from the factory with a 20hp or 15hp option. Mine is 15hp, but i will be swapping it to a 10hp single phase motor as soon as i find one, and reducing the rpm accordingly. With the 20hp motor, it produced 24 cfm at 5000 psi. Should be right around 11 or 12 cfm at 5000 when i'm done with the 10hp motor swap.

SDC12087.jpg

5,000 psi ??????
 

Jim Johnstone

Well-known member
Joined
Apr 11, 2011
Messages
1,841
Location
Brantford, Ontario
5,000 psi ??????

Yeah, it'll be for filling my scuba tanks. The ironic thing is that compressor is bigger than any of the dive shops I deal with have for servicing all their customers. Mine will be just for me :bounce:

The plan is to add a bank of 4500 or 5000 psi storage bottles (look like big welding bottles) to bank the air at high pressure, then I will decant off the storage bottles to fill individual scuba tanks. This allows me to run the compressor only to refill the storage bottles when I want to like later in the evening when it's cooler, and to run the compressor for extended run times, rather than little bursts to fill individual tanks.
 

Jim Johnstone

Well-known member
Joined
Apr 11, 2011
Messages
1,841
Location
Brantford, Ontario
Learn something new every day...

Yeah I have a totally different opinion of high pressure than most people. Most garage guys see 175 as very high pressure. I've been diving since I was 11, and my favorite tanks to dive with are old (1960's) tanks that are considered "low pressure" at 2250 psi.
 

romafern

Banned
Joined
Oct 9, 2009
Messages
275
Location
Nasty disgusta aka Augusta, GA
Speaking of 175...what is the common pressure for a garage compressor? My 30 gal is rated to 125, but I quickly learned that I needed more pressure when I started using it quite often. Now that I want to get a Quincy, their site does not give me a lot of info. Is 175 like the standard on compressors?
 
To avoid these ads, REGISTER NOW!

chrommagman

Well-known member
Joined
Jul 15, 2011
Messages
346
Location
Mesa, Arizona
romafern:

if you need more psi you mite just have to buy a new popoff valve.
What is the W.P. of your tank ? (this should be stamped on a plate that is tac welded on to your tank)
 

romafern

Banned
Joined
Oct 9, 2009
Messages
275
Location
Nasty disgusta aka Augusta, GA
Chrommangman,

wish it was that easy... The 30 gal I have has a leak...Not sure I want to up the pressure and have a bad outcome. I am in the mood for a new and big *** compressor.

I've was at a Northern Tool store about 4 hours ago and was looking at a QT 7.5...it was a work of art. Was priced at 1999 but when I asked why it was priced as such, the nut job working there said it was actually priced at 2499. I will call him a nut job because he could barely help me with questions like the aftercooler and auto drain valves. While still a good price, I will save more buying it online and would save on driving over one hour one way.

Right now I am doing research on it. Will have to buy it when I return from overseas...

Know of a good place to buy an hour meter to hook up to the new compressor? I want to keep track of the hours.

Cheers.
 

In My Garage

Well-known member
Joined
Jul 28, 2011
Messages
315
Location
ON
My new 4-cylinder, 2-stage, 7.5 HP, 80 gallon...should give me a bit of air.

Its in the corner of my basement and silent enough that I can sit in the room above it, watch TV and hardly hear it. Nothing like low RPMs.

1120841676_aZQva-X2-2.jpg
 

dwright406

Well-known member
Joined
Nov 2, 2010
Messages
172
Location
77566
My 1982 Speedaire 33 gallon compressor...

Wes72057.jpg


I usually have this 26 gallon tank plugged in and have my tools running off of the blue hose.

Wes72058.jpg


When I need a lot of air for blasting or whatnot, I add the green 25 gallon tank inline as well.

Wes72148.jpg
 

chrommagman

Well-known member
Joined
Jul 15, 2011
Messages
346
Location
Mesa, Arizona
dwright406

Nice setup :) I have a old 20 gal speedaire and old sears kinda like your speedaire, but the pump took a **** on me. I was thinking about linking the tanks like you have. how long does it take to fill when you have that green tank linked to your main ?
 

dwright406

Well-known member
Joined
Nov 2, 2010
Messages
172
Location
77566
I never timed it, but it's not too bad. From empty to 110 psi takes probably 6-8 minutes.

BTW those 2 extra tanks were old compressors I snatched from the curb before the garbage truck got them, they aren't pretty but they make a big difference when I'm running my sandblasting cabinet.
I bought the Speedaire used about 6 years ago for $150.
 
Last edited:

chrommagman

Well-known member
Joined
Jul 15, 2011
Messages
346
Location
Mesa, Arizona
I never timed it, but it's not too bad. From empty to 110 psi takes probably 6-8 minutes.

BTW those 2 extra tanks were old compressors I snatched from the curb before the garbage truck got them, they aren't pretty but they make a big difference when I'm running my sandblasting cabinet.
I bought the Speedaire used about 6 years ago for $150.

Cool, I bought mine for 150 to.

This is my current setup. but I mite link a 20 gal tank to it.

SDC12835.jpg

SDC12838.jpg

Drain valve
SDC12844.jpg
 

Bob Heine

ALLIANCE MEMBER
Joined
Oct 24, 2009
Messages
10,703
Location
Boca Raton, Florida
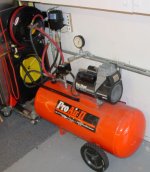
Last year I upgraded my setup. My oil-less Pro-Air II (picture 1) put out a decent volume but the air right off the compressor was full of water. I added a water separator, coalescing filter and hose reel so it was handy but the filter got saturated with water pretty quick. To get rid of the water I ran 1/2" galvanized pipe from the compressor to the front of the garage and connected it to a $40 desiccant dryer (yellow thing in picture 2). Instead of running one 15-foot pipe, I added a 20-foot S, making the cooling line 35-feet (picture 3), which is ten more than recommended. Added drains to each end of the run and one more under the dryer gave me pretty dry and clean air.

I built this setup expecting to eventually upgrade the compressor to a horizontal 60-gallon, 5 hp Eaton. The 60" wide, 42.5" high space under the cabinets is just big enough for the Eaton (54"x40"x22"). I had $1,500 saved but as time went on, the setup kept working so I bought a new aluminum radiator and coilovers for my big block Corvette. Decided to overhaul the old compressor and maybe even build a cover to reduce the deafening noise. Figured I still had $500 and I planned to rebuild the nestegg.

The day the custom radiator arrived, the Devilbiss Pro-Air II pump head on the motor exploded (my own fault). Couldn't find the castings to fix it so I checked the Eaton site and saw that nothing was on sale and the $999 compressor was now $1,199 and shipping was not free. Hmmm, 520 pounds from Ohio to Florida -- UPS site estimates $600 so it might be half that with Eaton's discount. Still talking $1,500. Another $100 for the 220v outlet -- $1,600 for a 14 SCFM @100 psi compressor.

A Harbor Freight flyer arrived that week and advertised a US General 3.5 hp 60-gallon 12.85 SCFM @90 psi compressor for $399. Unfortunately it's a vertical so it won't fit my cabinet setup. I tossed the ad and went into the garage to stare at the problem. I thought about pouring a slab outside the garage and installing the compressor on it. That would mean also building some kind of enclosure (it sometimes rains hard in South Florida and in a hurricane some pretty big stuff starts blowing around). I'd be back to spending a bunch of money I don't have. I didn't borrow money to buy my house so I sure wasn't going to borrow money for a compressor.

Staring at the cabinets didn't help but when I measured them, I realized they were 42" tall (I used those cheap Mills Pride stock cabinet doors from Home Depot on my home-made cabinets). Only a half-inch space under the cabinet but moving just the one cabinet made a perfect spot for a 60-gallon vertical compressor. My neighbor drove me to Harbor Freight with his truck and we picked up the compressor. Had to cut some holes in the sides of the moved cabinet to run the galvanized pipe through but it was pretty simple and I added a couple of unions to the ends of the pipes inside so they came out even. Two tees on the pipes let me have drains for any condensation. One tee is the supply and the other is the return (picture 4). My old setup had a 3/8" pipe going through the garage wall so I could have compressed air outside without having to run the hose out the back door and let air-conditioned air out of the garage. I use the outside line to connect my small blast cabinet and it keeps the dust out of the garage. I also have a paint shaker that I can mount out there. I moved the hose reel higher on the wall, along with a new coalescing filter. My old filter had 1/4" fittings and I upgraded to the larger 1/2" unit. Same element, just more air flow.

I swapped a couple of 15-amp breakers for double breakers and freed up space for a 30-amp double-pole and wired an outlet just above the compressor (might be just the thing when my fund is replenished and I can get that Eastwood MIG with the spool gun). While I was plumbing this setup, (picture 5) I tee-d two extra quick-connects. One is a plain air, direct outlet from the compressor. It's low on the wall and it should be handy for blowing dust out of the garage before setting it up for painting the Corvette. Don't need dry or filtered air for that. The second outlet is a few feet above the first and is before the filter. This gives me unfiltered but dried air. The final outlet is on the wall to the left of the compressor and it normally connects dry filtered air through the retractable hose reel. I have a brand new 50-foot 1/2" hose with 3/8" fittings that can connect to that outlet to be sure I have plenty of air volume for the spray gun.

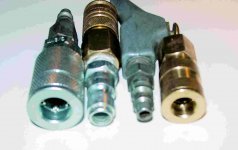
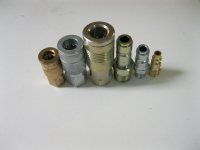
Everything in the system is 1/2-inch or larger. The 3/4" braided hose from the compressor to the hard line is from a water heater installation kit so there is no flow restriction until you get to the quick-connects (picture 6). Most of my air tool collection has 1/4" fittings (far left and right in picture 6) and they work just fine. There are 3/8" air couplers on the main lines and the hose reel, my long (50-foot) hoses, HVLP spray guns, blast cabinet and a few air pigs (second from left and right in picture 6 are 3/8" high flow couplers). The quick-connects on the coalescing filter are the 1/2" monsters (OK, monsters in my world) shown in the center of picture 6. I found the females for $13 each and the males for $4.00 each so the two connections cost $34 plus shipping and handling. I put these on the filter hoses (1/2" hose with 1/2" fittings) because I wanted minimal flow restriction into and out of the filter. The quick connect lets me easily bypass the filter when sandblasting outside. I could have done it differently but figured I'd need two different air lines going through the wall to get the same result. You often need dry air but not necessarily oil-free air for quite a few jobs (just my thought).

Because so many of my air tools have 1/4" fittings, I made up a few 3/8" to 1/4" adapters for both directions (the two on the left in picture 7 are adapters). Eventually I'll replace all my fittings with the high-flow but after buying out all of HF's clearance pieces for $0.07 each, it's going to be hard to spend $3 a piece for them somewhere else.

Sorry for the long post but I'm out of money and killing time while waiting for my Social Security check.
 

Attachments

  • Pro-Air II.jpg
    Pro-Air II.jpg
    52.7 KB · Views: 202
  • Pro-Air II Wall.jpg
    Pro-Air II Wall.jpg
    63.8 KB · Views: 196
  • Couplers.jpg
    Couplers.jpg
    77.9 KB · Views: 158
  • Couplers - 3 sizes.jpg
    Couplers - 3 sizes.jpg
    43.3 KB · Views: 206
  • New Compressor.jpg
    New Compressor.jpg
    74.3 KB · Views: 405
  • New Plumbing.jpg
    New Plumbing.jpg
    66.8 KB · Views: 408
  • Cooling Lines.jpg
    Cooling Lines.jpg
    67.1 KB · Views: 201

Bob Heine

ALLIANCE MEMBER
Joined
Oct 24, 2009
Messages
10,703
Location
Boca Raton, Florida
Bob Heine:

How is that compressor ? I have always wondered how HF compressors are
It's been great so far. I got what I expected so it isn't a fine piece of machinery but it puts out the air it claimed, as far as I can tell. It's about 1/10th the noise of the direct drive but that's to be expected -- both motors turn at 3450 RPM but belt-drive pump runs at half motor speed and with double the number of pistons puts out a decent volume of air. The HF also has a pressure blow-off so it really lets you know when it shuts off.

I ran this HF compressor unloaded (tank valve wide open) for half an hour and it didn't sound good. It was like a car with worn out rod bearings. I bought the extension on the warranty so I just closed the main valve and let it rip. After a few minutes the rod knock got less noticeable. After a week of cycling, the noise is gone.

The compressor didn't come with a regulator but that was fine with me because I could buy one of my own choosing. It was an extra $35 but I have a 1/2-inch regulator instead of the 1/4-inch ones I have seen on some of the others.

The air coming out of the compressor is hot! With the A/C on in the garage, the air going in is 77-degrees. The pipe from the compressor to the tank is over 300-degrees when the compressor is running. I suspect this is normal because a lot of the big units have fins on that pipe. I'll have to keep an eye out for a cooling line -- might even end up with a transmission cooler plumbed in there.

My personal feeling is that this HF compressor is a good machine for $400.
 

dolphin233

Well-known member
Joined
Oct 5, 2010
Messages
51
Bought this one for $75. Older model but pretty neat. Has a sticker where the people on the line that built it signed. I had to put the motor on it as it was originally three phase.


<a href="http://s189.photobucket.com/albums/z292/hunter29078/?action=view&current=compressor2.jpg" target="_blank"><img src="http://i189.photobucket.com/albums/z292/hunter29078/compressor2.jpg" border="0" alt="Photobucket"></a>
 

dolphin233

Well-known member
Joined
Oct 5, 2010
Messages
51
Durn. I bought this one from brake mfg. They were uprading to newer machines. The guy running the place wanted $350 for it with the motor but it was 3-phase. His selling point was that the motor was just put on and was pratically new and that is what I was really paying for. So I asked him if he would sell without the motor and he said to make him an offer and $75 was what he took. I should have probably offered less since it wasn't his money. Same guy also offered me a working coke machine for free just to haul it off. I got a farm duty 5hp from tractor supply for a little over $100. Oh and I had to but the pulley for the motor of of ebay. I think it was about $40.

I also bought a 20 gallonish? (farmhand) ch compressor from our tractor for $100 brand new. It was in the returned lot. It was tripping the guy breaker that bought it and when the guy at T.S. plugged it in to the extension cord they had it tripped there breaker. So they marked it as broken, it only needed a bigger breaker. It runs like a champ and I use it for a back up or to carry with me.

Our tractor supply does well with the returned/broken lot and clearence items. I bought the 5hp motor on clearance.
 

dolphin233

Well-known member
Joined
Oct 5, 2010
Messages
51
sweet!!

I would have taken that coke machine to. you could have sold it if you didn't want it!!!

Yeah would have but it was a a late 80's early 90's model that wasn't stylish at all. He couldn't sell in his listing so I figured it would have been sitting at my shop forever. Although it would be cool to have one in the shop with different beers in it. I could have charged .50 a beer to help recoup the cost of my thirsty friends.
 

Robleticia

Well-known member
Joined
May 5, 2010
Messages
6,416
Location
Angleton, Texas
Sorry for the crappy cell phone pics, but I up sized a little bit this week.:thumbup:
 

Attachments

  • IMG00997-20110808-1837.jpg
    IMG00997-20110808-1837.jpg
    139.3 KB · Views: 181
  • IMG00999-20110808-1909.jpg
    IMG00999-20110808-1909.jpg
    138 KB · Views: 266
To avoid these ads, REGISTER NOW!
Top Bottom