To avoid these ads, REGISTER NOW!

Compressor rebuild/machine tag question

cdsloop

Well-known member
Joined
Jul 28, 2015
Messages
88
Location
Central North Carolina
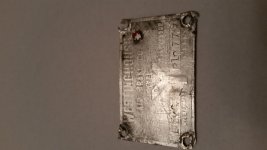
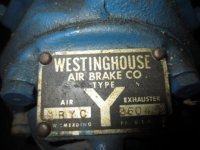
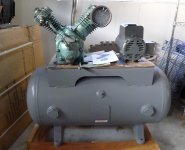
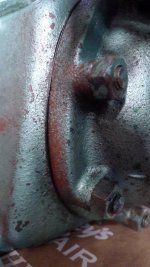
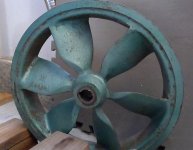
Hello GJ crew. I've begun a compressor rebuild journey, and am looking for some advice on a couple details. A little background...the subject of my work is a 1950 Westinghouse Air Brake Co. 1BYC. It belonged to my wife's grandfather, and I acquired it after the rest of the family had decided to cast it out. It had sat in his small shop for 5 or more years with very occasional use before I brought it home. I replaced the rotten wiring and fired it up after sitting in my shop for 2-3 years. The 2hp motor is not original, but the pump and tank are. It would run and build pressure, but upon cutting off, it would leak back through the valves in the head. I have stripped the tank of the motor and pump, and have hydrotested the tank. I have removed the heads, and the cylinders are in very good shape. I intend to remove the rods from the crank to inspect the condition of those surfaces before ordering a complete rebuild kit that I found online. I'm going to sandblast the tank, and lay on as good a paint job as I can accomplish, and disassemble the motor for a thorough cleaning and paint job. The pump will get a complete rebuild. My questions are: How should I strip the paint from the pump? I know that sandblasting is not recommended, and I really don't want to go that direction. Will aircraft stripper accomplish this? My other question is with the machine tag on the pump. It is pretty faded, and scratched up with years of shop use, and is hardly readable. Is there anyone on here that can reproduce this tag at a reasonable cost? It is held on by "rivets" of some sort, with a small, smooth button head. I intend to drill these rivets out to remove the tag for stripping and painting, but where can I find the same type to put the tag back on with? I guess that I could drill them out, and tap the holes for small machine screws, but would like to go back with the correct "rivets", especially if I can find someone to reproduce the tag. Any advice would be appreciated! Thanks in advance...
 
To avoid these ads, REGISTER NOW!

rsanter

Well-known member
Joined
Dec 22, 2007
Messages
18,487
Location
visalia ca
Most of the time the reed valves can be removed and the Burt oil cleaned from them. Scrape it off and the use very fine sandpaper to finish cleaning them up and reassemble.

If the rod is tight on the crank it is likly in good shape and won't need anything

Bob
 

Warrenator

Well-known member
Joined
May 31, 2008
Messages
781
Location
Newberg, OR
Name tag "rivets" are often these little screws called "drive screws," they might have a hole in the back so you can tap them out, or if you can lift them up a bit with a knife or razor blade you can grab the and pull them out with diagonal cutters.
 

jonjon1

Well-known member
Joined
Mar 11, 2015
Messages
1,036
For the problem of leaking back through the head upon shutting down- I had one with a bad check valve that did this, the valve in the tank where the copper line from the pump entered the tank, I cleaned that and the problem stopped...

For stripping the pump, if you are tearing it down to rebuild it, I would just soak it in a paint softener and wire brush the parts... Also I have had good luck with vht high heat paint for compressor pumps...

for the rivets, I have bought button head rivets off of this guy on ebay
http://www.ebay.com/sch/m.html?_odk...ad+rivet.TRS1&_nkw=button+head+rivet&_sacat=0

There is another seller on ebay with more sizes but I couldnt find his auctions, I have emailed this guy for special sizes and he has so far came through...

Before I used to make them on the lathe, so buying them is a much better option, lol, even if I have to cut them down a bit, turn them to fit, or make the hole I am using larger... For a ID plate, I would over size the hole so the rivet fits with out banging it and then just use metal epoxy to hold it in there, so if you ever want to remove it, you can just heat it up and pull it out.... Plus dab a bit of silicone on the back side of the plate itself so there is no vibration.... It pretty much for aesthetics at this point...

good luck with the rebuild, sounds like a cool project, can we have some pics???
 
OP
C

cdsloop

Well-known member
Joined
Jul 28, 2015
Messages
88
Location
Central North Carolina
Thank you for the replies. I remember reading about drive screws previously, I just couldn't remember what they were called. I have the compressor in pieces now, so before pics are not very feasible, lol. I will get a good pic of the tag this evening...
 
OP
C

cdsloop

Well-known member
Joined
Jul 28, 2015
Messages
88
Location
Central North Carolina
For Pardigital, here is the plate off of my compressor. It's hard to tell much about it, but it is what it is. I'm also posting a pic from the Web that I found, that I think represents what it probably should look like, except mine says air compressor, instead of air exhauster.
 

Attachments

  • 20151230_213437.jpg
    20151230_213437.jpg
    133.7 KB · Views: 22
  • r_60-2.jpg
    r_60-2.jpg
    72.2 KB · Views: 20
To avoid these ads, REGISTER NOW!

jakemac

Well-known member
Joined
May 21, 2013
Messages
9,035
Location
New England
To restore that plate, you could carefully "paint" some rubber cement onto the white areas, and once it dries spray the plate black. After the paint dries, carefully rub the rubber cement off of the plate and you should have it ready to go again.

If I remember correctly, you will need Mineral Spirits to keep your bushes from clogging up. But read the label on the rubber cement to be sure.
 

MrKona

Active member
Joined
Dec 29, 2011
Messages
34
I have the same compressor. Mine also had a leaking valve upon shut-off. On mine, there was NO check valve between the pump and original tank.
 
OP
C

cdsloop

Well-known member
Joined
Jul 28, 2015
Messages
88
Location
Central North Carolina
MrKona, there was no check valve on mine either, but I intend to put one in upon reassembly. After teardown, I feel that there is enough wear on most of the components to warrant the rebuild. Besides, once I rebuild this thing, it will last me the rest of my life. Would you mind posting a couple pictures of your compressor? Mine was red, but there was an almost olive green color underneath the red. I'm not sure if the olive was the primer, or original color...
 

Pardigital

Well-known member
Joined
Aug 4, 2013
Messages
60
Location
NKY
For Pardigital, here is the plate off of my compressor. It's hard to tell much about it, but it is what it is. I'm also posting a pic from the Web that I found, that I think represents what it probably should look like, except mine says air compressor, instead of air exhauster.

The tag wouldn't be terribly difficult to duplicate. A proper sized piece of metal could be acid-etched to produce a reasonable copy. Here's a pic of a copper tag I made for a friend. It's about the size of a business card.
 

Attachments

  • Copper Tag_2.jpg
    Copper Tag_2.jpg
    105.2 KB · Views: 14

MrKona

Active member
Joined
Dec 29, 2011
Messages
34
MrKona, there was no check valve on mine either, but I intend to put one in upon reassembly. After teardown, I feel that there is enough wear on most of the components to warrant the rebuild. Besides, once I rebuild this thing, it will last me the rest of my life. Would you mind posting a couple pictures of your compressor? Mine was red, but there was an almost olive green color underneath the red. I'm not sure if the olive was the primer, or original color...

I think mine is its original metallic green. It came with the original 60 gallon tank in the same color which I sold to a guy to who is turning it into a smoker. Appears to have red primer under the paint. I had originally mounted it on a 60 gallon vertical tank but have since changed plans and bought a new 30 gallon horizontal that you see in the pictures. It'll fit nicely under a workbench with this setup. The tank is currently in factory primer. I'm trying to decide what color to paint it. I'm not repainting the pump as I like the patina. Even considered having a custom color match done and painting the tank the same as the original, but now I'm leaning toward dark gray.

I too tore the pump down and did a complete rebuild with parts from Airflow, Inc. Mine had a slight knock on start-up and also the leaking upon shut off. The cylinders were in nice shape so I just re-ringed it and also installed a new bushing on one of the connecting rods which solved the knock. Also new disc valves. The only issue I have with it now is a leaking valve which is driving me nuts. Once I get that figured out this pump will be dialed in and I am very happy to have this old pump which will probably outlast me as well.
 

Attachments

  • P1050352.jpg
    P1050352.jpg
    120.4 KB · Views: 20
  • P1050353.jpg
    P1050353.jpg
    134 KB · Views: 22
  • P1050354.jpg
    P1050354.jpg
    106.3 KB · Views: 21
  • P1050355.jpg
    P1050355.jpg
    75.7 KB · Views: 18
  • P1050357.jpg
    P1050357.jpg
    97.3 KB · Views: 17
OP
C

cdsloop

Well-known member
Joined
Jul 28, 2015
Messages
88
Location
Central North Carolina
Thank you for the pictures, MrKona. I have not seen any hints of the metallic green that your pump has on mine. It does have the "iron red" primer underneath the bright red on the pump. The olive green that I spoke of is on the tank, and resembles an "army olive green" to me. I am probably going to go back with a bright red, since that is the color that I acquired it, and the color that the family remembers it being. My intentions are to fully restore it in tribute of my wife's grandfather, complete with an additional "In Memory of Papaw" tag on the tank with the date of the restoration. You said that you still have a valve leaking...did you lap the new valve discs? That was one of the remaining questions that I have about the rebuild, whether the new valve discs should be lapped upon installation. Given their configuration, I'm not quite sure how one might accomplish that anyway. So far I have only removed one of the valve discs, on the high pressure side, and I assume that it was the intake considering how clean it was. I may call on you again once I get into the rebuild stage of the project since you are familiar with the internals of the pump. Thanks again.
 

MrKona

Active member
Joined
Dec 29, 2011
Messages
34
I flattened the low pressure intake valve seat, where I thought the leak was coming from, with very fine sandpaper. The valve appears to sit nice and flat on the seat... but it's still doing it. If I can't figure it out, I'm going to contact Air-Flo for advice. The strange thing is that the leaking sound is intermittent during the pumping cycle. If anyone has knowledge on this topic, I'd appreciate your input. Thanks.
 
To avoid these ads, REGISTER NOW!
Top Bottom