burgie
Well-known member
Greetings...
Well, work has been insanely busy but this weekend I managed to move along with the restoration a bit.
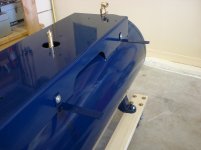
First, I got the shroud brackets cleaned, painted and mounted.
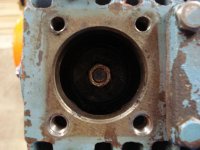
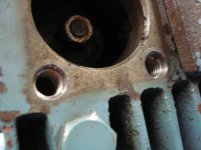
Next was to take care of 2 of the 4 valve retainer bolt holes that the previous owner screwed up. One hole was nearly stripped out and the other contained a feeble attempt at a heli-coil insertion. The hole was slightly crooked and the insert was just messed up. So, I went 2 sizes over and inserted new heli-coils. I squared my drill press table to ensure perfect alignment and re-drilled the 2 holes. After tapping I inserted the heli-coils to repair the holes.
Lastly, I installed a 60 amp switch to control the motor. I first decided to use a piece of thick aluminum stock as a backer. After cutting it to size I rounded the corners and gave it that circular burnished finish using a scotch-brite "cookie" chucked in my drill press. It is not perfect but does dress up the aluminum a bit, but I am OK with it given it was my first attempt at applying this decorative treatment. I also used rubber grommets to isolate the aluminum plate from the painted "superstructure" of the tank. I was fortunate that I had a 10/4 cord with a pre-molded 4-prong 230V receptacle (basically like a dryer pigtail).
So...pretty productive day. I am going to borrow a friend’s small sandblast cabinet and start cleaning the block, cylinders and heads once I get the compressor disassembled.
I will post more pics when I start the compressor disassembly and cleaning process...
Thanks and have a great night...
Burgie
Well, work has been insanely busy but this weekend I managed to move along with the restoration a bit.
First, I got the shroud brackets cleaned, painted and mounted.
Next was to take care of 2 of the 4 valve retainer bolt holes that the previous owner screwed up. One hole was nearly stripped out and the other contained a feeble attempt at a heli-coil insertion. The hole was slightly crooked and the insert was just messed up. So, I went 2 sizes over and inserted new heli-coils. I squared my drill press table to ensure perfect alignment and re-drilled the 2 holes. After tapping I inserted the heli-coils to repair the holes.
Lastly, I installed a 60 amp switch to control the motor. I first decided to use a piece of thick aluminum stock as a backer. After cutting it to size I rounded the corners and gave it that circular burnished finish using a scotch-brite "cookie" chucked in my drill press. It is not perfect but does dress up the aluminum a bit, but I am OK with it given it was my first attempt at applying this decorative treatment. I also used rubber grommets to isolate the aluminum plate from the painted "superstructure" of the tank. I was fortunate that I had a 10/4 cord with a pre-molded 4-prong 230V receptacle (basically like a dryer pigtail).
So...pretty productive day. I am going to borrow a friend’s small sandblast cabinet and start cleaning the block, cylinders and heads once I get the compressor disassembled.
I will post more pics when I start the compressor disassembly and cleaning process...
Thanks and have a great night...
Burgie