To avoid these ads, REGISTER NOW!

Compressor Restoration-Final Assembly

burgie

Well-known member
Joined
Mar 26, 2007
Messages
239
Location
Falcon, Colorado
Well...15 months or so ago I bought my used Curtis 80-gallon, 5HP with E-50 2-stage pump air compressor for a restoration project.

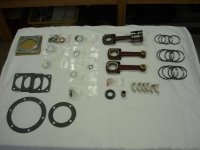
I now have the overhaul kit, spare parts, seals, gaskets and everything to put it back together...:bounce::bounce::bounce:

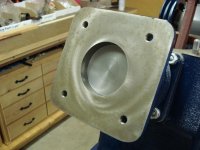
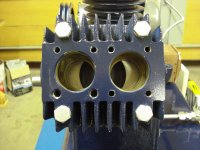
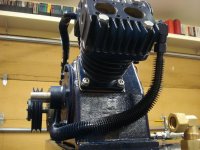
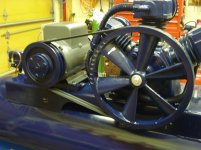
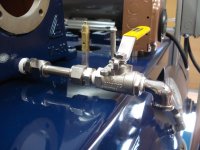
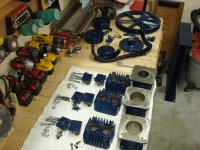
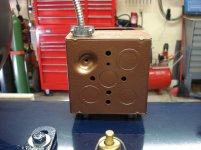
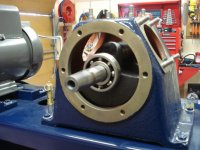
Here are a few initial pics showing the bare block, the new stainless steel drain assembly I fabricated and the pump components awaiting final assembly!!!

I'll post more throughout the day as I proceed...

Burgie
 

Attachments

  • Build_01.jpg
    Build_01.jpg
    141.6 KB · Views: 549
  • Build_02.jpg
    Build_02.jpg
    139.9 KB · Views: 473
  • Build_03.jpg
    Build_03.jpg
    143 KB · Views: 449
  • Build_04.jpg
    Build_04.jpg
    139.4 KB · Views: 479
  • Build_05.jpg
    Build_05.jpg
    143.4 KB · Views: 521
To avoid these ads, REGISTER NOW!
OP
B

burgie

Well-known member
Joined
Mar 26, 2007
Messages
239
Location
Falcon, Colorado
Seals, gaskets, etc. for the pump...

The high pressure piston wrist pin bushing on the connecting rod was worn bad when I bought it (see my old threads)...so I needed a new wrist pin, piston & rod. I couldn't buy just the wrist pin roller bearing for the rod so I had to order the complete rod assembly...

Interestingly enough the overhaul kit also came with 2 new low pressure connecting rods. I am very mechanical and could easily have pressed in new bushings. I hate to see the other rods sit around and collect dust all for a $2 bushing...

Oh well...
 

Attachments

  • Build_06.jpg
    Build_06.jpg
    123.7 KB · Views: 210
OP
B

burgie

Well-known member
Joined
Mar 26, 2007
Messages
239
Location
Falcon, Colorado
The hour meter is made by ENM and I got it from Grainger. It is for 230V operation and is wired to the magnetic starter with chrome coil sheathing I got from work (they were going to throw a bunch away...so I gladly accepted it)...

It happen to fit perfectly in s standard 4" metal electrical work box with round plug cover...so I painted it hammered Copper and mounted it on chrome bushings...
 

Attachments

  • Build_09.jpg
    Build_09.jpg
    137.8 KB · Views: 241
  • Build_08.jpg
    Build_08.jpg
    141.9 KB · Views: 218
  • Build_07.jpg
    Build_07.jpg
    140.1 KB · Views: 265

koditten

Well-known member
Joined
Apr 10, 2008
Messages
5,528
Location
Midland, Michigan
You need to send this to Curtis compressors. Ask for some new decals. They would love the free advertisement.

Absolutly stunning work!

Could this be called compressor ****?

KO
 
OP
B

burgie

Well-known member
Joined
Mar 26, 2007
Messages
239
Location
Falcon, Colorado
Back end plate on and crankshaft installed. I have big hands so I'll install the front plate once the rods are installed...it'll give me extra room to hold the rod caps...
 

Attachments

  • Build_10.jpg
    Build_10.jpg
    141.5 KB · Views: 203
  • Build_11.jpg
    Build_11.jpg
    137.5 KB · Views: 222
  • Build_12.jpg
    Build_12.jpg
    140.4 KB · Views: 201

Spudland_Dave

Well-known member
Joined
Mar 12, 2010
Messages
3,025
Location
Maine
Beautiful work!
Question...when I was shopping for a new compressor last year I was told by many people to stay away from old ones because of rust in the tanks and possible blow outs..particularly on older ones....made sense to me so I quickly ended my CL shopping and started shopping new. Ended up buying a cheaper unit (Puma Single Stage 60 Gal) so I would at least have a new tank to which I can upgrade with a nice pump down the road...Did you do anything special in the tank or have it inspected/tested?
 
OP
B

burgie

Well-known member
Joined
Mar 26, 2007
Messages
239
Location
Falcon, Colorado
This tank was made in 1983 and the tank on the Saylor Beall I just bought for restoration was made in 1958. Both had some internal surface rust but both also held pressure perfectly and both are very sound.

These were also probably much thicker metal than the metal they use in tanks these days. I would also think that location and maintenance has a lot to do with tank condition. If the system is left outside all the time (say, under a garage port or something) it may not fair as well as a system indoors. Plus...regular (as in daily) draining of the tank will prolong their life.

Either way...I prefer the older units...
 

Spudland_Dave

Well-known member
Joined
Mar 12, 2010
Messages
3,025
Location
Maine
Well I was referring to anyone in love with a certain pump but unsure about the tank.

Bingo...down the road, doing something like this would interest me (Old pump head on my new tank)...if I can find a rebuildable 2 stage head...the older rebuildable, built to last stuff is much nicer I agree.
 
OP
B

burgie

Well-known member
Joined
Mar 26, 2007
Messages
239
Location
Falcon, Colorado
Encountered a small delay. The small screws that hold the splash lubrication rods spring lookin' things on the bottom of the rod caps was slightly smaller on the new rods so I had to run to town to get new 4mm x 0.8 screws...

But...rods are on, torqued and the front cover in on and torqued as well.

Pistons next...
 

Attachments

  • Build_13.jpg
    Build_13.jpg
    138.7 KB · Views: 239
  • Build_14.jpg
    Build_14.jpg
    141.8 KB · Views: 197

CNGsaves

Well-known member
Joined
Sep 26, 2012
Messages
13,233
Location
KS and OK
Stunning rebuild on a quality compressor. EXCELLENT work !!

Please post pics of inner workings of air valves, etc.
 
OP
B

burgie

Well-known member
Joined
Mar 26, 2007
Messages
239
Location
Falcon, Colorado
New high pressure piston installed and cylinder torqued...
 

Attachments

  • Build_16.jpg
    Build_16.jpg
    138 KB · Views: 155
  • Build_15.jpg
    Build_15.jpg
    140.1 KB · Views: 168
OP
B

burgie

Well-known member
Joined
Mar 26, 2007
Messages
239
Location
Falcon, Colorado
All 3 cylinders are on and the crankcase has fresh oil...

Heads next...
 

Attachments

  • Build_17.jpg
    Build_17.jpg
    144.6 KB · Views: 167
  • Build_18.jpg
    Build_18.jpg
    141.6 KB · Views: 163
  • Build_19.jpg
    Build_19.jpg
    140.1 KB · Views: 155
OP
B

burgie

Well-known member
Joined
Mar 26, 2007
Messages
239
Location
Falcon, Colorado
Heads on & torqued...
 

Attachments

  • Build_20.jpg
    Build_20.jpg
    148.1 KB · Views: 168
  • Build_21.jpg
    Build_21.jpg
    146.3 KB · Views: 162
  • Build_22.jpg
    Build_22.jpg
    145.2 KB · Views: 164
To avoid these ads, REGISTER NOW!

Ben Buck

Well-known member
Joined
Dec 30, 2010
Messages
7,246
Location
S. W. Ohio
Bob, good looking refurb on that compressor. What was the thread on the stainless oil drain unit that you have? I have a 1986 Sandborn unit, the oil drain drain is 10mx1.50 thread, I was hoping to put either a 1/8 or 1/4 pipe thread on it to extend the drain, so it wouln't run all over the place. Did you drill and and tap a new hole to make it work?
 
OP
B

burgie

Well-known member
Joined
Mar 26, 2007
Messages
239
Location
Falcon, Colorado
Ben...the thread on the block for the drain port is a standard 3/4" NPT on my compressor. To me...a 1/8" NPT or even a 1/4" NPT "seems" too small for an oil drain...but I am by no means an expert...
 
OP
B

burgie

Well-known member
Joined
Mar 26, 2007
Messages
239
Location
Falcon, Colorado
Air intake and crankcase vent tube installed...
 

Attachments

  • Build_24.jpg
    Build_24.jpg
    139.2 KB · Views: 194
  • Build_23.jpg
    Build_23.jpg
    146.5 KB · Views: 224
OP
B

burgie

Well-known member
Joined
Mar 26, 2007
Messages
239
Location
Falcon, Colorado
Cylinder-to-cylinder air delivery lines installed...
 

Attachments

  • Build_25.jpg
    Build_25.jpg
    142.9 KB · Views: 185
  • Build_26.jpg
    Build_26.jpg
    142.1 KB · Views: 175
  • Build_27.jpg
    Build_27.jpg
    147.7 KB · Views: 209
  • Build_28.jpg
    Build_28.jpg
    143.7 KB · Views: 168
OP
B

burgie

Well-known member
Joined
Mar 26, 2007
Messages
239
Location
Falcon, Colorado
Flywheel installed & torqued and aligned with Baldor sheave w/ belts installed...
 

Attachments

  • Build_29.jpg
    Build_29.jpg
    139.3 KB · Views: 195
  • Build_30.jpg
    Build_30.jpg
    138 KB · Views: 169

JASTECH

Well-known member
Joined
Oct 21, 2009
Messages
2,671
Location
Gering, NE
Bob, That Sir looks good. I been keeping my left eyeball peeled on this here thread. I have a Quincy QR 120 gal. that will need sandblasted and so forth.
>
Thanks, JASTECH
 

kams1973

ALLIANCE MEMBER
Joined
Oct 3, 2010
Messages
1,572
Location
Amarillo, TX
I remember the original thread. I've restored and rebuilt several air compressors as well. Your work makes my past projects look like childs play.
 

racingtadpole

Well-known member
Joined
Dec 3, 2011
Messages
2,029
Location
The far side of crazy.. but sometimes Australia
I have compressor envy. Thats some very neat work. :bowdown:


Bob, good looking refurb on that compressor. What was the thread on the stainless oil drain unit that you have? I have a 1986 Sandborn unit, the oil drain drain is 10mx1.50 thread, I was hoping to put either a 1/8 or 1/4 pipe thread on it to extend the drain, so it wouln't run all over the place. Did you drill and and tap a new hole to make it work?

A hydraulics place should be able to supply you with an M10 to 1/8 or 1/4 adaptor.
 

Ben Buck

Well-known member
Joined
Dec 30, 2010
Messages
7,246
Location
S. W. Ohio
Thanks Tadpole, for that info on the drain plug. I didn't think of that. I hope I'm not hijacking Bob's thread with this!
 

Trey T

Well-known member
Joined
Aug 3, 2011
Messages
3,749
Location
Houston, TX
Yes you can upload your iphone .mov file to Youtube.

Youtube is the best place to host video, HD or not. It's fast!
OK...so I made a short video clip of the compressor running using my iPhone but can't upload a *.mov file??? :dunno::dunno::dunno:
 

strutaeng

Well-known member
Joined
Dec 12, 2011
Messages
2,246
Location
Dallas, TX
burgie, your work is stunning!

I have a similar Curtis pump (ES-100), except mine is slightly larger and single-stage.

I have a few questions:

What does the line from the breather to the center piston air filter do? My breather just has a rubber cap with some openings

How did remove the flywheel? I gave up on mine when I tried to remove and build a beltguard around it. I tried a 3 jaw puller and a bunch of other tools, but I never broke it loose.

Did you get that hour meter from Grainger? I have been wanting to install one on mine.

Keep up the great work!
 

zakmartin

Well-known member
Joined
Jul 3, 2012
Messages
620
Location
Seattle, WA
Beautiful job! I wish more people would take the time to refurbish quality tools instead of scrapping them and replacing with junk.
 
OP
B

burgie

Well-known member
Joined
Mar 26, 2007
Messages
239
Location
Falcon, Colorado
Thanks for all the kind comments!!!

Strutaeng:

1) That breather line was there when I bought the compressor. A compressor doesn't have combustion (like gasoline engines, etc.) so there are no exhaust gases to worry about. Nevertheless, the placement (it enters the back of the filter housing pre-filter) asuggests that there is a slighy suction on the line so it must just collect crankcase gases...and act like a PCV on a car. Seems logical to me...

2) Flywheel came off rather easily on mine. I mean, I used a 3-jaw puller but only required a wrench with hand power...not an impact wrench cranking wide open with max torque. I am a huge believer in PB Blaster...love that stuff...so gove the shaft a few sprays over a couple days and let it soak in and then try again...I bet it'll pop right off!!

3) This is the hour meter I purchased: http://www.grainger.com/Grainger/ENM-Hour-Meter-2PAR2?Pid=search

Hope this helps my friend...
 
OP
B

burgie

Well-known member
Joined
Mar 26, 2007
Messages
239
Location
Falcon, Colorado
OK...so I am NOT an Academy Award winning producer...but here is a quick video clip of my compressor starting and running. It is a bit louder because the air is discharging into the shop as opposed to going into the tank (I am getting a new tube bent tomorrow morning). But...ya get the idea...


I'll post another once the new copper tube is installed!!!
 
Last edited:
To avoid these ads, REGISTER NOW!
Top Bottom