To avoid these ads, REGISTER NOW!

Compressor water filter advice

RickyPetite

Well-known member
Joined
Oct 12, 2019
Messages
173
Location
Buck's County, PA
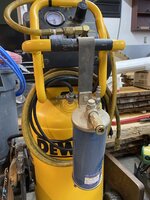
I have a 30-gallon Husky compressor with an attached regulator. Wondering how to add a filter/water condenser. Is it worth removing the regulator, inserting a filter between it and the tank, and then remounting the regulator (somewhere, not sure where)? Can a filter be placed distal to the regulator? For a home DIY setup (lugnuts etc), are there in-line filters that would suffice? See images. Thx
 

Attachments

  • compressor1.jpg
    compressor1.jpg
    211.1 KB · Views: 21
  • compressor2.jpg
    compressor2.jpg
    230.2 KB · Views: 18
To avoid these ads, REGISTER NOW!

GeoBruin

Well-known member
Joined
May 5, 2018
Messages
3,757
Brace yourself for the forthcoming responses about how you need 50 feet of copper pipe to cool and condense the air, then a multistage particulate filter/water trap/coellessing filter/dessicant filter, then a regulator :)

But really, I would invest in a piggyback filter/regulator (that will also have a water trap) and ditch the factory reg. They **** and it is likely restricting your flow. Combo units on Amazon are pretty cheap.

Good luck!
 
OP
R

RickyPetite

Well-known member
Joined
Oct 12, 2019
Messages
173
Location
Buck's County, PA
Not knowing much about these units, it appears to me that the left gauge feeds back pressure info (through a hose) to the motor (so as to keep the tank at constant pressure) and the right-sided gauge lowers the pressure to the desired amount for the tool. Would an aftermarket unit connect properly to the motor? Can this function be adjusted to run at the OEM pressure?
 
OP
R

RickyPetite

Well-known member
Joined
Oct 12, 2019
Messages
173
Location
Buck's County, PA
When in doubt, take it apart... I removed the handle and plastic shrouding over the gauges. See pics. It's a pretty simple affair. A simple T coming out of the tank, left-sided gauge measures tank pressure and a hose on that side connects to (what I assume) is the tank switch which is concealed under the motor shroud. The regulator knob sits in the middle and passes lower pressure to the right gauge connected to the tool (the black hose-looking thing on the right is the power cord). I'm fine with getting a combo unit if the regulator is better than OEM (hard to believe that it wouldn't be). The unit could have an oiler and a filter as long as it also has a place to connect the hose to the tank switch. Any suggestions? I have been looking but don't see any unit that has the pressure switch tubing. Thx
 

Attachments

  • compressor3.jpg
    compressor3.jpg
    246.3 KB · Views: 14
  • compressor4.jpg
    compressor4.jpg
    257.9 KB · Views: 13
  • compressor5.jpg
    compressor5.jpg
    246.7 KB · Views: 18

Citation

Well-known member
Joined
Jan 20, 2016
Messages
3,257
Location
Indy
What are you trying to do and why? If your objective is to remove lug nuts and fill tires a water separator really isn't something you need to mess with. If you want to do a lot of painting or sand blasting then water removal is an issue but so it compressor size.

So ignoring why, an easy way to deal with how is just to make a plug in filter station. Take a look at this picture (link). This is a large compressor with a ~3' whip to a filter and regulator mounted on a board. You could do something similar. Use a short hose to go from the output of your compressor to a filter and oiler or filter and desiccant canister (note, if you use an oiler with a hose always assume there is some oil in the hose). That's it. You don't have to mount the board to the wall, you can attach it to the compressor handle or motor mount plate. There is no rule that you have to screw attach everything nor that you need to have a chain of things hanging off the outlet of the compressor.

Still, I would ask why this is a problem that you feel needs to be corrected.
 

Sumboodie

Well-known member
Joined
Mar 20, 2021
Messages
10,967
Location
AK
For dry air on my plasma cutter, I have a desiccant filter.
If I was painting something fussy to moisture in the air supply, I'd use that as well.

My compressor has never made much water in the air though.
 
To avoid these ads, REGISTER NOW!
OP
R

RickyPetite

Well-known member
Joined
Oct 12, 2019
Messages
173
Location
Buck's County, PA
What are you trying to do and why? If your objective is to remove lug nuts and fill tires a water separator really isn't something you need to mess with. If you want to do a lot of painting or sand blasting then water removal is an issue but so it compressor size.

So ignoring why, an easy way to deal with how is just to make a plug in filter station. Take a look at this picture (link). This is a large compressor with a ~3' whip to a filter and regulator mounted on a board. You could do something similar. Use a short hose to go from the output of your compressor to a filter and oiler or filter and desiccant canister (note, if you use an oiler with a hose always assume there is some oil in the hose). That's it. You don't have to mount the board to the wall, you can attach it to the compressor handle or motor mount plate. There is no rule that you have to screw attach everything nor that you need to have a chain of things hanging off the outlet of the compressor.

Still, I would ask why this is a problem that you feel needs to be corrected.

Great question. I recently did suspension work on my son's 06' Accord and had a hell of a time removing rusted-out bolts and had to resort to heat and cutting off a few. The other day, I helped my friend with front brakes/flush on his BMW and couldn't get the lug nuts off. My old Craftsman impact was no match and I cracked an SK socket on a breaker bar. Took the car to my mechanic and paid to have the tires rotated. His impact took off the lug nuts easily. That was it for me. Bought an AirCat impact which is awesome. Way stronger than the old Craftsman unit. I also use a 1/4 inch right-angle air ratchet. No plans on painting. My compressor is a 30 gallon Husky which holds 90 ft/lbs at the tool easily. For now, it's sufficient although there is likely an old Mustang or Vette in my future (retirement). When I empty the tank on my Husky, the water pours out of it (humid PA weather). I thought that modifying things to filter water and deliver oil would be a good way to care for my new impact (and build for the future).
 

b-dog

Well-known member
Joined
Apr 24, 2015
Messages
243
Location
Lakewood, CO
I think you'll get the biggest ROI from a purge valve on the drain; $50 on Amazon. I wouldn't want the purge to cycle day and night 24/7 when you're only using the compressor once every few weeks to changes tires. You could wire the purge valve into the compressor power then when you unplug the compressor, the purge no longer cycles.

I think in a humid environment without some other form of water management, a desiccant dryer is going to be saturated almost immediately. I wouldn't say a desiccant dryer would be bad just be prepared to change/dry out the beads for every hour, or less, of compressor run time.

You could easily spend $1k+ in moisture management so that your new impact lasts 100 years instead of only 50 years. I never much cared about moisture in my tools. However, I consider grinders disposable and I abuse my tools so take that for what it's worth.
 

Walkers

Well-known member
Joined
May 17, 2021
Messages
3,912
Location
Cave Creek Az
I built a little stand that has a regulator and then a Motorguard filter. It is very effective, as there is generally a length of hose between the compressor and this unit. I only use this for painting when I am mobile. I have virtually the same set up wall mounted in the shop and it is 50’ away from the compressor. Both work very well. I have no issues from moisture in painting or plasma cutting.
 

RivennHewn

Well-known member
Joined
Jun 4, 2011
Messages
10,405
Location
PNW
My limited experience with my low-end, (Eastwood) cutter, the cheap HF filter and then a little clear filter made a big difference

It’s nice to get a visual thru the clear, and feel the moisture coming out the bleeder valve.
 

Attachments

  • 698F30F9-905B-4BEA-A21A-BA3A1CD410A0.jpeg
    698F30F9-905B-4BEA-A21A-BA3A1CD410A0.jpeg
    798.8 KB · Views: 9
  • 57E956C2-E08A-4B85-A9CA-E97A3FD95211.png
    57E956C2-E08A-4B85-A9CA-E97A3FD95211.png
    1.5 MB · Views: 9
To avoid these ads, REGISTER NOW!
Top Bottom