To avoid these ads, REGISTER NOW!

Concrete countertop

850xpeps

Well-known member
Joined
Aug 6, 2017
Messages
1,365
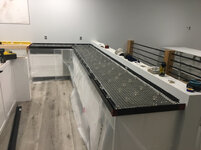
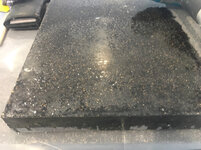
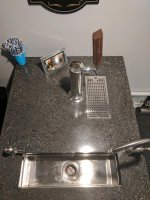
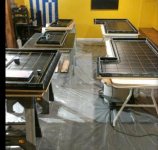
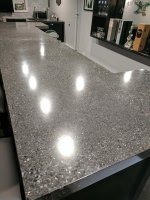
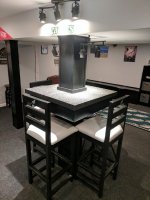
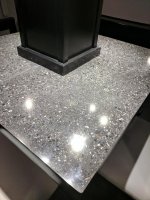
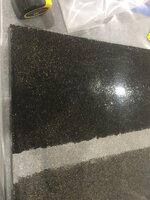
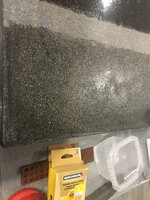
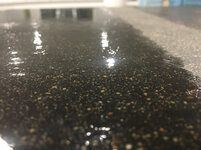
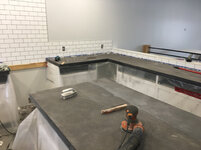
I’m doing my first concrete countertop and have encountered a few issues. I couldn’t resist the urge to try get a nice finish. And against my better judgment to let the concrete setup I over finished it. So I took to sanding off the weak layer. Now I’m left with a rough surface. I don’t have the texture I actually like it but it can’t be good for cleanliness and germs and whatnot I wouldn’t think. Trying to decide the route I want to go for a sealer. We wanted it dark so there is charcoal powder mixed in the batches. I applied an epoxy on a Test chunk and also a sealer on the other half. Not crazy about the gloss of the epoxy wish it was more matte. And wish more of the aggregate would disappear. The sealer isn’t dark enough for my liking. Once again I don’t mind the feel of the cement but nervous it will trap food and whatever else.

Products used were from concrete counter top solutions.

Am wondering if a stain would darken some of the aggregate and the cement and then maybe there’s a matte finish epoxy that can be applied? New to this world so any help is appreciated. Or questions lol.
760804e3e9e1d3ca4b738570fe037e79.jpg77a221304c15996f9467a3a11694a12d.jpg646877914f6706fd2b8927402f621209.jpgec172330f86c33721df8835d4a1ad19f.jpgef3053905c8ca61a0f34af2999c95d25.jpge030c83d938789a72970a3e0d65021b1.jpg6965098331b9f8d99bb25ef45bd98abf.jpg072de61488ff67d21a6fb515bde9d63b.jpg


Sent from my iPad using Tapatalk Pro
 

Attachments

  • 760804e3e9e1d3ca4b738570fe037e79.jpg
    760804e3e9e1d3ca4b738570fe037e79.jpg
    912.6 KB · Views: 0
  • 77a221304c15996f9467a3a11694a12d.jpg
    77a221304c15996f9467a3a11694a12d.jpg
    991 KB · Views: 0
  • 646877914f6706fd2b8927402f621209.jpg
    646877914f6706fd2b8927402f621209.jpg
    746.6 KB · Views: 0
  • ec172330f86c33721df8835d4a1ad19f.jpg
    ec172330f86c33721df8835d4a1ad19f.jpg
    703.1 KB · Views: 0
  • ef3053905c8ca61a0f34af2999c95d25.jpg
    ef3053905c8ca61a0f34af2999c95d25.jpg
    760.6 KB · Views: 0
  • e030c83d938789a72970a3e0d65021b1.jpg
    e030c83d938789a72970a3e0d65021b1.jpg
    775.6 KB · Views: 0
  • 6965098331b9f8d99bb25ef45bd98abf.jpg
    6965098331b9f8d99bb25ef45bd98abf.jpg
    580.4 KB · Views: 0
  • 072de61488ff67d21a6fb515bde9d63b.jpg
    072de61488ff67d21a6fb515bde9d63b.jpg
    621.7 KB · Views: 0
To avoid these ads, REGISTER NOW!

PCustoms

Well-known member
Joined
Jul 23, 2011
Messages
22,193
Location
VT
Following this one, as I'm about to venture down a similar road.

What concrete mix did you use?

Cast in place I assume?
 
OP
8

850xpeps

Well-known member
Joined
Aug 6, 2017
Messages
1,365
Following this one, as I'm about to venture down a similar road.


What concrete mix did you use?


Cast in place I assume?


Sand-topping mix 55lb bag with liqui-crete additive and a gunmetal color pack.

9806e4911313afc30037a96f3660415e.jpg

Not sure if I could have saved the weak top as I placed a trowel in one spot on the hard surface and the next day I tried sanding and when I hit that square I couldn’t remove the finish. Even with a wire brush.
 

Attachments

  • 9806e4911313afc30037a96f3660415e.jpg
    9806e4911313afc30037a96f3660415e.jpg
    687.6 KB · Views: 1

Kaizen

Well-known member
Joined
Jan 9, 2015
Messages
6,936
Location
New England
Did you put those tests on the real countertop??
Are you dry sanding with sandpaper?
I would get a diamond grinder and go back and spend some serious time grinding to get smooth and then keep grinding with progressive grits till it’s smooth like soap stone. Also feels like baby powder. Then clean it. Then seal the **** out of it. Multiple coats to fill pinholes. Then and only then epoxy. This process will expose some aggregate by that can’t be helped. I used a grinder from amazon for 130 bucks that came with the sanding grits.
You can also try mixing a slurry and applying on top and the grinding as described. Either way don’t get impatient. Going to take a long time with multiple steps.


Sent from my iPhone using Tapatalk
 

Kaizen

Well-known member
Joined
Jan 9, 2015
Messages
6,936
Location
New England
Following this one, as I'm about to venture down a similar road.


What concrete mix did you use?


Cast in place I assume?


I did a write up on mine a few years ago here if you want to look for it. Did not do a cast in place for these reasons. Harder for newb to make a pour in place right. Also he’ll if a mess inside. Biggest piece took four guys to move in. Should have not made full thickness. Should have used some foam


Sent from my iPhone using Tapatalk
 

LX-Markham

Well-known member
Joined
Apr 27, 2013
Messages
2,929
Location
Markham, Ont.
My wife suggests a skim coat of Ardex.

Ardex-4-Bag.jpg
 

ConCretin

Well-known member
Joined
Jan 20, 2011
Messages
3,378
Location
Central Maine
I've only tackled concrete countertops a handful of times and I cast them face down and then polished them before installing. I used one of these with incrementally finer diamond pads to achieve a polished finish that just needed a sealer.

https://www.amazon.com/gp/product/B004XAN47E/?tag=atomicindus08-20

I suppose you could use the same procedure in place - I'm just not sure how you could deal with all the water.

Another alternative would be one of these;

https://www.amazon.com/gp/product/B004S39BBO/?tag=atomicindus08-20

It's not intended for this use but it will accept 5" dry diamond polishing pads. Start with the 50 grit pads and work your way up until you get a level of polish you can live with.
 
OP
8

850xpeps

Well-known member
Joined
Aug 6, 2017
Messages
1,365
Did you put those tests on the real countertop??
Are you dry sanding with sandpaper?
I would get a diamond grinder and go back and spend some serious time grinding to get smooth and then keep grinding with progressive grits till it’s smooth like soap stone. Also feels like baby powder. Then clean it. Then seal the **** out of it. Multiple coats to fill pinholes. Then and only then epoxy. This process will expose some aggregate by that can’t be helped. I used a grinder from amazon for 130 bucks that came with the sanding grits.
You can also try mixing a slurry and applying on top and the grinding as described. Either way don’t get impatient. Going to take a long time with multiple steps.


Sent from my iPhone using Tapatalk

I’ve just been using an orbital sander with dry sanding pads. My question more is do I need a glas like surface? The texture it is right now imo is nice and I don’t mind it. But in a sealed state the sealer doesn’t have enough thickness to it to actually fill the voids. And this might cause cleanliness issues. I also want it darker than the sealer turns it. Guessing the epoxy darkened more because it hides the smaller sand particles. The tests are on a 2’ square piece I poured seperate for this reason. But because it was a test I never troweled so much and it actually had a bit better finish. If I were to do again I think I would poly as spots that had something sitting on it seemed to get hard.

My wife suggests a skim coat of Ardex.
.
Ardex-4-Bag.jpg

I’d be nervous of a skim coating popping and being more of a mess. Concrete counter solutions sells a micro topping to put back on that provides a troweled finish and maybe that’s what I need to do

I've only tackled concrete countertops a handful of times and I cast them face down and then polished them before installing. I used one of these with incrementally finer diamond pads to achieve a polished finish that just needed a sealer.

https://www.amazon.com/gp/product/B004XAN47E/?tag=atomicindus08-20

I suppose you could use the same procedure in place - I'm just not sure how you could deal with all the water.

Another alternative would be one of these;

https://www.amazon.com/gp/product/B004S39BBO/?tag=atomicindus08-20

It's not intended for this use but it will accept 5" dry diamond polishing pads. Start with the 50 grit pads and work your way up until you get a level of polish you can live with.

I’ve thought about wet polish to at least knock the roughness down a bit. But ya the mess is prob a good reason not to.

I'm not a pro but what about a waxed finish?


Sent from my SM-G965U using Tapatalk

I think you can wax on top of epoxy but not sure just on the cement. It would have to be reapplied often to provide protection I would think.

I did a write up on mine a few years ago here if you want to look for it. Did not do a cast in place for these reasons. Harder for newb to make a pour in place right. Also he’ll if a mess inside. Biggest piece took four guys to move in. Should have not made full thickness. Should have used some foam


Sent from my iPhone using Tapatalk


It’s winter here now and no shop yet being a new build. Not an excuse I know. But the size of my counters would have been impossible and I did not want any seams. I also wanted the troweled finish.

I don’t really need or want a glass finish. We want a matte and texture is ok as long as there isn’t a bacterial issue.
 
OP
8

850xpeps

Well-known member
Joined
Aug 6, 2017
Messages
1,365
8aadf61b565ca69c1cc4fcececd6c198.jpg
Hit the epoxy with some 220 and orbital. Nice velvet finish feels great. Kinda little patchy but doesn’t bother me too much. As long as entire counter was this way. But it’s little too hazy for me.
 

Attachments

  • 8aadf61b565ca69c1cc4fcececd6c198.jpg
    8aadf61b565ca69c1cc4fcececd6c198.jpg
    809.7 KB · Views: 2

Firebrick43

Well-known member
Joined
May 12, 2015
Messages
13,971
Location
West central Indiana
Epoxy is going to yellow and pop over time(uv exposure) unless spar varnished regularly with a varnish that has uv blockers. May take longer at the ends but it will happen at the window.

Also heat will soften. You need to grind the concrete down to a smooth finish and seal. If you want it darker stain it before sealing. A smooth surface is key to not having bacterial issues. You can use a matte sealer that has no gloss but there should be no texture period.
 
OP
8

850xpeps

Well-known member
Joined
Aug 6, 2017
Messages
1,365
Epoxy is going to yellow and pop over time(uv exposure) unless spar varnished regularly with a varnish that has uv blockers. May take longer at the ends but it will happen at the window.

Also heat will soften. You need to grind the concrete down to a smooth finish and seal. If you want it darker stain it before sealing. A smooth surface is key to not having bacterial issues. You can use a matte sealer that has no gloss but there should be no texture period.


You think it will yellow even with no actual sunlight hitting it? The window is on the north side. The sun never makes it north of the house. On top of the 10’ deck over hang.

You don’t think the poxy will adhere properly?

The issue is the stain won’t darken the sand and that what seems to be lightening up the sealer.

Not trying to be argumentative. We are moving in end of the week because I’m forced to but I’m just going to cover counters until I figure out best way to get finish I want. So kinda stressed lol trying to figure out best direction.
 

Kaizen

Well-known member
Joined
Jan 9, 2015
Messages
6,936
Location
New England
Countertops should not have texture. Even thick epoxy you will need ten coats to cover those peaks. Yes it will be a mess when you start using it if it’s not smooth.
Like I said I’d get a grinder and keep grinding


Sent from my iPhone using Tapatalk
 

Jazz1

Well-known member
Joined
Jan 3, 2016
Messages
4,184
Location
Thunder Bay On.
I would contact the suppliers of product for building these countertops and furniture. They know what products and steps required. There are better sanding blocks as well. I am not aware of any epoxy being used to seal cement tops. I know SIL refinished a cement countertop for someone that had not been properly maintained as well as building this table.

https://www.garagejournal.com/forum/showthread.php?t=371950&highlight=cement+table
 
Last edited:

Firebrick43

Well-known member
Joined
May 12, 2015
Messages
13,971
Location
West central Indiana
You think it will yellow even with no actual sunlight hitting it? The window is on the north side. The sun never makes it north of the house. On top of the 10’ deck over hang.

You don’t think the poxy will adhere properly?

The issue is the stain won’t darken the sand and that what seems to be lightening up the sealer.

Not trying to be argumentative. We are moving in end of the week because I’m forced to but I’m just going to cover counters until I figure out best way to get finish I want. So kinda stressed lol trying to figure out best direction.

Well, if it's a north window it will take much much longer to yellow. It still will but it may be 10 years or more. But you still have to get it smooth.
 
OP
8

850xpeps

Well-known member
Joined
Aug 6, 2017
Messages
1,365
Well, if it's a north window it will take much much longer to yellow. It still will but it may be 10 years or more. But you still have to get it smooth.


Spoke with someone local who polished concrete and whatever else for a living. He said it could be epoxied the way it is. Then a urethane over it to give it a matte finish and a little more strength. But says he doesn’t recommend epoxy because it scratches easy.

He also said another option is to topcoat it. With something similar to mentioned above. Ardex sdm. Says he’s never done that for counters himself though. But used on floors when polishing.

Then he also said it could be ground and polished lol the least favourite of mine. Obviously because of the mesh. Would require some sort of hoarding inside.

Still kinda searching and thinking about how I want to handle it.
 
OP
8

850xpeps

Well-known member
Joined
Aug 6, 2017
Messages
1,365
Well, if it's a north window it will take much much longer to yellow. It still will but it may be 10 years or more. But you still have to get it smooth.


If I were to get it smooth I would probably just do a sealer. Getting smooth almost seems like an impossible feat being inside a finished house. Anything is doable though.


Sent from my iPad using Tapatalk Pro
 
OP
8

850xpeps

Well-known member
Joined
Aug 6, 2017
Messages
1,365
What is your guys thoughts on a skim coat?


Sent from my iPad using Tapatalk Pro
 

Kaizen

Well-known member
Joined
Jan 9, 2015
Messages
6,936
Location
New England
What is your guys thoughts on a skim coat?


Sent from my iPad using Tapatalk Pro


Probably same amount of grinding. I really think you should try water diamond grinding. What you used looks to have somehow gouged it? Maybe just pour water to keep it wet. Use plastic as a trough. Gonna be hard not to make a mess. You are so close. You can figure a way.


Sent from my iPhone using Tapatalk
 
OP
8

850xpeps

Well-known member
Joined
Aug 6, 2017
Messages
1,365
Probably same amount of grinding. I really think you should try water diamond grinding. What you used looks to have somehow gouged it? Maybe just pour water to keep it wet. Use plastic as a trough. Gonna be hard not to make a mess. You are so close. You can figure a way.


Sent from my iPhone using Tapatalk


Ya it’s gouging. I think because the concrete isn’t strong enough to hold the aggregate yet? Before any grinding is done I think I need to let it harden more. It’s a week old st this point and I thought that was enough. Instead of the sander cutting the sand it’s just pulling it out. At this point my sander won’t remove anymore material. Even if I try a real aggressive grit.


Just bad timing with us having to move as the house were renting is needed. And I like doing things proper. Stressed to the nines and half sick about it.

If I wet grind I will have to look into getting proper tools. Was thinking maybe grinder on dimmer switch. But also read the water should
Come from center to clean out better.

I was hoping a topping with eliminate so much work.
 
To avoid these ads, REGISTER NOW!
OP
8

850xpeps

Well-known member
Joined
Aug 6, 2017
Messages
1,365
7-day concrete strength should be about 75% of the 28-day strength.


I did some of the sanding at 5 days ....a bit soon but was told by the company supplying the add mixture to remove the weak layer was fine at that point. But now at this point my sander isn’t doing anymore digging.


Sent from my iPad using Tapatalk Pro
 

Radix2

Well-known member
Joined
May 28, 2014
Messages
1,853
Location
the thumb!, MI
When polishing concrete, you grind to say 100 grit (diamonds) then you densify before trying to polish. The densifier makes a big difference in hardness, the hardened concrete polishes much better. A steel nail can often scratch the concrete before densifying, but not after.

A product like epoxy or urethane will quickly look like **** on a counter since most ceramic dishes and cups have unglazed bottoms that wil scratch coatings easily. A real polished surface has little film on it and what is there is easily refreshed. The aggregates are likely not going to be darkened by any stain, they are probably some hard impervious rock, it has been around a few billion years, it is what it is...
 
OP
8

850xpeps

Well-known member
Joined
Aug 6, 2017
Messages
1,365
When polishing concrete, you grind to say 100 grit (diamonds) then you densify before trying to polish. The densifier makes a big difference in hardness, the hardened concrete polishes much better. A steel nail can often scratch the concrete before densifying, but not after.

A product like epoxy or urethane will quickly look like **** on a counter since most ceramic dishes and cups have unglazed bottoms that wil scratch coatings easily. A real polished surface has little film on it and what is there is easily refreshed. The aggregates are likely not going to be darkened by any stain, they are probably some hard impervious rock, it has been around a few billion years, it is what it is...


We aren’t wanting a real polished surface but I do want a durable one. What grits would I need to polish with? Would I have to go passed 400? I seen an air grinder in another thread linked here maybe it would work.

You should be hand sanding with diamond blocks. It’s slow but gets the job done right.


I’m probabaly passed that point now. I don’t think hand sanding would remove the roughness. But maybe it would.
 
OP
8

850xpeps

Well-known member
Joined
Aug 6, 2017
Messages
1,365
I've only tackled concrete countertops a handful of times and I cast them face down and then polished them before installing. I used one of these with incrementally finer diamond pads to achieve a polished finish that just needed a sealer.

https://www.amazon.com/gp/product/B004XAN47E/?tag=atomicindus08-20

I suppose you could use the same procedure in place - I'm just not sure how you could deal with all the water.

Another alternative would be one of these;

https://www.amazon.com/gp/product/B004S39BBO/?tag=atomicindus08-20

It's not intended for this use but it will accept 5" dry diamond polishing pads. Start with the 50 grit pads and work your way up until you get a level of polish you can live with.


The one you post is fairly expensive but this one looks like it’s similar?

https://www.amazon.com/dp/B071NP441T/?tag=atomicindus08-20

It also has 7 pads with it. And that might be able to do what I need? Not sure if the 50 would take out my roughness though. Or if a grinding cup would be needed. Also not sure how long these pads last for. I have about 80 sq ft of counter.
 

Kaizen

Well-known member
Joined
Jan 9, 2015
Messages
6,936
Location
New England
The one you post is fairly expensive but this one looks like it’s similar?

https://www.amazon.com/dp/B071NP441T/?tag=atomicindus08-20

It also has 7 pads with it. And that might be able to do what I need? Not sure if the 50 would take out my roughness though. Or if a grinding cup would be needed. Also not sure how long these pads last for. I have about 80 sq ft of counter.


I used one like this. ZFE 800W/110V Variable Speed 4'' Wet Polisher/Grinder & Granite Diamond Polishing Pads Concrete Polisher Stone Polisher for Granite/Marble/Concrete/Stones https://www.amazon.com/dp/B00RFAA1UC/?tag=atomicindus08-20
I only used three grits and with water it was still cutting. 50 should do the rough then 80/100 then 150 or so. Cutting cup could grab and ruin it. Mine had adjustable rpm which might help keep the mess down


Sent from my iPhone using Tapatalk
 

plout99

Well-known member
Joined
Apr 8, 2012
Messages
288
Location
Ohio
I used the same polisher Kaizen linked above. I poured mine in the shop, polished them their then hauled them inside. Polishing in place would be quite the mess, might be doable with a couple of wet vacs running with the polisher.
 
OP
8

850xpeps

Well-known member
Joined
Aug 6, 2017
Messages
1,365
I used one like this. ZFE 800W/110V Variable Speed 4'' Wet Polisher/Grinder & Granite Diamond Polishing Pads Concrete Polisher Stone Polisher for Granite/Marble/Concrete/Stones https://www.amazon.com/dp/B00RFAA1UC/?tag=atomicindus08-20
I only used three grits and with water it was still cutting. 50 should do the rough then 80/100 then 150 or so. Cutting cup could grab and ruin it. Mine had adjustable rpm which might help keep the mess down


Sent from my iPhone using Tapatalk


Looks decent and price is good. How much counter did you do? Save to say my 80 aw ft wouldn’t use up a pad?
 
OP
8

850xpeps

Well-known member
Joined
Aug 6, 2017
Messages
1,365
I used the same polisher Kaizen linked above. I poured mine in the shop, polished them their then hauled them inside. Polishing in place would be quite the mess, might be doable with a couple of wet vacs running with the polisher.


I’m sure I’d have to be creative with poly. And maybe caulk the back under the tile so water don’t run down the back. If this is the route I choose to go.

How much life do you think the pads have? I would have to figure out how to get into the 3 corners I have as well.
 

AA7483

Well-known member
Joined
Dec 22, 2017
Messages
433
Location
South Jersey
Get a wet polisher and grind them down. I did this in my basement last year and they came out really good. Then I used a sealer on top. I'll post pics when I get home.
 
OP
8

850xpeps

Well-known member
Joined
Aug 6, 2017
Messages
1,365
Get a wet polisher and grind them down. I did this in my basement last year and they came out really good. Then I used a sealer on top. I'll post pics when I get home.


It’s looking like I’m being bullied into it lol
Love to see pictures.
 

Kaizen

Well-known member
Joined
Jan 9, 2015
Messages
6,936
Location
New England
Looks decent and price is good. How much counter did you do? Save to say my 80 aw ft wouldn’t use up a pad?


Maybe 45? Let the machine do the work. Use low grit on one pass on all that have the roughness. You can get more if it doesn’t hold up. I think it will for two complete passes. Then move up grit. Needs water to wash away the grinding but not a pressure spray. Practice on a little area of those test slabs

For prep I’d start with a curb of 2x4 and poly in the floors and up the cabinets. Fold down the folly you have over that. Have someone use a shop vac if it puddles. Then maybe some setup with a ten foot house gutter under the front face of the top. Put it at a pitch in two sawhorses? Into a bucket at the end with a sump pump. Get it all done in one sitting so there isn’t standing water.


Sent from my iPhone using Tapatalk
 
Last edited:

Radix2

Well-known member
Joined
May 28, 2014
Messages
1,853
Location
the thumb!, MI
We aren’t wanting a real polished surface but I do want a durable one. What grits would I need to polish with? Would I have to go passed 400? I seen an air grinder in another thread linked here maybe it would work.


I’m probabaly passed that point now. I don’t think hand sanding would remove the roughness. But maybe it would.

I'd try to get some densifier on- it will reduce the absorption and make it easier to smooth. The first sheen starts at 4-800grit for a nice satin if that is what you want. You wont have a high gloss till 3000+, but unless you have a surface you have hardened and brought up with diamonds, chances are that the soft cement between the hard aggregate is not super smooth, leaving a low gloss overall no matter how high a grit you go - you will see small polished dots of aggregate in a sea of low gloss cement.

A real polished (or satin, etc) surface will be the most durable since it needs the least surface film. Densified polished concrete is much much harder and less prone to scratching than the plastic coatings on top.
 
OP
8

850xpeps

Well-known member
Joined
Aug 6, 2017
Messages
1,365
I'd try to get some densifier on- it will reduce the absorption and make it easier to smooth. The first sheen starts at 4-800grit for a nice satin if that is what you want. You wont have a high gloss till 3000+, but unless you have a surface you have hardened and brought up with diamonds, chances are that the soft cement between the hard aggregate is not super smooth, leaving a low gloss overall no matter how high a grit you go - you will see small polished dots of aggregate in a sea of low gloss cement.


A real polished (or satin, etc) surface will be the most durable since it needs the least surface film. Densified polished concrete is much much harder and less prone to scratching than the plastic coatings on top.


So you’d suggest get it smooth with 50 then do a 100 pass. Let it dry and clean it. Then apply a densifier. And then continue after it cures? A satin finish is what we want. The sealer we got originally is a gloss that darkens and then we had a matte to apply on top.


Sent from my iPad using Tapatalk Pro
 

Radix2

Well-known member
Joined
May 28, 2014
Messages
1,853
Location
the thumb!, MI
Also might be a good idea to put a small round on the edge? Less likely it will chip after the fact. I would like a little tighter though. Maybe “breaking” the edge with the diamond pad will be enough

https://www.amazon.com/dp/B004PCMGAQ/?tag=atomicindus08-20


Sent from my iPad using Tapatalk Pro

Those bits are really aggressive, and will leave a finish you need to complete with the diamond pads anyway. I'd see if if you are satisfied with just easing the edge with the diamonds. If you get a chip some day you can grind it out then


So you’d suggest get it smooth with 50 then do a 100 pass. Let it dry and clean it. Then apply a densifier. And then continue after it cures? A satin finish is what we want. The sealer we got originally is a gloss that darkens and then we had a matte to apply on top.


Sent from my iPad using Tapatalk Pro

Hard to say. You might just densify what you have, then grind a test area with 100-200-400-800 and see if you need to drop back any more. The wet diamonds will cut fast if you can do it that way.
 

couch67

Well-known member
Joined
Mar 18, 2016
Messages
1,398
Location
Ontario Canada
Already some great advice here. Wet polish is the way to go, I did my kitchen counters over 6 years ago now. I used the Cheng method (lots of info online), and built them in the garage in molds. Bought ebay variable speed wet polisher with diamond pads (50 to 2000 grit). Dont think I went past 1000 grit.

Your challenge will be keeping the mess down to a minimum. Some good advice from others that hopefully works.

After using my counters for 6 years - I would definitely to with a topical coat like a 2 part polyurethane. I did this on the raised bar top which gets a lot of use, and it still looks great. Not a stain on it. For the main counters, I used a latex sealer and applied a wax coating. Even with applying the wax every few months (for the first few years !) there are now quite a few glass ring 'ghost' marks and splotches around the stove. And we try to be pretty diligent with cleaning up spills when they happen but you know how it goes. Things happen and the next morning you are left with a stain.

I've considered re-polishing the main counters and using the poly coating to refinish, but never came up with a good plan to polish in place. My other option is to pull the tops out and wet grind in the garage. PIA but maybe less work than all the wet polishing in the kitchen. I will be keeping an eye out and wish you luck!:thumbup:
 

AA7483

Well-known member
Joined
Dec 22, 2017
Messages
433
Location
South Jersey
Sorry for the delay. Here are some pics. I used a cup grinder to smooth the surface bc I was too aggressive with the stick ******** and put a bunch of nicks in the melamine which left imperfecions. I then wet polished with 50, 100, 200, 400. Then I put 5 coats of U Seal from Fishstone on them. Then I burnished them with dry diamond pads up to 3000 grit.
 

Attachments

  • ct1.jpg
    ct1.jpg
    117.9 KB · Views: 189
  • const0.jpg
    const0.jpg
    156.6 KB · Views: 176
  • const1.jpg
    const1.jpg
    19.4 KB · Views: 34
  • const2.jpg
    const2.jpg
    135.7 KB · Views: 172
  • const4.jpg
    const4.jpg
    95.8 KB · Views: 172
  • ct4.jpg
    ct4.jpg
    117.4 KB · Views: 179
  • ct2.jpg
    ct2.jpg
    112.7 KB · Views: 208
Last edited:

AA7483

Well-known member
Joined
Dec 22, 2017
Messages
433
Location
South Jersey
More
 

Attachments

  • IMG_20170723_154442.jpg
    IMG_20170723_154442.jpg
    127 KB · Views: 141
  • ct6.jpg
    ct6.jpg
    82.5 KB · Views: 132
  • ct7.jpg
    ct7.jpg
    89.7 KB · Views: 124
  • ct8.jpg
    ct8.jpg
    122.2 KB · Views: 146
  • IMG_20170723_154429.jpg
    IMG_20170723_154429.jpg
    84.3 KB · Views: 127
To avoid these ads, REGISTER NOW!
Top Bottom