To avoid these ads, REGISTER NOW!

Concrete Prep

Dyno Dan

Well-known member
Joined
Jan 31, 2012
Messages
121
Location
Southwest Montana
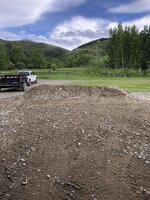
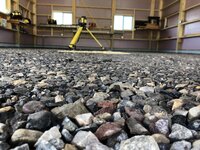
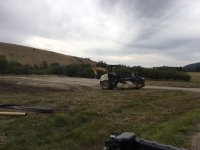
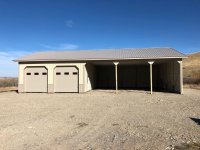
I have silty loam soil in an area that is essentially a drainage from the surrounding mountains. I brought in 854 yards of 4" road mix (yikes....that hurt the budget) that was compacted between truck loads. The dirt work was done back in August of 2017, and then my 36x60 pole barn was built in October 2017.

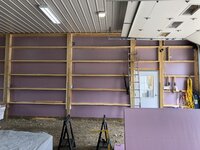
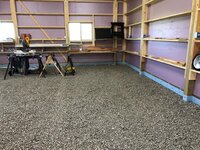
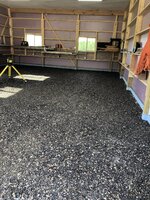
Since then I haven't done much to the building, but I've been chipping away at electrical (now that I have 100amp service), installing some "bash boards" on the open side, and planning how to finish inside of enclosed bays (wall material, insulation, and concrete floor).

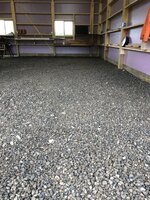
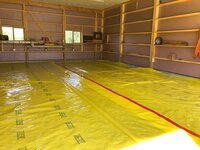
My million dollar question is can I pour concrete on the 4" road mix after another round of compacting? My intent (budget limited) is to have concrete only on the enclosed side. I have a 2x8 baseboard / skirt board and the current gravel floor needs to be leveled to take care of high / low spots. How thick should I pour? Also, do I need to have a foam buffer around the slab to avoid bonding the concrete to my posts?


Usage > I intend on parking regular automotive stuff and toys, and perhaps a 4 post lift.

Heat > In floor heat is probably not in the budget so a propane fired radiant tube heater or convection heater will most likely be used.
 

Attachments

  • IMG_0970.JPG
    IMG_0970.JPG
    129 KB · Views: 604
  • IMG_0984.JPG
    IMG_0984.JPG
    96.8 KB · Views: 642
  • IMG_1353.jpg
    IMG_1353.jpg
    149.6 KB · Views: 561
Last edited:
To avoid these ads, REGISTER NOW!

Kaizen

Well-known member
Joined
Jan 9, 2015
Messages
6,938
Location
New England
How thick is the base inside the building? What was used to compact it?


Sent from my iPhone using Tapatalk
 
OP
D

Dyno Dan

Well-known member
Joined
Jan 31, 2012
Messages
121
Location
Southwest Montana
Sorry about the double post.

The base is something like 3-4' deep! Compacted with the equipment show in pic. I'm not too handy in knowing my commercial construction equipment :)
 

ConCretin

Well-known member
Joined
Jan 20, 2011
Messages
3,378
Location
Central Maine
Looks like they used a good sized roller, which should yield good compaction. You could have the material tested for compaction if you want but I wouldn't be reluctant to place a slab on what's there.
 
OP
D

Dyno Dan

Well-known member
Joined
Jan 31, 2012
Messages
121
Location
Southwest Montana
So another layer of?? I have since talked to an old friend who has done well with concrete construction here in the valley. He said crushed stone would be ideal, but he would even consider 3/4 minus gravel, compacted, as a solution as well. God knows I could use a load of 3/4 minus to "smooth over" some other areas around the shop as well, that 4" road mix is pretty rough in places.
 

Chris705

Well-known member
Joined
Nov 1, 2012
Messages
834
Location
The Finger Lakes of NY
Do you need to bring the grade up at all if you placed concrete in either a 6 or 4” thickness? Then you can bring in some nice fine graded well compacting stone. If no added fill is needed to get to your selected concrete slab thickness then I would move forward with the fill you have in place. If the top surface is lose and you think a plate compactor will firm it up, wet the surface a little bit. I’d also suggest a 6 or 10 mil. vapor barrier prior to placing your concrete....actually look at post #5...be sure to read all of LLWillysfan guide to floor slabs! Ask any further questions you may have here, we’ll offer plenty of advice.

Do you need to have a foam buffer around the outside? Well not exactly But you may want to install some thickness of insulation at th slab edge to temper the freezing cold from sucking any heat you try to add to the inside....
 
Last edited:

Kaizen

Well-known member
Joined
Jan 9, 2015
Messages
6,938
Location
New England
As much as I hate to say this...you need an engineer or soil engineer. That is a lot of fill even if compacted right it sounds like bad soil under it. You don’t want to waste money and have it crack up


Sent from my iPhone using Tapatalk
 
OP
D

Dyno Dan

Well-known member
Joined
Jan 31, 2012
Messages
121
Location
Southwest Montana
Do you need to bring the grade up at all if you placed concrete in either a 6 or 4” thickness? Then you can bring in some nice fine graded well compacting stone. If no added fill is needed to get to your selected concrete slab thickness then I would move forward with the fill you have in place. If the top surface is lose and you think a plate compactor will firm it up, wet the surface a little bit. I’d also suggest a 6 or 10 mil. vapor barrier prior to placing your concrete....actually look at post #5...be sure to read all of LLWillysfan guide to floor slabs! Ask any further questions you may have here, we’ll offer plenty of advice.

Do you need to have a foam buffer around the outside? Well not exactly But you may want to install some thickness of insulation at th slab edge to temper the freezing cold from sucking any heat you try to add to the inside....

OK, I've got some reading to do (LLWillysfan Guide to Floor Slabs), thanks for that. I did some quick eyeballing last night and there are definitely some high spots, and low spots. The back left hand corner in particular is low and I can see day light under the 2x8 skirt board.

I'd like to end up with a true 12' ceiling height. I pulled a tape from the ceiling liner down to the 2x8 skirt board. Looks like 12' lands about 2" down on the skirt board....if that makes sense. So working for the floor up, there would 5" of concrete, and then 2.25" to the top of the skirt board. I was looking at doing bookshelf girts and insulating the wall, so I suppose I can put the bottom bookshelf girt flush / even with the top of the skirt board.


If I want to maintain a 12' ceiling, it appears as if the concrete would need to start at the base of the 2x8 skirt board.it looks like I'll need to pour starting at the base of the 2x8 skirt board, 5" of concrete, and that leaves
 

Attachments

  • IMG_3888.jpg
    IMG_3888.jpg
    156.1 KB · Views: 309
  • IMG_3886.jpg
    IMG_3886.jpg
    155.4 KB · Views: 298

Chris705

Well-known member
Joined
Nov 1, 2012
Messages
834
Location
The Finger Lakes of NY
I had a tough time leveling out my fill after a couple years of driving & working on it. A rotary level helped me define the low’s and high’s so I could get it to about 1/2” difference.
Adding rigid insulation at the skirt board w/ a 45 at the top edge will quickly close the gaps under the board. Would you be adding some exterior top soil around the perimeter? I also poured a 5” thick slab.
 
OP
D

Dyno Dan

Well-known member
Joined
Jan 31, 2012
Messages
121
Location
Southwest Montana
I had a tough time leveling out my fill after a couple years of driving & working on it. A rotary level helped me define the low’s and high’s so I could get it to about 1/2” difference.
Adding rigid insulation at the skirt board w/ a 45 at the top edge will quickly close the gaps under the board. Would you be adding some exterior top soil around the perimeter? I also poured a 5” thick slab.


Foam board on the outside?

I have a 15’ cushion on each side and 5’ off the back side. Same material, same compaction, etc. I thought I would add lean-to on each side some day. A man can dream.

b0c9d3ce3af3a8932f5b4acdf165e664.jpg
 

Attachments

  • b0c9d3ce3af3a8932f5b4acdf165e664.jpg
    b0c9d3ce3af3a8932f5b4acdf165e664.jpg
    334.3 KB · Views: 4
Last edited:

Bretny

Well-known member
Joined
Jul 31, 2017
Messages
3,918
Location
Dutchess county NY
Make sure you put concrete underlayment under the concrete. Basicly thick thick plastic. Some people forget this then have to deal with a moist slab for years.
 
OP
D

Dyno Dan

Well-known member
Joined
Jan 31, 2012
Messages
121
Location
Southwest Montana
Make sure you put concrete underlayment under the concrete. Basicly thick thick plastic. Some people forget this then have to deal with a moist slab for years.


That I can do. Looks like I’ll need to remove some material to get level with bottom the skirt board.....and maybe a bit more to leave a few inches for new base material.
 

Chris705

Well-known member
Joined
Nov 1, 2012
Messages
834
Location
The Finger Lakes of NY
Insulation board on inside face of skirt board.... I suppose knowing you are planning on insulation with the bookshelf girts you don’t need to trim top of insulation board at 45 degrees. Just place top edge at top of slab height.....
 
OP
D

Dyno Dan

Well-known member
Joined
Jan 31, 2012
Messages
121
Location
Southwest Montana
What board / what thickness? Also how deep? Does this negate the need for expansion joint foam?

Reading LLWillysfan's write-up: "Insulation - In heated structures, particularly with in-floor radiant, a minimum of 2" of rigid board insulation is typically placed under the slab. You can use either XPS or EPS as long as it meets ASTM C578. In cold climates, rigid insulation should also be used vertically on your frost walls to keep frost from getting under your slab through the walls.

For slabs under unheated structures, you can protect the structure from frost movement by placing insulation under the slab and extending it out or down 4' around the perimeter. The insulation will retain the natural heat from the ground and keep the frost from getting under the slab.


I'm going to be heated, and I could put foam under the slab, but I don't have a frost wall in this case. If the foam is up against the skirt board on the inside, it sounds like I'll be doing some shoveling.......but how deep?
 
Last edited:

ConCretin

Well-known member
Joined
Jan 20, 2011
Messages
3,378
Location
Central Maine
The first function of underslab insulation is to improve heating efficiency particularly with in floor radiant. This requires insulation between the slab and the ground and the air if the edges are exposed.

An equally important function is to keep frost from penetrating under the slab around the perimeter. With frost walls, insulation can be laid against the wall before backfilling to provide a frost barrier. A floating slab such as in your pole barn requires a different approach. You could dig a trench to your local frost depth and install the insulation vertically or an easier method might be to lay insulation horizontally out the same distance. This insulation can be run as deep as necessary to allow for lawns, pavement, etc

this has added benefit of protecting your structure from frost in the event your heat is turned off for whatever reason. Pole structures are a bit different from what i'm used to so others may have other ideas.
 
OP
D

Dyno Dan

Well-known member
Joined
Jan 31, 2012
Messages
121
Location
Southwest Montana
Hey guys I’m back. Wiring, bookshelf girts, garage door operators are all done. I did 1.5” foam board between the girts and plan on 2-3” of foam over that.

Next up is concrete. I have to move some stuff out of the way and then start removing some compacted 4” road mix......ick. That is if I want a full 12’ inside ceiling height

Any who, as you can see in the pic I didn’t run the bottom BS girt yet. I had a thought, and now a question. If I ran the last BS girt and then a 2x8 skirt board on the inside of the structure (forming an “H” shape), would that yield any benefit? Would the slab be in a better position to float, and could I then insulate the inside face of the existing skirt board? Does that help, or is it just an asinine idea?


178e5d7ab0583c1368b0833d79928430.jpg
 

Attachments

  • 178e5d7ab0583c1368b0833d79928430.jpg
    178e5d7ab0583c1368b0833d79928430.jpg
    237.6 KB · Views: 4
Last edited:

lakeroadster

Well-known member
Joined
Jan 19, 2015
Messages
5,166
Location
Central Colorado
Hey guys I’m back. Wiring, bookshelf girts, garage door operators are all done. I did 1.5” foam board between the girts and plan on 2-3” of foam over that.

Next up is concrete. I have to move some stuff out of the way and then start removing some compacted 4” road mix......ick. That is if I want a full 12’ inside ceiling height

Any who, as you can see in the pic I didn’t run the bottom BS girt yet. I had a thought, and now a question. If I ran the last BS girt and then a 2x8 skirt board on the inside of the structure (forming an “H” shape), would that yield any benefit? Would the slab be in a better position to float, and could I then insulate the inside face of the existing skirt board? Does that help, or is it just an asinine idea?

I wouldn't do the H shape. You've created a pathway for burrowing animals and varmints to get into the building.

Leave the bottom bookshelf girt off. Pour the concrete. Then install the bookshelf girt a couple inches above the concrete so the slab can move relative to the building.
 
OP
D

Dyno Dan

Well-known member
Joined
Jan 31, 2012
Messages
121
Location
Southwest Montana
Ok, I removed some of the 4” compacted road mix and got it level with the bottom of the skirt board. My little JOhn Deere 1025R got a work out.

d6af5cfde7e665380b95adfe013333a2.jpg

Then I got a load of 3/4” screen rock (that’s what the gravel pit guy called it) and laid down about 1.5” of it so far. I’ll rent a plate compactor this weekend and make a few passes while pulling a string to check for level.

1a8e649294d6427230ed02ab2a44625c.jpg


d18e03ab66b1aba53c90d09642eb7745.jpg
267da3b844d7c73fb8efb31426927e52.jpg


So at the garage doors I’ll have to make forms? Anything needing to be done on the inside?
 

Attachments

  • 267da3b844d7c73fb8efb31426927e52.jpg
    267da3b844d7c73fb8efb31426927e52.jpg
    219.5 KB · Views: 5
  • d18e03ab66b1aba53c90d09642eb7745.jpg
    d18e03ab66b1aba53c90d09642eb7745.jpg
    197.5 KB · Views: 3
  • 1a8e649294d6427230ed02ab2a44625c.jpg
    1a8e649294d6427230ed02ab2a44625c.jpg
    267 KB · Views: 3
  • d6af5cfde7e665380b95adfe013333a2.jpg
    d6af5cfde7e665380b95adfe013333a2.jpg
    482.1 KB · Views: 3

ConCretin

Well-known member
Joined
Jan 20, 2011
Messages
3,378
Location
Central Maine
That looks like a nice solid base. I would consider thickening the slab where you drive onto and off of the slab. I'd probably throw in a couple rebar in the the bottom for good measure. You might want to install expansion foam around the entire perimeter or just around the posts to isolate the slab from the structure. If you have a minute, you could give my Guide to Floor Slabs in the link below a read for some additional thoughts. Great work so far.
 
To avoid these ads, REGISTER NOW!

matt_i

Well-known member
Joined
Mar 14, 2008
Messages
10,722
Location
SE Michigan
When doing the block-outs for the garage doors, I recommend forming a small pocket for the door to sit in, slightly lower than the finished floor. Even if its just 1/8" lower it will help keep wind driven rain from going under the door and causing irritation. 1/4" is better but may require some advanced planning as the door may uncover the trim at the top if it drops an additional 1/4" lower. Its a detail that seems like "you can work that out later" but when the grey mud is flowing there isn't time.

I'm going to recommend some kind of long-distance level to get the stone base leveled. It doesn't have to be uber-precise but that can throw off your concrete delivery volume if you have a drop over a long distance. Rotary laser level on "coarse" is best/easiest but a water tube level will do the same thing at lower cost and slower.

I like to use curing sealer on concrete to get max strength without the humidity bomb of wet-curing and saw-cut any control joints the next morning after the initial pour. 10-12' squares.
 
OP
D

Dyno Dan

Well-known member
Joined
Jan 31, 2012
Messages
121
Location
Southwest Montana
That looks like a nice solid base. I would consider thickening the slab where you drive onto and off of the slab. I'd probably throw in a couple rebar in the the bottom for good measure. You might want to install expansion foam around the entire perimeter or just around the posts to isolate the slab from the structure. If you have a minute, you could give my Guide to Floor Slabs in the link below a read for some additional thoughts. Great work so far.


Expansion foam will be installed around the entire interior.

I do plan on #3 rebar at 24”o.c. On the idea of a thickened edge at the doorways, you’re talking about additional rebar?

Thanks for the support and encouragement.
 
OP
D

Dyno Dan

Well-known member
Joined
Jan 31, 2012
Messages
121
Location
Southwest Montana
When doing the block-outs for the garage doors, I recommend forming a small pocket for the door to sit in, slightly lower than the finished floor. Even if its just 1/8" lower it will help keep wind driven rain from going under the door and causing irritation. 1/4" is better but may require some advanced planning as the door may uncover the trim at the top if it drops an additional 1/4" lower. Its a detail that seems like "you can work that out later" but when the grey mud is flowing there isn't time.

I'm going to recommend some kind of long-distance level to get the stone base leveled. It doesn't have to be uber-precise but that can throw off your concrete delivery volume if you have a drop over a long distance. Rotary laser level on "coarse" is best/easiest but a water tube level will do the same thing at lower cost and slower.

I like to use curing sealer on concrete to get max strength without the humidity bomb of wet-curing and saw-cut any control joints the next morning after the initial pour. 10-12' squares.


Thanks for the tips. In regards to the door channel / trough, isn’t that a recipe for a frozen door seal and gravel trap? I’ve got plenty of both (cold/wet, gravel).

I was actually contemplating putting in a floor drain before I get any further along, but this may be above my capabilities...... maybe ;)
 

ConCretin

Well-known member
Joined
Jan 20, 2011
Messages
3,378
Location
Central Maine
Expansion foam will be installed around the entire interior.

I do plan on #3 rebar at 24”o.c. On the idea of a thickened edge at the doorways, you’re talking about additional rebar?

Thanks for the support and encouragement.

That sounds perfect. Yes on the extra bars. I'd thicken the edge to 8" or so and install a couple bars in the bottom.
 
OP
D

Dyno Dan

Well-known member
Joined
Jan 31, 2012
Messages
121
Location
Southwest Montana
Perhaps a silly question, but on the foam I going to use what was suggested earlier in this thread. Question is how to retain to the skirt board and posts? Looks like what is referred to as "cap nails" is the hot ticket?

These?

Also, after the pour does everyone recommend saw cuts (the space is ~25x35)? Lastly what’s the preferred method to “cure” the slab? Keep it wet for a week or seal it the day after the pour? I do plan on an epoxy coating if that matters.
 
Last edited:
OP
D

Dyno Dan

Well-known member
Joined
Jan 31, 2012
Messages
121
Location
Southwest Montana
Put down some more material on the other side. I have no idea on how level things are, but I suppose after running a plate compactor I can pull some strings.

04d6af7d75c88ca44990ffe0546ade45.jpg
85d4e15a18dde479372e745bb42d929a.jpg
bdd22cc32d5c099cbbb15048e2da25f7.jpg
 

Attachments

  • 04d6af7d75c88ca44990ffe0546ade45.jpg
    04d6af7d75c88ca44990ffe0546ade45.jpg
    245.4 KB · Views: 2
  • 85d4e15a18dde479372e745bb42d929a.jpg
    85d4e15a18dde479372e745bb42d929a.jpg
    167.9 KB · Views: 1
  • bdd22cc32d5c099cbbb15048e2da25f7.jpg
    bdd22cc32d5c099cbbb15048e2da25f7.jpg
    215.9 KB · Views: 2

matt_i

Well-known member
Joined
Mar 14, 2008
Messages
10,722
Location
SE Michigan
Also, after the pour does everyone recommend saw cuts (the space is ~25x35)? Lastly what’s the preferred method to “cure” the slab? Keep it wet for a week or seal it the day after the pour? I do plan on an epoxy coating if that matters.

Saw cut the next morning after the pour is my advice.

Curing sealer is a set-it-and-forget-it solution. But its likely that coating will eventually have to be ground-off.

Wet curing is a possibility but the internal humidity can wreak havoc on things you don't want to rust...but...along those lines, the entire building has to be emptied anyway, so that might be a moot point.

See below on the potential gains from proper curing.

https://images.app.goo.gl/LeMcihGdXmbyGvL56
 

spudley

Well-known member
Joined
Dec 27, 2016
Messages
702
Location
Northeast Wisconsin
We poured my floor at 7AM in July. Saw cut the slab at 7PM that evening.

If you're doing epoxy, do the wet cure and skip the sealer.

As far as rust, it's pretty dry out there.

Are you in Paradise Valley? Beautiful area.
 

ConCretin

Well-known member
Joined
Jan 20, 2011
Messages
3,378
Location
Central Maine
The ideal method of sawcutting control joints is an early entry or 'soffcut' saw designed to cut green concrete immediately after finishing is completed. Tension from shrinkage starts and early and the sooner you relieve it with control joints the less likely you are to have random cracks.

Moist curing is ideal. Keep the slab wet by ponding, fogging or covering. The best method in my experience is a curing fabric such as Koncure. Wet the slab, roll out the fabric and forget about it for a week or two. Spray on products are fine but as had been mentioned, can interfere with the bond of future floor coverings.
 
Last edited:
OP
D

Dyno Dan

Well-known member
Joined
Jan 31, 2012
Messages
121
Location
Southwest Montana
We poured my floor at 7AM in July. Saw cut the slab at 7PM that evening.

If you're doing epoxy, do the wet cure and skip the sealer.

As far as rust, it's pretty dry out there.

Are you in Paradise Valley? Beautiful area.


Sounds like wet cure will be the way to go for me.

I’m over the “hill” from Paradise Valley in the Gallatin Valley to the west.
 

spudley

Well-known member
Joined
Dec 27, 2016
Messages
702
Location
Northeast Wisconsin
Sounds like wet cure will be the way to go for me.

I’m over the “hill” from Paradise Valley in the Gallatin Valley to the west.
My buddy built in Paradise Valley. My son lives in Boise so I stop on the way out and spend some time in your area. Beautiful mountain views.

Looks like you have a good start on your project, but if there's anyway possible to squeeze in floor radiant into your plans/budget...do it, even if you don't hook up to a boiler or water heater now.

I'm using a 75K gas heater in a 1000 sq ft shop (oversized but free) but the feet get cold, and I don't like woodworking in boots.

Anyway, listen to everything LLWillys says and you won't be disappointed. He is the GJ concrete guru.

Good luck!:thumbup:
 
OP
D

Dyno Dan

Well-known member
Joined
Jan 31, 2012
Messages
121
Location
Southwest Montana
A bit more progress today.

5a979d7f4c1dbf99d0ddf1a8b3bfd864.jpg
92c3d2c6eab5f069af5ca8ae3ea75f18.jpg
5ec6e07cb0c1dfbcb47133969abaf735.jpg
abcc2cee21347dd3488dd296668c87e6.jpg
c932ee720aaea94d9cae7d7c019920a2.jpg
 

Attachments

  • c932ee720aaea94d9cae7d7c019920a2.jpg
    c932ee720aaea94d9cae7d7c019920a2.jpg
    207.3 KB · Views: 2
  • 5a979d7f4c1dbf99d0ddf1a8b3bfd864.jpg
    5a979d7f4c1dbf99d0ddf1a8b3bfd864.jpg
    200.3 KB · Views: 2
  • 92c3d2c6eab5f069af5ca8ae3ea75f18.jpg
    92c3d2c6eab5f069af5ca8ae3ea75f18.jpg
    186.2 KB · Views: 2
  • 5ec6e07cb0c1dfbcb47133969abaf735.jpg
    5ec6e07cb0c1dfbcb47133969abaf735.jpg
    226.9 KB · Views: 1
  • abcc2cee21347dd3488dd296668c87e6.jpg
    abcc2cee21347dd3488dd296668c87e6.jpg
    214.2 KB · Views: 1

lakeroadster

Well-known member
Joined
Jan 19, 2015
Messages
5,166
Location
Central Colorado
That's going to be nice Dan. You are doing a fantastic job.

I'd suggest you put up some thin plastic poly sheeting, Visqueen, temporarily on the walls before they pour the concrete. That way you won't end up with concrete splashed up on your columns, girts and insulation board.

I just used a staple gun to attach it...

I wish your "gravel pit" guy would have sold you crushed rock though... it compacts so much better. Rock with smooth edges just doesn't lock into place well. I know that's no help to you at this point, but might help somebody else that's reading this.

attachment.php
 

Attachments

  • Ready To Pour 004.jpg
    Ready To Pour 004.jpg
    40.8 KB · Views: 516
Last edited:
OP
D

Dyno Dan

Well-known member
Joined
Jan 31, 2012
Messages
121
Location
Southwest Montana
Thanks for the tip John. I was thinking that I could run the vapor barrier that I’m putting on the floor a little long and run up the walls a couple feet. See any harm in that? Of course I’d trim it back once everything is settled.
 

lakeroadster

Well-known member
Joined
Jan 19, 2015
Messages
5,166
Location
Central Colorado
Thanks for the tip John. I was thinking that I could run the vapor barrier that I’m putting on the floor a little long and run up the walls a couple feet. See any harm in that? Of course I’d trim it back once everything is settled.

Might be difficult to get the vapor barrier plastic to sit nice and flush around the posts. And you don't want it laying in the concrete and being a hassle for the guys finishing the concrete.

I'd do the splash barrier all on it's own.

Are you putting in any reinforcing steel / mesh?
 
OP
D

Dyno Dan

Well-known member
Joined
Jan 31, 2012
Messages
121
Location
Southwest Montana
Slow going. I’ve got the 3/4” screened rock as flat and level as I can get it. Added some moisture, ran a plate compactor, checked, added / removed material.....repeat.

I ended up buying Stego 15 mil vapor barrier, sealing tape, #3 rebar, ties, and chairs the other day. Next step is the vapor barrier.

440b52ea9748ccff54c5ddf56b519ae3.jpg
8fb167edcd524bcfdc955313518ca12f.jpg
52e0491d168bffd19bf98e927d6e51df.jpg
 

Attachments

  • 440b52ea9748ccff54c5ddf56b519ae3.jpg
    440b52ea9748ccff54c5ddf56b519ae3.jpg
    388.6 KB · Views: 2
  • 8fb167edcd524bcfdc955313518ca12f.jpg
    8fb167edcd524bcfdc955313518ca12f.jpg
    264.5 KB · Views: 2
  • 52e0491d168bffd19bf98e927d6e51df.jpg
    52e0491d168bffd19bf98e927d6e51df.jpg
    566.6 KB · Views: 2
OP
D

Dyno Dan

Well-known member
Joined
Jan 31, 2012
Messages
121
Location
Southwest Montana
.....and more
03415f65e7523476cd0f33c6bd39c8fd.jpg
7c57beb538a71f9142b44de2c7bcd6a9.jpg
f9fe6135f86b43ba537e5c4e4af48440.jpg
 

Attachments

  • 03415f65e7523476cd0f33c6bd39c8fd.jpg
    03415f65e7523476cd0f33c6bd39c8fd.jpg
    401.5 KB · Views: 2
  • 7c57beb538a71f9142b44de2c7bcd6a9.jpg
    7c57beb538a71f9142b44de2c7bcd6a9.jpg
    117.1 KB · Views: 2
  • f9fe6135f86b43ba537e5c4e4af48440.jpg
    f9fe6135f86b43ba537e5c4e4af48440.jpg
    101.9 KB · Views: 4
To avoid these ads, REGISTER NOW!
Top Bottom