To avoid these ads, REGISTER NOW!

Concrete Screed in Polebarn question

Marctrees

Well-known member
Joined
Mar 5, 2015
Messages
6,265
Location
TX/LA border - Toledo Bend
In concrete flatwork I have seen, I recall in most cases the screed lays on the top of the forms.. so they can just slide it at the correct finite elevation as they push it.

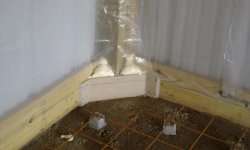
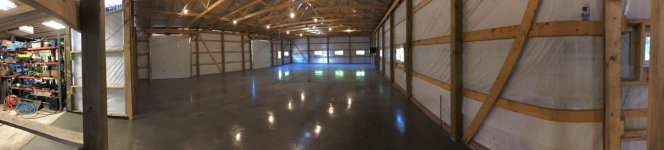
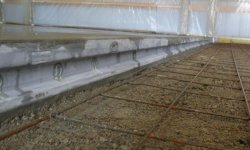
In my new Pole building, I would like the top elevation of my bottom mud girt to end up about 4" above the top of my concrete.

I would be using 2x10 or 12's.

Floor will be poured after all framing, and before any steel applied.

Is it reasonable to expect the concrete guys to deal with not having the convenience of laying their screed directly on the top of the mud girt?

Seems to me they would have to fab in field like "Ears" or flanges on the ends of their screed so it can hang on the top of my tall girt and drop down like 4" to the proper concrete elevation.

Like maybe simply slap on a 2x2x2' sistered at end of screed 2x4 hanging a few inches past 2x4 end..so concrete elevation ends up 3 1/2" below girt top.

Is this what's done and common ?

OR, are they gonna hassle me about this?

Marc
 
To avoid these ads, REGISTER NOW!

KnurledNut

Well-known member
Joined
Jan 28, 2011
Messages
8,135
Location
n/a
Chalk a line.
Hand float the edges to the line.
Screed from that.
Its pretty common.
 

lakeroadster

Well-known member
Joined
Jan 19, 2015
Messages
5,166
Location
Central Colorado
Chalk line is how it is normally done on a pole barn, because of the splash boards.

You can see the blue chalk in the photo's below.

attachment.php


attachment.php


attachment.php


attachment.php


attachment.php


attachment.php
 

Attachments

  • Ready To Pour 002.jpg
    Ready To Pour 002.jpg
    66.8 KB · Views: 536
  • Ready To Pour 003.jpg
    Ready To Pour 003.jpg
    52.7 KB · Views: 530
  • Ready To Pour 004.jpg
    Ready To Pour 004.jpg
    40.8 KB · Views: 528
  • Backer Rod 001.jpg
    Backer Rod 001.jpg
    88.8 KB · Views: 523
  • Column Isolaters 002.jpg
    Column Isolaters 002.jpg
    38.3 KB · Views: 517
  • Pour Day 1 008.jpg
    Pour Day 1 008.jpg
    77.6 KB · Views: 495
Last edited:

Leaflessshadetree

Well-known member
Joined
Aug 1, 2013
Messages
7,156
Location
Don't ask.
They will most likelysnap a line around teh exterior and set up a laser. Then they'll screed/float small pads at the length of the screed and screed to those. Not a big deal and ver quick.
DIY I've set stakes/pipes to slide the screed along, then remove the pipes and drive the stakes in as we went.
 

ConCretin

Well-known member
Joined
Jan 20, 2011
Messages
3,378
Location
Central Maine
It's a commonly used technique usually referred to as 'wet screeding'. After the concrete is placed roughly to grade, small pads are set to grade using lines or preferably a laser. The concrete between the pads is struck off level using the pads as reference. Once two of these wet screeds are complete, the crew turns 90 degrees and strikes off the concrete by dragging a straightedge along them. Skilled finishers can achieve a surprisingly flat floor using this technique using hand screeds or vibra-screeds.

Even if you are able to set your perimeter forms to grade, the crew will likely have to rely on this method for the areas in between. You didn't mention how wide your slab is but it's pretty tough to drag a straightedge much longer than 12 or 14'.
 
Last edited:

Firebrick43

Well-known member
Joined
May 12, 2015
Messages
14,060
Location
West central Indiana
My guys used a plywood square about 8"x8" with a wood post and put the lazer detector on that. We chalk lined the walls for easy visual but every thing was really on the lazer level. They were a pretty small time op, just two guys, every thing in a pickup and they still had a lazer level.

Look closely at lake roadsters barn. The way he did the corners and around the post is top notch. Also he has enough chairs to keep the wire up unlike a lot of idiots that try to pull it up (while standing on it)

The only thing that I would improve upon is put a vapor barrier down to prevent curling while curing.
 
OP
M

Marctrees

Well-known member
Joined
Mar 5, 2015
Messages
6,265
Location
TX/LA border - Toledo Bend
Ok, I guess you guys have answered my question.

I always thought the screed ran on the tops of the form boards, like using 2"x6 form boards for a 4' wide sidewalk and running like a 5' long screed over it.

Now, in the narrow sidewalk case, for overall ease that's probably how it's done.

But in a bigger building, not necessary.

So now after reading all above, it seems it is no problem at all that my girt top elevation is higher than the concrete.

Did I understand ?

I will have Poly sheet underneath, and even REAL chairs, not just brick chunks !

Will water it for a few days at least.

Thank you, Marc
 
Last edited:

lakeroadster

Well-known member
Joined
Jan 19, 2015
Messages
5,166
Location
Central Colorado
Lakeroadsters chair chunks were totally fine, I just meant not hodgy podgy busted up bricks.

Marc

Those "chair chunks"... they are "Dobies"... and are made of concrete, even come with their own attachment wires. Nothing sticks to concrete better than concrete.

Link---> https://www.whitecap.com/shop/wc/p/dayton-superior-cwd-2-dobie-with-wire-123704

Lake - Is that extra L shaped Girt at about 3' high level for future worbench back ledge?

Marc

The barn has wainscot trim. It has a 2x4 wainscot nailer. It makes the wall stronger.

attachment.php


It also has "T-Girts" on the wide bay wall. (Posts are spaced @ 13'-6"). They stiffen the wall due to the 116 mph wind loading.... and they stiffen the wall a bunch!

attachment.php
 

Attachments

  • Detail MF-342.jpg
    Detail MF-342.jpg
    47.4 KB · Views: 413
  • Detail G4 TGirt.jpg
    Detail G4 TGirt.jpg
    15.2 KB · Views: 410
Last edited:
OP
M

Marctrees

Well-known member
Joined
Mar 5, 2015
Messages
6,265
Location
TX/LA border - Toledo Bend
I just spent an hour + reading every post in Lakeroadster's "Ye Ole Build" thread linked in his Sig.

Well worth the time for anyone going to build a pole building.

Thank You Lake for taking the time to put it all online.

Couple thoughts -

#1 - I am very detail oriented, Lake even more so.

I am always afraid to send my contractors running off the job to the hills if I overly comment.. they seem to get really easily offended in their pride.. no matter how much I praise what is done well, .."one minute manager" I adroitly make the comments.

I have done/ built MANY different things in my years, and am always VERY studied on how they should end up.

So I have more than once gotten incompetent contractors that act like I'm the crazy one... believe me, it's not ME.. I just want it done right as I would do it if my body was 10 years younger.

In our area, most of them seem to be "not the sharpest tool in the shed"

Recently, I had two guys that DID do a very good job on something, very conscientious, , but when I began talking to them about associated info on the ORNL website, they told me they did not have internet, they ONLY learned from their Daddy.


I 'm having one of the fast track economical OK type PB builders coming next week to start.

I just REALLY hope I do not run into **** like the sheetmetal scratches, etc Lake had.

Dragging sheets on each other, not sweeping the roof of metal shavings, etc.

#2 - Lake - I'm surprised you used the backer rod and can foam to fill the ribs...Did you overlook the use of "Foam Closures" ?

You covered ALLLL your bases very well.. is there a reason you did not use those?

I did not see in thread.. What gauge of sheet did you use?

I ended up supplying my own .60 CCA posts and mud girt.. buildr stocks .40.

Just some thoughts.

Would like to continue this thread... as again.. my builder is coming in about 4 days.. 6 man crew.. to totally frame and final grade 1300 ft sq x 10' wall + 36 x 14 lean to roof.

Marc
 
Last edited:

matt_i

Well-known member
Joined
Mar 14, 2008
Messages
10,728
Location
SE Michigan
In my job, I snapped a chalkline referenced from a laser level, all around the perimeter.

The concrete guys placed and one guy went around and got the edges all "cut in".

Then they power screeded, basically by eye from what i could tell, to those first edges. It was a honda motor, a long aluminum (?) bar, and some motorcycle handlebars to control it. One guy did the power screed, he seemed to have a skill the others didnt in this aspect.

Then it was a combination of waiting, floating, power troweling and finally hand-steel troweling on knee boards.

The contractor I hired was one of two recommended by the local ready mix plant after I described my job. And I was very pleased with their recommendation.
 
Last edited:
To avoid these ads, REGISTER NOW!

lakeroadster

Well-known member
Joined
Jan 19, 2015
Messages
5,166
Location
Central Colorado
#2 - Lake - I'm surprised you used the backer rod and can foam to fill the ribs...Did you overlook the use of "Foam Closures" ?

You covered ALLLL your bases very well.. is there a reason you did not use those?

My barn has those closures on the roof. Opinions vary, but I don't care for them. They can easily be moved around and they aren't air tight. They are made from foam rubber, the kind that degrades and turns into powder.

The spray foam provides an air tight seal. Plus since I used the "Pest Block" spray foam it has an additive in it that insects and vermin don't like.

I did not see in thread.. What gauge of sheet did you use?


attachment.php
 

Attachments

  • Roof and Wall Panels.jpg
    Roof and Wall Panels.jpg
    128 KB · Views: 330

Firebrick43

Well-known member
Joined
May 12, 2015
Messages
14,060
Location
West central Indiana
My barn has those closures on the roof. Opinions vary, but I don't care for them. They can easily be moved around and they aren't air tight. They are made from foam rubber, the kind that degrades and turns into powder.

Ironically just yesterday I found a closure strip in the center of my storage shed that came out from the roof panel/ridge cap joint. And another is hanging.
 

lakeroadster

Well-known member
Joined
Jan 19, 2015
Messages
5,166
Location
Central Colorado
Ironically just yesterday I found a closure strip in the center of my storage shed that came out from the roof panel/ridge cap joint. And another is hanging.

Yep... :Violent:

All it takes is for the installer to push them back far enough for the wood screws to penetrate them. But it seems attention to detail is pretty much a lost skill.
 
Last edited:
OP
M

Marctrees

Well-known member
Joined
Mar 5, 2015
Messages
6,265
Location
TX/LA border - Toledo Bend
That is one of the details I am gonna bring up on site in a brief "pre" construction chat.

Also ..thanks to you.. a reminder of NO dragging panels or other scratches.. and sweeping the roof of shavings at end of day.

I will also confirm my closures are USA made.

So they don't stink and melt like HF store.

Marc
 
Last edited:

webdog

Well-known member
Joined
Aug 18, 2011
Messages
54
Location
Taylors Falls, MN
It's a commonly used technique usually referred to as 'wet screeding'. After the concrete is placed roughly to grade, small pads are set to grade using lines or preferably a laser. The concrete between the pads is struck off level using the pads as reference. Once two of these wet screeds are complete, the crew turns 90 degrees and strikes off the concrete by dragging a straightedge along them. Skilled finishers can achieve a surprisingly flat floor using this technique using hand screeds or vibra-screeds.

Even if you are able to set your perimeter forms to grade, the crew will likely have to rely on this method for the areas in between. You didn't mention how wide your slab is but it's pretty tough to drag a straightedge much longer than 12 or 14'.

This is how they just did my floor last week, they set rebar for height. Once they had the reference height down they pounded the rebar down into the floor and screeded the other way.

The sides were chalk line as the grade board is 4" higher than floor height.
 

Attachments

  • 30821721_10215006523210004_325943178307829760_n.jpg
    30821721_10215006523210004_325943178307829760_n.jpg
    65.1 KB · Views: 50
OP
M

Marctrees

Well-known member
Joined
Mar 5, 2015
Messages
6,265
Location
TX/LA border - Toledo Bend
OK, the only thing I don't understan is that it seems to me it would be easier than following visually a chalkline... to set the mud girt boards level w a laser or Builders level, THEN screw some extension ears on the screed board in the correct place so the ears would ride on the top of the mudboard.. no matter how that elevation is different than the slab surface.

I would just think less room for error riding on a finite surface rather than eyeballing to a chalkline... less chance of uneven finished floor.

But I guess if the Finishers are skilled, AND used to be able to do that, all that matters is the finished product.

Marc
 

lakeroadster

Well-known member
Joined
Jan 19, 2015
Messages
5,166
Location
Central Colorado
But I guess if the Finishers are skilled...

That's one big red if....

You could always use construction joint keys, like I used on my slab. Place them such that the screed runs across them.

Your slab.. your call. If you use the brackets made for the keys it can still be a one day pour. The guy that poured my slab wanted to do a two day pour. I was all on board with that and it worked out well.

More reading material for you Marc...

https://www.garagejournal.com/forum/showthread.php?t=353845&highlight=slab

https://www.garagejournal.com/forum/showthread.php?t=346747

https://www.garagejournal.com/forum/showthread.php?t=353625

attachment.php
 

Attachments

  • Key 002.jpg
    Key 002.jpg
    75.2 KB · Views: 152
Last edited:

ConCretin

Well-known member
Joined
Jan 20, 2011
Messages
3,378
Location
Central Maine
OK, the only thing I don't understan is that it seems to me it would be easier than following visually a chalkline... to set the mud girt boards level w a laser or Builders level, THEN screw some extension ears on the screed board in the correct place so the ears would ride on the top of the mudboard.. no matter how that elevation is different than the slab surface.

I would just think less room for error riding on a finite surface rather than eyeballing to a chalkline... less chance of uneven finished floor.

But I guess if the Finishers are skilled, AND used to be able to do that, all that matters is the finished product.

Marc

It's always nice to set forms to grade - it's just not usually necessary. Most crews can wet screed a very flat floor. Probably best to talk to your finisher about what they need. There are many possible methods - some obviously better than others.

I'm not a fan of using chalk lines. It's too easy to lose them when concrete splashes against the form. A laser provides a consistent reference over the entire area wherever it's needed.

Keep in mind that striking off the concrete is just the first of several steps that determine flatness. Bull floating followed by several operations with float blades will further level the concrete after screeding. As long as the floor is screeded reasonably well, it is these subsequent operations that will determine flatness.
 
Last edited:

Firebrick43

Well-known member
Joined
May 12, 2015
Messages
14,060
Location
West central Indiana
Also make sure you have a discussion on flatness with yourself and your contractor. Flat is different to a lot of people. I have seen 1" deep puddles before on a good looking slab but I wouldn't accept that. I told my guys 3/8 is all you get and they met with some to spare. I have heard tennis courts need to have no puddle deeper than a dime and guys even hundred years ago before lasers did it(probably with water levels)

The tighter the tolerance the corresponding higher the finishing cost however.
 

tinysparky

Well-known member
Joined
Oct 22, 2016
Messages
195
My guys uses pins all over the floor from which they had adjustable holders for 2*4 which they went against. They pulled them as they went.MVIMG_20180319_101645.jpg

Sent from my Pixel 2 XL using Tapatalk
 

southpier

Well-known member
Joined
Jun 28, 2009
Messages
552
...not a fan of using chalk lines. It's too easy to lose them when concrete splashes against...


I hoped someone would bring that up. run a row of 6d galvanized common nails about 2' apart around the chalkline. drive them in half-way, and bend down 45 degrees. tell the guys to pull them as they go (good luck with that!) or just leave them in - they bump shouldn't show.


if you're putting in expansion joint, nail the board to the height of the chalkline. when the sealant goes in later, just crush the board down 3/8" - 1/2" with a block of hardwood and squirt the sealant over it.
 

kj_mustang

Well-known member
Joined
Feb 9, 2011
Messages
1,213
Location
Harrisonburg, VA
I set the line for the slab height. The crew used a power screed and a laser level and a pole taking measurements periodically to make sure they were correct.

Ai1cn9G74WQGkN-u4_BzhyRTrtgrORPhuXLhq4qgwkDsqu-yhk0jIpdO1EqTiVAUmBliDAaOs68yRIvdabsY9zMEI9qu-QlkZwE_OUMUjcfb47nS8FrvyOE0S3sdJGYDLb3vXyoHoRScAvcWavM5wF93qZm1KjlkPDkcpF-mhCSy8tQoIbfd7DnLIdQHyr6nEuPXeWuNh14EqMSv3EbGYWSNmbwKUTl8R2D9REoQT6miC4YTsE7ZITapYGbRNCMf2v9lWd7HIeFmjPFlLKuRSA1kdeoJxLaWL3cHWI-cHV2XEQGtwNmp5RjY0pRjedvYkkkZT0ejBNHugjEG_TtIy5t3d7g9-srGg7rp-t9WtL7GTGzGKDY3zmJWCQQR0eCBmR5ldFjSBam73FZ8Lg1K216cTRiqYkbz4wUWfXQ35NHot6c-LrmKLQeXn3E0cl3QtqJhEebSnGtRj5EqIMXpfOXz9nOlr0pD7EvQFnkHPIttSauF75kNlRxJT-mLJVaCQwmQ_ch9eiwkTXYTUeTvFLAeWxoeTzJyXKbhKBN-zjloi8nOzrCAspwkCUbrr95juxrG_n_KMydjioYqgpAKzyD-w3k6r2C2pAV6phxXSE4NM2YTB_569iWPeaqnGS5D3YIT4R6qloi5yzXu3GwrftumKV3-Dm85=w1266-h949-no
 

ConCretin

Well-known member
Joined
Jan 20, 2011
Messages
3,378
Location
Central Maine
If you have a less experienced crew, the hardest part is striking off the concrete. It really does take some skill to pull a straightedge or guide a vibra-screed over a wet pad.

We have used this system for slopes but it would also lower the degree of difficulty significantly for a flat slab.

http://www.makoproducts.com

We use the driving tool to set the saddle on a piece of rebar to grade.
 
To avoid these ads, REGISTER NOW!
Top Bottom