To avoid these ads, REGISTER NOW!

Concrete sectional garage build

OP
M

moodubs

Well-known member
Joined
Jan 10, 2015
Messages
82
Location
Wrexham North Wales
Hi all well its bank holiday weekend here in Wales, and the weathers been lovely today so I've managed to cut and weld the 40x40 mm box to make the garage door frames. It's going to be a triple door, each about 44" wide. I also sanded the front gable end and primed it with two coats. That was in between watching the F1 Monaco qualifying and the Ospreys lose to Munster:sad:
 

Attachments

  • IMAG0953.jpg
    IMAG0953.jpg
    148.8 KB · Views: 89
  • IMAG0959.jpg
    IMAG0959.jpg
    143.3 KB · Views: 86
  • IMAG0958.jpg
    IMAG0958.jpg
    140.5 KB · Views: 87
To avoid these ads, REGISTER NOW!

Brunel

Well-known member
Joined
May 30, 2014
Messages
156
Just spotted this. Your garage is a very similar style to my old man's. Might have been made by the same firm - http://www.lidget.co.uk. Your work on the roof and front looks top notch.
 
OP
M

moodubs

Well-known member
Joined
Jan 10, 2015
Messages
82
Location
Wrexham North Wales
Why thanks very much, it was supplied by a Leeds company to the person I bought it off, it possibly is as you suggested, I was worried about the size and weight of the industrial 8' high panels initially but I am now so glad I found this one I love it
 
OP
M

moodubs

Well-known member
Joined
Jan 10, 2015
Messages
82
Location
Wrexham North Wales
Well after picking up a full set of spanners and a soldering gun from the car boot sale for 8 quid and watching the Monaco F1 Grand Prix, I finally got to work fitting more roofing beams and fitting the uprights for the shiplap gable end. They need leveling tomorrow and screwing at the top, then hopefully get the four shiplap boards I have left on.
 

Attachments

  • IMAG0961.jpg
    IMAG0961.jpg
    141.6 KB · Views: 66
  • IMAG0960.jpg
    IMAG0960.jpg
    152.5 KB · Views: 68
OP
M

moodubs

Well-known member
Joined
Jan 10, 2015
Messages
82
Location
Wrexham North Wales
Hi all, well its been a while since I got any serious work done on the garage, but today I've got the left hand door made up and worked out where the first of the three deadlocks will go. I need to reinforce the area around the locks but happy with today's work, I need to get it sealed up before the weather turns.
 

Attachments

  • garage door.jpg
    garage door.jpg
    56.7 KB · Views: 78
  • garage door front.jpg
    garage door front.jpg
    148.7 KB · Views: 98
  • garage lock.jpg
    garage lock.jpg
    18.6 KB · Views: 74
OP
M

moodubs

Well-known member
Joined
Jan 10, 2015
Messages
82
Location
Wrexham North Wales
well didnt get anything done today but big push to get it sealed up this weekend, fingers crossed

and thanks all you guys for your inspiration
 
OP
M

moodubs

Well-known member
Joined
Jan 10, 2015
Messages
82
Location
Wrexham North Wales
Well I got a bit more done on the doors Sat 3rd Oct, hopefully they'll be finished today to the extent that I can lock everything up and not have to move everything to the shed at night when I pack up for the day
 

Attachments

  • garage doors.jpg
    garage doors.jpg
    154.2 KB · Views: 59

Basher

Well-known member
Joined
Sep 14, 2009
Messages
146
Location
Blighty
Hi,

What a great build
That original photo, before you dismantled it, looks a bit deceptive - the reassembly seems much bigger!

Quite a landmark to now have the garage secured.
That'll be a very useful space

:thumbup:
Well done
 
OP
M

moodubs

Well-known member
Joined
Jan 10, 2015
Messages
82
Location
Wrexham North Wales
Cheers basher, thanks, the garage was originally 30' x 10' so using the same amount of panels I made it 20' x 20' . It just meant making new steelwork, oh yeh and new roof n new wood ha ha. Lot done but a long way to go.
 
To avoid these ads, REGISTER NOW!

DonPowers

Well-known member
Joined
Dec 7, 2014
Messages
4,398
Location
On The Hair At The End Of The Dog's Tail
Hi all thanks for looking, yes its coming along nicely albeit slowly due to lack of funds, however weve had a good weekend removing the rubbish that accumulated in front of the garage and managed to sus out the beam spacing's that allow the lights to be positioned correctly.

A small item that has played a massive part in the building of the garage is my little milk crate and block of wood, many an hour sat on that with a beer has solved so many problems

I call that stare time, an essential component of project planning. Some problems might take a whole day of stare time and several beers to keep the wheels turning.:)

Nice job on your build.
 
OP
M

moodubs

Well-known member
Joined
Jan 10, 2015
Messages
82
Location
Wrexham North Wales
Stare time it shall be called from now on Don, many thanks, cheers AK much appreciated, well I nearly got the doors finished today but Im short of two planks of shiplap to complete the front. Got all the dead locks fitted to keep any low life out, so hopefully this week I'll get it secure

thanks all you guys for your help, support and ideas theyre much appreciated
 

Attachments

  • garage door centre 1.jpg
    garage door centre 1.jpg
    144.9 KB · Views: 63
  • garage door centre 2.jpg
    garage door centre 2.jpg
    157.1 KB · Views: 55
  • garage door centre 3.jpg
    garage door centre 3.jpg
    154 KB · Views: 58
OP
M

moodubs

Well-known member
Joined
Jan 10, 2015
Messages
82
Location
Wrexham North Wales
Hi guys, well finally decided where to run and got round to running the electric cable into the garage, a lot of digging out yet and fixing etc but at least I know where its going. Fitted three of the five lights which will all run on their own switch, just wired them in on 3 into one socket on an extension for now so Ive got light now the clocks have gone back an hour its dark very early.
 

Attachments

  • IMAG1446[1].jpg
    IMAG1446[1].jpg
    140.3 KB · Views: 43
  • IMAG1449[1].jpg
    IMAG1449[1].jpg
    132.9 KB · Views: 42
  • IMAG1452[1].jpg
    IMAG1452[1].jpg
    135.2 KB · Views: 41
OP
M

moodubs

Well-known member
Joined
Jan 10, 2015
Messages
82
Location
Wrexham North Wales
well got round to buying 20 sheets of OSB board today to line the walls after ive insulated them with 50mm of jablite on the thin runs and 90mm of jablite on the majority of the runs. Before anyone says anything about the OSB a friend of mine bought too many sheets for a warehouse contract so I'm having these and another 10 sheets tomorrow for £50 !!! that's enough to do all the walls and the ceiling.

:3gears:
 

Attachments

  • IMAG1756.jpg
    IMAG1756.jpg
    146.9 KB · Views: 22
  • IMAG1755.jpg
    IMAG1755.jpg
    142.9 KB · Views: 26
OP
M

moodubs

Well-known member
Joined
Jan 10, 2015
Messages
82
Location
Wrexham North Wales
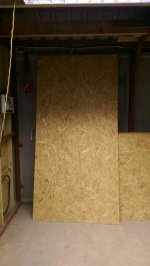
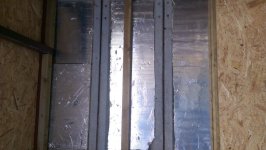
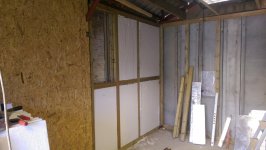
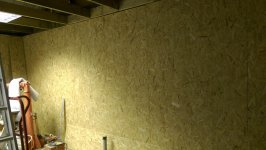
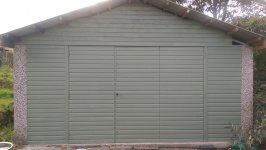
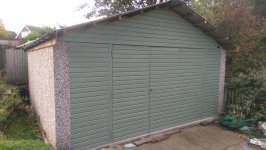
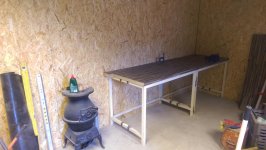
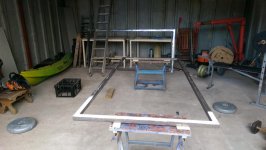
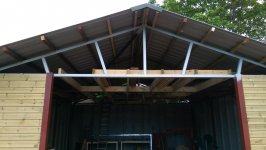
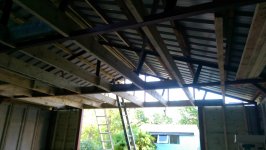
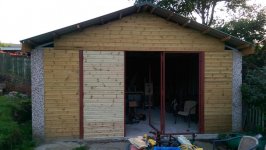
Hi guys, well, Ive not spent much time on the garage lately due to a lot of holidays and a lot of work, however I have taken 11 days off work to get a load of work done before the fall. The first two days I was ill so did nothing but today I have come on in leaps and bounds, I have decided to remove the 50x50mm box section shelf supports and do away with them. I have placed double foil lined 1" insulation into the concrete garage wall cavity structure, then built a wooden 3x2" tanalised frame bolted to the concrete structure, inside the garage and infilled it with 2" jabalite insulation. thus most of the garage has 3" of wall insulation lined with OSB board. All of the walls will be completed like this, hopefully this week. The ceiling will be the same OSB board with 6" of loft insulation.
 

Attachments

  • IMAG1756.jpg
    IMAG1756.jpg
    146.9 KB · Views: 26
  • IMAG2056.jpg
    IMAG2056.jpg
    145.4 KB · Views: 25
  • IMAG2063.jpg
    IMAG2063.jpg
    145.8 KB · Views: 25
  • IMAG2268.jpg
    IMAG2268.jpg
    145.2 KB · Views: 28
  • IMAG2269.jpg
    IMAG2269.jpg
    142.6 KB · Views: 29

slimpickins

Well-known member
Joined
Mar 27, 2011
Messages
2,404
Location
Canada
Moodubs,

Never seen this kind of construction before, especially for non-commercial construction. And that you say its not considered permanent there ... I'm shaking my head. In the urban areas here, if you're over about 60 sq. ft. of floor area then you have to get a permit, even if it's one of the tin garden sheds that'll blow away in the wind.

That's one of the things I love about GJ is to see this kind of work from all over the world and the differences, as well as the similarities.

Keep up the good work. I'll be following your build! :thumbup::thumbup:

Cheers!
 
OP
M

moodubs

Well-known member
Joined
Jan 10, 2015
Messages
82
Location
Wrexham North Wales
well I had to work till 8-30pm on this today, a 12 hour shift to get the rear wall completely framed insulated, and boarded, in 75 degs at 80% humidity, I'm so happy with the progress this week
 

Attachments

  • IMAG2274.jpg
    IMAG2274.jpg
    145.3 KB · Views: 24
  • IMAG2273.jpg
    IMAG2273.jpg
    144.5 KB · Views: 28
  • IMAG2272.jpg
    IMAG2272.jpg
    142.9 KB · Views: 30

C_F

ALLIANCE MEMBER
Joined
Jan 21, 2005
Messages
9,675
Location
Utah...SNOW BLOWS!
This is my first time seeing your thread, and I've gotta say it's a very interesting build. Looks like it's turning out very nice, can't wait to see more!:thumbup:
 

Bib Overalls

Well-known member
Joined
Dec 4, 2006
Messages
3,318
Location
Jonesboro, Arkansas
Still waiting to see that stainless steel beer keg derived wood heater you talked about at the beginning.

I used OSB on my shop walls and I have been very happy with it. Does soak up a lot of paint. I started with two coats of Kilz oil based primer followed by two coats of latex house paint. With the lights you have and white paint on the ceiling (and top half of the walls also recommended) you will be able to do brain surgery.
 
OP
M

moodubs

Well-known member
Joined
Jan 10, 2015
Messages
82
Location
Wrexham North Wales
heres a few more pics, got the outside painted at last, the two benches re sized and welded together with new work top on, now measures 8' x 3', fitted the record 9" wood vice bought for £4 and the other vice I've had for years, one half of the bench (left) will be woodworking and the right half electrical. The welding bench will be to the left of the wood burner I was given in payment for some welding I did. So the barrel is shelved at the moment as this wood burner is quite economical and gives off double what the calculation is to heat my space.
 

Attachments

  • IMAG2412.jpg
    IMAG2412.jpg
    146.2 KB · Views: 22
  • IMAG2413.jpg
    IMAG2413.jpg
    151.6 KB · Views: 21
  • IMAG2299.jpg
    IMAG2299.jpg
    147.1 KB · Views: 21
  • IMAG2310.jpg
    IMAG2310.jpg
    144.7 KB · Views: 18
  • IMAG2311.jpg
    IMAG2311.jpg
    143.7 KB · Views: 18
To avoid these ads, REGISTER NOW!
Top Bottom