To avoid these ads, REGISTER NOW!

concrete slab repair

BurtEggley

Well-known member
Joined
Oct 8, 2024
Messages
887
I have another thread going in flooring on stains on vinyl. This is a question on concrete repair and probably not something that could be answered in flooring.

There are stains in the flooring coming from under the toilets. It has happened multiple times. I will consult with my plumber. The flanges have been replaced, and to replace them again with all new, my guess is that he will suggest cutting the slab in the bathroom, digging down to the ABC, and replacing a piece of it and the stub coming up thru the slab, along with a new ABS flange glued onto the repair. This question is about that process.

Once the slab is cut and the repair made, if anyone has done this, what is the procedure to pour new concrete where it was removed? Does one need to drill horizontal holes into the old slab and slide in rebar so that the new pour is structurally tied to the old slab. The flange holds the toilet down. What holds the new pour down so it can't rock or lift out of the slab, or settle over time? How wide does the hole need to be?

The picture below is AN EXAMPLE from the Internet. It is NOT mine. In this photo one can see that the concrete needs to be poured, then the flange anchored to that new pour. What is the proper way to anchor that pour into the old concrete?

FLANGE.jpg
 
To avoid these ads, REGISTER NOW!

larry4406

Well-known member
Joined
Jan 27, 2006
Messages
19,503
Location
Northern Virginia
across the hole or individual pieces stuck in slab sides? Size of rebar on 4" slab? Depth of hole? Frequency of holes? Do you epoxy into holes? etc?
We drill into the saw cut edge both sides of the trench cut. Holes in line. 1/2” for #4 bar.

Fix sub grade. Repair vapor barrier. Insert a rebar dowel one side then the other. Lap the dowels. Wire tie them at least twice and overlap 6” minimum.

Spray water on the saw cut edges. Repeat until it won’t absorb. Then pour and screed off.

We typically don’t use epoxy for small trench cuts. Large ones (~3+ feet or more) yes.
 
OP
B

BurtEggley

Well-known member
Joined
Oct 8, 2024
Messages
887
when you wire tie, are you weaving the bars on the 4 sides of the rectangular hole, then weaving between sides using the weave on the sides to anchor that to, creating a pattern of squares like concrete wire?
 

larry4406

Well-known member
Joined
Jan 27, 2006
Messages
19,503
Location
Northern Virginia
when you wire tie, are you weaving the bars on the 4 sides of the rectangular hole, then weaving between sides using the weave on the sides to anchor that to, creating a pattern of squares like concrete wire?
?

Usually a trench gets cut. It’s rectangular. Typically around 12” wide by whatever length.

The dowels are inline and inserted opposite each other so they overlap.

We don’t dowel the short side.

Small concrete holes (basket ball size) typically it’s just dumped in concrete. Can’t get a hammer drill in.
 
OP
B

BurtEggley

Well-known member
Joined
Oct 8, 2024
Messages
887
?

Usually a trench gets cut. It’s rectangular. Typically around 12” wide by whatever length.

The dowels are inline and inserted opposite each other so they overlap.

We don’t dowel the short side.

Small concrete holes (basket ball size) typically it’s just dumped in concrete. Can’t get a hammer drill in.
is this what you are basically doing?

flange2.jpg
 

larry4406

Well-known member
Joined
Jan 27, 2006
Messages
19,503
Location
Northern Virginia
is this what you are basically doing?

flange2.jpg
No.

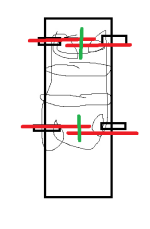
The bars are red, the wires are green. The dowel holes are drilled opposite each other and inline. Drill in about 3-4" inches each side. Insert rebar each side so that they overlap then tie them.

When the trench is narrow, you can't easily bend a long bar that would engage both drilled holes. So you use 2 shorter bars such that you can insert one each end, overlap, and then tie. Lets assume your trench were 12" wide. Cut the bars shy of the trench width (say 11.5"), then insert fully into the 4" hole (now 7.5" of bar protrudes with a 4.5" gap from the bar end to the other side. Insert same size 11.5" bar in the opposing hole. Now the bars overlap by around 3". Wire tie them together.
1772622327705.png
 
To avoid these ads, REGISTER NOW!

mm08822

Well-known member
Joined
Jan 13, 2012
Messages
6,032
Location
NJ
You don't even need #4 rebar. #3 would do. Even re-mesh would pin in well to the existing.

I would place a small amount of concrete (or mortar) under the elbow to assure the position, let dry all day. Then backfill further and place vb. Place rebar/mesh, pour, consolidate, screed, float. Keep the slots clean.
 

wssix99

Well-known member
Joined
Mar 2, 2011
Messages
5,162
Location
Chicago, IL
I would be surprised if you have a flange problem. If you have stains coming from under the toilet, the laws of gravity are telling you that you have a mounting or wax ring problem. What makes you think it's the flange?
 

larry4406

Well-known member
Joined
Jan 27, 2006
Messages
19,503
Location
Northern Virginia
Remember that the bottom of the toilet flange is on top of the finished floor surface not flush.

Your toilet flange is installed incorrectly in my opinion as its flush with the ceramic.

1772654182485.png
 
OP
B

BurtEggley

Well-known member
Joined
Oct 8, 2024
Messages
887
I would be surprised if you have a flange problem. If you have stains coming from under the toilet, the laws of gravity are telling you that you have a mounting or wax ring problem. What makes you think it's the flange?

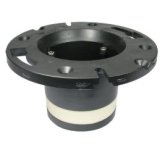
the flange in the hall bathroom was replaced in 2024. The new one is ABS like the image below. That hall bathroom has the worst staining. The master bathroom flange installed in 1998 was also partially bad due to electrolysis but we were able to rotate the outside ring enough to get the bolts to work. That was not possible in the hall bathroom, too eroded. That said, my flooring guy made some calls, and got back to me this morning.

No one, including people who do a lot of installs have seen this before on this type fiberglass backed flooring. The people who know the flooring said that it is impossible for water to do this, it has to be something other than water, some kind of solvent migrating thru the flooring etc..

We did not use a solvent of any kind so will have to look at it carefully when it comes apart to see if there are any other clues. There are no chemicals that I know of other then soaps that go down our drains. The thought is that it can't be aerosols coming from the wax ring or it would be happening all over the country.

All I want is to replace the flooring, put the toilets back in, and be done with it for the next 20 years. The original cheap builder grade ABS flanges from 1979 were warped pretty bad in 1998 when I replaced the toilets. They were glued over the outside of 4" ABS. I cut them off and used aluminum and ABS flanges that glued on the inside. In 2014 we replaced the flooring and the ones from 1998 were fine then. By 2024 the aluminum in the flanges was going soft and the paper backed vinyl getting stained around the toilets.

I did the toilets exactly the same in 1998 as in 2014, and 2024. It is pretty simple. Buy good wax ring (Ferguson high end thicker one), let sit in house a couple days to warm up, set toilet without ring, shim and tape shims to floor to level and prevent rocking, lift toilet back up and place wax ring on it so it does not fall off, use straws on the bolts and set down to align with marks made before installing wax ring, weigh down evenly to crush wax, sit on it for a minute to make sure wax is fully set then install washers and nuts. Caulk all but back to help support evenly, remove the temporary shims and check the nuts for proper tightness again in 48 - 72 hours.

Style plumber used in hall bath
flange.jpg

This is the style in the master bathroom except in 1998 the metal ring was made of aluminum. Today they are stainless.
flange2.jpg
 
Last edited:

larry4406

Well-known member
Joined
Jan 27, 2006
Messages
19,503
Location
Northern Virginia
On concrete, I like using a 4x3 elbow to rise up with 4” for a toilet.

Install your finish floor.

Cut the 4” stub flush with the top of your finish floor.

Install an insert style toilet flange. Drill and set the screws.

Use a quality wax ring.
 
To avoid these ads, REGISTER NOW!
Top Bottom