

Buckle up this has been 3 years in the making. This floor took on a life of it’s own. Here is my experience with Coval Concrete and a number of other products.
The start: back in Sept 2022 I had my pad poured. After waiting 30 days, I applied Legacy Industrial Formula 137
https://www.legacyindustrial.co/pro...74rJrywKldH2VYdja_6aEewsAA28nq33KM6K_oC0HgAVH
At first, I was delighted with the results. Water would bead and the building had not been built. I was prepared for work! After the building was built, I had a few oil drips that I was able to wipe up just as advertised.
Over the next couple of years, I was working in the shop and on the shop and I had tragedy strike several times. As a precaution, I used nice cardboard under the engines of cars I was working on. The 71 Chevelle I was working on leaked oil out of the rocker panel after my first startup following a major amount of transmission service. WTF? Who knew. That happened after I had gone to bed. It turns out that over the next couple of years, I would find out how many things drip small amounts of oil and I had permanent stains in a few places.
I tried to keep oil off of the ground while I prepared for the next step. Finally in June of 2025, I was ready to have spray foam installed. I realized that this was my last chance to do something else with the floor.
I got quotes from several local small and large businesses. The end result $12K no matter what I wanted. The number was $12,000 for a while you are in there. I was already spending $10K on spray foam, so this was not an option. Loads of research later, I came up with a plan to do this DIY.
Goal: enhance the natural beauty of concrete (I know, my opinion) and add a top coat that was easy to maintain without complete replacement. I hate chipped epoxy. It looks trashy to me. I work in a manufacturing facility and they are constantly grinding and recoating. Epoxy, isn’t for me.
Before:

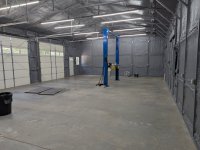

The Plan:
Grind the Formula 137 off with diamond impregnated pads from Concrete DNA
https://www.concretefloorsupply.com...-diamond-floor-pads/diamond-pads-with-resins/
The plan here was 2 passes with 200 grit to remove and even out look and physically remove the ineffective Formula 137 sealer.
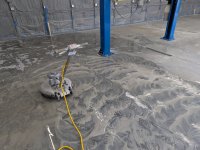
Apply densifier
I used Ameripolish 3D HSL densifier.
 www.ameripolish.com
This is a really good easy to use densifier. One of the keys to good application is to apply to rejection. This product has a 15 minute application to rejection requirement. You need to keep it wet for 15 minutes to allow the product to soak in completely to achieve full depth densification.

Polish with 400 grit pad from Concrete DNA
This step cleaned up the look to a more final look and made sure that the top layer of densifier was removed. When you properly apply to rejection some residue is left. Physically removing it is the easiest method. If you are doing a final step in polish, you can get a 2 for one.
Clean clean clean
I must have mopped with soap and water 3 times followed up with clean water 3 or 4 times.
Prep for sealer application.
This is where things got interesting fast. I wanted the sealer under the door seal for the overhead doors, so the doors needed to be 6-8” up. But by this point, the leaves were in full drop and blow around mode. So I had to tape the leaves out from the door opening.

Yes, this stuff smells pretty bad. I used a quality 3M organic respirator. I never noticed the smell until my wife stuck her head in the door and I pulled the respirator off from my face to talk to her. PPE is important. If you don’t follow the rules, you get sick. Beyond that, I had good success with the Coval branded sprayer, but I did not even try to clean it. I threw it in the trash.
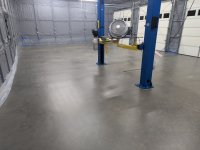
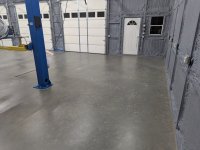


I am very happy with the results. The finish is satin. The surface is not slick to the point of safety hazard. I like the look, but I like the look of wet bare concrete. I believe that oil will be able to sit overnight and be wiped up. Time will tell on that. In the event that I want to recoat an area, all I need to do is scuff the area and wipe it with Acetone and spray that area.
I hope this helps a future version of me make a decision on a coating. If you have questions, ask away.
The start: back in Sept 2022 I had my pad poured. After waiting 30 days, I applied Legacy Industrial Formula 137
https://www.legacyindustrial.co/pro...74rJrywKldH2VYdja_6aEewsAA28nq33KM6K_oC0HgAVH
At first, I was delighted with the results. Water would bead and the building had not been built. I was prepared for work! After the building was built, I had a few oil drips that I was able to wipe up just as advertised.
Over the next couple of years, I was working in the shop and on the shop and I had tragedy strike several times. As a precaution, I used nice cardboard under the engines of cars I was working on. The 71 Chevelle I was working on leaked oil out of the rocker panel after my first startup following a major amount of transmission service. WTF? Who knew. That happened after I had gone to bed. It turns out that over the next couple of years, I would find out how many things drip small amounts of oil and I had permanent stains in a few places.
I tried to keep oil off of the ground while I prepared for the next step. Finally in June of 2025, I was ready to have spray foam installed. I realized that this was my last chance to do something else with the floor.
I got quotes from several local small and large businesses. The end result $12K no matter what I wanted. The number was $12,000 for a while you are in there. I was already spending $10K on spray foam, so this was not an option. Loads of research later, I came up with a plan to do this DIY.
Goal: enhance the natural beauty of concrete (I know, my opinion) and add a top coat that was easy to maintain without complete replacement. I hate chipped epoxy. It looks trashy to me. I work in a manufacturing facility and they are constantly grinding and recoating. Epoxy, isn’t for me.
Before:
The Plan:
Grind the Formula 137 off with diamond impregnated pads from Concrete DNA
https://www.concretefloorsupply.com...-diamond-floor-pads/diamond-pads-with-resins/
The plan here was 2 passes with 200 grit to remove and even out look and physically remove the ineffective Formula 137 sealer.
Apply densifier
I used Ameripolish 3D HSL densifier.
3D HSL Densifier - Ameripolish
This is a really good easy to use densifier. One of the keys to good application is to apply to rejection. This product has a 15 minute application to rejection requirement. You need to keep it wet for 15 minutes to allow the product to soak in completely to achieve full depth densification.
Polish with 400 grit pad from Concrete DNA
This step cleaned up the look to a more final look and made sure that the top layer of densifier was removed. When you properly apply to rejection some residue is left. Physically removing it is the easiest method. If you are doing a final step in polish, you can get a 2 for one.
Clean clean clean
I must have mopped with soap and water 3 times followed up with clean water 3 or 4 times.
Prep for sealer application.
This is where things got interesting fast. I wanted the sealer under the door seal for the overhead doors, so the doors needed to be 6-8” up. But by this point, the leaves were in full drop and blow around mode. So I had to tape the leaves out from the door opening.
- One more round of cleaning. Coval requires a wipe down with Acetone. I just mopped with Acetone. Call me lazy, but here we go.
- Spray Coval Concrete
Yes, this stuff smells pretty bad. I used a quality 3M organic respirator. I never noticed the smell until my wife stuck her head in the door and I pulled the respirator off from my face to talk to her. PPE is important. If you don’t follow the rules, you get sick. Beyond that, I had good success with the Coval branded sprayer, but I did not even try to clean it. I threw it in the trash.
I am very happy with the results. The finish is satin. The surface is not slick to the point of safety hazard. I like the look, but I like the look of wet bare concrete. I believe that oil will be able to sit overnight and be wiped up. Time will tell on that. In the event that I want to recoat an area, all I need to do is scuff the area and wipe it with Acetone and spray that area.
I hope this helps a future version of me make a decision on a coating. If you have questions, ask away.


