To avoid these ads, REGISTER NOW!

Craftsman 12in disk sander restoration.

Cahark

Well-known member
Joined
Sep 28, 2016
Messages
340
Location
Dayton,Oh
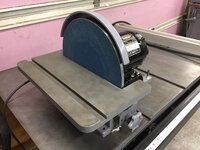
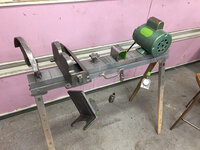
I was able to pick of this little disc sander from my local craigslist for what I believe to be a decent price at $50. Definitely not a steal, but I feel that I didn't do too badly.


12677a46feda7c867ee907015419efe8.jpg
My intention was to build a disk sander this year. I had actually already began to track down materials and a motor before I found this specific sander.
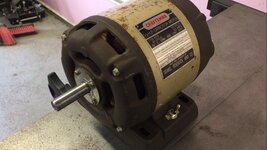
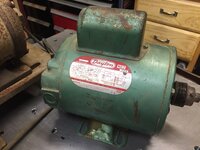
I started to strip down everything and didn't find too many surprises. However, the motor seemed to have a little bit more endplay and wear than I was OK with. It was an excessive amount of play, and it was slightly less power and I truly hoped for. Luckily I had a One horse power motor left over from an old air compressor that I had decommissioned. It was about the right size and in relatively good shape other than needing a coat of paint and bearings.
870ac5d348f7f459f4de4c33d3ad7bc3.jpg
I proceeded to take everything apart completely and strip the metal for a new coat of paint.
63130de2ba143506fae515942529bcac.jpg
ba0e56a23823800114affce49f8789b9.jpg
00f45f12f939066fbb1de834d86f3bad.jpg
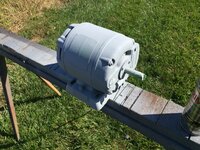
The primer went on well, and so did the dark machine gray. I like using rustoleum professional for these small jobs. I found that the coating dries fast and holds up relatively well for most of my uses.
bebfce0a53646c51e68084b4fc4aead5.jpg
c925e6afda5f89e959f493e1a766c50f.jpg
b004075b79ad9d1c93795dee9117a597.jpg
I have also ordered new bearings for the motor. They should be in on Tuesday. Hopefully the assembly will go about as well as the disassembly.
So far I have about five hours in this job. My goal is to come up with a piece of equipment that I will be happy to pass down to future generations.
Depending on how I feel, I may also remachine the table itself. There was awful lot of pitting and rust. I feel that it would be a nice finishing touch to have a completely re-machined surface
3e55d1d3583be64189ceb7024628b0ed.jpg
0ab675e87d29349e74c50b8c4c1e8fa0.jpg
More updates coming

Sent from my iPhone using Tapatalk
 

Attachments

  • 0ab675e87d29349e74c50b8c4c1e8fa0.jpg
    0ab675e87d29349e74c50b8c4c1e8fa0.jpg
    536.5 KB · Views: 0
  • 12677a46feda7c867ee907015419efe8.jpg
    12677a46feda7c867ee907015419efe8.jpg
    607.1 KB · Views: 0
  • 870ac5d348f7f459f4de4c33d3ad7bc3.jpg
    870ac5d348f7f459f4de4c33d3ad7bc3.jpg
    503.9 KB · Views: 0
  • 63130de2ba143506fae515942529bcac.jpg
    63130de2ba143506fae515942529bcac.jpg
    743.4 KB · Views: 0
  • ba0e56a23823800114affce49f8789b9.jpg
    ba0e56a23823800114affce49f8789b9.jpg
    513 KB · Views: 0
  • 00f45f12f939066fbb1de834d86f3bad.jpg
    00f45f12f939066fbb1de834d86f3bad.jpg
    421.6 KB · Views: 0
  • bebfce0a53646c51e68084b4fc4aead5.jpg
    bebfce0a53646c51e68084b4fc4aead5.jpg
    458.7 KB · Views: 0
  • c925e6afda5f89e959f493e1a766c50f.jpg
    c925e6afda5f89e959f493e1a766c50f.jpg
    410.6 KB · Views: 0
  • b004075b79ad9d1c93795dee9117a597.jpg
    b004075b79ad9d1c93795dee9117a597.jpg
    410.6 KB · Views: 0
  • 3e55d1d3583be64189ceb7024628b0ed.jpg
    3e55d1d3583be64189ceb7024628b0ed.jpg
    384 KB · Views: 0
Last edited:
To avoid these ads, REGISTER NOW!

jakemac

Well-known member
Joined
May 21, 2013
Messages
9,035
Location
New England
Looking forward to updates.
I have the same sander that I took apart to re-paint 2yrs ago. It's still in pieces. I can't decide on a goldtone paint to match the Power Bronze.
 
OP
C

Cahark

Well-known member
Joined
Sep 28, 2016
Messages
340
Location
Dayton,Oh
Looking forward to updates.
I have the same sander that I took apart to re-paint 2yrs ago. It's still in pieces. I can't decide on a goldtone paint to match the Power Bronze.


I had also debated on the goldtone paint. I'm pretty partial to gray for machine tools though.
If you are looking for a kick in the pants, Pick a color and get to work! Haha just joking.


Sent from my iPhone using Tapatalk
 
OP
C

Cahark

Well-known member
Joined
Sep 28, 2016
Messages
340
Location
Dayton,Oh
After getting the paint done, I installed new bearings in my motor. It's now running like new. Unfortunately I missed a couple key details when I chose this motor. First is that it is non reversible. Not a big deal, but I like the reversible option. I also missed that it's double the speed that I need. Stupid mistakes on my part, but lesson learned. Luckily I have a fresh motor laying around now.

To solve my issues, I stopped by my father in laws place this morning. He hooked me up with two motors that could fit the bill. They need a bit of work, but I'm excited to give them a shot.

More to come


Sent from my iPhone using Tapatalk
 
OP
C

Cahark

Well-known member
Joined
Sep 28, 2016
Messages
340
Location
Dayton,Oh
It’s been a while since I’ve updated. I used a couple hours on Saturday to re-wire and re-paint my newly acquired 1/2 horse motor.
60f8f14fa0886a4193f8972f747e7e17.jpg
As suggested by my local motor shop, I tipped the motor on end, and let some oil soak into the shielded bearings. The grease had stiffened to the point that there was resistance on the shaft when turned. After an hour or so on each bearing, the shaft turned freely. I can’t say that this will be a permanent fix, but it should get me by for a while.

I also decided to make a new strap for the capacitor. The old one was long gone so the fix was a must. This was also a good time for a new switch to be installed.

Next up, I have the motor a good scuff with some sandpaper. Then came the primer
a077c2b20146cf5880eb29c6ba3f7582.jpg
Next up was some plain black, and a little clear coat.
43598b6f2741f37db24c17b2324fdeaa.jpg
So far, I’m pretty happy with things. I need to pick up a few new screws on my way home from work, but the job should be completed in the next day or two.
da98872d43b09b5bfe5b835e6e84f59f.jpg
d4a3be78523365b7b91ef21fbcd9fa9e.jpg


Sent from my iPhone using Tapatalk
 

Attachments

  • d4a3be78523365b7b91ef21fbcd9fa9e.jpg
    d4a3be78523365b7b91ef21fbcd9fa9e.jpg
    493.9 KB · Views: 1
  • 60f8f14fa0886a4193f8972f747e7e17.jpg
    60f8f14fa0886a4193f8972f747e7e17.jpg
    310.5 KB · Views: 1
  • a077c2b20146cf5880eb29c6ba3f7582.jpg
    a077c2b20146cf5880eb29c6ba3f7582.jpg
    833.3 KB · Views: 1
  • da98872d43b09b5bfe5b835e6e84f59f.jpg
    da98872d43b09b5bfe5b835e6e84f59f.jpg
    545.8 KB · Views: 0
  • 43598b6f2741f37db24c17b2324fdeaa.jpg
    43598b6f2741f37db24c17b2324fdeaa.jpg
    893.9 KB · Views: 0

jakemac

Well-known member
Joined
May 21, 2013
Messages
9,035
Location
New England
I have a Power Bronze one I took apart 3yrs ago to repaint.
The parts are still sitting in a pile waiting for me to get off my ****.
 
OP
C

Cahark

Well-known member
Joined
Sep 28, 2016
Messages
340
Location
Dayton,Oh
I have a Power Bronze one I took apart 3yrs ago to repaint.
The parts are still sitting in a pile waiting for me to get off my ****.


Just think about the reward of using a freshly painted disk sander! (In case you needed some motivation)


Sent from my iPhone using Tapatalk
 
To avoid these ads, REGISTER NOW!
OP
C

Cahark

Well-known member
Joined
Sep 28, 2016
Messages
340
Location
Dayton,Oh
Very productive evening in the shop tonight. I was able to get the rest of the disc sander together relatively quickly. After I mounted the disc onto the hub, I realized that the front face of the disc was running out about .012” I had considered setting up the hub and facing it in the lathe to get it back into spec. I knew that the faceplate was flat and parallel due to my check on the surface plate. In the end I just shoved a little shim stock between the hub and the faceplate to get it running within .0025”. realistically, that should be fine for most of the work that I do at home. (Probably overkill)

After getting everything installed, I fired it up and it ran nice and smooth. All I had to do next was install a new sanding pad. Hopefully this machine will be ready for a few more years of service.

cffec4baeaae3db2fa6a96e75b671ceb.jpg
c10c23a348d9d1b6d29fc0e8e83c529e.jpg
ee2ae61e59d21f56eea5f8c2e2f738b2.jpg
Thanks for following along. I will post some pictures once I get it in its final resting place.


Sent from my iPhone using Tapatalk
 

Attachments

  • cffec4baeaae3db2fa6a96e75b671ceb.jpg
    cffec4baeaae3db2fa6a96e75b671ceb.jpg
    465.7 KB · Views: 0
  • c10c23a348d9d1b6d29fc0e8e83c529e.jpg
    c10c23a348d9d1b6d29fc0e8e83c529e.jpg
    501 KB · Views: 0
  • ee2ae61e59d21f56eea5f8c2e2f738b2.jpg
    ee2ae61e59d21f56eea5f8c2e2f738b2.jpg
    476.9 KB · Views: 1

larry4406

Well-known member
Joined
Jan 27, 2006
Messages
19,066
Location
Northern Virginia
Nice!

Is the Craftsman motor reversible and are you setting that up? What advantage would this provide on the sander?

What are you doing for a miter gauge?

Any thoughts on making a belt grinder attachment to run of the other end of the motor shaft?
 
OP
C

Cahark

Well-known member
Joined
Sep 28, 2016
Messages
340
Location
Dayton,Oh
Nice!

Is the Craftsman motor reversible and are you setting that up? What advantage would this provide on the sander?

What are you doing for a miter gauge?

Any thoughts on making a belt grinder attachment to run of the other end of the motor shaft?


The motor is reversible. The advantage would be that you could work on either side of the wheel. Sometimes it’s easier to position yourself if you have the flexibility of reversing. I may someday put the reversing switch back on depending on how I like the single direction.

Currently, I have a few miter gauges laying around that will fit the bill. Eventually I plan to machine one that is very accurate. I would also like to do this for my tablesaw as I do not want to spend excessive amounts of money on the higher end models.

Using the backside of the shaft could definitely prove to be useful. In my case, I already own a belt grinder so I will probably not make anything to fit the backside. But it is nice knowing that I have that option in the future.


Sent from my iPhone using Tapatalk
 
OP
C

Cahark

Well-known member
Joined
Sep 28, 2016
Messages
340
Location
Dayton,Oh
IMO you stole that sander. I've been looking for one of those forever.

Project looks great btw!


Thank you for the compliment. I certainly did not get a bad deal. I’m sure that somebody out there picked one up for under five dollars at a garage sale ha ha.


Sent from my iPhone using Tapatalk
 

StanF

Member
Joined
Feb 24, 2015
Messages
12
Cahark, how's the sander working out for you? It looks like you also do some machining, so I figure you're using it for metal? In particular, I'm wondering how well it works on shaping or deburring metal parts.
 
To avoid these ads, REGISTER NOW!
Top Bottom